KIESELMANN 8615500120-000 User manual

Quickstart
Type 8615500120-000 / 8615500130-000
Positioner / Positioner / Positionneur
8615500120-000 for stroke actuators / für Hubantriebe / pour actionneurs de levage
8615500130-000 for rotary piston actuators / für Drehkolbenantriebe /
pour actionneurs à piston rotatif

We reserve the right to make technical changes without notice.
Technische Änderungen vorbehalten.
Sous réserve de modifications techniques.
© 2014 Kieselmann GmbH
Quickstart 1405/00_EU-ML_00810389 / Original DE

3
Type 8615500120-000 / 8615500130-000
1 QUICKSTART GUIDE .................................................................................4
1.1 Definition of the term 'Device' .................................................4
1.2 Symbols .......................................................................................4
2 AUTHORIZED USE ......................................................................................5
2.1 Restrictions .................................................................................5
3 BASIC SAFETY INSTRUCTIONS ..........................................................6
4 GENERAL INFORMATION ........................................................................7
4.1 Contact address ........................................................................7
4.2 Warranty ......................................................................................7
4.3 Information on the Internet ......................................................7
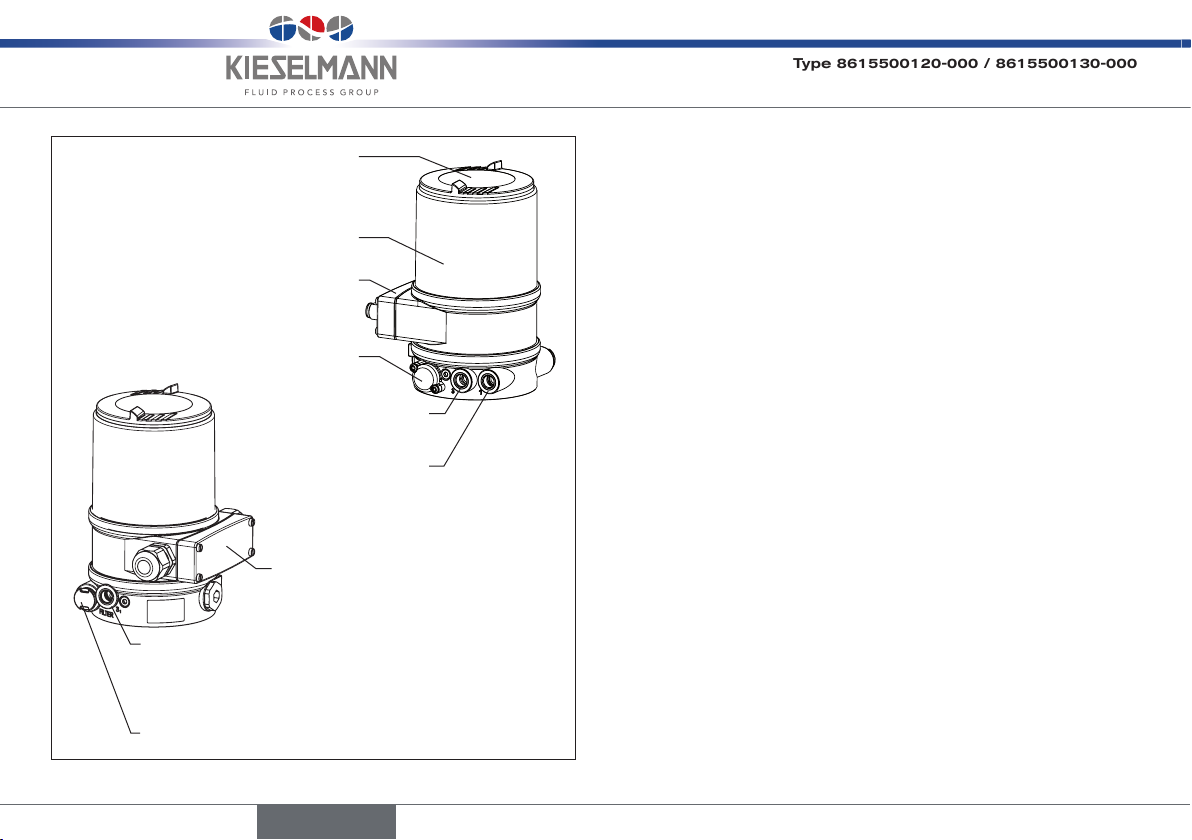
5 SYSTEM DESCRIPTION ............................................................................7
5.1 Functions ..................................................................................... 8
6 TECHNICAL DATA ........................................................................................9
6.1 Conformity ................................................................................... 9
6.2 Standards ....................................................................................9
6.3 Operating conditions ................................................................ 9
6.4 Rating plate ...............................................................................9
6.5 Mechanical data.........................................................................9
6.6 Pneumatic data ........................................................................10
6.7 Electrical data ...........................................................................10
7 OPERATION ..................................................................................................11
7.1 Description of the operating and display elements .........11
7.2 Function of the keys ................................................................... 12
8 OPERATING STATES ...............................................................................13
8.1 Changing the operating state ...............................................13
8.2 Displays in the AUTOMATIC operating state ...................... 14
8.3 Master code ..............................................................................15
9 OPERATING LEVELS ...............................................................................15
9.1 Switching between the operating levels ............................15
10 INSTALLATION ............................................................................................16
10.1 Installation of devices for the Ex area .................................16
10.2 Safety instructions ...................................................................16
10.3 Installation on stroke actuators ................................................... 16
10.4 Installation on rotary piston actuators ....................................... 17
10.5 Installation on rotary actuators from third party
manufacturers ................................................................................................ 17
10.6 Pneumatic connection ............................................................18
11 ELECTRICAL INSTALLATION ...............................................................19
11.1 Safety instructions ...................................................................19
11.2 Electrical installation with circular plug-in connector ......20
11.3 Electrical installation with cable gland ................................25
12 PROFIBUS DP / DEVICENET..............................................................26
12.1 Electrical installation ...............................................................26
13 START-UP ......................................................................................................29
13.1 Safety instructions ...................................................................29
13.2 Starting-up Type 8615500120-000 /
8615500130-000 ...............................................................................29
14 SAFETY END POSITIONS .................................................................... 31
15 ACCESSORIES ...........................................................................................32
16 TRANSPORT, STORAGE, DISPOSAL .............................................. 32
Contents
English

4
Quickstart guide
Type 8615500120-000 / 8615500130-000
1 QUICKSTART GUIDE
The quickstart guide contains the most important information and
notes regarding the use of the device. A detailed description can
be found in the operating instructions for Type 8615500120-000 /
8615500130-000.
Keep the quickstart guide in a location which is easily accessible to
every user and make it available to every new owner of the device.
Important Safety Information!
Read Quickstart carefully and thoroughly. Study in particular the
chapters entitled "Basic safety instructions", and "Authorized use".
▶Quickstart must be read and understood.
The operating instructions can be found on the enclosed CD
and on the Internet at:
www.kieselmann.de
1.1 Definition of the term 'Device'
In these instructions, the term "device" always refers to the
Type 8615500120-000 / 8615500130-000.
1.2 Symbols
The following symbols are used in these instructions.
DANGER!
Warns of an immediate danger!
▶Failure to observe the warning will result in a fatal or serious injury.
WARNING!
Warns of a potentially dangerous situation!
▶Failure to observe the warning may result in serious injuries or
death.
CAUTION!
Warns of a possible danger!
▶Failure to observe this warning may result in a moderate or minor
injury.
NOTE!
Warns of damage to property!
Important tips and recommendations.
Refers to information in these operating instructions or in
other documentation.
→Designates a procedure which you must carry out.
English

5
Authorized use
Type 8615500120-000 / 8615500130-000
2 AUTHORIZED USE
Non-authorized use of the positioner Type 8615500120-000
and the process controller Type 8615500130-000 can be dan-
gerous to people, nearby equipment and the environment.
The device is designed to be mounted on pneumatic actuators of
process valves for the control of media.
▶In a potentially explosive area, Type 8615500120-000 and
8615500130-000 may be used only in accordance with the
specification on the separate Ex rating plate. For the use, observe
the ATEX manual with safety instructions for the Ex area.
▶Devices without a separate Ex rating plate may not be used in a
potentially explosive area.
▶Do not expose the device to direct sunlight.
▶A pulsating direct voltage (rectified alternating voltage without
smoothing) must not be used as the operating voltage.
▶Use according to the authorized data, operating conditions, and
conditions of use specified in the contract documents and oper-
ating instructions. These are described in Chapter "6 Technical
data".
▶Use the device only in conjunction with third-party devices and
components recommended and authorized by Kieselmann.
▶In view of the large number of options for use, before installa-
tion, it is essential to study and if necessary to test whether the
device is suitable for the actual use planned.
▶Correct transportation, storage and installation, as well as care-
ful use and maintenance are essential for reliable and faultless
operation.
▶Use Type 8615500120-000 and 8615500130-000 only as
intended.
2.1 Restrictions
If exporting the system/device, observe any existing restrictions.
English

6
Basic safety instructions
Type 8615500120-000 / 8615500130-000
3 BASIC SAFETY INSTRUCTIONS
These safety instructions do not make allowance for any
• Contingencies and events which may arise during the assembly,
operation, and maintenance of the devices.
• Local safety regulations – the operator is responsible for observing
these regulations, also in relation to the installation personnel.
Risk of injury from high pressure in the system/device.
▶Before working on the system or device, switch off the pressure
and vent/drain lines.
Risk of electric shock!
▶Before reaching into the device or the equipment, switch off the
power supply and secure to prevent reactivation.
▶Observe applicable accident prevention and safety regulations
for electrical equipment.
General hazardous situations.
To prevent injuries:
▶Ensure that the system cannot be activated unintentionally.
▶The device must only be operated when in a perfect condition
and in consideration of the operating instructions.
▶Installation and maintenance work may be carried out only by
authorized technicians with the appropriate tools.
▶ After an interruption in the electrical or pneumatic supply,
ensure that the process is restarted in a defined or controlled
manner.
▶The general rules of technology must be observed for applica-
tion planning and operation of the device.
To prevent damage to the device:
When unscrewing and screwing the housing jacket
(with transparent cap) in, do not hold the actuator but the electrical con-
nection housing of Type 8615500120-000 / 8615500130-000.
▶Do not supply the pilot air port with aggressive or flammable
media or fluids.
▶Do not physically stress the housing (e.g. by placing objects on
it or standing on it).
▶Do not make any external alterations to the housing of the
device. Do not paint housing parts or screws.
NOTE!
Electrostatic sensitive components/modules!
The device contains electronic components which react sensitively
to electrostatic discharge (ESD). Contact with electrostatically
charged persons or objects are hazardous to these components.
In the worst case scenario, they will be destroyed immediately or
will fail after start-up.
• Observe the requirements in accordance with DIN EN 61340-5-1
to minimize or avoid the possibility of damage caused by
sudden electrostatic discharge!
• Do not touch electronic components while the operating voltage
is switched on!
English

7
System description
Type 8615500120-000 / 8615500130-000
4 GENERAL INFORMATION
4.1 Contact address
Germany
Kieselmann GmbH
Paul-Kieselmann-Str. 4-10
D-75438 Knittlingen
Tel. + 49 (0) 7043 - 371-0
Fax + 49 (0) 7043 - 371-125
E-mail: [email protected]
International
Contact addresses can be found on the final pages of the printed
operating instructions.
And also on the Internet at:
www.kieselmann.de
4.2 Warranty
The warranty is only valid if the Types 8615500120-000/8615500130-000
are used as intended in accordance with the specified application
conditions.
4.3 Information on the Internet
The operating instructions and data sheets for Types 8615500120-000 /
8615500130-000 can be found on the Internet at:
www.kieselmann.de
5 SYSTEM DESCRIPTION
Positioner
(pneumatic)
Actuator
Valve body
Process valve
(control valve)
Fig. 1: Structure, Type 8615500120‑000 / 8615500130‑000 with
process valve
The positioner Type 8615500120-000 and Type 8615500130-000
are electropneumatic position controllers for pneumatically actuated
control valves with single-acting or double-acting actuators.
Together with the pneumatic actuator the positioner and process
controller form an optical and functional unit.
The control valve systems can be used for a wide range of control
tasks in fluid technology and, depending on the application conditions,
different process valves from the Kieselmann range can be combined
with the positioner or the process controller. Angle seat valves, straight
seat valves, control valves, diaphragm or ball valves are suitable.
English

8
System description
Type 8615500120-000 / 8615500130-000
Pilot air port
(Label: 1)
Exhaust air port
(Label: 3)
Electrical connection housing
(Connection option with circular plug-in
connector)
Transparent cap
(below control module with display
and keys)
Housing jacket
Additional exhaust air port
(Label: 3.1)
only with pilot-controlled control system for a high air flow
rate from actuator size ø 125 / 130
Air intake filter
Pressure limiting valve
Electrical connection housing
(Connection option with connection
terminals)
Fig. 2: Structure Type 8615500120‑000 / 8615500130‑000
5.1 Functions
Type 8615500120.000 - positioner (position controller) for stroke
actuators
The position of the actuator (stroke) is regulated according to the
position set-point value. The position set-point value can be
specified by an external standard signal (or via field bus).
Type 8615500130.-000 - positioner (position controller) for rotary
piston actuators
The position of the actuator (angle of rotation) is controlled
according to the position set-point value. The position set-point
value can be specified by an external standard signal (or via field
bus).
English

9
Technical data
Type 8615500120-000 / 8615500130-000
6 TECHNICAL DATA
6.1 Conformity
Types 8615500120-000 / 8615500130-000 conform to the EC
directives according to the EC Declaration of Conformity.
6.2 Standards
The applied standards which are used to demonstrate compliance with
the EC Directives are listed in the EC-Type Examination Certificate and/
or the EC Declaration of Conformity.
6.3 Operating conditions
WARNING!
Solar radiation and temperature fluctuations may cause mal-
functions or leaks.
▶If the device is used outdoors, do not expose it unprotected to
the weather conditions.
▶The permitted ambient temperature may not exceed the maxi-
mum value or drop below the minimum value.
Ambient temperature: The permitted temperature range is given
on the rating plate of the device.
Degree of protection IP65 / IP67 according to EN 60529
(only if cables, plugs and sockets have
been connected correctly and in com-
pliance with the exhaust air concept
(see Chapter "10.6 Pneumatic connection",
page 18).
6.4 Rating plate
8615500120-000 24 V DC
single act Pilot 0.6
Pmax 7 bar
Tamb 0°C - +55°C
S/N 001000
00227290 W14UN
Identification number
Operating voltage /
control
Nominal pressure
Type
Control function
pilot valve
Bar code
Serial number,
CE symbol
Max. ambient
temperature
Example:
Fig. 3: Example of rating plate
6.5 Mechanical data
Dimensions see data sheet
Housing material outside: PPS, PC, VA, interior:
PA 6; ABS
Sealing material NBR / EPDM
Stroke range valve spindle 3 ... 45 mm
English

10
Technical data
Type 8615500120-000 / 8615500130-000
6.6 Pneumatic data
Control medium Neutral gases, air
Quality classes as per DIN ISO 8573-1
Dust content Class 7, max. particle size 40 µm,
max. particle density 10 mg/m³
Water content Class 3, max. pressure dew point
- 20 °C or min. 10°C below the lowest
operating temperature
Oil content Class X, max. 25 mg/m3
Temperature range
control medium 0 ... + 50 °C
Pressure range
control medium 3 ... 7 bar
Air flow rate pilot valve 7 lN / min (for aeration and deaeration)
(QNn- value according to definition for
pressure drop from 7 to 6 bar absolute)
optional: 130 lN / min (for aeration
and deaeration) (only single-acting
connections)
Connections Plug-in hose connector ø 6 mm /
1/4" socket connection G1/8
6.7 Electrical data
Protection class 3 in accordance with VDE 0580
Connections Cable gland M16 x 1.5, SW22
(clamping area 5 ... 10 mm)
with connection terminals for cable cross-
sections 0.14 ... 1.5 mm² (24 V DC)
or
circular plug-in connector (M12 x 1)
(24 V DC, Profibus, DeviceNet)
Operating voltage 24 V DC ± 10 %
- max. residual ripple 10 %
Power consumption < 5 W
Input data for actual value signal
4 ... 20 mA: Input resistance 180 Ω
Resolution 12 bit
Frequency: Measurement range 0 ... 1000 Hz
Input resistance 17 kΩ
Resolution 1‰ of measurement value
Input signal > 300 mVss
Waveform sine, square, triangle
Pt 100: Measurement range -20 ... +220 °C
Resolution < 0.1 °C
Measurement current < 1 mA
English

11
Operation
Type 8615500120-000 / 8615500130-000
Input data for set-point value signal
0/4 ... 20 mA: Input resistance 180 Ω
Resolution 12 bit
0 ... 5/10 V: Input resistance 19 kΩ
Resolution 12 bit
Analogue feedback
Max. current 10 mA
(for voltage output 0 ... 5/10 V)
Burden (load) 0 ... 560 Ω
(for current output 0/4 ... 20 mA)
Inductive
proximity switches 100 mA current limitation
Binary outputs galvanically isolated, PNP
Current limitation 100 mA, output is clocked if overload
occurs
Binary input galvanically isolated, PNP
0 ... 5 V = log "0", 10 ... 30 V = log "1"
inverted input in reverse order
(input current < 6 mA)
Communication
interface Direct connection to PC via USB adapter
with integrated interface driver, commu-
nication with communications software
based on FDT/DTM technology.
7 OPERATION
7.1 Description of the operating and
display elements
Operating elements:
Abbreviated designation for the
displayed process value
Process value *
Unit of the displayed process
value
Designation for the function of
the keys
Right selection key
Arrow key , arrow down
Arrow key , arrow up
Left selection key
Display elements of the process level:
Save symbol
Symbol for position control
Symbol for process control
Symbol for the AUTOMATIC operating state
Other symbols are displayed according to the activated func-
tions. See operating instructions type 8615500120-000 /
8615500130-000
Fig. 4: Display elements of the process level; operating elements
English

12
Operation
Type 8615500120-000 / 8615500130-000
EXIT ENTER
1
MAIN
ACTUATOR
X.TUNE
ADD.FUNCTION
INPUT
Submenu
Designation for the function
of the keys
Display elements of the
setting level:
Menu designation
Operating elements:
For description see "Fig. 4"
Fig. 5: Display elements of the setting level
The display is adjusted to the set functions and operating levels.
In principle, a distinction can be made between the display view for
the process level and the setting level.
When the operating voltage has been applied, the process level is
displayed.
* The process values which can be displayed in the AUTOMATIC
operating state depend on type.
7.2 Function of the keys
The function of the 4 keys in the control field differs depending
on the operating state (AUTOMATIC or MANUAL) and
operating level (process level or setting level).
The function of the keys is displayed in the gray text field which is
above the key.
Function of the keys on the process level:
Key Function of
the keys
Description of the
function
Operating
state
Arrow key MENU
OPN
(OPEN)
Manual opening of the
actuator MANUAL
Change the displayed value
(e.g. POS-CMD-TEMP-...) AUTOMATIC
Arrow key MENU
CLS
(CLOSE)
Manual closing of the
actuator MANUAL
Change the displayed value
(e.g. POS-CMD-TEMP-...) AUTOMATIC
Selection key MENU
MENU Change to the setting level
Note: Press key for
approx. 3 s.
AUTOMATIC
or MANUAL
Selection key MENU
AUTO Return to AUTOMATIC
operating state MANUAL
MENU
MANUAL Change to MANUAL
operating state AUTOMATIC
English

13
Operating states
Type 8615500120-000 / 8615500130-000
Function of the keys on the setting level:
Key Function of the
keys Description of the function
Arrow key Scroll up in the menus
MENU
+Increase numerical values
Arrow key Scroll down in the menus
MENU
–Decrease numerical values
MENU
←Change by one digit to the left; when
entering numerical values
Selection key MENU
EXIT (BACK) Return to the process level
Gradually return from a submenu
option
MENU
ESC Leave a menu
MENU
STOP Stop a sequence
Selection key MENU
ENTER
MENU
SELEC
MENU
OK
MENU
INPUT
Select, activate or deactivate a menu
option
MENU
EXIT (BACK) Gradually return from a submenu
option
MENU
RUN Start a sequence
MENU
STOP Stop a sequence
Tab. 1: Function of the keys
8 OPERATING STATES
Type 8615500120-000 / 8615500130-000 has 2 operating states:
AUTOMATIC and MANUAL.
AUTOMATIC
MENU CMD POS MANU
POS 0.0
In the AUTOMATIC operating state normal
controlled operation is implemented.
(The symbol for AUTOMATIC is
shown on the display. (A bar runs along
the upper edge of the display).
MANUAL
MENU OPN CLS AUTO
POS 0.0
In the MANUAL operating state the
valve can be manually opened or closed
via the arrow keys (key function
OPN and CLS ).
(The symbol for AUTOMATIC is
hidden. No bar running along the upper
edge of the display).
8.1 Changing the operating state
Change to MANUAL operating state
(only available for process value
display: POS, CMD, PV, SP)
MANU Press
Return to AUTOMATIC operating
state
AUTO Press
English

14
Operating states
Type 8615500120-000 / 8615500130-000
8.2 Displays in the AUTOMATIC
operating state
Type
8615500120-000 Description of the display Type
8615500130-000
MENU
CMD/POS
CMD MANU
POS 0.0
Actual position of the valve
actuator (0 ... 100%)
MENU SP/PV CMD MANU
POS
0.0
MENU POS TEMP MANU
CMD 0.0
Set-point position of the valve
actuator (0 ... 100%)
MENU POS TEMP MANU
CMD
0.0
MENU CMD
CMD/POS
TEMP
0.0
C
Internal temperature in
the housing of the type
8615500120-000 /
8615500130-000 ( °C)
MENU CMD PV
TEMP
0.0
C
Process actual value
MENU TEMP SP MANU
PV
0.0
m3/min
Process set-point value
MENU PV PV
(t)
INPUT
SP
0.0
m3/min
Type
8615500120-000 Description of the display Type
8615500130-000
Simultaneous display of the
set-point position and the
actual position of the valve
actuator (0 ... 100 %)
MENU
CMD/POS
POS MANU
0.0
SP
PV
0.0
m3/min
m3/min
Graphical display of SP and PV
with time axis
MENU HOLD
SP / PV (t)
MENU HOLD
CMD / POS (t)
Graphical display of POS
and CMD with time axis
MENU HOLD
CMD / POS (t)
MENU
CMD/POS
CLOCK
INPUT
4.0
mA
Input signal for
set-point position
(0 ... 5/10 V / 0/4 ... 20 mA)
MENU
INPUT X.TUNE
INPUT
12:00
00
Thu. 01 . 09 . 11
CLOCK
Time, weekday and date
MENU
POS
(t)
X.TUNE
INPUT
12:00
00
Thu. 01 . 09 . 11
CLOCK
MENU CLOCK
CMD/POS
RUN
X.TUNE
Automatic adjustment of the
positioner (position controller)
MENU CLOCK P.TUNE RUN
X.TUNE
English

15
Operating levels
Type 8615500120-000 / 8615500130-000
Type
8615500120-000 Description of the display Type
8615500130-000
Automatic optimization of the
process controller parameters
MENU X.TUNE P.LIN RUN
P.TUNE
Automatic linearization of the
process characteristics
MENU P.TUNE
CMD/POS
RUN
P.LIN
MENU X.TUNE POS MANU
0.0
CMD
POS
0.0
Simultaneous display of the
set-point position and the
actual position of the valve
actuator (0 ... 100 %)
MENU P.LIN SP/PV MANU
0.0
CMD
POS
0.0
8.3 Master code
Operation of the device can be locked via a freely selectable user
code. In addition, there is a non-changeable master code with which
you can perform all operator actions on the device. This 4-digit master
code can be found on the last pages of this quickstart guide in the
Chapter "Master code".
If required, cut out the code and keep it separate from this quickstart
guide.
9 OPERATING LEVELS
There is the process level and the setting level for the operation and
setting of type 8615500120-000 / 8615500130-000.
Process level:
The running process is displayed and operated on this level.
Operating state: AUTOMATIC – Displaying the process data
MANUAL – Manually opening and closing
the valve
Setting level:
The basic settings for the process
are made on the setting level. – Inputting the operating parameters
– Activating auxiliary functions
If the device is in the AUTOMATIC operating state when
changing to the setting level, the process continues running
during the setting.
9.1 Switching between the operating
levels
Change to the setting level MENU Press for
3 seconds
Return to the process level EXIT Press briefly
English

16
Installation
Type 8615500120-000 / 8615500130-000
10 INSTALLATION
Only for positioners and process controllers without pre-
assembled process valve.
10.1 Installation of devices for the Ex
area
When installing devices in the explosion-protected area, observe the
"ATEX manual for use in the Ex area" enclosed with the Ex-devices.
10.2 Safety instructions
DANGER!
Risk of injury from high pressure in the system/device.
▶Before working on the system or device, switch off the pressure
and vent/drain lines.
Risk of injury due to electrical shock!
▶Before reaching into the device or the equipment, switch off the
power supply and secure to prevent reactivation!
▶Observe applicable accident prevention and safety regulations
for electrical equipment!
WARNING!
Risk of injury from improper assembly!
▶Assembly may be carried out by authorized technicians only and
with the appropriate tools!
Risk of injury from unintentional activation of the system and
uncontrolled restart!
▶Secure system against unintentional activation.
▶Following assembly, ensure a controlled restart.
10.3 Installation on stroke actuators
The installation of the switch spindle and the form
seal is described in the operating instructions for Type
8615500120-000. Additional information can be found on
the Kieselmann homepage.
During the installation, the collets of the pilot air ports must not
be fitted to the actuator.
→Aligning actuator with type 8615500120-000:
1. Align the pilot air ports of the actuator with the
connection pieces of Type 8615500120-000 (see "Fig. 6").
Connection piece
Pilot air ports
Fastening screws
max. 0.5 Nm
Fig. 6: Aligning the pilot air ports
English

17
Installation
Type 8615500120-000 / 8615500130-000
2. Align the puck of the actuator with the guide rail of
Type 8615500120-000 (see "Fig. 7")
Guide rail
Puck
Fig. 7: Aligning the puck
NOTE!
Damage to the PCB or malfunction!
▶Ensure that the puck lies flat on the guide rail.
→Push Type 8615500120-000 without turning it onto the actuator
until no gap is visible on the form seal.
NOTE!
To comply with the degree of protection IP65 / IP67, do not
fasten the fastening screws too tightly.
▶Maximum tightening torque: 0.5 Nm.
→Attach Type 8615500120-000 to the actuator using the two side
fastening screws. In doing so, tighten the screws only hand-tight
(max. tightening torque: 0.5 Nm).
10.4 Installation on rotary piston actuators
The installation of the switch spindle is described in the
operating instructions for Type 8615500130-000.
Additional information can be found on the Kieselmann
homepage.
10.5 Installation on rotary actuators from
third party manufacturers
→Align actuator and Type 8615500120-000 / 8615500130-000 to
each other (see installation instructions for the adaptation set).
→Connect magnetic encoder to actuator shaft and attach using
setscrew (maximum tightening torque: 0.5 Nm).
→Place angle of rotation sensor on magnetic encoder (attachment is
with the adaptation set; see associated installation instructions).
NOTE!
Damage to the sensor cable!
▶Ensure that the sensor cable is not damaged during assembly.
→Press down Type 8615500120-000 / 8615500130-000 as far
as the actuator.
NOTE!
To comply with the degree of protection IP65 / IP67, do not
fasten the fastening screws too tightly.
▶Maximum tightening torque: 0.5 Nm.
English

18
Installation
Type 8615500120-000 / 8615500130-000
→Attach type 8615500120-000 / 8615500130-000 to the
actuator using both lateral fastening screws. In doing so, tighten
the screws only lightly (maximum tightening torque: 0.5 Nm).
Electrical con-
nection housing
Fastening screws
max. 0.5 Nm
Angle of rotation
sensor
Setscrew
Sensor cable
Magnetic
encoder
Fig. 8: Installation on rotary actuators
10.6 Pneumatic connection
DANGER!
Risk of injury from high pressure in the system/device.
▶Before working on the system or device, switch off the pressure
and vent/drain lines.
Observe the following for the proper functioning of the
device:
▶The installation must not cause back pressure to build up.
▶To make the connection, select a hose with sufficient
cross section.
▶Design the exhaust air line in such a way that no water or
other liquid can get into the device through the exhaust
air port (3 or 3.1).
Exhaust air concept:
▶In compliance with the degree of protection IP67, an
exhaust air line must be installed in the dry area.
▶Always maintain an applied control pressure of at least
0.5 ... 1 bar above the pressure which is required to
move the pneumatic actuator to its end position.
This ensures that the control behavior is not negatively
affected in the upper stroke range on account of too little
pressure difference.
▶During operation, keep the fluctuations of the control
pressure as low as possible (max. ±10 %).
If fluctuations are greater, the control parameters mea-
sured with the X.TUNE function are not optimum.
English

19
Electrical installation
Type 8615500120-000 / 8615500130-000
Pilot air
port
Label: 1
Exhaust air
port
Label: 3
Additional exhaust
air port
Label: 3.1
(only with pilot-controlled control system for a high air flow rate from
actuator size ø 125 / 130)
Fig. 9: Pneumatic connection
Procedure:
→Connect the control medium to the pilot air port (1)
(3 ... 7 bar; instrument air, free of oil, water and dust).
→Mount the exhaust air line or a silencer on the exhaust air port (3)
and, if present, on the exhaust air port (3.1).
11 ELECTRICAL INSTALLATION
There are 2 connection options for Type 8615500120-000 /
8615500130-000:
• Multi-pole with circular plug-in connector
• Cable gland with connection terminals
Signal values
Operating voltage: 24 V DC
Set-point value
(process/position controller): 0 ... 20 mA; 4 ... 20 mA
0 ... 5 V; 0 ... 10 V
Actual value
(only process controller): 4 ... 20 mA;
frequency;
Pt 100
11.1 Safety instructions
DANGER!
Risk of injury due to electrical shock!
▶Before reaching into the system, switch off the power supply
and secure to prevent reactivation!
▶Observe applicable accident prevention and safety regulations
for electrical equipment!
English

20
Electrical installation
Type 8615500120-000 / 8615500130-000
WARNING!
Risk of injury from improper installation!
▶Installation may be carried out by authorized technicians only
and with the appropriate tools!
Risk of injury from unintentional activation of the system and
uncontrolled restart!
▶Secure system against unintentional activation.
▶Following installation, ensure a controlled restart.
11.2 Electrical installation with circular
plug-in connector
Procedure:
→Connect Type 8615500120-000 / 8615500130-000 according
to the tables.
In designs with proximity switch:
Set the proximity switch (see "11.2.1 Setting the proximity switch
- optional")
When the operating voltage is applied, Type 8615500120-000 /
8615500130-000 is operating.
→Now make the required basic settings and adjustments for the
positioner/process controller. For description see Chapter
"13 Start-up".
Designation of the circular plug-in connectors:
X6 - M12 circular connector,
4-pole
Operating voltage
X1 - M12 circular connector,
8-pole
Input signals for the control
center
Output signals from the control
center (optional)
X4 - M8 socket, 4-pole
Option: proximity switch
Switch
(to operate loosen the screw
connection)
1
2
3
4
5
6
7
8
1
2
3
4
1
2
4
3
1
24
3X5 - M8 circular con-
nector, 4-pole (only Type
8615500130-000)
Input signals process actual
value
Fig. 10: Electrical connection with 24 V DC circular plug‑in connector
English
This manual suits for next models
1
Table of contents
Languages:
Popular Valve Positioner manuals by other brands

Samson
Samson 3730-4 Mounting and operating instructions

Topworx
Topworx PD200 quick start guide

halstrup-walcher
halstrup-walcher PS*3**DN series instruction manual

Spirax Sarco
Spirax Sarco SP400 Installation and maintenance instructions

Nupi
Nupi 00IPOS01 operating instructions

tissin
tissin TS800 Series instruction manual

EBRO ARMATUREN
EBRO ARMATUREN EP 501 B quick start

Festo
Festo CMSX-P-S-C-U-F1-D-130-A operating instructions

Axis
Axis T99A12 installation guide

ABB
ABB PositionMaster EDP300 Commissioning Instruction

Festo
Festo CMSX-P-S-C-U-F1-D-130-A operating instructions

INDELAC CONTROLS
INDELAC CONTROLS 22018-DH Installation, operation & maintenance manual