CONTENTS
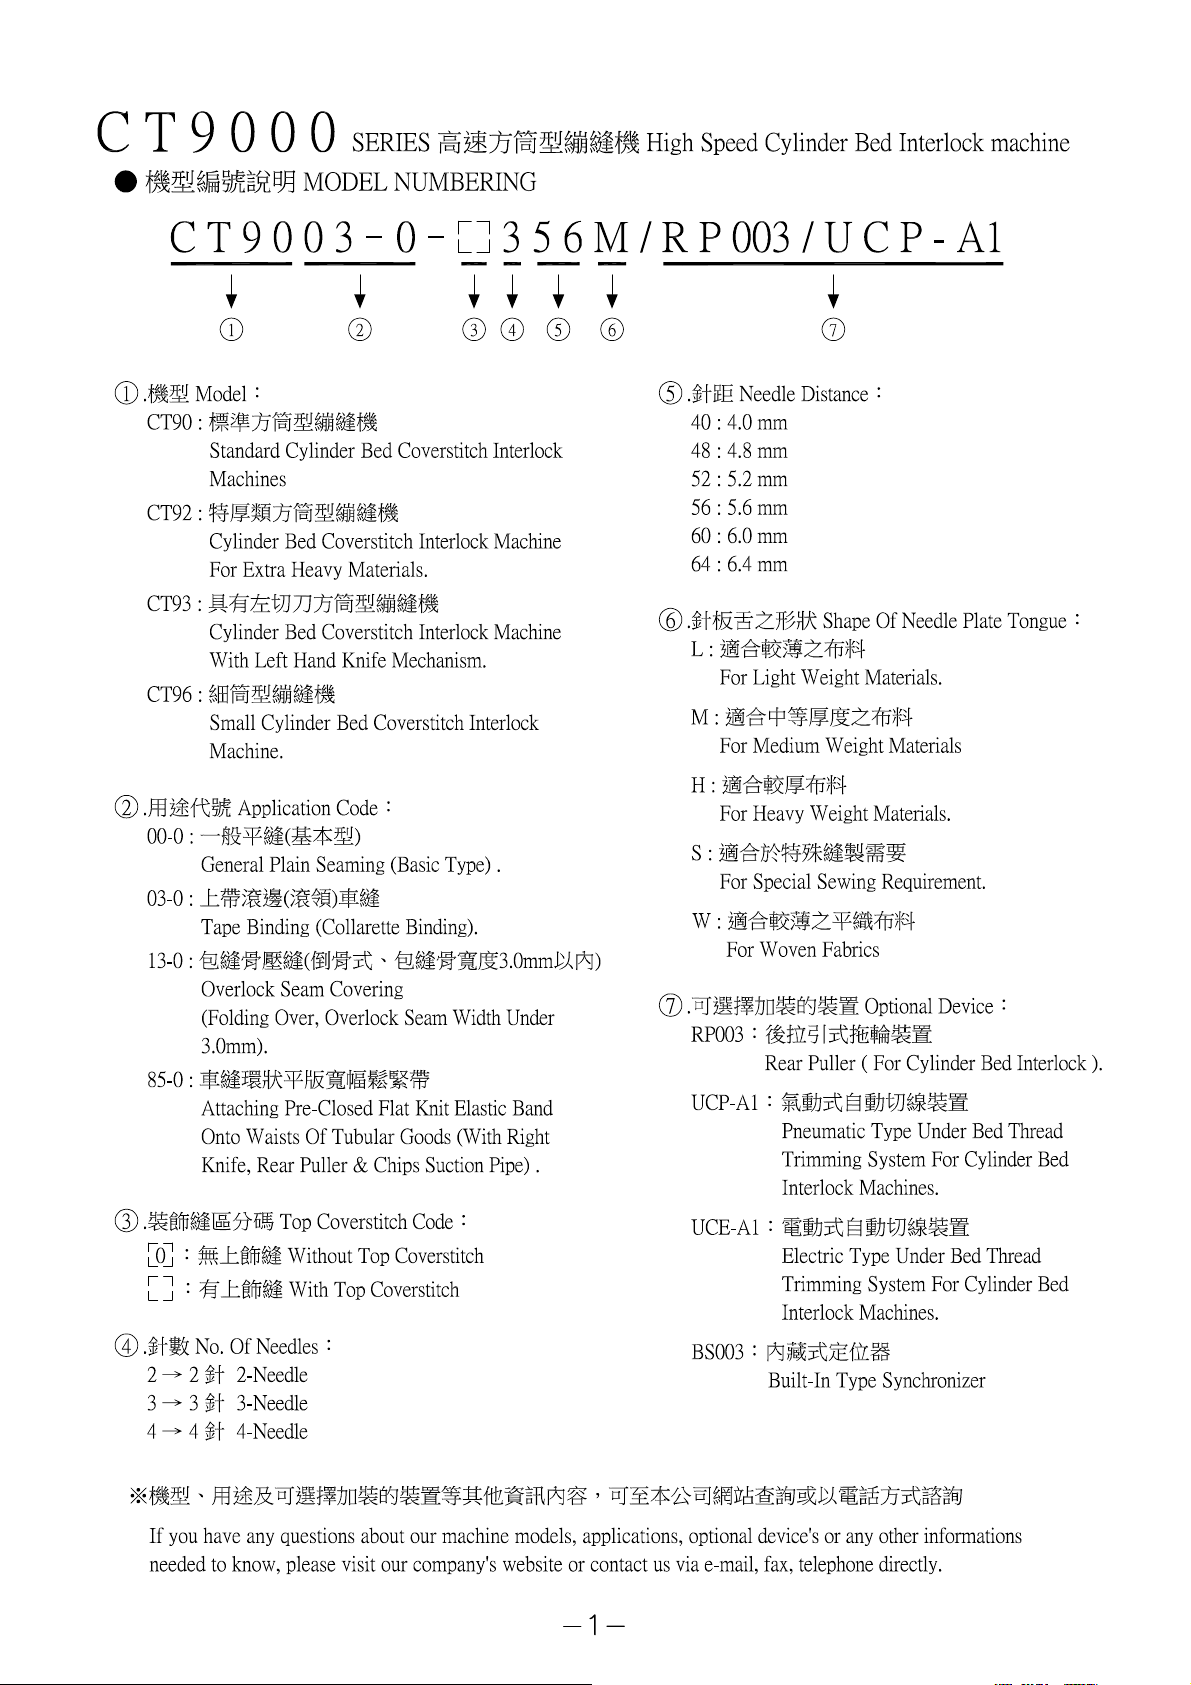
機型編號說明 Model n
umbering ----------------------------------------------------------------------------------------------------------------------------------
1
1. 規格
Specifications ----------------------------------------------------------------------------------------------------------------------------------
2
2. 搬運
Moving ----------------------------------------------------------------------------------------------------------------------------------
2
3. 安裝說明
Installation ----------------------------------------------------------------------------------------------------------------------------------
3
3-1. 上載式安裝 Table top i
nstallation ----------------------------------------------------------------------------------------------------------------------------------
3
3-2. 半沉式安裝 Semi submerged i
nstallation ----------------------------------------------------------------------------------------------------------------------------------
3
3-3. 馬達、皮帶與皮帶護蓋 Motor belt and belt c
over ----------------------------------------------------------------------------------------------------------------------------------
4
4. 使用前說明 Before o
peration ----------------------------------------------------------------------------------------------------------------------------------
5
5. 潤滑油及冷卻油 Lubrication oil and cooling o
il ----------------------------------------------------------------------------------------------------------------------------------
5
5-1. 選用潤滑油及冷卻油 Lubrication oil and cooling o
il ----------------------------------------------------------------------------------------------------------------------------------
5
5-2. 添加潤滑油 Feeding o
il ----------------------------------------------------------------------------------------------------------------------------------
5
5-3. 換油 Changing o
il ----------------------------------------------------------------------------------------------------------------------------------
5
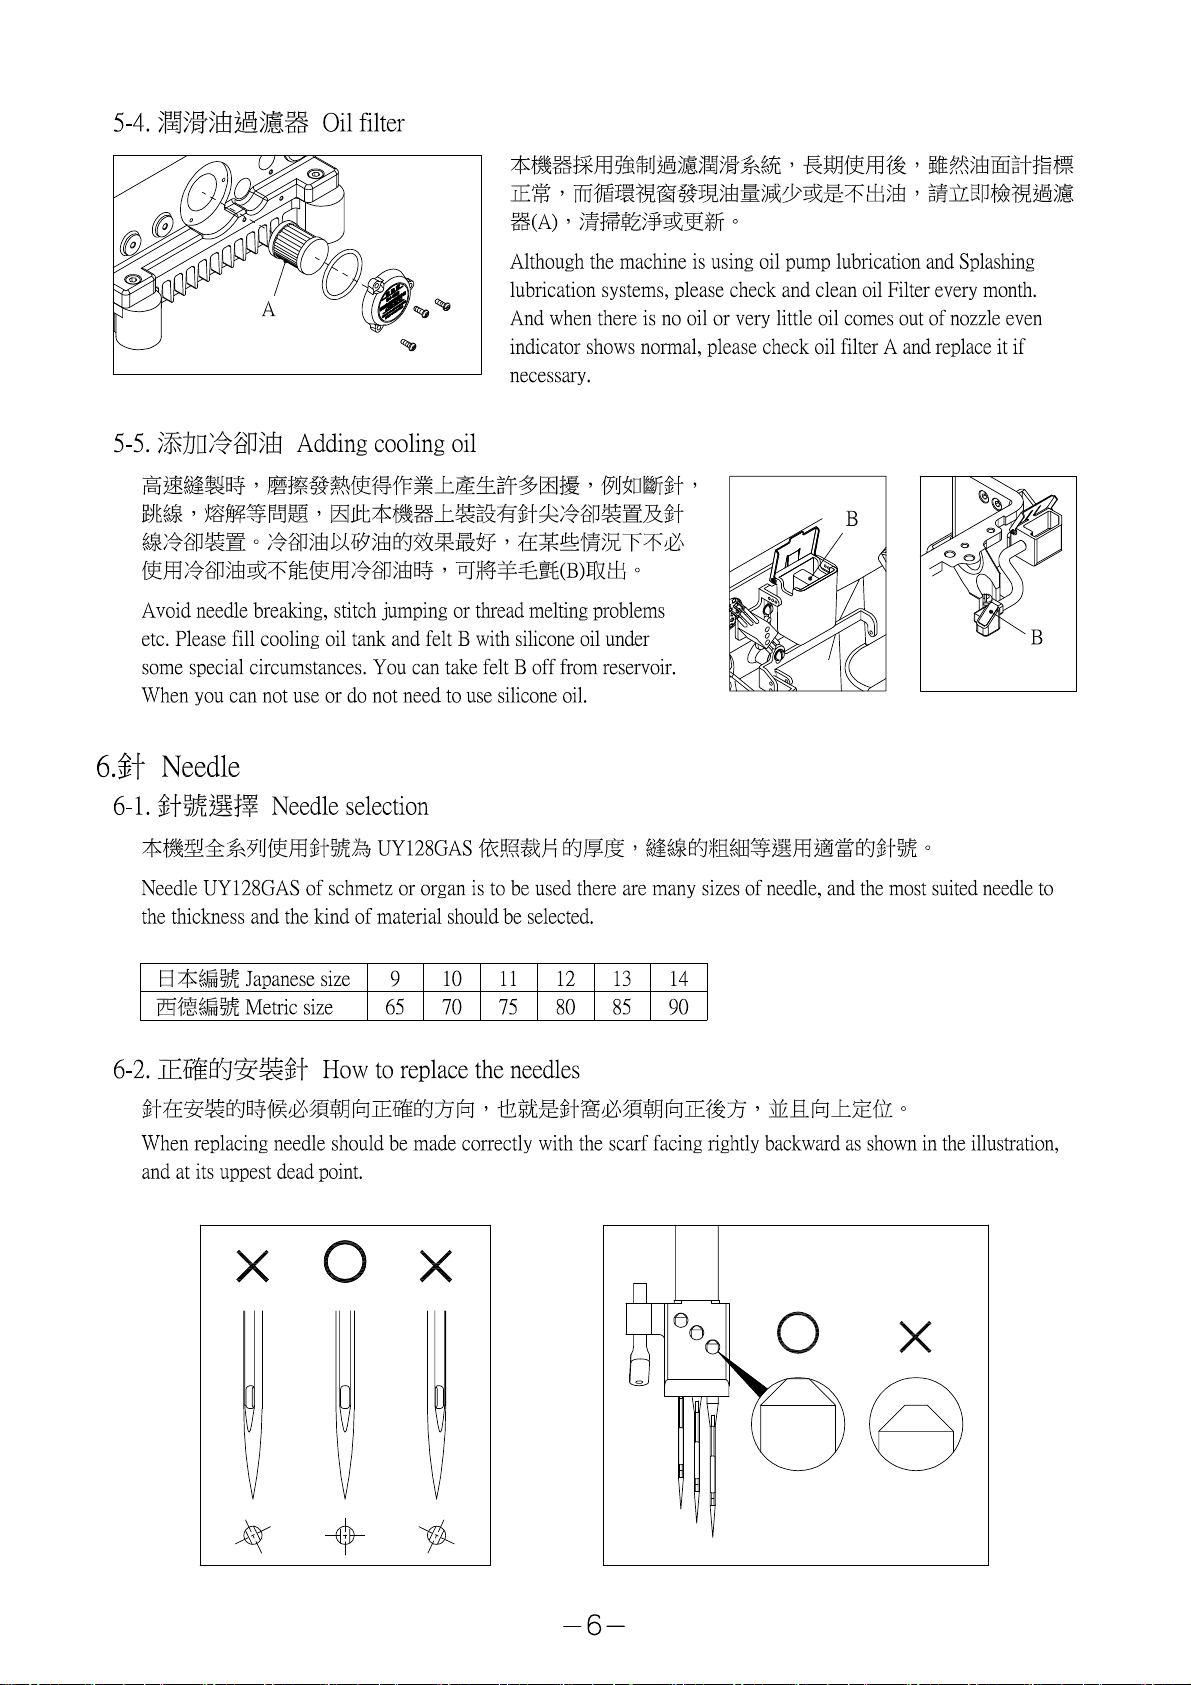
5-4. 潤滑油過濾器 Oil f
ilter ----------------------------------------------------------------------------------------------------------------------------------
6
5-5. 添加冷卻油 Adding cooling o
il ----------------------------------------------------------------------------------------------------------------------------------
6
6. 針
Needle ----------------------------------------------------------------------------------------------------------------------------------
6
6-1. 針號選擇 Needle s
election ----------------------------------------------------------------------------------------------------------------------------------
6
6-2. 正確的安裝針 How to replace the n
eedles ----------------------------------------------------------------------------------------------------------------------------------
6
6-3. 穿線
Threading ----------------------------------------------------------------------------------------------------------------------------------
7
7. 與縫製有關的各項調整 Proper operation a
djustment ----------------------------------------------------------------------------------------------------------------------------------
7
7-1. 壓腳壓力 Pressure of presser f
oot ----------------------------------------------------------------------------------------------------------------------------------
8
7-2. 縫線張力 Thread t
ension ----------------------------------------------------------------------------------------------------------------------------------
8
7-3. 進給率調整 Adjusting stitch l
ength ----------------------------------------------------------------------------------------------------------------------------------
8
7-4. 差動比例調整 Adjusting differential feed
----------------------------------------------------------------------------------------------------------------------------------
9
7-5. 針線收放量調整 Adjusting the needle the needle thread t
ake-up ----------------------------------------------------------------------------------------------------------------------------------
10
7-6. 下結線鉤縫線收放量調整 Adjusting the looper thread t
ake-up ----------------------------------------------------------------------------------------------------------------------------------
11
7-7. 上裝飾線收放量調整 Adjusting spreader thread t
ake-up ----------------------------------------------------------------------------------------------------------------------------------
11
8. 與內部機構及時序有關的各項調整 Adjustment of m
achine ----------------------------------------------------------------------------------------------------------------------------------
11
8-1. 更換壓腳及設定提昇高度
Adjusting presser foot and setting the setting the height of presser f
oot ----------------------------------------------------------------------------------------------------------------------------------
12
8-2. 針棒高度及針落點 Adjusting the height of needle bar and needle drop p
oint ----------------------------------------------------------------------------------------------------------------------------------
12
8-3. 安裝下結線鉤 How to install l
ooper ----------------------------------------------------------------------------------------------------------------------------------
12
8-4. 下結線鉤定位 How to set looper p
osition ----------------------------------------------------------------------------------------------------------------------------------
13
8-5. 下結線鉤與針的間隙 The clearance between looper and n
eedle ----------------------------------------------------------------------------------------------------------------------------------
13
8-6. 針與後導針器 Needle and rear needle g
uide ----------------------------------------------------------------------------------------------------------------------------------
14
8-7. 針與前導針器 Needle and front needle g
uide ----------------------------------------------------------------------------------------------------------------------------------
15
8-8. 設定送布齒高度 Setting the height of feed d
ogs ----------------------------------------------------------------------------------------------------------------------------------
15
9. 裝飾縫
Coverstitich ----------------------------------------------------------------------------------------------------------------------------------
16
9-1. 上裝飾縫結線鉤安裝及定位 Installing and setting the spreader l
ooper ----------------------------------------------------------------------------------------------------------------------------------
16
9-2. 安裝裝飾線導線板 Installation of thread guide of spreader l
ooper ----------------------------------------------------------------------------------------------------------------------------------
16
10. 車板圖 Table top cut-o
ut ----------------------------------------------------------------------------------------------------------------------------------
17
10-1. 上載式開口車板圖 Open-cut table top
----------------------------------------------------------------------------------------------------------------------------------
17
10-2. 上載式車板圖 Standard type
----------------------------------------------------------------------------------------------------------------------------------
17
10-3. 半沉式車板圖 Semi submerged t
ype ----------------------------------------------------------------------------------------------------------------------------------
18
10-4. 上載式車板圖 Standard type
----------------------------------------------------------------------------------------------------------------------------------
18
10-5. 上載式開口車板圖 Open-cut table top
----------------------------------------------------------------------------------------------------------------------------------
19