Kirkland Signature KS562-DRW User manual

USER GUIDE
RECEIVER-IN-EAR HEARING INSTRUMENT
MODEL KS562-DRW
400146240-CA_rA KS RIE ug.indd 1 31-07-2013 13:30:55

2
Hearing instrument type designations for models included in this user guide are: MRIE, FCC ID: X26MRIE,
IC: 6941C-MRIE. Please see page 8 for list of models referring to all types.
Statement:
This device complies with Part 15 of the FCC Rules.
Operation is subject to the following two conditions: (1) this device may not cause harmful interference,
and (2) this device must accept any interference received, including interference that may cause undesired
operation.
Note: This equipment has been tested and found to comply with the limits for a Class B digital device, pur-
suant to part 15 of the FCC Rules. These limits are designed to provide reasonable protection against harm-
ful interference in a residential installation. This equipment generates, uses and can radiate radio frequency
energy and, if not installed and used in accordance with the instructions, may cause harmful interference
to radio communications. However, there is no guarantee that interference will not occur in a particular
installation. If this equipment does cause harmful interference to radio or television reception, which can be
determined by turning the equipment off and on, the user is encouraged to try to correct the interference
by one or more of the following measures:
• Reorient or relocate the receiving antenna.
• Increase the separation between the equipment and receiver.
• Connect the equipment into an outlet on a circuit different from the one in which the receiver is con-
nected.
• Consult the dealer or an experienced radio/TV technician for help.
Changes or modifications can void the user´s authority to operate the equipment
400146240-CA_rA KS RIE ug.indd 2 31-07-2013 13:30:58

3
Intended use
Generic air-conduction hearing instruments are wearable sound-amplifying devices intended to compen-
sate for impaired hearing. The fundamental operating principle of hearing instruments is to receive, amplify,
and transfer sound to the ear drum of a hearing impaired person.
List of countries:
Products without wireless functionality are intended for worldwide sales.
Products with wireless functionality are intended for sale in countries within European Economic Area as
well as Switzerland.
Specification of restrictions: You are not allowed to operate the equipment within 20 km of the centre
of Ny Ålesund, Norway.
The products are in compliance with the following regulatory requirements:
• In EU: the device conforms to the Essential Requirements according to Annex I of Council Directive
93/42/EEC for medical devices (MDD) and essential requirements and other relevant provisions of Direc-
tive 1999/5/EC (R&TTE).
• The declaration of conformity may be consulted at www.resound.com
• In US: FCC CFR 47 Part 15, subpart C, section 15.249
• Other identified applicable international regulatory requirements in countries outside EU and US. Please
refer to local country requirements for these areas.
• Products are categorized as receiver category 2 according to EN 300 440
• In Canada these hearing instruments are certified under models: MRIE/IC: 6941C-MRIE.
400146240-CA_rA KS RIE ug.indd 3 31-07-2013 13:30:58

4
• This Class B digital apparatus complies with Canadian ICES-003. Cet appareil numérique de la classe
B est conforme à la norme NMB-003 du Canada.
• Operation is subject to the following two conditions: (1) this device may not cause interference, and (2) this
device must accept any interference, including interference that may cause undesired operation of the device.
• In Japan, this device has been granted a designation number by Ministry of Internal Affairs and Commu-
nications under “Ordinance Concerning Technical Regulations Conformity Certification, etc., of Speci-
fied Radio Equipment (特定無線設備の技術基準適合証明等に関する規則) ‘Article 2-1-19.’ This device
should not be modified (otherwise the granted designation number will be invalid).”
Introduction
Congratulations on the purchase of your new hearing instruments. Kirkland Signature hearing aids are in-
novative sound technology and design, combined with the customised device programming selected by
your hearing healthcare professional, will make hearing a more enjoyable experience. Hearing instruments
will enable you to hear sounds that you may not have heard in years because of your hearing loss. Practice
and a positive attitude are important in learning to use hearing instruments. Your Kirkland Signature hearing
instruments have been adjusted according to your individual hearing loss and needs. Some people adjust
quickly to wearing hearing instruments in their ears and hearing new sounds; other people may need more
time.
Please read this manual carefully in order to wholly benefit from the use of your hearing instruments. With
proper care, maintenance, and usage, your hearing instruments will aid you in better communication for
many years. Ask your hearing healthcare professional if you have any questions.
400146240-CA_rA KS RIE ug.indd 4 31-07-2013 13:30:59

5
Hearing instrument model: KS562-DRW
Battery size: 312
Receiver tube length:
Dome size:
Left serial number:
Right serial number:
400146240-CA_rA KS RIE ug.indd 5 31-07-2013 13:30:59

6
400146240-CA_rA KS RIE ug.indd 6 31-07-2013 13:30:59

7
Introduction .................................4
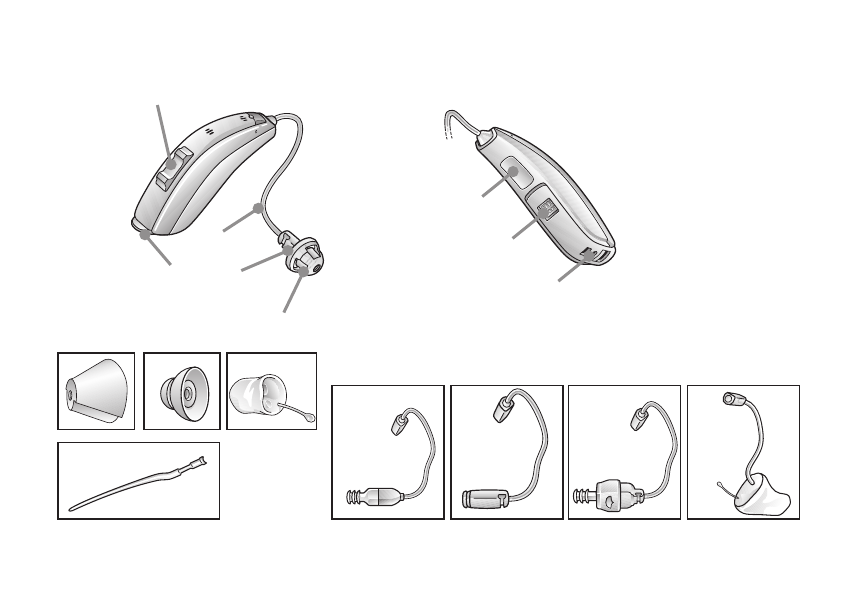
Description of the hearing instruments ............8
Getting started ..............................10
On/Off function .............................10
Delayed Start ...............................10
Inserting/Replacing the battery .................10
Low battery indicator .........................11
Sports lock.................................12
Inserting/removing hearing instruments ..........12
Program and Multi-Function buttons.............14
Flight mode ................................17
Telephone use ..............................18
Listen to radio or TV..........................19
Cellular phones .............................19
Auto Phone Detection ........................19
Telecoil ....................................21
Tele-loop systems ...........................22
Direct audio input (optional) ...................22
Connecting/Disconnecting audio boots ..........22
Care and maintenance........................23
Daily maintenance ...........................24
The receiver tube ...........................25
Cleaning the receiver tubes and domes ..........25
Cleaning RIE molds ..........................25
Changing wax guard for receiver tube ...........26
How to apply domes .........................27
Using Kirkland Signature hearing instruments
with smart phone apps .......................28
General precautions..........................38
General warnings............................29
Battery warning Information....................30
Hearing instrument expectations................31
Important notice for prospective hearing aid users..31
Children with hearing loss .....................32
Warning to hearing aid dispensers ..............33
Troubleshooting guide ........................34
Technical data ..............................38
Warranty and repairs .........................42
Temperature test, transport
and storage information.......................42
Contents
400146240-CA_rA KS RIE ug.indd 7 31-07-2013 13:31:03

1. Receiver tube
2. Receiver Open Dome
3. Receiver Tulip Dome
4. Receiver Power Dome
5. RIE mold
6. Sports lock
7. Battery compartment (serial
number inside)
8. Receiver
9. Push button
10. Volume Control (optional)
11. S receiver tube
12. NP receiver tube
13. HP receiver tube
14. UP receiver tube
15. Left/right indicator
16. Model name and serial
number
17. Direct audio input
8
Receiver-in-the-ear (RIE) hearing
instruments of type MRIE with FCC
ID X26MRIE, IC number 6941C-MRIE
and size 312 battery are available in
the following variants:
KS562-DRW
The identification number for the MRIE,
SY312 instrument models can be found
at location “16” as indicated in the illustra-
tions on page 9.
400146240-CA_rA KS RIE ug.indd 8 31-07-2013 13:31:07

3
6
9, 10
1
8
2
16
17
15
7
5
13 14
4
11 12
9
Model: KS562-DRW
(type MRIE)
400146240-CA_rA KS RIE ug.indd 9 31-07-2013 13:31:40

2
1
3
10
Getting started
On/Off function
1. When the battery door is closed, the hearing instrument
turns on, and the default program will be activated.
2. To turn off the hearing instrument, open the battery door.
Use your fingernail to pull it open.
Delayed Start
Hearing instruments can be turned on once you have placed them on your
ears. If you prefer to turn them on just prior to placing them on your ear, your hearing healthcare professional
can activate a function called Delayed Start. This function will delay the time in which the hearing instru-
ments turn on by ten seconds after the battery compartment is closed. With Delayed Start, a beep will be
heard for each second of the delay period.
Inserting/Replacing the battery
1. Open the battery door completely by using your fingernail. Remove the used battery if present.
2. Prepare the new battery (please refer to page 7 for information on appropriate battery type/size for your
hearing instrument). Remove the protective foil and wait 2 minutes before inserting the battery into the
hearing instrument to allow activation of the battery.
3. Insert the new battery with the positive side in the
correct position.
4. Gently close the battery door.
On
Off
400146240-CA_rA KS RIE ug.indd 10 31-07-2013 13:31:52

11
iTip:
1. Always use new Zinc-Air batteries that have a minimum remaining shelf life of one year.
2. Whenever the hearing instruments are not in use, remember to turn them off to avoid unnecessary
battery consumption.
Low battery indicator
Your hearing healthcare professional can set your hearing instrument to give an acoustical indication when
the battery is reaching its end of life. The hearing instrument will reduce amplification and emit a melody if
battery power gets too low. This signal will recur every five minutes until the hearing instrument automati-
cally switches off. It is recommended that you keep spare batteries on hand.
Low battery indicator
(instruments paired with compatible wireless accessories only)
Active usage of the wireless accessories (Remote Control 2, Phone Clip+, TV Streamer and Clip-On Mi-
crophone) requires more battery power from the hearing instruments than when these are working on their
own meaning that battery life is highly dependent on the amount of wireless accessory usage. When the
battery in the hearing instrument has depleted to a level at which use of the TV Streamer, Phone Clip+ and
Clip-On Microphone cannot be supported, the hearing instrument will play two sets of descending tones.
After this, your hearing instrument and the Remote Control 2 will continue to work as usual, but you will not
be able to use your TV Streamer, Phone Clip+ and Clip-On Microphone. At some point the battery level will
not support the Remote Control 2 either and you will once again hear the descending tones. The hearing
instruments will continue to work as usual. Once a new battery is inserted, full operation of the accessories
will resume.
400146240-CA_rA KS RIE ug.indd 11 31-07-2013 13:31:56

12
Sports lock
The sports lock will be applied or adjusted by your hearing healthcare professional.
Inserting/Removing hearing instruments
Insertion (custom RIE molds)
1. Hold the RIE mold between your thumb and index finger and position its sound
outlet in your ear canal.
2. Slide the RIE mold all the way into your ear with a gentle, twisting movement.
3. Move the RIE mold up and down and gently press to ensure it is positioned correctly
in the ear. Opening and closing your mouth can ease insertion.
4. Make sure the hearing instrument is seated behind the ear.
By experimenting, an easier method may be discovered. With proper insertion, hearing
instruments should fit snugly but comfortably. If hearing instruments cause irritation of
the ears, contact your hearing healthcare professional.
iNever attempt to modify the shape of the hearing instrument, RIE molds, or tubing
yourself.
iTip: It may be helpful to pull the top of your ear back with your opposite hand during insertion to open
the ear canal.
400146240-CA_rA KS RIE ug.indd 12 31-07-2013 13:32:09

13
Insertion (domes)
1. Hold the receiver tube where it bends, and
gently place the dome into the ear canal. Push
the dome far enough into the ear canal so that
the receiver tube lies flush with the side of the
head.
2. It is important that the tube and the dome fit
correctly into your ear.
3. When the dome is placed correctly, you should
not be able to see the receiver tube sticking out
when facing a mirror.
iNote: You should never attempt to bend or modify the shape of the receiver tube.
Removal (RIE molds)
1. Grasp the removal string and pull the RIE mold outward.
2. Consult your hearing healthcare professional if you have difficulties removing the hearing instrument.
Removal (domes)
1. Hold the receiver tube with your thumb and forefinger and remove the tube.
2. Consult your hearing healthcare professional if you have difficulties removing
the hearing instrument.
400146240-CA_rA KS RIE ug.indd 13 31-07-2013 13:32:23

14
Program and Multi-Function buttons
The program button or multi-function button will allow
you to use up to four different listening programs, each
of them suitable for certain situations.
Multi-function button
Your hearing healthcare professional can fill out the following table for you.
Program Description of when to use
1
2
3
4
400146240-CA_rA KS RIE ug.indd 14 31-07-2013 13:32:28

15
When using the program or multi-function buttons to switch programs, each press will move the instrument
to the next program. For example, if it was in program 1 it will switch to program 2, if it was in program 2 it
will switch to program 3 etc.
When you close the battery door and switch the instrument on, it will start in program 1. Press the program
or multi-function buttons if you want to move to a different listening program.
If you have two hearing instruments with the synchronization function enabled, program changes to one
instrument will automatically repeat in the second instrument. When a program change is made in one
instrument, you will hear the same amount of confirmation beeps in the second instrument.
Your instrument has a fully automatic volume control. Therefore, it should not be necessary to control the
volume manually.
However, in addition to controlling listening programs, the multi-function button provides you with the ability
to adjust the amplification to your liking.
If you have two hearing instruments with the synchronization function enabled and you have the Multifunc-
tion Button set for volume control functionality, volume adjustments to one instrument will automatically
repeat in the second instrument. When a volume control adjustment is made in one instrument, you will hear
a confirmation beep. A beep in the second instrument will follow.
The multi-function button is designed to change the volume or listening programs of the hearing instrument,
based on different ways it is pressed.
400146240-CA_rA KS RIE ug.indd 15 31-07-2013 13:32:28

16
If necessary, your hearing healthcare professional can change these settings and fill in the following table
to indicate the new settings:
Multi-function button action Default setting New setting
Short press up Increases volume
Short press down Decreases volume
Long press up (3 seconds) Changes programs
Long press down (3 seconds) Activates streaming
400146240-CA_rA KS RIE ug.indd 16 31-07-2013 13:32:28

17
iFlight mode
When boarding a flight or entering an area where RF transmitters are prohibited, wireless functionality must
be deactivated, as it is not allowed to radiate radio signals during flights or in otherwise restricted areas.
Follow the following steps to enter and leave flight mode:
It is possible to disable wireless operation by opening and closing the battery compartment three times
within a ten second period (open-close, open-close, open-close). Your instruments will now be in flight
mode.
If the hearing instrument is in flight mode, the hearing instrument must have been operating in flight mode
for at least 10 seconds before attempting to enable wireless again. it is possible to re-enable wireless opera-
tion by opening and closing the battery door once. 10 seconds after this operation is completed, wireless
operation will begin again.
iNote: It is important to wait an additional 15 seconds after wireless function resumes before open-
ing and closing the battery compartment again for any reason. If the battery compartment is opened and
closed during this 15 second window, flight mode will resume.
400146240-CA_rA KS RIE ug.indd 17 31-07-2013 13:32:28

18
Telephone use
If your hearing instruments are fit with a receiver open dome or receiver tulip dome, you can probably
use the telephone as you normally would by holding it up to your ear canal opening. If your hearing
instruments are fit with a receiver power dome or RIE mold, finding the optimal position for holding a
telephone while using a hearing instrument may require practice for some individuals, and one or more
of the following suggestions may be helpful.
1. Hold the telephone as you would normally.
2. Hold the telephone towards the top of the ear (closer to where the
microphones are located).
3. If whistling occurs, it may take a brief moment of holding the telephone in
the same position before the hearing instrument adapts and reduces the
feedback.
4. Any whistling may also be decreased by holding the telephone slightly
away from the ear.
5. Depending on your individual needs, your hearing healthcare professional
may activate a program specifically for telephone use.
400146240-CA_rA KS RIE ug.indd 18 31-07-2013 13:32:30

19
Listen to radio or TV
When listening to the TV or the radio, start out by listening to news commentators since they usually speak
clearly, then try other programs.
If you find it difficult to listen to TV or radio, your hearing healthcare professional will be able to give you
advice on available accessories to enhance your listening capabilities for TV and radio.
Cellular phones
Your hearing instrument is designed to comply with the most stringent Standards of International Electro-
magnetic Compatibility. However, not all cell phones are hearing instrument compatible. The varying de-
gree of disturbance can be due to the nature of your particular cellular phone or of your wireless telephony
service provider.
If you find it difficult to obtain a good result while using your cellular phone, your hearing healthcare profes-
sional will be able to give you advice on available accessories to enhance listening capabilities.
Auto Phone Detection
The Auto Phone Detection function, allows your hearing instrument to automatically switch to your tele-
phone program when a telephone receiver is raised to the ear. When the telephone receiver is removed from
the ear, the hearing instrument automatically returns to the previous listening program.
Placement of Auto Phone Detection magnets
Place Auto Phone Detection magnet on your telephone receiver to allow operation of the Auto Phone Detec-
tion function. In order to place Auto Phone Detection magnet properly:
400146240-CA_rA KS RIE ug.indd 19 31-07-2013 13:32:30

20
1. Clean the telephone receiver thoroughly.
2. Hold the telephone vertically, in a position similar to when making a
telephone call.
3. Place the magnets just below the telephone receiver. Make sure not
to cover the microphone openings. If necessary, move the magnet to
another position to improve ease of use and comfort while speaking.
4. If you are not satisfied with the strength of Auto Phone Detection, you
can reposition the Auto Phone Detection magnet or add additional
Auto Phone Detection magnets.
Auto Phone Detection usage
Telephones can be used in a normal manner. A short melody will indicate that the Auto Phone Detection
feature has automatically switched the hearing instrument to your telephone program. Initially, you may
need to move the telephone receiver slightly to find the best position for reliable Auto Phone Detection
activation and good hearing on the telephone.
If you have two hearing instruments with the synchronization function enabled, the volume of hearing instru-
ment on the non-phone ear will be turned down.
iOnly use recommended cleaning agent to clean the telephone prior to placing the magnet on the
phone in order to obtain best possible adherence.
400146240-CA_rA KS RIE ug.indd 20 31-07-2013 13:32:33
Other manuals for KS562-DRW
1
Table of contents
Other Kirkland Signature Hearing Aid manuals

Kirkland Signature
Kirkland Signature Signature 9.0 User manual

Kirkland Signature
Kirkland Signature Signature 6.0 User manual

Kirkland Signature
Kirkland Signature 8.0 User manual

Kirkland Signature
Kirkland Signature 10.0T User manual

Kirkland Signature
Kirkland Signature KS661-DRW User manual

Kirkland Signature
Kirkland Signature Premium User manual

Kirkland Signature
Kirkland Signature SDS 4.0 User manual

Kirkland Signature
Kirkland Signature KS 10.0 User manual

Kirkland Signature
Kirkland Signature KS 9.0 Loaner User manual

Kirkland Signature
Kirkland Signature Signature 9.0 Quick start guide