KneeRover HYBRID User manual

KneeRover® Hybrid
User Manual

Congratulaons on your purchase of the KneeRover® Hybrid!
The KneeRover® Hybrid Knee Scooter provides a more reliable and com-
fortable alternave to crutches for paents needing an eecve mobility
soluon at an aordable price.
Operang Instrucons:
This medical device is designed to maximize mobility during your recovery
from foot/ankle surgery or injury.
Place the knee of your injured leg on the knee plaorm and stand as straight
as possible. Adjust the handlebar to approximately waist high or the top of
your hips. This will allow you to nd the most comfortable posion for your
hands while holding the grips. Adjust the knee plaorm height so that your
injured leg is supported at a 90 degree angle when standing.
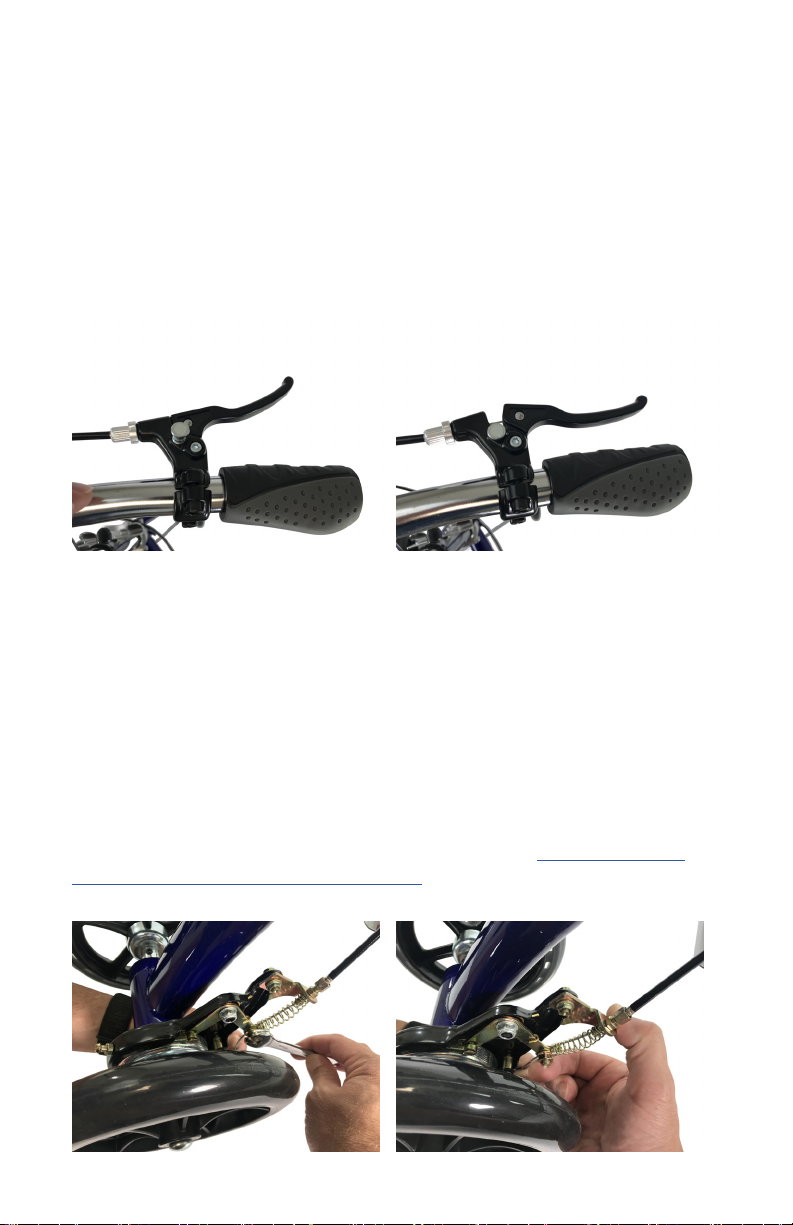
Ensure that the hand brake is fully engaged before mounng the KneeRover®
scooter. To move the scooter, simply push forward with your good foot. Allow
the scooter to glide, and as it slows down, push again.
We recommend operang the KneeRover® scooter at a safe walking
speed (< 3 mph).
Ongoing Maintenance:
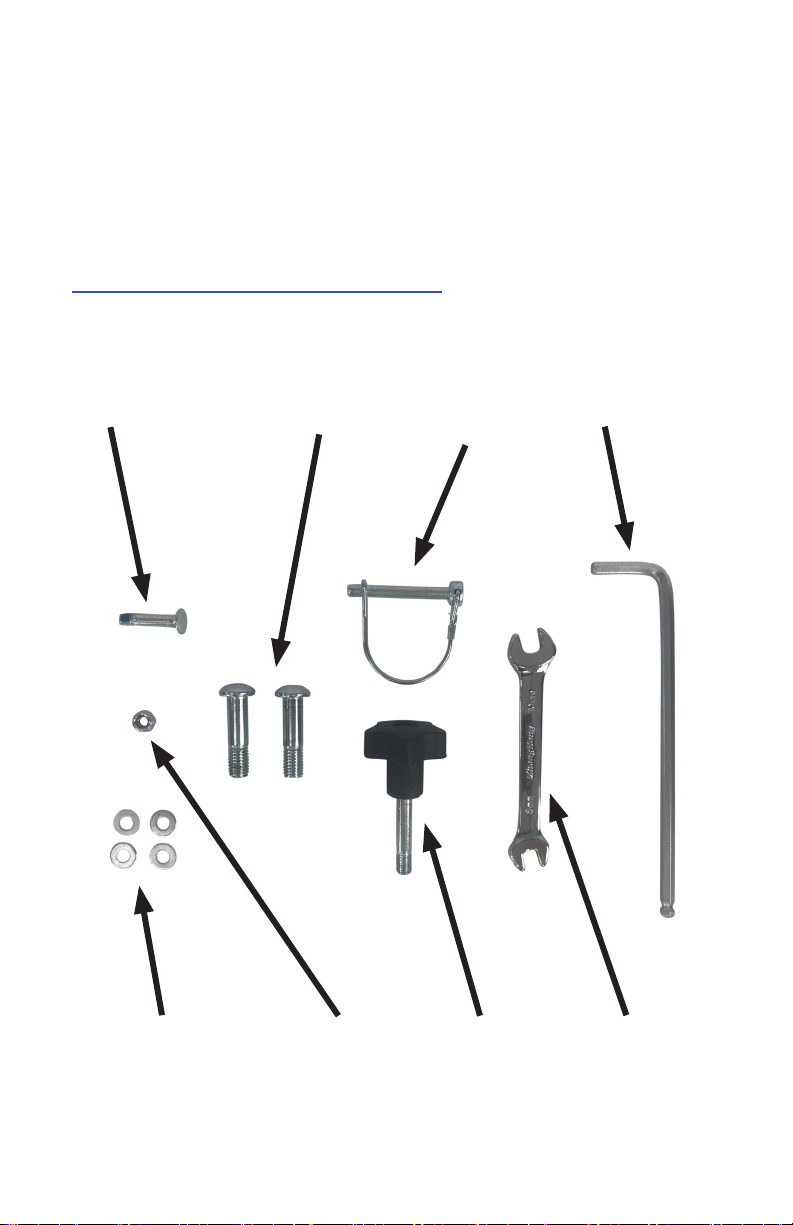
We recommend saving the tools that are provided with your KneeRover®
product, as you may need them to provide ongoing maintenance. With
roune use, nuts and bolts on the KneeRover® knee walker can become
loose. To ensure safe operaon of your KneeRover® scooter, it is important
to periodically inspect for loose nuts and bolts and re-ghten as appropriate.
Ensure that the two FRONT wheels are inated to between 33 and 35 PSI. The
maximum PSI is 35.
Please visit hps://kneerover.com/pages/kneerover-maintenance-videos for
addional support in maintaining your KneeRover® product.

KneeRover® Hybrid - Tools & Parts List:
The following tools and parts are included with your KneeRover® Hybrid.
Please follow assembly instrucons for your specic KneeRover® model, using
the tools and parts provided.
Assembly videos for your KneeRover® model can also be found at:
hps://kneerover.com/pages/assembly-video
Tie Rod Bolt Front Axle Bolts Kneepad
Locking Pin
Allen Wrench
Tie Rod Washers (4) Tie Rod Nut Height Adjustment
Knob
Wrench for
Tie Rod Bolt
and Brake
Adjustment

KneeRover® Hybrid Set Up Instrucons:
Please follow the step by step instrucons on the following pages to properly
assemble your KneeRover® scooter. The diagram below idenes the key
components of the scooter to aid with assembly.
Visit hps://kneerover.com/pages/assembly-video for assembly videos.
Weight capacity = 300 pounds
Height Adjustment
Knob
Hand Brake with Parking
Feature
Steering
Column
Brake Cable
9” All Terrain Wheels-
Maximum 35 PSI
Rear Brake
Adjustable
Knee Plaorm
Quick Release
Lever
Front Alxe

Step 1: Front Axle Assembly
Please take your me to carefully complete all steps before operang your new
KneeRover® scooter. First, place the front axle with 9” wheels under the scooter
frame, ensuring the round bolts by the wheels are facing up (Top). Align the
axle and frame holes, insert front axle bolts and ghten completely using the
allen wrench provided (Boom). Make sure the welded nuts on the front axle
are facing towards the ground. Once the front axle is installed, inate the front
res. We recommend the res be inated to between 33-35 PSI.
Round Bolt needs to face upInstall Front Axle Bolt through the top
hole and into the welded nut on the
boom
Tighten Front Axle Bolt with the
provided allen wrench

Step 2: Tie Rod Assembly
The e rod ends are already aached to the spindles/wheels. Bring the le e
rod (square hole) and place over the black guide and the right e rod (round
hole) under the black guide. Insert the bolt into the top e rod so the head of
the bolt is sing ush (Top Le). Next, insert the bolt through the washer and
black guide. Place another washer on the e rod bolt under the black guide
and then the bolt through the right e-rod round hole. Next, place two
washers onto the e-rod bolt from the boom and then the locking nut. Aer
the e rods are assembled, ghten the locking nut unl it barely touches the
boom washer (Top Right). Take care not to over ghten the locking nut, as this
could cause some resistence while turning the knee walker. Below is a picture
of a properly assembled Tie Rod (Boom).
Le Tie Rod Right Tie
Rod
Bolt
Washer (1)
Washer (1)
Washers (2)
Locking Nut

Step 3: Steering Column Assembly
Raise the steering column up by pushing the clamp lever to the le allowing the
column to raise all the way up (Top Le and Right). Raise the clamp lever
upward in to the “U” slot and ghten by turning it clockwise (Boom Le).
Finally, push clamp lever down rmly to secure the steering column (Boom
Right). Reverse these steps when needing to lower steering column for
transport.
Push pin to the le Raise steering column and
release the pin
Raise the clamp into the “U”
shaped slot
Push clamp down
rmly

Step 4: Handle Bar Assembly
Please make sure the brake line is not twisted and the brake handle is facing
forward. Insert the handle bar into the steering column (Le). Raise the
handle bar to a comfortable posion and insert the height adjustment knob
into the hole and ghten (Right). We recommend the handle bar height to be
set approximately waist high.
Step 5: Basket Assembly
Locate the basket bracket on the front of the steering column (Top
Le). Place the rear basket holes over the bracket and push down (Top
Right). Your basket is now installed on the steering column (Boom).

Step 6: Knee Plaorm Assembly
The knee plaorm is designed to be used with either the right or le leg. Insert
the knee plaorm post into the receptacle tube (Top Le). Next, set the knee
plaorm at your desired height for use by inserng the locking pin through the
aligned holes (Top Right). We recommend that the knee on the knee plaorm
be at a 90 degree angle while the leg on the ground is straight. Finally, ghten
the clamp lever to secure the knee plaorm in place (Boom Le).
Insert Knee plaorm into the
receptacle tube
Insert the locking pin through the
aligned holes
Tighten and secure the clamp Properly assembled
kneepad

Brake and Parking Brake Operaon
Your KneeRover® knee walker comes equipped with a Brake Lock/Parking Brake.
To engage the brake, squeeze the brake lever on the handle bar. To apply the
parking brake, squeeze brake handle rmly and while squeezing the brake
handle press the silver buon to engage the lock. While sll holding the buon
down, release the brake handle and your parking brake will be set. To release
the lock, squeeze the brake handle again and the silver buon will pop up.
Unlocked Brake Locked Brake
Brake Adjustment
If there is ever a need to perform a brake adjustment, please follow these steps.
Locate the brake cable and spring at the rear of the scooter. Use a 10mm
wrench and loosen the nut (Le). Squeeze the spring together and pull the
brake cable down (Right). While holding the brake cable, reghten the nut.
You may also view the brake adjustment video by vising hps://kneerover.
com/pages/kneerover-maintenance-videos.

WARRANTY
Who is Covered? This warranty applies to the original owner. To validate your
warranty, the KneeRover® scooter must be registered within 30 days of the
purchase date and have a valid proof of purchase. Please make sure to visit
hps://kneerover.com/apps/product-registraon to complete the product
registraon.
What is Covered? While the frame is covered for the life of the KneeRover®,
some parts of the scooter are subject to normal wear and tear and depending
on the use, may not last the lifeme of the scooter. The applicable warranty
coverage for all parts are listed below.
Frame, Cross Braces and Welds: LIFETIME
Brake Components and Hardware: 1 YEAR
Wheels, Kneepad, Seat and Grips: 6 MONTHS
What is NOT Covered? This warranty does not cover defects or malfuncon
caused by misuse, abuse, negligence, improper maintenance, or failure to
follow the user manual instrucons and safety instrucons. This warranty will
not apply to damage caused by unauthorized parts, alteraons or modicaons
of this product. Cosmec or incidental damages are not covered.
How to obtain Warranty Service: To obtain warranty service for products,
please submit a warranty claim at hps://kneerover.com/pages/warranty
and have your serial number and proof of purchase available.
If the part that you need is no longer covered under your warranty, please visit
hps://kneerover.com/collecons/parts as we carry replacement parts for all
KneeRover® models.
If you have any quesons regarding your KneeRover® product or this warranty,
please contact our Customer Care Team by calling 1-877-737-9877 or by email
at help@kneerover.com. We are available Monday - Friday from 9:00 am to
5:00 pm Eastern.

KneeRover® Knee Walker Safety Instrucons:
The following safety instrucons and warnings are provided to
educate the user on how to safely operate a knee walker. Knee
Walkers are mobility devices designed to provide increased
mobility during recovery from foot/ankle/lower leg surgery or
injury. This is a walking aid, not a recreaonal device. For the
user’s safety, it is important to follow these safety instrucons at
all mes.
Dealer: User manual and safety instrucons must be given to the
user.
User: BEFORE using the knee walker, you must read the user
manual and safety instrucons and save for future reference.
Cauon: DO NOT aempt to adjust or operate
the knee walker without carefully reading all secons
of the user manual and following safety instrucons.
If you do not understand the User Manual or the Warnings and
Cauons provided here, please contact us or your healthcare
professional for a complete explanaon before aempng to
assemble or operate this equipment. Failure to read and comply
may result in injury to user or damage to the unit. If you have any
quesons, please contact us at 1-877-737-9877 or at
help@kneerover.com.
(Customer Service Hours: M-F 9AM to 5PM Eastern)

WARNINGS:
BEFORE OPERATING KNEE WALKER:
DO NOT exceed the maximum weight capacity of 300 pounds for
this knee walker. Exceeding the maximum weight capacity may
result in injury to the user or damage to the knee walker.
Aer fully assembling the knee walker according to this user
manual, ensure that the brakes are working correctly, meaning
they engage the rear wheel(s) when the brake handle is squeezed.
Failure to do this may result in injury to the user.
Inspect the knee walker periodically to ensure the brakes and
wheels are funconing properly. Be sure steering column clamp
and height adjustment knob are ghtened and fully engaged
before each use. Also, ensure that the knee plaorm height
adjustment clamp is ghtened and fully engaged and the lock-
ing pin is locked in place prior to use. Make sure the All Terrain
Wheels are inated to the proper psi.
Only use accessories and replacement parts authorized by the
KneeRover® brand. Accessories designed by other manufacturers
have not been tested by KneeRover® and are not recommended
for use with KneeRover® products.
As a reminder, this is a mobility / walking aid, not a recreaonal
device. For the user’s safety, it is important to follow these safety
instrucons at all mes.

SAFETY INSTRUCTIONS FOR OPERATING KNEE WALKER:
As with any new physical acvity, pracce and common sense are
necessary for successful use of the knee walker. Before operang
the knee walker at normal walking speed, pracce maneuvering
and making turns at slow rates of speed to get familiar with the
knee walker and how to best maintain balance. Gradually
increase the me spent using the knee walker to allow muscles to
adjust to this new acvity. A users’s learning curve for use of the
knee walker depends on the individual’s level of acvity, balance,
and ability. Consult a healthcare professional for addional
guidance on height sengs and use of the knee walker for
maximum support and comfort during recovery.
The following warnings are intended to help the user
achieve the safest operaon of the knee walker during recovery.
Failure to read and comply may result in injury to user or
damage to the unit.
DO NOT operate the knee walker faster than a comfortable
walking speed (we recommend not more than 3 miles per hour).
Running with the knee walker or riding it fast down a hill is
dangerous as one can easily lose control of the knee walker and
serious injury could result.
Use extra cauon when turning the knee walker. Do not turn
unless one foot is on the ground. Do not turn at speeds over 1
mph (very slow walking speed). Never make a sharp turn at high
speed as this could result in a fall and serious injury.
DO NOT travel over loose gravel, large cracks, or other uneven
surfaces.

DO NOT operate on inclines above 15 degrees (slight incline). Use
Extreme Cauon when operang the knee walker on any slopes,
as there is risk of losing balance. It is best to avoid slopes. Only
mount or dismount your knee walker on a level surface.
DO NOT aempt to reach for objects while the knee walker is in
moon. Ensure that you have come to a complete stop with brake
fully engaged or locked, and have established good balance
before reaching for an object.
Be aware of your surroundings when operang the Knee Walker.
Stop and move forward slowly when encountering cracks or
separaons in walkway surfaces. Look for hazards on the ground
and avoid them to prevent falls. Use cauon when moving from
one surface to another, such as hard oors or carpet.
DO NOT use the knee walker on or near stairs, curbs, obstacles,
ect. Doing this increases risk of fall and/or injury.
DO NOT walk backwards while using the knee walker.
All wheels must be in contact with the oor at all mes while
moving on the knee walker to ensure proper balance. Always
keep both hands on the handlebar grips when in use.

Your Sasfacon is Our Top Priority:
Thank you for your business - we appreciate having you as a
Customer! We are commied to providing innovave and
aordable mobility soluons to get you moving as soon as
possible aer injury or surgery and for the duraon of your
recovery - free to go about your busy, acve life - and have a lile
fun doing it.
We hope that you are completely sased with your purchase! If
you have any issues, please contact us and we will do
everything possible to help you. Reviews have a signicant impact
on our small business and if you purchased this product on
Amazon or ebay, we would greatly appreciate a review once
you’ve had a chance to use your new KneeRover® scooter. We
hope we’ve earned a 4 or 5 star review - if not, please give us the
opportunity to help you before leaving a review. Thank you for
your support. We appreciate you!
Need Help - Contact us:
Phone: 877-737-9877
Email: help@kneerover.com
Web: www.kneerover.com
EU Authorized Representave
Emergo Europe
Prinsessegracht 20
2514 AP The Hague
The Netherlands
T: +31 70 345 8570
EmergoEur[email protected]
KneeRover® is a registered trademark of Rover Mobility, LLC.
Other manuals for HYBRID
1
Table of contents
Other KneeRover Bicycle manuals