Knew Value Sentinel B Series User manual

Sentinel Operating Manual
Model B
rev: July 29, 2018

2
Table of Contents
TABLE OF CONTENTS 2
TL;DR 3
MODEL B OVERVIEW 4
GENERAL OVERVIEW & SAFETY 5
SENTINEL INSTALLATION 6
START UP 7
ONGOING MAINTENANCE & BEST PRACTICES 8
EXCHANGER TUBE CHANGE & INSTALLATION 9
PUTTING EXCHANGERS IN SERIES 15
DATA READINGS, VELOCITIES & SKIN TEMPERATURES 16
TROUBLESHOOTING 18
SUPPLIES & SERVICE 19

3
TL;DR
“Too long, didn’t read”
Consider this as your introduction. Your crash course. Your safety overview. Just by reading this, you
are closer to operation of the best cooling water performance monitor. Welcome to the world of the
Sentinel.
If you do not read past this page, you will still have a general overview of Sentinel. We do, however,
recommend that you read the entire manual, as well as strongly recommend that you watch the
supplementing videos on our website.
The operation of Sentinel is not a “plug & play” device. It requires a basic mechanical aptitude to use it
successfully to monitor a cooling water system’s performance. If it is not set up properly during start-
up, it will correctly, and your evaluation will be interrupted. When operated properly, this tool
provides continuous performance monitoring for years with only tube replacements and minor
maintenance. If ignored or tampered with, it will fail.
It contains high temperatures on the process side of the exchangers and heaters. Tubing and valves
will become hot and may result in burns if touched. The heaters should be turned off and cooling
water left flowing in order to cool down the unit prior to maintenance being performed, unless it is a
minor tightening of fittings. The indication that the process has cooled satisfactorily is that the inlet
and outlet of the cooling water on an individual exchanger are roughly the same, indicating no more
heat input from the process.
Key points to know:
- Cooling water has to be flowing in and out of the unit in order for it to turn on. Without
cooling water, power will not go to the heaters on the inside of the metallurgy.
- Basic physics apply to the unit. If you slow down the velocity on one exchanger, the velocity
will increase on the other.
- If the cooling water flowing through the unit is full of debris, you likely will need a strainer.
Strainers inevitably will require cleaning so they themselves continue working.
- Exploit the reasons why Sentinel is better: Use your eyes to actually review your performance.
This is why each exchanger is equipped with a poly-carbonate shell: for you to see your results.
- You might think that your outdated corrosion coupon testing is indicating good performance,
and that Sentinel is not working properly because the exchanger tubes contradict that
performance. Sentinel is working properly in this scenario, and it is doing its job by showing
you just how bad your cooling water is performing.
If you made it this far, thank you. We encourage you to continue reading this guide as it will help with
the successful operation of the unit. If used properly, Sentinel is a very helpful tool in cooling water
performance monitoring.
LJ Aspinall
Founder & President
Knew Value, LLC

4
Model B Overview
** Please Note **
If you are reading this and looking at your Sentinel skid simultaneously, some items might be different,
parts installed in alternative locations, rheostats placed together, fewer/more streamlined wires, etc.
Because each unit is made by hand, and individually tested by our team, improvements and efficiencies
are constantly made. However, all standard components will be labeled for ease of use.

5
General Overview & Safety
General Overiew:
Sentinel test heat exchanger consists of two annular exchangers (Model B-3 has three) used to model
skin temperature and velocity of critical exchangers in the process and cooling water system being
monitored.
It is designed to evaluate cooling water performance and to allow online, real time visual observation
of scale, corrosion and bacteria on selected metallurgy. Any data collected from Sentinel is for
monitoring the operation of the skid during an exposure period, primarily the operation of the heaters.
It is important to note we do not attempt to model an exchanger exactly on both the
process and cooling water sides. Sentinel is designed to model the surface area of the metallurgy
of your choice.
The results are initially visual, just like an inspection during a turnaround or outage. However, these
results can be realized immediately, as if you have a window to your heat exchanger. These results will
directly correlate to your heat exchanger.
Safety:
Our patented design has redundant safety features to help ensure reliability and consistent operation.
Safety also must be thought of using common sense. Simply hot water is hot and hot water going
through stainless steel will make the metal hot. Common sense will keep you from burning yourself.
Cooling water flow with a minimum of 0.5gpm is required for the operation of Sentinel, otherwise
heaters will not operate.
The heaters are also equipped with an automatic shutoff if they reach a temperature of 500˚F. Normal
operation on the heaters is around 300˚F due to the flow and temperature of the cooling water supply.
Be smart. Be safe.

6
Sentinel Installation
Sentinel Model B-2 requires 120 volts, 20 amps, AC power (Model B-3 120v, 30a). The power lead
enters the right side of the skid enclosure and is landed on the main power terminal block inside the
skid, in the upper right-hand corner when looking inside the box while the door is open. This task will
usually be performed by a plant electrician.
The skid requires a cooling water sample line and drain. Optimal cooling water supply from the
cooling tower is 6-10gpm. Please contact us if you have a supply line that is below 6gpm. A return
sample sent to the skid will assist achieving desired higher skin temperatures due to the elevated heat.
The sample should be as representative as possible, so the actual performance of the cooling water can
be monitored. A few minor items to consider:
- Ensure the sample line is not too long so the chlorine residual is not depleted by the time it
reaches the skid.
- Make sure that the pressure is not too low due to line loss that a booster pump is required.
The skid does not come with a booster pump as a standard item. It is normally only required
in unusual circumstances.
The cooling water drain from the skid can be routed back to the cooling tower or any other drain.
Care should be taken to provide an unobstructed flow from the skid to ensure adequate cooling water
flow and associated velocity in the exchangers.
Typically, a Management of Change (MOC) will be required by your customer before installation and
start-up of Sentinel. To help facilitate that requirement, there is a file for the Model B design that you
can download at www.knewvalue.com. This file should answer the majority of the questions during an
MOC.

7
Start Up
We highly recommend watching the startup video in the support section of our website. This will give
a very thorough overview to a successful startup.
Install ½” tubes in Sentinel exchangers of the desired metallurgy for the evaluation and ensure the
exchangers are installed in Sentinel. For installation help, please read the section for changing the
exchanger tubes.
Step 1: Before continuing, be sure that all breakers in the skid are in the off position.
Step 2: Ensure the supply stream is turned on and make sure both exchanger valves are open.
Step 3: The next step of the start-up of the skid is the setting of exchanger velocity. Turn on the
breaker labeled “Data” by switching the breaker to the on position. The screen on the data unit will
rotate through different readings. “Flow 1” and “Flow 2” are associated with exchanger #1 and
exchanger #2 respectively. Adjust the cooling water flow through each exchanger until the desired
flow for the velocity is achieved. Refer to the section on setting velocities & temperatures for specific
details.
Step 4: Once velocity is set for each exchanger, turn on the heaters and begin to observe the cooling
water temperature rise. This is done by observing the difference between inlet temperature and outlet
temperature and controlling the heat via the rheostats.

8
Ongoing Maintenance & Best Practices
Sentinel does not require little ongoing maintenance once the exposure period has been started. That
does not mean that you should set it and forget it.
As a best practice, we would recommend reviewing the current visible results through the clear
polycarbonate shell, at a minimum, once per week. It is also important to check that your velocity and
skin temperature settings are still correctly targeted. External climate and plant operations affect both
the supply stream pressure and cooling water inlet temperature.
It is also recommended as a best practice to periodically test the relay safety shutoff by temporarily
turning off cooling water, one exchanger at a time. When the data unit breaker is on, a green power
light on the relay board may be visible depending on how the safety relay is installed in your specific
unit. In regular operating conditions, you will see two red lights, next to the 1st and 2nd relays,
indicating that power is flowing through the relay, and everything is operational. This represents
exchanger #1 and exchanger #2 respectively. If one or both red lights are off, it is likely that cooling
water flow has been lost to a respective exchanger. If flow has not stopped, then the flow has dipped
below 0.5gpm.
Exposure period lengths are up to the operator; however, we recommend no more than 90 days per
exposure period to have an ongoing log for continuity. Following the completion of an exposure
period the tubes can be replaced and submitted for evaluation.
There is typically very little routine maintenance of Sentinel after start-up and during the exposure
period. The following are some points to consider:
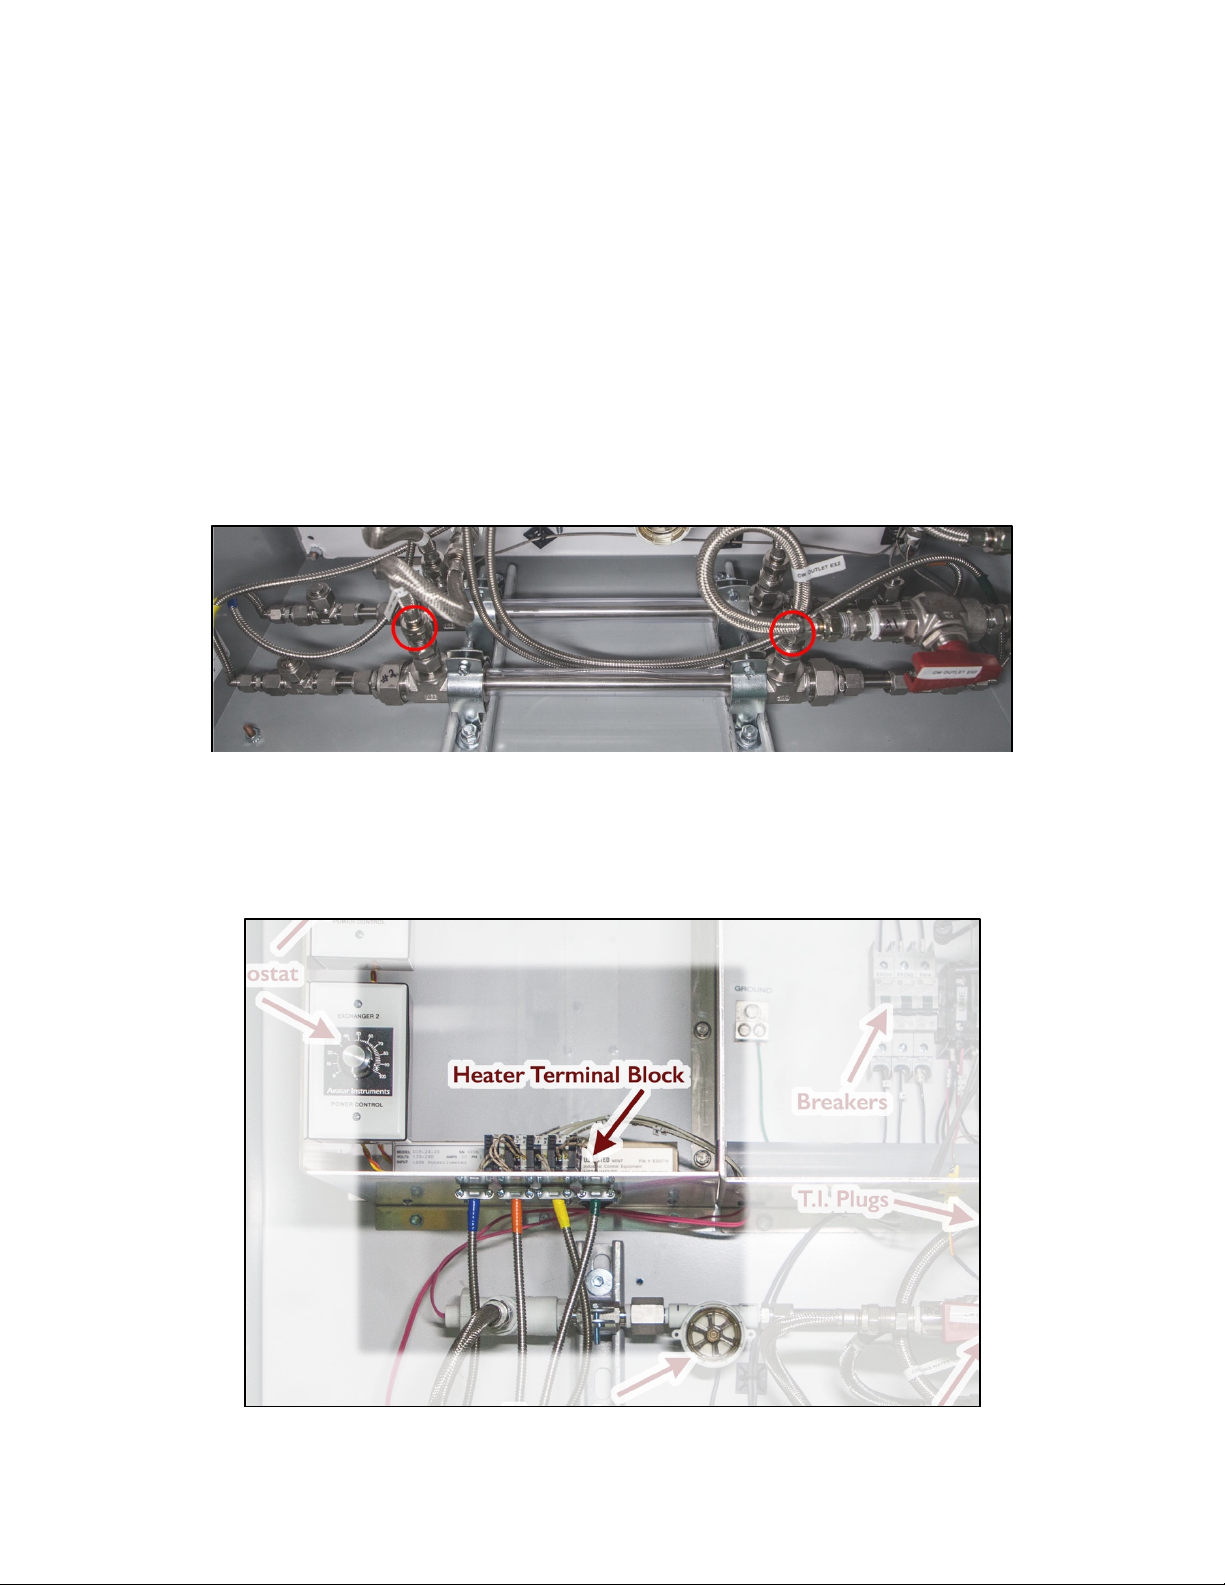
• Check the skid at least once per week for any noticeable leaks and tighten fittings as needed. If
water is lost from the process chamber during a run, turn off the heaters in that exchanger,
allow the process chamber to cool down by observing the inlet and outlet cooling water
temperature. When they are equal, it is cool. Then remove the caps and refill the chamber.
This will prevent hot spots on the ½” tube specimen.
• Check the operation of the skid at least once per week to ensure correct operation as well as
observing cooling water result.
• Photographs of the exchangers will help document the results during an exposure period and
also assist in technical support, if needed.
• If an inlet strainer is installed on the cooling water, check to ensure it is kept clean and cooling
water flow through Sentinel is not lost. Loss of cooling water flow will create non-typical
conditions for the cooling water and likely invalidate the exposure period.
• Any failure of components in Sentinel (heaters, flow meter, thermocouples, data logger, circuit
breakers or power supply) will be replaced in kind. No repair of these components is
suggested. Contact Knew Value and we will send you replacement parts as soon as possible.

9
Exchanger Tube Change & Installation
Exchanger Removal:
When the tube is changed the skid must be shut down. Please refer to the safety note
intended to prevent being burned. The water inside the process chamber will leak out of the
end you first loosen. For this reason, there are drain holes at the bottom of the box.
To complete this process, it is helpful having the following tools:
7” Channel Locks
Adjustable Wrench
7/8th-inch wrench
11/16th-inch wrench
2.5mm “jewelers” screw driver
***IMPORTANT***
When you get to Step 10 (or you get over zealous at any point in these step-by-step instructions),
under no circumstances, should you pull the tube specimen through one of the ½” fittings. This will
scrape off all the deposits, and other material from the surface of the specimen, that are on the tube,
and you will not be able to sample it. Metallurgists prefer the tube specimens to arrive at the lab dirty,
so they can observe the deposits and assist in determining the corrosion mechanism.

10
Step 1: To accomplish the tube change, first turn off the heaters at the breakers and allow the
cooling water to cool off the process chamber and metallurgy, or you are going to burn yourself.
When the temperature of the process and the cooling water are approximately the same, you are
ready to proceed. The time for this to occur will depend upon the inlet cooling water temperature to
the skid but should be around 5 minutes.
Step 2: Turn off the cooling water to the skid. Sentinel does not come with a master cooling water
inlet valve. This is typically provided in tandem with the supply stream. If supply stream shutoff is not
done, cooling water will be sprayed throughout the skid as you begin to open lines to remove the
exchangers.
Step 3: Remove the flexible hoses from the branches of the 1-inch Tees on the exchangers. They are
labeled so don’t worry about being able to put them on the correct location following this step. You
may also trace them from their flowmeters to their respective exchangers.
Please note that the valves used to control flow of cooling water through the exchangers are on the outlet of the
exchangers to ensure a liquid full condition in the exchangers.
Step 4: Disconnect the heater wires from the rheostat terminal blocks

11
Step 5a: If you are not planning on taking apart the exchanger to remove the tube specimen, you just
skip to Step 7, and you are done.
Step 5b: Loosen the 3/8” fitting attached to the heater on the left side. This will use an 11/16th
wrench if you have one available.
Step 6: On the right side of the exchanger, loosen the two ½” fittings located between the two tees.
These use a 7/8th wrench. It is also worth noting that inside each fitting are two “o” rings and a Teflon
ferrule.

12
Step 7: Remove the unistrut clamps and take the entire exchanger out of Sentinel. As a best practice,
we recommend putting the bolt back through the clamp, securing the nut and putting each clamp set
on top of Sentinel enclosure so you always know where they are during reinstallation.
Step 8: Remove the heater from the tube specimen. This was loosened in step 4.
Step 9:On the left 1-inch tee, the inside large nut that was below the Unistrut clamp, loosen and
remove from the 1-inch tee by sliding it over the polycarbonate tube.
Step 10:Holding onto the two 1-inch tee’s, pull the exchanger apart. The polycarbonate tube should
go to the right and slide over the tube specimen. You should be left holding the left-hand 1-inch tee
with the exposed tube specimen.
Step 11:Loosen the two left-side ½” nuts located between the two remaining tees. Please see the
important note at the beginning of these step by step instructions.

13
Step 12: Under no circumstances, should you pull the tube specimen through one of the ½” fittings.
This will scrape off all the deposits, and other material from the surface of the specimen, that are on
the tube, and you will not be able to sample it. At this point, grasp the tube specimen on the far-right
side. While simultaneously holding the remaining 1-inch tee, carefully remove the tube specimen.
After removing the tube specimens from the exchangers, complete the specimen card which came with
the tubes. This contains the initial weight and the start date for the exposure period. Please fill in the
ending date for the exposure period before submitting the sample to the lab so corrosion rates can be
calculated. This is the same procedure as standard corrosion coupons.
Exchanger Installation:
Once the tubes are removed you just reverse the process to install new tube specimens. If using
passivated tubes, no additional pre-cleaning should be required. If installing un-passivated tubes, please
follow these important cleaning procedures to ensure the best results.
• Wipe down the tube using an acetone wipe or acetone from the local plant lab. The cleaning of
the tube specimen with acetone is intended to remove any labeling or surface oils used for
preservation of the tube.
• A clean green abrasive pad is also recommended to remove oxide layers from the surface of
admiralty brass or copper.
After inserting the new tube specimens into the exchangers be sure you fill out the tube specimen card
which came with the tube and contains the initial weight. This card is required when the tube is
removed and sent to the lab for analysis.
The most critical step in the start-up is the filling of the “process” chamber on the exchanger. There
are two ½” T’s with caps on the branches at both ends of the exchanger. The straight runs contain
the heater which extends inside the ½tube specimen in the exchanger referred to as the process
chamber. This provides the “liquid to liquid” heat transfer through the specimen into the cooling
water.

14
Demineralized water, preferably treated with nitrite, should be used to fill the process chamber. This
ensures there is no scale or corrosion on the process side of the exchanger tube and that only events
occur on the cooling water side of the tube specimen. This is the side you are able to observe through
the clear polycarbonate outer tube. Make sure there is at least 1000ppm of nitrite (as NaNO2) in the
fluid used to fill the chamber.
Fill the process side of the exchanger from one end through the branch on the ½” Tee until the liquid
runs out of the other end. Replace and tighten the caps on the branches. The volume of water
required to fill this chamber is approximately 15-25ml. Having the chamber completely full is required
for effective operation of Sentinel.
Clamp the exchanger into its original position and you are now ready to go through another skid start-
up. Please refer to the earlier section for Start-up.

15
Putting Exchangers in Series
If there is a requirement to model a higher skin temperature than can be obtained on one exchanger,
putting the exchangers in series is required. Follow the proceeding steps:
Step 1: Turn off cooling water flow at the supply stream.
Step 2: Close Valve #1 as shown in the labeled diagram below. This is the valve of Exchanger #1.
Step 3: Remove the flexible hose directly connected to the flow meter labeled #2.
Step 4: Remove the white cap, as shown in the labeled diagram below, and place it on the outlet of
the flow meter that you just exposed in the previous step (Step 3).
Step 5: Connect the hose end you removed in Step 3 to the fitting where the white cap was removed
in Step 4.
Step 6: Open Valve #2 completely, as shown in the labeled diagram. This allows the flow for both
Exchanger #1 and Exchanger #2 to be controlled by the Valve for Exchanger #2 (not to be confused
with the valve listed as “valve #2” in this specific step by step).
Step 7 (only for Model B-3): On the right side, there will be a spare T.I. plug. Remove T.I. #2
(from left to right) and replace it with the spare.
At this point you are done. See the section on data readings for calculating skin temperature of the
series exchangers.
Please note: For Model B-3, it is not advisable to put all three exchangers in Series. The steps
above are specifically to put Exchanger #1 (rear) and Exchanger #2 (middle or front depending on
model) in series. Exchanger #3 (front) will remain unchanged.

16
Data Readings, Velocities & Skin Temperatures
The screen on the data unit will display flows in GPM (gallons per minute) versus FPS (feet per
second) velocity. Please refer to the chart below for conversion.
GPM
0.5
1
1.5
2
2.5
3
3.5
4
4.5
5
5.5
6
Velocity
0.7
1.3
2.0
2.6
3.3
3.9
4.6
5.2
5.9
6.5
7.2
7.8
You can also download our spreadsheet calculator “Simplified Design Simulation” from our website.
The desired rise in cooling water across each exchanger is obtained by using the inlet temperature and
outlet temperature from each exchanger.
For normal operations, when the exchangers are being used in parallel, you will see the following
readings on the data unit screen:
Model B-2
Temp 1: Exchanger #1 Heater Temperature
Temp 2: Exchanger #2 Heater Temperature
Temp 3: N/A
Temp 4: N/A
Temp 5: Cooling water inlet temperature. This applies to both exchangers.
Temp 6: Exchanger #1 Outlet Temperature
Temp 7: Exchanger #2 Outlet Temperature
Temp 8: Disregard this reading.
Model B-3
Temp 1: Exchanger #1 Heater Temperature
Temp 2: Exchanger #2 Heater Temperature
Temp 3: Exchanger #3 Heater Temperature
Temp 4: N/A
Temp 5: Cooling water inlet temperature. This applies to all three exchangers.
Temp 6: Exchanger #1 Outlet Temperature
Temp 7: Exchanger #2 Outlet Temperature
Temp 8: Exchanger #3 Outlet Temperature
Calculate the skin temperature the following ways both normal operation of both Model B-2 and B-3.
Exchanger #1: Temp 5 (inlet temperature) & Temp 6 (exchanger #1 outlet temperature)
Exchanger #2: Temp 5 (inlet temperature) & Temp 7 (exchanger #2 outlet temperature)
Exchanger #3: Temp 5 (inlet temperature) & Temp 8 (exchanger #3 outlet temperature)

17
For exchangers put in series, the temperature readings and calculations change because the inlet
temperature for exchanger #2 changes.
Model B-2 (in series only)
Temp 1: Exchanger #1 Heater Temperature
Temp 2: Exchanger #2 Heater Temperature
Temp 3: N/A
Temp 4: N/A
Temp 5: Exchanger #1 Cooling water inlet temperature.
Temp 6: Disregard this reading because after closing the valve to Exchanger #1 there is no longer flow
passing by the TI
Temp 7: Exchanger #2 Outlet Temperature
Temp 8: Exchanger #1 Outlet Temperature & Exchanger #2 Cooling water inlet temperature.
Calculate the skin temperature the following ways for operation in series for the Model B-2:
Exchanger #1: Temp 5 (inlet temperature) & Temp 8 (exchanger #1 outlet temperature)
Exchanger #2: Temp 8 (inlet temperature) & Temp 7 (exchanger #2 outlet temperature)
Model B-3 (in series only)
Temp 1: Exchanger #1 Heater Temperature
Temp 2: Exchanger #2 Heater Temperature
Temp 3: Exchanger #3 Heater Temperature
Temp 4: N/A
Temp 5: Exchanger #1 & Exchanger #3 Cooling water inlet temperature.
Temp 6: Exchanger #1 Outlet Temperature & Exchanger #2 Cooling water inlet temperature.
Temp 7: Exchanger #2 Outlet Temperature
Temp 8: Exchanger #3 Outlet Temperature
Calculate the skin temperature the following ways for operation in series for the Model B-3.
Exchanger #1: Temp 5 (inlet temperature) & Temp 6 (exchanger #1 outlet temperature)
Exchanger #2: Temp 6 (inlet temperature) & Temp 7 (exchanger #2 outlet temperature)
Exchanger #3: Temp 5 (inlet temperature) & Temp 8 (exchanger #3 outlet temperature)

18
Troubleshooting
You must have some amount of mechanical aptitude and common sense to perform troubleshooting
work on the skid. It is also extremely important to note that due to the inevitable variables in
operating conditions and the infinite unknowns that this troubleshooting guide can only cover certain
problems. We take great care on the preparation of each unit in hopes that you do not need to
reference this section at all.
Decrease in cooling water velocity:
This can be caused by many issues. Ensure that the supply stream from the plant has not dropped. If
the supply stream does not supply adequate pressure, it is possible to use a booster pump to
supplement the pressure to obtain the correct velocity. If you are using a strainer, make sure this is
clean. Cooling water flow below 0.5gpm will result in the heater shutting off. The data readings are
accurate between 0.5gpm-5gpm. A data reading of .18gpm is the same as 0gpm.
Cooling water flow stopped:
Make sure cooling water is still flowing through the supply stream. If cooling water is still flowing to
Sentinel, make sure no one has closed the valves inside the unit to each exchanger. If everything
appears as operational, it is possible that the flow meter has been stopped by debris. You can manually
attempt to rotate the debris out of the flow meter. For additional flow meter operations, please see
the support section of our website.
Heater not heating:
This likely will present itself as a decrease in outlet cooling water temperature through the exchanger
inlet and outlet temperatures being close to identical. Turn off the heater breaker and making sure
your wire connections are secure in the terminal blocks. If they are secure and the heater is not
working after this check, make sure that you have adequate flow (above .5gpm). Double-check to make
sure the flow meter wires are still connected to the data input board. If everything checks out, it is
possible you have a bad heater. It will require the removal of the exchanger with the bad heater and
simply loosen the 3/8” compression nut on the end of the exchanger. Slide out the bad heater and
replace it with a new one. Please note all heaters come with a 3/8” compressing nut and ferrules
attached. After replacing the heater, reinstall the exchanger following the instructions at the end of a
tube specimen replacement, hook up the heater wires, and you are back in business.
We have taken the same approach with all the other components in our skid: replacement, “in kind”,
with no repair in the field. Broken components should be returned to our shop for repair and
assessment of any changes for increased reliability.

19
Supplies & Service
Knew Value can provide the following:
- Tube Specimen: Pre-weighed, Passivated or un-passivated. Metallurgy of choice
- Consumables: Teflon ferrules and “o” rings.
- Exchangers: Spare, pre-assembled exchangers.
- Maintenance
Feel free to contact us directly.
Knew Value, LLC
Huffman, Texas
www.knewvalue.com
832-603-2039 or 832-233-0481
This manual suits for next models
2
Table of contents
Other Knew Value Industrial Equipment manuals
Popular Industrial Equipment manuals by other brands

ABB
ABB HT607553 Operation manual

Gardner Denver
Gardner Denver MH3 HYDRAPAK Operation, maintenance and installation manual

Facom
Facom WV.1105 instruction manual

ABB
ABB HT573809 Operation manual

Apator
Apator ARS 00/60 mm pro OPERATING AND INSTALLATION Manual

Lennartsfors
Lennartsfors IronHorse IH 2055 Classic Operator's manual