Kobalt SGY-AIR87TZ User manual

SMALL GRAVITY
FEED SPRAY GUN
ITEM #0301339
MODEL #SGY-AIR87TZ
ATTACH YOUR RECEIPT HERE
Serial Number Purchase Date
® ®

2
TABLE OF CONTENTS
Safety Information ............................................................................................... 3
Assembly Instructions ..........................................................................................
Package Contents ................................................................................................ 5
Product Specifications .......................................................................................... 5
Preparation ..........................................................................................................
Operating Instructions ........................................................................................
Care and Maintenance .......................................................................................
Repair Instructions ..............................................................................................
Troubleshooting ...................................................................................................
Replacement Parts List ........................................................................................
Warranty................................................................................................................
5
6
7
8
10
10
12
13
IMPORTANT: To operate correctly, this tool requires airflow that is at least 3.3 cubic feet per
minute (CFM) at 40 pounds per square inch (PSI). Check the specifications of your air compressor
to be sure that it can support both the minimum CFM and PSI required. An air hose may cause
up to 15 PSI drop in pressure, so you may need to set the output higher to maintain the required
pressure at the tool.
de maintenir un niveau adéquat.
IMPORTANTE: Para funcionar de manera correcta, esta herramienta requiere un flujo de aire de
por lo menos 3,3 pies cúbicos por minutos (CFM por sus siglas en inglés) para 40 libras por
pulgada cuadrada(PSI, por sus siglas en inglés). Revise las especificaciones de su compresora
de aire para asegurarse de que puede soportar tanto los CFM como las PSI mínimas requeridas.
Una manguera de aire comprimido puede causar una caída de hasta 15 PSI en la presión, de
manera que puede necesitar configurar la potencia más alta para mantener la presión requerida
en la herramienta.
IMPORTANT : Cet outil nécessite un débit d'air d'au moins 3,3 pi par minute à une pression de
3
3
aux exigencies minimales (pi /min et lb/psi ). L'utilisation d'un tuyau à air peut entraîner une chute
2
40 lb/psi . Vérifiez les spécifications de votre compresseur d'air afin de vous assurer qu'il satisfait
2
de pression de jusqu'à 15 lb/psi . Il peut donc s'avérer nécessaire d'augmenter la pression afin
2
3.3
CFM
40
PSI
Tool Requirements
Exigences relatives aux outils
Requisitos de herramientas
@

3
SAFETY INFORMATION
Please read and understand this entire manual before attempting to assemble, operate
or install the product. If you have any questions regarding the product, please call
customer service at 1-888-3KOBALT, 8:00 a.m.-8:00 p.m., EST, Monday-Friday.
Do not allow children to operate tool, and keep children away from the work area.
Noise can harm your hearing. To safe guard your hearing always wear proper ear
protection.
Whenever doing maintenance on tool, proper impact resistant safety glasses and face
protection must be used.
During cleaning and flushing, be sure operator and others in the work areas are wearing
proper impact resistant eye and face protection. Solvents can be forcefully expelled
from fluid and air passages which may cause eye injury. Even small objects can injure
eyes and cause blindness.
Do not wear loose clothing, jewelry, or anything that may get caught or tangled when
using tool.
Before changing accessories, when making repairs, or when tool is not in use, always
first shut off air supply and release / drain air pressure from hose. Then disconnect tool
from air supply or hose and store in a safe location.
Always have control of the air hose.
Never spray or direct air at yourself or anyone else.
Whipping hoses can cause serious injury. Always check for damaged or loose hoses
and fittings before use. Never use quick change couplings at tool. They add weight and
could fail due to vibration. Instead, add a hose whip connect coupling between air
supply and hose whip, or between hose whip and leader hose.
Always use the tool at a safe distance from other people in the work area.
Maintain tools with care, never use a tool that is leaking air, has missing or damaged
parts, or requires repairs.
Keep tools clean and properly oiled for best and safest performance. Follow lubrication
instructions for best and safest operation.
Follow assembly and repair instructions on how to properly change accessories.
Wiping or cleaning rags and other flammable waste materials that may have been
used on tool must be placed in a tightly closed metal container, and disposed of in a
proper manner.
Keep proper footing at all times. Do not overreach, as slipping, tripping, and or falling
can be a major cause of serious injury and or death. Be aware of excess hose in the
working area or work surface.
Check hoses for weak or worn connections before each use, and make certain that all
connections are secure.
Whenever possible, secure work with clamps, or vise so both hands can be free to
operate tool.
Repetitive motions, awkward positions and exposure to vibration can be harmful to
hands and arms.
Adequate exhaust must be provided to keep the air free of toxic materials. Use proper
work clothin tg o avoid direct skin contact.
Do not abuse hoses or connectors. Never carry the tool by the house or yank it to
disconnect it from a power supply. Keep hoses away from heat, oil, sharp edges, and
other sharp objects.

4
SAFETY INFORMATION
Do not remove Brass baffle attached to front of gun body as special technical training
and tools are required. Only authorized service centers should remove this part.
To avoid cross-threading, all spray gun parts should be initially screwed in by hand
and hand tightened only. If the parts cannot be easily turned by hand, be sure you have
the correct parts, unscrew, realign, and secure properly in matching parts.
WARNING
CAUTION
SOME DUST CREATED BY PAINT SPRAYING, POWER SANDING, SAWING,
GRINDING, DRILLING, AND OTHER RELATED ACTIVITIES KNOWN TO THE
STATE OF CALIFORNIA TO CAUSE CANCER, BIRTH DEFECTS, AND OTHER
REPRODUCTIVE HARM. A LISTING OF CHEMICALS CAN BE OBTAINED FROM
www.oehha.ca.gov UNDER PROPOSITION 65. SOME EXAMPLES OF THESE
CHEMICALS ARE:
YOUR RISK FROM THESE EXPOSURES VARIES, DEPENDING ON HOW OFTEN
YOU DO THIS TYPE OF WORK. TO REDUCE YOUR EXPOSURE TO THESE
CHEMICALS WORK IN A WELL VENTILATED AREA, AND WORK WITH
WHICH ARE SPECIALLY DESIGNED TO FILTER MICROSOPIC PARTICLES.
LEAD FROM LEAD BASED PAINTS
PRODUCTS
CRYSTALLINE SILICA FROM BRICKS, CEMENT AND OTHER MASONRY
ARSENIC AND CHROMIUM FROM CHEMICALLY TREATED LUMBER
APPROVED SAFETY EQUIPMENT, SUCH AS A RESPRIATOR OR DUST MASKS
Use proper respirator whenever possible, or if there is a chance of inhaling sprayed
materials. The mask must be compatible with the materials being sprayed. Contact the
materials supplier for further details.
Solvent and coating can be highly combustible especially when sprayed.
Adequate exhaust must be provided to keep air free of flammable vapors.
Do not smoke in or near work area.
Always keep a fire extinguisher present in the work area.
Never spray near sources of ignition such sources such as pilot lights, welders, etc.
Halogenated hydrocarbon solvents, and methylene chloride, are not chemically
compatible with the aluminum that might be used in may spray system components.
The chemical reaction caused by these solvents reacting with aluminum can become
dangerous and lead to equipment failure and or equipment explosion.
Guns with stainless steel fluid passages may be used with these solvents; however
aluminum is widely used in other spray applications such as material pumps, cups, and
regulators, valves etc. Check all other equipment items before use and make sure they
can also be safely used with these solvents. Read the label or material safety data
sheet for the materials you intend to spray.
Operators and maintenance personnel must be physically able to handle the bulk
weight, and power of the tool.
This tool is not intended for using in explosive atmospheres and is not insulated for
contact with electrical power sources.

5
PREPARATION
Before beginning assembly and operation of product, make sure all parts are present. Compare
parts with package contents list and diagram above. If any part is missing or damaged, do not
attempt to assemble or operate the product. Contact customer service for replacement parts.
Estimated Assembly Time: 3 minutes
Tools Required for Assembly: Wrench (included)
Quantity
1
1
1
1
1
1
1
1
1
1
Part
A
B
C
D
E
F
G
H
I
J
Description
PACKAGE CONTENTS
Air Cap w/Ring
Fluid Nozzle
Spray Pattern Adjustment Knob
Paint Needle
Fluid Adjustment Knob
Air Connection
Air Adjustment Knob
Plastic Cup
Cover
Wrench
3.3 6
40
40
GRAVITY
EXTERNAL
BLEEDER

6
ASSEMBLY INSTRUCTIONS
1
1. Take out spray gun and put on paint cup
(see Figure 2)
3
The life of this product and the efficiency of its
operation depend upon the knowledge of its
construction,
usage and maintenance (See Figure 1.
Not all accessories shown are included).
2
Gravity Feed Cup
Fluid Adjustment Knob
Oil and
Water
Extractor
Atomization
Pressure Gauge
Air Hose
Air Inlet
Spray Pattern Adjustment Knob
Air Adjustment Knob
Fluid Adjustment Knob
2. Connect air tube to air intake connector from air
compressor; set pressure to 43 psi. Fully open air
adjustment knob and adjust the spray pattern
adjustment knob to proper range (See Fig 3. Oil and
water extractor and air compressor not included.)
Read and follow all directions before assembly or use

7
ASSEMBLY INSTRUCTIONS
4
4. Pour paint into paint cup and put on cover
(See Fig 4. Oil and water extractor and air
compressor not included). Load paint
OPERATION INSTRUCTIONS
Proper handling of the gun is essential for obtaining a good finish. The gun should be held at a
90 angle the surface being covered, and moved parallel to it. For precise control of the gun and
material, the trigger should be released before the end of the stroke. Hold the gun 6 to 12 inches
away from the surface depending on material and atomizing pressure. For a uniform finish, lap
each stroke over the preceding stroke, making sure the spray is smooth and wet. Using the
lowest possible atomizing air pressure will reduce over spray and provide maximum efficiency
(See Fig. 5).
O
6 to 12 inches
Start
stroke Pull
trigger
Even and wet coat
Release
trigger End of
stroke
RIGHT
Light coat Heavy coat
WRONG
5
During normal use, the air cap wings are horizontal and the air cap should be pointed up as
shown here (See Fig. 6).This provides a vertical fan-shaped pattern which gives maximum and
even material coverage as the gun is moved back and forth parallel to the surface being finished.
The air cap wings
are horizontal.
6

8
REPAIR INSTRUCTIONS
CAUTION:
Remove air pressure from air hose / gun.
Take care not to damage the seals on the gun body when
removing the air distribution ring.
1. Remove the nozzle set:
a. Remove air cap w/ring (See Fig. 1)
b. Unscrew the fluid adjustment knob (See Fig. 2)
c. Pull out needle spring and paint needle (See Fig. 3)
d. Remove paint nozzle using wrench provided (See Fig. 4)
1 2 3
4
2. Pull out the air distribution ring using needle-nose pliers,
and remove dirt (See Fig. 5)
NOTE: Make sure that dirt has not settled in the sealing surfaces
and no scratches prevent optimum sealing performance.
5
pin marked with an arrow (1) fits smoothly into the hole marked (2) (See Fig. 6)
Then firmly push in the air distribution ring (See Fig. 7) Insert the paint nozzle and
tighten slightly. Then remove itagain. Make sure the air distribution ring
fits securely against the gun body.
Reconnect air hose with spray gun and set to desired PSI.

9
REPAIR INSTRUCTIONS
89
10 11
12
67
4. Mount the nozzle set:
a. Screw on paint nozzle (See Fig. 8)
b. Attach the air cap w/ring (See Fig. 9)
c. Put on paint needle (See Fig. 10)
d. Attach the needle spring (See Fig. 11)
e. Screw on the fluid adjustment knob
(See Fig. 12)
NOTE: Test spray pattern before use again.
During normal use, the air cap wings are horizontal and the air cap should be pointed up as
shown here (See Fig. 13) This provides a vertical fan-shaped pattern which gives maximum
and even material coverage as the gun is moved back and forth parallel to the surface being
finished.
The air cap wings
are horizontal.
13

10
CARE AND MAINTENANCE
To properly maintain and keep your small gravity feed sprayer working at its optimal performance,
it is recommended that the spray gun nozzle be cleaned and cleared of any clogs or debris buildup
using paint thinner, or lacquer thinner. DO NOT USE ANY ACID BASED SOLVENTS, AS ACID
BASED SOLVENTS CAN DAMAGE THE SPRAYER. Please consult with your local Lowes
retailer in choosing the right solvent materials.
15
14
1. Pour enough solvent material(s) into container so that nozzle will be completely submerge in
solvent material
NOTE: There are two methods for properly submerging spray gun nozzle into cleaning solvent
material(s). The manufacturer recommends method 1:
Nozzle
Nozzle
Solvent material
Solvent
material
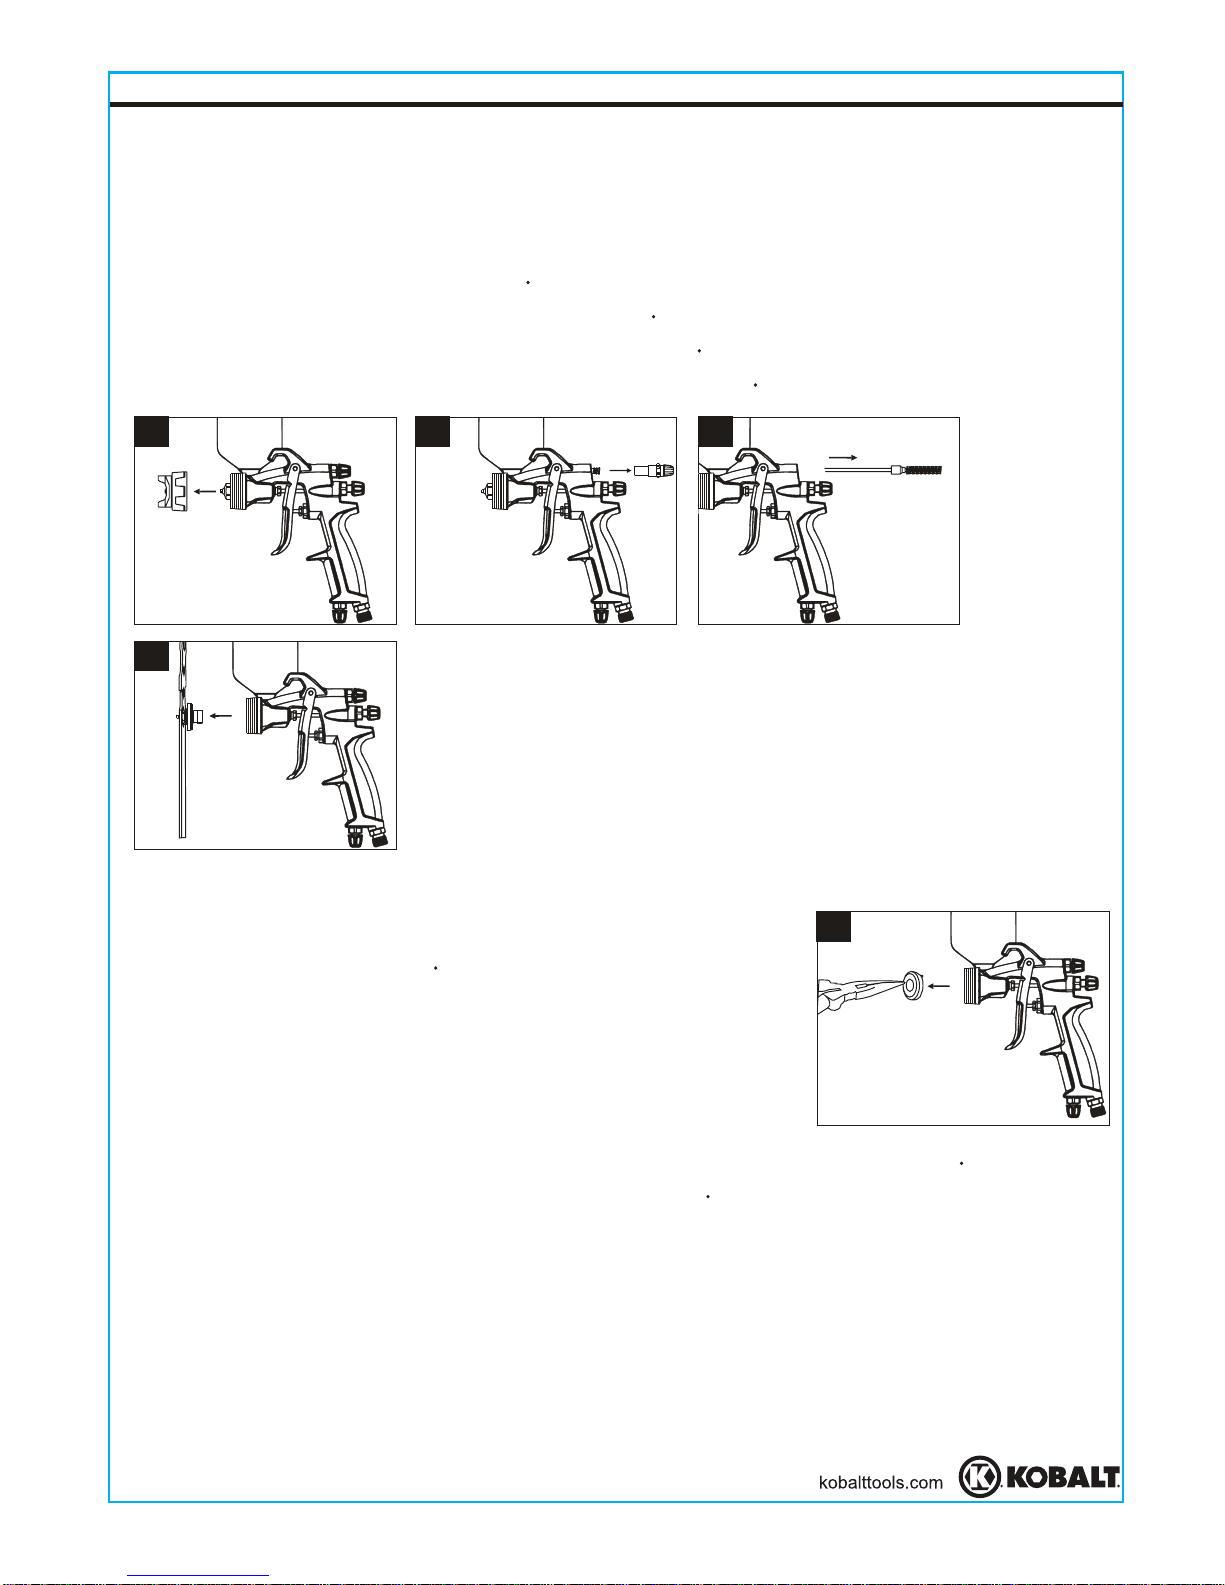
Method 2: Keeping the Spray gun nozzle attached to the spray gun
housing, submerge the front end of the spray gun only (See Fig. 15).
Make sure that only the spray gun nozzle is submerged in solvent
material(s). IF USING METHOD 2, AND NOT COMPLETELY
REMOVING SPRAY GUN NOZZLE, MAKE SURE A SUITALBLE
CONTAINER IS USED WHICH CAN NOT EASILY TIP OVER. IF
THE CONTAINER USED DOES TIP OVER, YOU WILL SPIL
SOLVENT MATERAIL(S), CAUSING A POTENTIAL SAFETY HAZZARD.
NOTE: Make sure that you never submerge any part of the spray gun
housing into solvent material(s), as air passages would become clogged
with dirty solvent. This would also cause the lubricant in the leather
packaging, and other gaskets inside the gun housing to dry out,
resulting in difficult operation and faster wear on the item which will cause poor spray performance.
2. Let nozzle sit in solvent material(s) for 3-5 minutes allowing solvent material(s) to break up any
build up of dirt and or debris on spray nozzle.
3. Remove nozzle from solvent material(s) and closely inspect the spray gun nozzle to ensure any
dirt or debris build up has been cleared.
NOTE: Depending on the paint and solvent material(s) used, steps 1-4 may need to be repeated
multiple times.
BEFORE PERFORMING ANY CLEANING OR MAINTENANCE REMOVE SPRAY GUN FROM
AIR SUPPLY AND KEEP AWAY FROM ANY INGITION SOURCES.
Method 1: Remove the spray gun nozzle completely from spray gun
and place into a container that will not cause solvent derogation when
solvent material(s) are added (See Fig. 14).
4. If debris or build up is still present use a non wire soft bristle brush and brush area of nozzle
that still contains dirt or debris, and repeat steps 1-4.
5. Once spray gun nozzle has been completely cleared of any dirt or debris, and is clean, wipe
nozzle clean with a clean cloth or rag.
6. Once nozzle has been properly cleaned reconnect nozzle to spray gun, and reconnect spray
gun to air supply, and test sprayer ensuing that sprayer is working properly. If you are at the
end of a project, when test spraying make sure you do not test spray having paint go through
the system as this will require you to begin the cleaning process again.
7. Once sprayer is working properly, make sure you follow the solvent manufactures
recommendations for properly discarding any dirty cloths, or rags that were used in the
cleaning process.
Storing
1. When not using spray gun, turn the fluid adjustment knob counterclockwise to open
which will reduce spring tension on needle fluid tip.
2. Spray gun must be well cleaned and lightly lubricated.
3. Store spray gun in a dry and safe place out of reach of children.

TROUBLESHOOTING
11
a) Gun improperly adjusted.
b) Dirty air cap.
c) Fluid tip obstructed.
d) Sluggish needle.
Fan adjustment screw not seating
properly.
a) No air pressure at gun.
b) Fluid pressure too low with internal
mix cap and pressure tank.
c) Fluid control screw not open
enough.
d) Fluid too heavy for suction feed.
a) Packing nut loose.
b) Packing worn or dry.
a) Tighten, but not so tight as to grip
needle.
b) Replace packing or lubricate.
a) Check air supply and air lines.
b) Increase fluid pressure at tank.
c) Open fluid control screw.
d) Thin material or change to
pressure feed.
Clean or replace.
a) Re-adjust gun. Follow instructions
carefully.
b) Clean air cap.
c) Clean.
d) Lubricate.
Unable to get
round spray.
Improper spray
pattern.
Will not spray.
Fluid leakage
from packing nut.
PROBLEM SOLUTION
SPRAY PATTERN/
CONDITION
If you have any questions regarding the product, please call customer service at 1-888-3KOBALT,
8 a.m. - 8 p.m., EST, Monday - Friday.
Gun held too close to surface.
a) Dry packing.
b) Sluggish needle.
c) Tight packing nut.
d) Worn fluid nozzle or needle.
a) Gun held too far from surface.
b) Atomization pressure set too high.
Move gun further from surface.
a) Move gun closer to surface.
b) Adjust atomization pressure.
a) Lubricate.
b) Lubricate.
c) Adjust.
d) For pressure feed, replace with
new fluid nozzle and needle.
Dripping from
fluid tip.
Thick, dimpled
finish resembling
orange peel.
Thin, sandy
coarse finish.
a) Loose air nozzle.
b) Material around outside of air
nozzle has dried.
a) Atomization air pressure is set too
high.
b) Trying to spray a thin material in
too wide a pattern.
a) Packing around needle valve is dried
out.
b) Fluid nozzle loosely installed, or dirt
between nozzle and body.
c) Needle sealing damaged.
a) Back up knurled nut, put a few drops of
machine oil on packing, retighten nut.
b) Take off fluid nozzle, clean rear of nozzle
and seat in gun body. Replace nozzle
and bring in tight to body.
c) Replace seal.
a) Reduce air pressure.
b) Increase material control by turning fluid
adjustment knob to left, while reducing
spray width by turning spray pattern
adjustment knob to right.
a) Trigger air nozzle.
b) Take off air nozzle and wipe off fluid tip,
using a rag moistened with thinner.
Intermittent spray
Soak nozzle in solvent to loosen clog, then
blow air through until clean. To clean orifices
use a broom straw or toothpick. Never try to
detach dried material with sharp tool.
One side of nozzle is clogged.

WARRANTY
12
This tool is warranted by the manufacturer to the original purchaser from the original
purchase date for three (3) years subject to the warranty coverage described herein.
This tool is warranted to the original user to be free from defect in material and
workmanship. If you believe that a tool is defective, return the tool, with proper proof
of purchase to the point of purchase. If it is determined that the tool is defective and
covered by this warranty, the distributor will replace the tool or refund the
purchase price.
This warranty is void if: defects in materials or workmanship or damages result from
repairs or alterations which have been made or attempted by others or the
unauthorized use of nonconforming parts; the damage is due to normal wear,
damage is due to abuse (including overloading of the tool beyond capacity), improper
maintenance, neglect or accident; or the damage is due to the use of the tool after
partial failure or use with improper accessories or unauthorized repair or alteration.
This warranty gives you specific legal rights, and you may also have other rights that
vary from state to state.
For warranty questions, call our customer service department at 1-888-3KOBALT,
8:00 a.m.-8:00 p.m. EST, Monday-Friday.

REPLACEMENT PARTS LIST
13
Washer D=3 1 43 Non-drip control device 1
12
Spring
1 44 Washer D=3 1
13 Washer D=3 1 I Cover 1
14 O-ring2.5x2.1 1 46
Air Valve Spring
1
15 O-ring 8x1.5 1 47 Washer D=3 1
16 Pattern Adj. Knob 1 48 O-ring 2.5x2.1 1
17 Pattern Adj.Screw 1 49 O-ring 8x1.5 1
C
Spray pattern adj. knob
1 50
Pattern Adj. Knob
1
19 Screw M 5X2.5 5X2.5 1 51
Air Adj. Screw
1
20 Screw M 1 H
J
CPlastic up 1
E
Fluid adj. knob
1 G Air Adj. Knob 1
22
Fluid Adj. Screw Plug
1 54 Screw M2.5x5 1
23
Needle Housing Fluid
1 55 Fluid nipple 1
24 O-ring 10x1.8 1 56
Butterfly Nut
1
25 Snap Retainer d=4 1 57
Paint inlet Nozzle
1
26 Trigger 1 58 Cup holder 1
27 Gasket 1 59 Plug 1
28 O-ring 7x1.5 1 60
61
63
Plug 1
1
1
1
29 Needle spring 1
1
1
1
30 Washer
31 Washer
32 Trigger pin
Part No. Description Qty. Part No. Description Qty.
A Air cap w/Ring 1 D Paint Needle 1
2 Air nozzle washer 1 34 Spring 1
3 Air cap 1 35
Air Valve
1
4 Air cap washer 1 36 O-ring 6x1.5 1
B Fluid nozzle 1 37 O-ring 8x1.5 1
6 Gun body 1 38
Switch Seat
1
7
Washer
1 39 O-ring 2.5x1.5 1
8
Sealing gasket
1 40
Switch Screw Seat
1
9
Direction Screw
1 F Air connection 1
10
Pattern Needle
1 42
Air Inlet Valve
1
11
Printed in China
Gun holder
Wrench
Brush

SMALL GRAVITY
FEED SPRAY GUN
14
Article #0301339
MODÈLE #SGY-NS87TZ
Numéro de série Date d'achat
KOBALT et le motif de K sont des marques
de commerce déposées de LF, LLC Tous droits
réservés.
JOIGNEZ VOTRE REÇU ICI
Des questions, des problèmes, des pièces manquantes? Avant de
retourner l'article au détaillant, communiquez avec notre service à la
clientèle au 1 888 3KOBAL , entre 8 h et 20 h (HNE), du lundi au vendredi.
® ®

15
TABLE DES MATIÈRES
Consignes de sécurité
....................................................................................... 16
Caractéristiques du produit .................................................................................. 18
Contenu de l'emballage .......................................................................................18
Préparation .......................................................................................................... 18
Directives d’assemblage ..................................................................................... 19
Instructions d’utilisation ...................................................................................... 20
Entretien ..............................................................................................................23
Dépannage ......................................................................................................... 24
Garantie ............................................................................................................. 25
Liste des pièces de rechange...............................................................................26
Instructions pour la réparation ........................................................................... 21

16
CONSIGNES DE SÉCURITÉ
Veuillez vous assurer de lire et de comprendre l'intégralité du présent guide avant
u
d'assembler, d' tiliser ou d'installer ce produit. Si vous avez des questions concernant
ce produit, veuillez téléphoner au service à la clientèle au 1 888 3KOBALT, entre 8 h et
20 h (HNE), du lundi au vendredi.
Ne laissez pas les enfants utiliser l’outil et gardez les enfants à distance de l’aire de travail.
Le bruit peut détériorer votre ouïe. Afin de protéger votre ouïe, portez toujours des
protecteurs auditifs appropriés.
Lorsque vous entretenez l’outil, portez un protecteur facial et des lunettes de sécurité
résistant aux chocs.
Lors du nettoyage et du rinçage, assurez-vous que l’utilisateur et les autres personnes
présentes dans l’air de travail portent un protecteur facial et des lunettes de sécurité
résistant aux chocs appropriés. Les solvants peuvent être expulsés sous la pression de
l’air et des fluides et causer des blessures aux yeux. Les petits objets peuvent également
blesser les yeux et entraîner la cécité.
Ne portez pas de vêtements amples, de bijoux ni tout autre article qui pourrait
s’accrocher ou s’emmêler dans l’outil lors de son utilisation.
Coupez l’alimentation en air et évacuez la pression d’air du tuyau avant de changer les
accessoires ou d’effectuer des réparations, ainsi que lorsque vous n’utilisez pas l’outil.
Débranchez ensuite l’outil de l’alimentation en air et rangez-le dans un endroit sécuritaire.
Gardez toujours la maîtrise du tuyau à air.
Ne pointez jamais le jet d’air vers vous-même ou une autre personne.
Le cinglage des tuyaux souples peut entraîner de graves blessures.Vérifiez toujours les
tuyaux et les raccords pour déceler des dommages ou desserrages éventuels. N'utilisez
jamais de raccords à changement rapide sur l'outil. Ils ajoutent du poids et pourraient
Gardez toujours l’outil à une distance sécuritaire des personnes présentes dans l’aire
de travail.
Entretenez soigneusement les outils. N’utilisez jamais un outil qui présente une fuite d’air,
auquel il manque des pièces, dont des pièces sont endommagées ou qui nécessite des réparations.
Gardez les outils propres et adéquatement huilés pour un rendement optimal et sécuritaire.
Suivez les instructions pour la lubrification afin d’assurer un fonctionnement optimal et sécuritaire.
Suivez les instructions pour l’assemblage et les réparations pour changer les
accessoires correctement.
Demeurez stable sur vos pieds et gardez l'équilibre en tout temps. Glisser, trébucher ou
Vérifiez les tuyaux souples pour déceler tout signe de faiblesse ou d'usure avant de les
utiliser et assurez-vous que toutes les connexions sont sûres.
Prenez soin des tuyaux souples et des connecteurs. Ne transportez jamais l'outil par le
tuyau souple et ne le tirez pas d'un coup sec pour le débrancher de l'alimentation électrique.
tenez les tuyaux éloignés des sources de chaleur, de l’huile, des rebords coupants
et d’autres objets tranchants.
se desserrer en raison des vibrations. Ajoutez plutôt une amorce de tuyau et fixez le
raccord entre l'arrivée d'air et l'amorce ou entre l'amorce et le tuyau principal.
chuter peut causer des blessures graves ou le décès. Faites attention au surplus de
tuyau laissé sur le passage ou la surface de travail.
Si possible, fixez la pièce sur laquelle vous travaillez avec des pinces ou un étau afin de
pouvoir vous servir de vos mains pour faire fonctionner l'outil.
Les mouvements répétitifs effectués pendant le travail, les positions inconfortables et
l'exposition aux vibrations peuvent se révéler douloureux pour les mains et les bras.
Une sortie de ventilation doit être prévue pour maintenir l'air exempt de matériaux toxiques.
Gardez une posture sécuritaire en tout temps. Ne vous étirez pas pour étendre votre
portée; vous risqueriez de glisser, de trébucher ou de tomber et de subir des blessures
graves ou mortelles. Faites attention à l’excédent du tuyau à air et aux prises
d’alimentation de l’aire de travail.
Portez des vêtements de travail appropriés pour éviter le contact direct avec la peau.

17
ING
Portez un masque respiratoire approprié lorsque possible, ainsi que lorsqu’il y a un risque
d’inhalation des matériaux vaporisés. Le masque doit être compatible avec les matériaux
vaporisés. Communiquez avec le fournisseur des matériaux pour plus de détails.
Les solvants et les apprêts peuvent se révéler très combustibles, tout particulièrement
lorsqu'ils sont pulvérisés.
Une sortie de ventilation doit être prévue pour maintenir l'air exempt de vapeurs inflammables.
Ne fumez pas sur le lieu de travail ou à proximité.
Ayez toujours un extincteur sur le lieu de travail.
Ne pulvérisez jamais près des sources d'inflammation telles que les flammes de veilleuses,
les machines à souder, etc.
Les halons, par exemple les dichlorométhanes, ne sont pas chimiquement compatibles avec
l'aluminium qui pourrait être utilisé dans de nombreux composants du système. La réaction
chimique causée par ces solvants réagissant à l'aluminium peut se révéler dangereuse et
provoquer une explosion de l'équipement.
Les pistolets munis de conduites de fluide en acier inoxydable peuvent être utilisés avec ces
solvants. Toutefois, l'aluminium est largement utilisé dans d'autres outils de pulvérisation tels
que les pompes à pulvériser, les godets et les régulateurs, les soupapes, etc. Vérifiez toutes
les pièces de l'équipement avant de vous en servir et assurez-vous qu'elles peuvent être
utilisées en toute sécurité avec ces solvants. Lisez l'étiquette et la fiche signalétique de sécurité
du matériau que vous avez l'intention de pulvériser.
Les opérateurs et le personnel d'entretien doivent avoir les capacités physiques
nécessaires pour manier un outil de ce volume, de ce poids et de cette puissance.
Cet outil n'est pas conçu pour être utilisé dans des atmosphères explosives et n'est pas isolé
de façon à pouvoir supporter un contact avec les sources d'alimentation électrique.
CONSIGNES DE SÉCURITÉ
AVERTISSEMENT
LA POUSSIÈRE CRÉÉE PENDANT LE PONÇAGE, LE SCIAGE, LE POLISSAGE, LE
PERÇAGE ET D'AUTRES ACTIVITÉS PEUT CONTENIR DES PRODUITS CHIMIQUES
RECONNUS PAR L'ÉTAT DE LA CALIFORNIE COMME ÉTANT LA CAUSE DE CANCERS,
D'ANOMALIES CONGÉNITALES ET D'AUTRES PROBLÈMES LIÉS AUX FONCTIONS
AU www.oehha.ca.gov, CONFORMÉMENT À LA PROPOSITION 65. VOICI
QUELQUES-UNS DE CES PRODUITS CHIMIQUES :
DU PLOMB PROVENANT DE PEINTURES À BASE DE PLOMB;
DE LA SILICE CRISTALLINE PROVENANT DE LA BRIQUE, DU CIMENT OU
D'AUTRES MATÉRIAUX DE MAÇONNERIE;
DE L'ARSENIC ET DU CHROME PROVENANT DU BOIS D'ŒUVRE TRAITÉ AVEC
UN PRODUIT CHIMIQUE.
REPRODUCTRICES. VOUS POUVEZ OBTENIR LA LISTE DES PRODUITS CHIMIQUES
LES RISQUES LIÉS À L’EXPOSITION À CES PRODUITS VARIENT SELON LE NOMBRE
DE FOIS OÙ VOUS PRATIQUEZ CES ACTIVITÉS. AFIN DE LIMITER VOTRE
EXPOSITION À CES PRODUITS CHIMIQUES, TRAVAILLEZ DANS UN ENDROIT BIEN
VENTILÉ ET UTILISEZ DE L’ÉQUIPEMENT DE SÉCURITÉ APPROUVÉ, TEL QU’UN
APPAREIL RESPIRATOIRE OU UN MASQUE ANTIPOUSSIÈRE CONÇUS
SPÉCIALEMENT POUR FILTRER LES PARTICULES MICROSCOPIQUES.

18
CARACTÉRISTIQUES DU PRODUIT
CARACTÉRISTIQUES
COMPOSANTE
ENTRÉE D’AIR
.
NE RETIREZ PAS le déflecteur en laiton fixé à l'avant du corps du pistolet car une
formation technique spéciale et certains outils sont nécessaires. Le retrait de cette
pièce devrait être confié aux centres de réparation et d'entretien autorisés.
CONSIGNES DE SÉCURITÉ
1
1
1
1
1
1
1
1
1
1
A
B
C
D
E
F
G
H
I
J
Quantité
Pièce Description
Obturateur d’air avec anneau
Buse à fluide
Pointeau à peinture
Bouton de réglage du fluide
Raccord d'air
Bouton de réglage de l’air
Recipiente de plástico
Cubierta
Clé
Bouton de réglage du jet
CONTENU DE L'EMBALLAGE
PRÉPARATION
Avant de commencer l'assemblage et d'utiliser le produit, assurez-vous de disposer de toutes les
pièces. Comparez les pièces dans l'emballage avec la liste et le tableau ci-dessus. Si des pièces
sont manquantes ou endommagées, ne tentez pas d'assembler ou d'utiliser le produit.
Communiquez avec le service à la clientèle pour obtenir des pièces de rechange.
Temps d'assemblage approximatif : 3 minutes
Accessoires requis pour l'assemblage : Clé (comprise)
Pour éviter de déformer le filetage, toutes les pièces du pistolet de pulvérisation
devraient d’abord être serrées solidement à la main. Si le serrage à la main s’avère
difficile, assurez-vous qu’il s’agit des bonnes pièces. Dévissez-les, ajustez-les et
tentez de les visser de nouveau avec plus de force.
TYPE D’ALIMENTATION
TYPE DE MÉLANGE
TYPE DE PURGE
DIAMÈTRE INTÉRIEUR DE
LARGEUR DU JET
ENTRÉE DE FLUIDE
LB/PO )
2
AIR REQUIS (PI /MIN À 40
3
PRESSION DE SERVICE MAXIMALE
GRAVITÉ
EXTERNE
PURGEUR
1,4 MM (0,055 PO)
40 LB/PO
2
3,3 EN MOYENNE/8,6 EN CONTINU
20,32 CM (8 PO) À 50 LB/PO /À 20,32 CM (8 PO)
DE LA PIÈCE
2
1/4 PO NPS (M)
1/4 PO NPS (M)
MISE EN GARDE

19
1
3
2
Godet de pistolet
à gravitation
Molette de réglage du fluide
Extracteur
d'huile
et d'eau
Manomètre
de pulvérisation
Tuyau d'air souple
Arrivée d'air
DIRECTIVES D'ASSEMBLAGE
3. Raccordez le tube d’air au connecteur d’entrée
d’air du compresseur d’air et réglez la pression
à 60 lb/po2. Tournez complètement le bouton
de réglage du débit d’air en position ouverte et
tournez le bouton de réglage du jet en position
adéquate. (Consultez la figure. 3. L’extracteur
d’huile et d’eau et le compresseur d’air ne
sont pas inclus.)
Molette de réglage de la répartition
de la pulvérisation
Molette de régulation de l'air
Molette de réglage du fluide
Ce pistolet de pulvérisation est d'une fabrication
robuste; il a été conçu pour offrir une valeur
exceptionnelle. La durée de vie et l'efficacité de ce
produit dépendent des connaissances qu'ont les
utilisateurs relativement à sa fabrication, à son
utilisation et à son entretien. (Consultez la figure 1..
Certains accessoires illustrés ne sont pas inclus.)
2. Prenez le pistolet de pulvérisation et placez-le sur
le réservoir à peinture. (Consultez la figure 2.)

20
4
La manipulation appropriée du pistolet est essentielle à l’obtention d’un fini adéquat. Le pistolet
doit être tenu à un angle de 90° de la surface couverte et il doit être déplacé parallèlement à
celle-ci. Pour plus de précision, gardez le pistolet à une distance de 15,24 cm à 30,48 cm de la
surface et des matériaux. Relâchez la gâchette avant la fin du trait pour obtenir une couverture
uniforme. Pour obtenir une couverture uniforme, tenez le pistolet à une distance de 15,24 cm à
30,48 cm, selon le matériau pulvérisé, la pression de pulvérisation et la surface couverte. Pour
un fini uniforme, faites chevaucher chaque trait sur le trait précédent, en vous assurant que la
couverture est lisse et humide. En utilisant le réglage de pression de vaporisation le plus faible,
vous réduirez les risques de surpulvérisation et vous jouirez d’une efficacité maximale.
(Consultez la fig. 5.)
5
Lors de l’utilisation normale, les ailettes de l’obturateur d’air sont à l’horizontale et l’obturateur
d’air est orienté vers le haut, tel qu’il est illustré. (Consultez la fig. 6) Ainsi, vous obtiendrez un
jet vertical en forme d’éventail et vous vous assurerez d’obtenir une couverture optimale et
uniforme (déplacez le pistolet dans un mouvement de va-et-vient parallèle à la surface).
6
4. Versez la peinture dans le réservoir à peinture
et mettez le couvercle en place. (Consultez la
fig. 4. L’extracteur d’huile et d’eau et le
compresseur d’air ne sont pas inclus.) Chargez la peinture
DIRECTIVES D'ASSEMBLAGE
INSTRUCTIONS D'UTILISATION
Commencez
le passage Tirezla
gâchette
Couche uniforme
et mouillée
Relâchez
la gâchette Findu
passage
Couche
légère Couche
épaisse
INADÉQUAT
15,25 à 30,50 cm
(6 à 12 po)
Les ailettes du
capuchon d'air
sont à l'horizontale.
DROITE
Table of contents
Languages:
Other Kobalt Paint Sprayer manuals

Kobalt
Kobalt SGY-AIR70NB User manual

Kobalt
Kobalt KSP 440-06 User manual

Kobalt
Kobalt SGY-AIR293 User manual

Kobalt
Kobalt SGY-AIR176 User manual

Kobalt
Kobalt SGY-APS41 User manual

Kobalt
Kobalt SGY-AIR160NB User manual

Kobalt
Kobalt SGY-AIR294 User manual

Kobalt
Kobalt SGY-AIR84TZ User manual

Kobalt
Kobalt SGY-AIR160TZ User manual

Kobalt
Kobalt SGY-AIR88NB User manual