Kodicom KSR-304N User manual

USER GUIDE
DIGITAL
RECORDING SYSTEM
KSR-304N
Please read this manual thoroughly before use,
and keep it handy for future reference.

KSR
KSR-
-304N Manual
304N Manual
This manual is published by KODICOM Co, Ltd and contains
information on KSR-304N Series which will enable you to use this
product properly.
If you require additional copies of this manual, please print the
manual contained in the CD provided with your purchase.

3
3KSR
KSR-
-304N
304N
Introduction
Introduction
Introduction
Thank you for purchasing this product.
This DVR is produced by the most advanced KODICOM technology and its quality
is guaranteed by strict reliability and compatibility testing.
This KSR-304N product manual provides necessary information for the correct use
of this product and also contains some useful tips.
Please read this manual thoroughly before using your KSR-304N in order to
prevent possible breakdown due to any mishandling.

4
4KSR
KSR-
-304N
304N
This manual applies to KSR-304N DVR only.
This manual describes external features of the KSR-304N DVR, part names,
correct connection methods for supported domes or Pan/Tilt receivers, control
devices, peripheral devices, and the system set up instructions. It should be noted
that some features, figures, pictures and references can only be applied to one
model either KSR-304N Series.
• KODICOM can not be held responsible if the DVR is damaged due to non-
compatible devices being used with this product. If you have any doubts please
check.
• KODICOM can not be held responsible if the DVR is damaged due to the product
being disassembled or modified by the user.
• If you wish to open the system casing to attempt to modify, repair, or upgrade the
system, it is recommended that you ask for a KODICOM engineer’s assistance by
contacting either your dealer or KODICOM head office.
• This product is qualified for both domestic and industrial use. This product is
qualified under the Radio Equipment Requirements of Korea and acquired
international certification including CE (Europe) and FCC (USA).
Notice
Notice
Notice

5
5KSR
KSR-
-304N
304N
All copyrights of this manual are reserved by KODICOM CO., Ltd.
Copyright©2006
It is prohibited to copy or republish this manual for commercial reasons.
It is prohibited to transfer this manual via online media such as, but not limited to,
the Internet. It is also prohibited to post, distribute, or translate this manual without
KODICOM’S permission.
KODICOM is not held responsible if the DVR is damaged due to the system being
handled inappropriately by a user who is not aware of how to operate this product,
or by a user who did not refer to this manual before attempting to operate the
product.
KODICOM reserves the right to change the contents of this manual without notice.
KODICOM reserves all copyrights of registered trademarks in this manual.
Copyrights
Copyrights
Copyrights

6
6KSR
KSR-
-304N
304N
Caution
Caution
Caution
Please be aware of the following precautions before installing the DVR.
• Avoid positioning the KSR-304N in any place where the unit may come into
contact with moisture, dust, or soot.
• Avoid placing in direct sunlight or near heating appliances.
• Keep the product away from electric shock or magnetic substances.
• Avoid temperature extremes (recommended operation temperature is between
0°C and ~40°C).
• Do not place any conductive material through the ventilation grills.
• Keep the system turned off before installation.
• Ensure enough space is left for cable connections.
• Place the system on a solid surface with sufficient air ventilation. Avoid any
surface that vibrates.
• Placing the system near electronic devices such as radio or TV may cause
breakdown to the product.
• Do not place any heavy object on the system.

7
7KSR
KSR-
-304N
304N
The following are warnings and cautions for the safety of the users and for
the prevention of any property damage. Please read below thoroughly.
Warning and Caution signs
If you are not aware of this
caution, you may be injured
or cause property loss.
If you are not aware of this
warning, you may be seriously
injured or be killed.
Warning Caution
Safety Warnings and Cautions
Turn off the system before installing the system.
Do not plug in several electric devices to the
same outlet.
yThis may cause heating, fire, or electric shock.
Do not place any liquid container on the system,
such as water, coffee, or beverage.
• If liquid is poured onto the system, it can cause
a system breakdown or cause fire.
Prevent power cable from being severely bent or
pressed by a heavy object.
• This may cause fire.
Clean the dust around the system on regular
basis. When cleaning the system, always use dry
cloth. Do not use wet cloth or other organic
solvents.
• This may damage the surface of the system and
can cause system breakdown or electric shock.
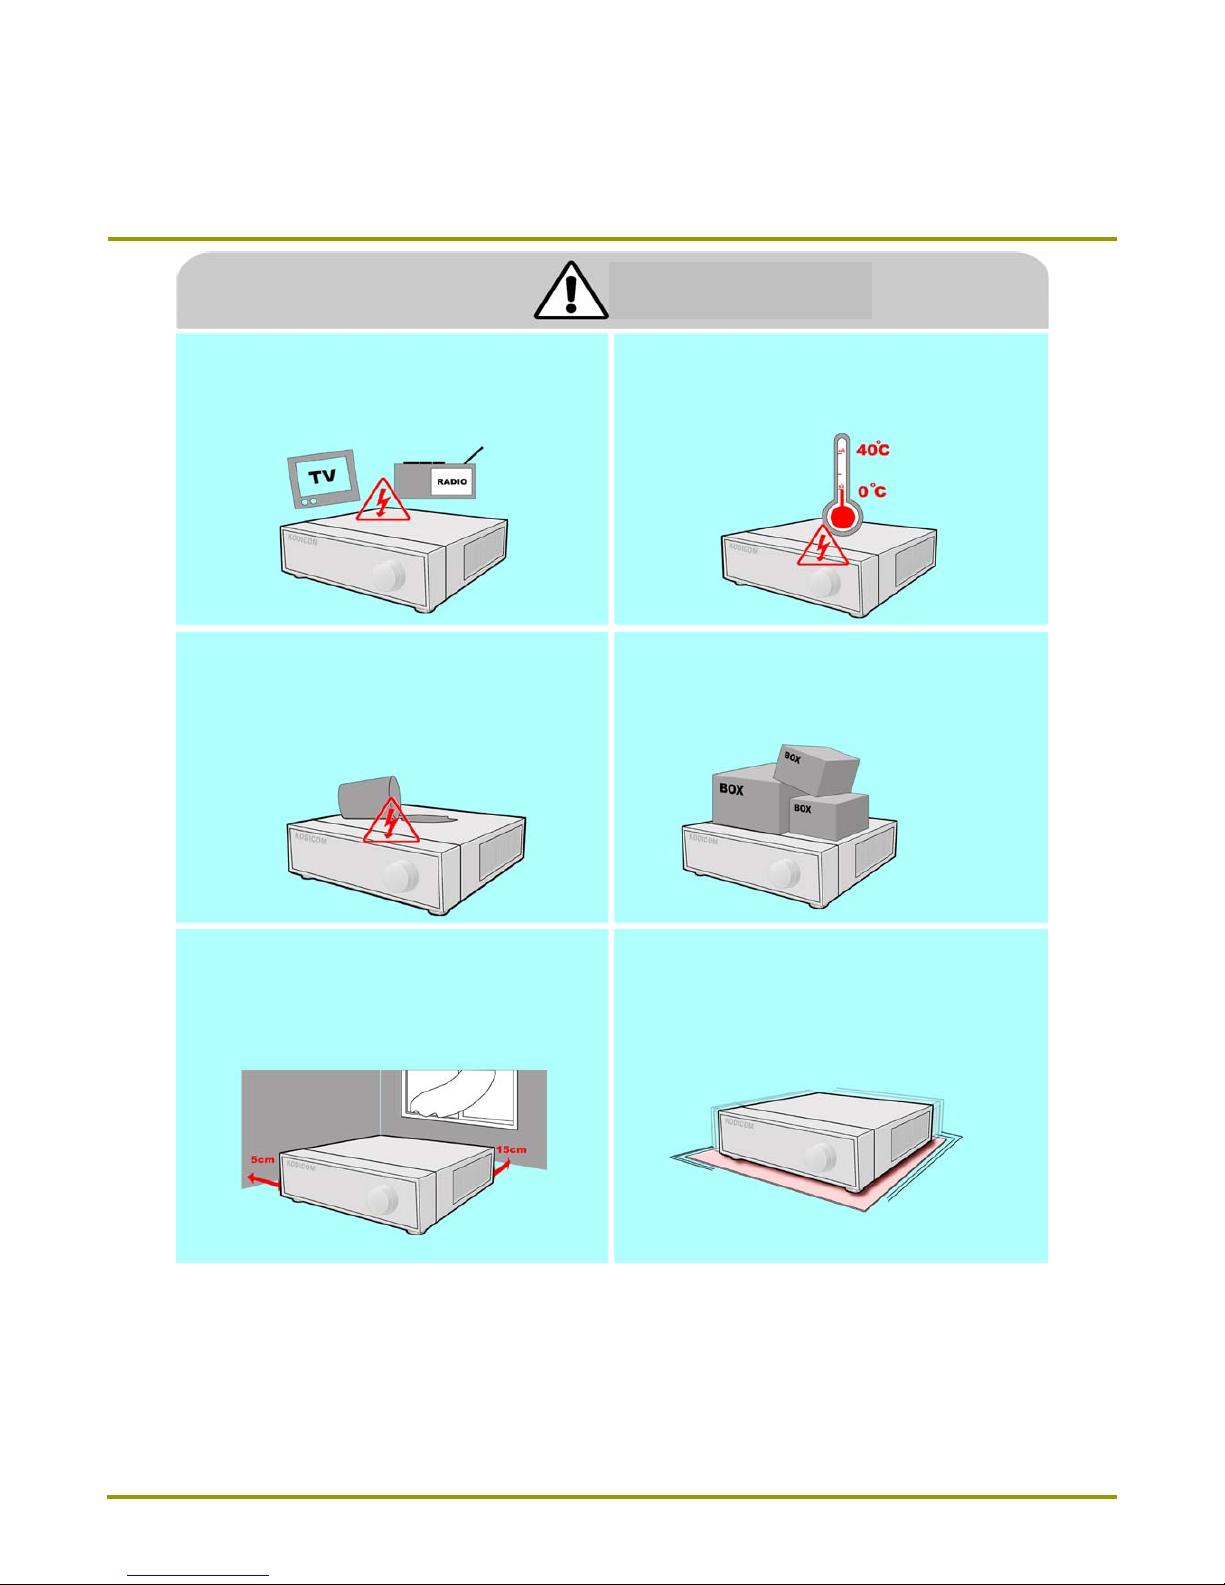
Avoid any place with moisture, dust, or soot.
• This can cause fire or electric shock. When pulling the power cable from the plug, do
so gently. Do not touch the plug with wet hands
and avoid using the plug if the holes on the outlet
are too loose.
• This may cause fire or electric shock.
Warning

8
8KSR
KSR-
-304N
304N
Do not attempt to disassemble, repair, or modify
the system on your own. It is extremely dangerous
due to high voltage running through the system.
• This may cause fire, electric shock, or serious
injuries.
Install the system in a cool place without direct
sunlight and always maintain room temperature.
Avoid candle light and heat-generating devices
such as heater. Keep the system away from
places where many people pass.
• This may cause fire.
Check for any danger signs such as moist floor,
loosened or damaged power cable, or unstable
surface. If you encounter any problems, ask for
assistance from your dealer.
• This may cause fire or electric shock.
Install the system on a plain surface with sufficient
air ventilation. Do not place the system on
elevated surface.
• This may cause system breakdown or serious
injuries.
Keep at least 15cm between the back of the
system and a wall for the cables connected into
the system. Otherwise, cables may be bent,
damaged, or cut.
• This may cause fire, electric shock, or injuries.
The power outlet must be placed on a ground,
and the voltage range must be within 10% of the
voltage rate. Do not use the same outlet with a
hair dryer, iron, refrigerator, or any heating
appliances.
• This may cause fire, heating, an electric shock.
Warning

9
9KSR
KSR-
-304N
304N
When the system’s battery is depleted, you must
change it with the same or equivalent type of
battery specified by the manufacturer. Depleted
batteries should be discarded according to
manufacturer’s instructions.
• This may cause an explosion.
If the system’s HDD has exceeded its life span,
you may not be able to recover any data stored
inside the HDD. If the video on the system screen
appears ‘damaged’ while playing a recording
stored inside the system’s HDD, it must be
replaced with a new one. Ask for an engineer’s
assistance for HDD replacement from your dealer.
• Provider is not responsible for deleted data
caused by user’s mishandling.
Warning
CALIFORINIA USA ONLY
This Perchlorate warning applies only to primary CR
(Manganese Dioxide) Lithium coin cells in the
product sold or distributed ONLY in California USA.
“Perchlorate Material - special handing may apply,
See www.dtsc.ca.gov/hazardouswaste/perchlorate.”

10
10 KSR
KSR-
-304N
304N
Do not install the system in a place with high
magnetic, electric wave, or wireless devices such
as radio or TV.
• Install the system in a place without magnetic
objects, electric frequencies, or vibration.
Install the system in a place with appropriate
moisture and temperature level.
• Avoid installing the system with high (over 40℃)
or low (under 0℃) temperature.
Prevent any substances from being inserted into
the system.
• This may cause system breakdown.
Do not place any heavy object on the system.
• This may cause system breakdown.
Install the system in a place with sufficient air
ventilation.
• Keep at least 15cm distance between the back
of the system and a wall, and at least 5cm
distance between the side of the system and a
wall.
Install the system on a stable and leveled surface..
• The system may not operate properly.
Caution

11
11 KSR
KSR-
-304N
304N
The system can be damaged from a strong impact
or vibration. Avoid throwing objects within the
vicinity of the system.
The outlet must be placed on the ground.
Avoid direct sunlight or any heating appliances. If there is strange sound or smell, unplug the
power cable immediately and contact the service
Center.
• This may cause fire or electric shock.
Ventilate the air inside the system operation room,
and tighten the system cover firmly.
• System breakdown may be cause by
inappropriate environment.
In order to maintain stable system performance,
have your system checked regularly by the
service Center.
• Provider is not held responsible for system
breakdown caused by user’s mishandling.
It is recommended to use AVR (Automatic Voltage
Regulator) for stable power supply.
It is recommended to coil the core-ferrite around
the connector of the system to avoid
electromagnetic interference.
Caution
Do not overturn the product under use.

12
12 KSR
KSR-
-304N
304N
Equipment
Equipment
Equipment
Please check to make sure the following equipment are included when
you purchased KSR-304N. If any items are missing, contact your dealer.
Power Cable
Manual (Site/Center)
CD
(Manual/Center)
DC 12V Adaptor
Audio/Video
Connection Cable

13
13 KSR
KSR-
-304N
304N
Contents
Contents
Contents
Chapter 1. Introducing your real time DVR
Chapter 2. Installation
2.1 Checking install environment……………………………………………………………………………………23
2.2 Pan/Tilt Connection………………………………………………………………………………………..………25
2.3 Connecting LAN/PSTN Communication Lines………………………………………………….……………26
2.3.1 LAN and Dedicated Line Connection…………………………..…………………………………26
2.4 External Alarm In Connection (Input)………………………………………...…………………………………27
2.5 Alarm Out Port Connection (Output)………………………………………..…………………………………28
1.1 Front Panel………………………………………..……………………………………………………………………17
1.2 Rear Panel…………………………………………………..……………………………………………………20
3.1 Screen layout ……………………………………………...………………………………………………………30
3.2 Enabling full screen and sequence mode……………………………………………………………………31
3.3 POP-UP MENU…………………………..……………………………………………………………………………32
3.4 Pan/Tilt Camera…………………………..…………………………………………………………………………34
3.4.1 Switching to Pan/Tilt control mode………………………………………….…………………………………34
3.4.2 Pan/Tilt Camera Control………………….………………………………….…………………………………35
3.4.3 Supported Pan/Tilt Camera List………………….……………………….…………………………………36
3.5 ALARM OUT – Manual Control……………………………………………………………..…………………37
3.5.1 Switching to Alarm Out mode……………………….…..………………………………………………………37
Chapter 3. Live
4.1 Accessing Setup mode……………………………………………………………………………………………39
4.2 Recording menu…………………………………………….……………………………………………………39
4.2.1 Motion detection……………………………………..…………………..…………………………………40
4.2.2 Schedule………………………………………..…………………………………………………………42
4.2.3 Quality/Resolution………………………….………………………..…………………………………43
4.2.3.1 Normal REC Setting……….………………………..…………………..…………………………………43
4.2.3.2 Alarm REC Setting…………….………………..…………………………………………………………44
4.2.3.3 Network REC Setting……………..……………..…………………………………………………………45
4.2.3.4 Alarm REC Time…………………….…………..…………………………………………………………46
4.2.4 Property………….…………..…………..…………….………………………..…………………………………47
4.3 Camera menu…………………………………………….……………………………………………………48
4.3.1 Channel Setting…………………………...………………..…………………..…………………………………48
4.3.2 Alarm In Setting………………………………………..…………………………………………………………50
4.3.3 Alarm In Out link………..…………………………….………………………..…………………………………51
4.3.4 Alarm In Camera link…………………………………..…………………………………………………………51
Chapter 4. System setup

14
14 KSR
KSR-
-304N
304N
4.4 Network…………………………………………….……………………………………………………53
4.4.1 DDNS Setup…………………………...………………..…………………..…………………………………53
4.4.2 Network Setup………………………………………..…………………………………………………………54
4.4.3 Network Port Setup…………………………………..…………………………………………………………54
4.4.4 Network Test………..…..…………….…………….………………………..…………………………………56
4.4.5 NTP Setup………………………………………..…..…………………………………………………………56
4.4.6 Emergency Notification………..…..……………….………………………..…………………………………59
4.5 System Setup…………………………………………….……………………………………………………64
4.5.1 User Management………………………………………..…………………..…………………………………64
4.5.1.1 Password Setup………………..………………………..………………………………..…………………65
4.5.1.2 User Addition Setup…………………………………….………………………………..…………….……65
4.5.1.3 Group Setup …………..............………………………..………………………………..…………………66
4.5.2 Site Setup………………………………………..……..………………………………………………………67
4.5.2.1 Regional Setting………………..……………………..………………………………..…………………67
4.5.2.2 OSD Dwell Time…………………………………….………………………………..…………….……69
4.5.2.3 Video Format …………..................……………..………………………………..…………………70
4.5.2.4 Beep Setup..…………………………………………..………………………………..…………………70
4.5.2.5 Live Audio..…………………………………………….………………………………..…………………71
4.5.3 Software Upgrade………..…..…….…………….………………………..…………………………………72
4.5.4 Schedule…………………………………..…..…………………………………………………………73
4.5.4.1 Backup Schedule………………..………………………..………………………………..…………………73
4.5.4.1.1 Adding Backup schedule…………………………….……………………………..…………….……...74
4.5.4.1.2 Deleting Backup schedule…………………………….……………………………..…………….……75
4.5.4.2 System Restart………..…..………………….………………………..…………………………………75
4.5.5 Storage………………………………..………………..…………………………………………………………76
4.5.5.1 Hard Disk Format……………………..…………….………………………………..…...………….……….76
4.6 System Info………………………………………….………..………………..………………………………………79
4.6.1 Log Info……………..……………………………………..………………………………..………………………79
4.6.2 Factory Default…………….…….…..………..…………………………………………..…………….………...82
4.6.3 System Shutdown/Restart …………....................…………………………..……………..…..………………82
5.1 Accessing Search Mode ………………………………………………………………………………………84
5.2 Search mode display………………………..………………………………………………………………84
5.3 Selecting date and time …………………………..………………………………………………………85
5.4 Selecting cameras and changing search bar line……….……………………………………………86
5.5 Audio Output………………………………………………………………………..…………………87
5.6 Playback………………………..……………………………………………………………………88
5.7 Event Search………………………..………………………………………………………………89
Chapter 5. Search

15
15 KSR
KSR-
-304N
304N
Appendix
1. KDB Viewer……………………………………………………………………….……………………………………95
1.1 How to run Viewer………………………………..……………….…………..…………………………………95
1.2 Viewer main screen……………………………………………....……………………………………………96
2. WebDVR………………..…………………………………………………………………………………………………99
3. Watermark Checker………………………………………….……………………………………………………103
4. Adding HDD………………………………………………………………………………….………………………104
4.1 Installing new HDD………………………………..………….…………..…………………………………104
4.2 Checking HDD Database………………………………………..……………………………………………106
5. Specifications…………………………………………………………………………………………………………107
6. FAQ………………………………………………………………………………………………………………109
6.1 Video Backup ……………………………………………………………………………………..……………91
6.2 Still Image Backup………………………..………………………………………………………..…………92
6.3 Media Format…………………….……………..………………………………………………..…………93
Chapter 6. Backup

1. Introducing your real
time DVR
time DVR

17
17 KSR
KSR-
-304N
304N
1
2
4
5
6
7
8
9
The explanation of system button and port is as below
[LCD Monitor]
• It does not need to connect Monitor because of All-on-one DVR.
[Camera number (Key button)]
• It is used when we select each camera in watch mode.
• It is used when we enlarge one picture which is recorded.
• We can input secret password when we change watch screen.
[Up/Down/Left/Right Key]
• It is used when we change menu in watch screen or search screen.
• We can control camera’s direction when PTZ camera was controlled.
1
2
3
[System Configuration]
3
1.1 Front panel
1.1 Front panel

18
18 KSR
KSR-
-304N
304N
[Enter button]
• It is used when we select each menu’s button in watch screen or search screen.
[Button for watching function]
• When you use play/pause mode, you can use Button for watching function
[Auto/ Separated Display change button]
• It is used when we change channels automatically in watch screen.
• It is used when we divide 4 channels automatically in watch screen.
[MENU]
• When you establish system, put MENU button. Don’t forget password input
• It is used when we go to move another mode.
[SEARCH]
• When you go to Search mode, put SEARCH button. Don’t forget password input.
• It is used when we go to move another mode.
[USB terminal]
• You can backup recorded files by USB terminal.
• System can be upgraded by USB terminal.
9
7
8
4
5
6

19
19 KSR
KSR-
-304N
304N
[Note] Removable Disk
The table below lists compatible USB disks. If you want to use other removable disk, it
should be compatible with Linux 2.4.0 or over. Other USB disk may not work properly.
It is recommended that you confirm through the manufacturer the Linux compatibility
of the removal disk you wish to purchase.
The USB disk should be formatted as FAT 32. DVR does not supports NTFS or other
file system.
When the memory of the portable USB disk is partitioned, or a password has been
set, the system will not recognize the disk. Combine partitions in the memory and
unlock the password before connecting the disk to the system.
Since some USB HDDs do not generate power at all or generate only low-voltage
power, a separate power source is required for such USB HDDs to enable the system
to recognize them.
Only when the memory of the USB HDD is formatted as the main partition will the
system recognize the USB HDD. If it is formatted as an extension partition, however,
the system will not recognize the USB HDD.
☞
☞
Ver 2.0SAROTECHFIEX 2.013
Ver 2.0IMATIONiflashEX 2.014
Ver 2.0FM SemiconMemoRive 2.0 Pro7
Ver 2.0TRANSCENDJetFlash6
Ver 1.1TRANSCEND
TRANSCEND JF A
128M
5
Ver 2.0SANDISKSANDISK8
Ver 2.0SELF I&FSELF I&C9
Ver 2.0TRUTIONTRUTION-512MB10
Ver 2.0IOCELLCELLDISK 2.011
Ver 2.0DAOSIMBADDA 2.012
Ver 2.0TWINMOSMobile Disk Z4 2.015
Ver 1.1KMITUnidrive2
Ver 1.1SHELLGINOSHELLGINO N44
3
1
No.
Ver 1.1JUNGSOFTNexdrive
Ver 1.1AL-techAnyDrive
USB VersionCompanyName
Ver 2.0IomegaFireWire HDD 20G2
3
1
No.
Ver 2.0IomegaFireWire HDD 40G
Ver 1.1NudianHD 335
USB VersionCompanyName
* Removable HDD support
* Removable Disk support

20
20 KSR
KSR-
-304N
304N
The explanation of System Backside button and port is as below.
[System Rear]
[Power Connector]
•It is a power connector to connect main electric power.
•We can input DC12V.
1
2
3
[ETHERNET]
•It is a 10/100 Ethernet terminal for remote connection.
[AUDIO/VIDEO cable connection terminal]
•It is a terminal which is connect with Audio/Video .
•After you connect Audio/Video cable, connect picture from 1 channel to 4 channel.
•Audio can store up only 1number channel.
[Warning]
•When you connect BNC terminal with picture line, please connect it in a moment of
power off in prevention for electric shock.
7
1 2 346
5
1.2 Rear panel
1.2 Rear panel
Table of contents
Other Kodicom DVR manuals
Popular DVR manuals by other brands

Inter-m
Inter-m DSR-815 Operation manual

Radio Engineering Industries
Radio Engineering Industries HD6-600 Hardware user manual

Planet Networking & Communication
Planet Networking & Communication DVR-462 user manual

Samsung
Samsung SHR-1010 user manual

SB
SB SB-MV309 instruction manual

Gator
Gator GHDVR349 user guide