Koenig DSY500 User manual

Instruction manual
Manuel d'utilisation
Bedienungsanleitung
Handboek
Manual de utilización
Manuale d'uso
DSY500
Digital food dehydrator
Déshydrateur alimentaire numérique
Digitales lebensmitteldörrgerät
Digitale voedsel droger
Deshidratador de alimentos digital
Essiccatore digitale per alimenti

ENGLISH
Dehydrates fruits,vegetables,herbs,and spices.
Makes jerky and fruits rolls.
Digital temperature control and timer for precise drying time and
temperatures
Six drying trays included for big drying capacity. Expands up to 12 trays.
Trays nest for compact storage.
INSTRUCTIONS
The following important safeguards are recommended by most portable appliance
manufactures.
IMPORTANT SAFEGUARDS
To reduce the risk of personal injury or property damage,when using electrical
appliances basic safety precautions should always be followed,including the
following:
1.Read all instructions.
2.Do not touch hot surface.Use handles or knobs.
3.To protect against electrical shock,do not immerse cord,plug,or the dehydrator base
in water or other liquid.
4.Close supervision is necessary when any appliance is used by or near children.
5.Unplug from outlet when not in use and before cleaning.Allow to cool before putting
on or taking off parts, and before cleaning the appliance.
6.Do not operate any appliance with a damaged cord or plug or in the event the
appliance malfunctions or has been damaged in any manner.
7.The use of accessory attachments not recommended by the appliance
manufacturer may cause injuries.
8.Do not let cord hand over edge of table or counter or touch hot surfaces.
9.Do not use outdoors.
10.Do not place on or near a hot gas or electric burner or in a heated oven.
11.Never use this appliance to dehydrate foods that contain alcohol or have been
marinated in alcohol.
12.Do not use appliance for other than intended use
SAVE THIS INSTRUCTION
This product is for household use only
Before First USE
Become familiar with the food dehydrator and read and follow the instructions
carefully. As received, your food dehydrator will be in the storage position.Remove the
dehydrator trays and cover from the base and wash them according to the "Care and
Cleaning" instructions on page 9.
How To Assemble and Load Trays for Dehydrating
1.Remove trays and cover from unit.
2.Turn power base over and located cord. Uncoil form base
3.Set base, right side up,on a dry,level surface.In order to function properly,the
dehydrator must have sufficient airflow; therefore,be sure the base and cover vents
are not obstructed at any time. Never place dehydrator on carpet or a towel.
4.Note that each tray has a smooth surface on one side and raised ribs on the
reverse side.Food goes on the smooth side.The raised ribs should always be facing

down.
5.Select a tray with handles,Set the tray on the counter so the words"THIS SIDE
UP",which are molded onto the handles,are facing up.Begin loading tray with a single
layer of food.
6.Place loaded tray onto power base.The first tray placed onto the power base
MUST have handles.
7.Select a tray without handles.Load food onto smooth surface and stack tray
without handles onto tray with handles.
8.Continue filling and stacking trays,alternating trays with handles and without
handles.
9.Place clear cover over stacked trays.Position cover so that the words on the
cover handles "THIS SIDE UP"are facing up.
How to use the digital control

The digital control(Fig.c) allows for easy adjustment of adjustment dehydration
temperature.In addition,it will automatically shut off the dehydrator when the selected
time has elapsed.
To Adjust Temperature
1.Press the TIME/TEMP button and the temperature in the display window will begin
to flash(if the time flashes,press the TIME/TEMP button again.)
2.Press the + or -buttons to select the desired temperature. To change the
temperature rapidly,hold down the + or - buttons. The temperature range for this
dehydrator is 90 to 165 F(32-70C).
Note:To convert from Fahrenherit to Celsius, hold down the TIME/TEMP button.
To set Timer(30 minutes to 48 hours)
1.Press the TIME/TEMP button and 00:00 will begin to flash(if the temperature
flashes,press the TIME/TEMP button again).
Note:If----appears,the unit is in the count up model. Hold down the START/STOP
button to reset the 00:00.
2.Press the + or -button until the desired time is displayed. If you hold down the + or-
buttons,the time will change rapidly. To reset the time to 00:00,hold down the
START/STOP button.
3.Once you have the desired time and temperature set,press the START/STOP button
to turn the dehydrator on. At any time,you can adjust the time or temperature by
using the TIME/TEMP,+ ,and - buttons. You can stop the dehydrator at any time by
pressing the START/STOP button.
4.The dehydrator will automatically shut off after the set time has expired,and the
green indicator light will flash.When this occurs,check the food for dryness.If the
dehydration is complete,remove food from dehydrator. If additional dry time is needed,
follow the preceding step1 through 3 to continue dehydrating.
To use count-up timer(up to 48 hours)
1.If START/STOP is pressed with 00:00 showing the timer display,the dehydrator will
turn on and the unit will begin counting up in seconds for the first minute. After 59
seconds,the time is displayed in hours and minutes(HH:MM).
2.At any time,the temperature can be adjusted using the + or - buttons. Note:the time
is not adjustable when the timer is counting up..
3.At any time, you can stop the dehydrator by pressing the START/STOP button . To
reset the time to 00:00,hold down the START/STOP button.
4.The unit will automatically shut down after 48 hours.
How to Use the Nonstick Mesh Screens
The flexible mesh screen fit into the dehydrator trays to keep foods that get very small

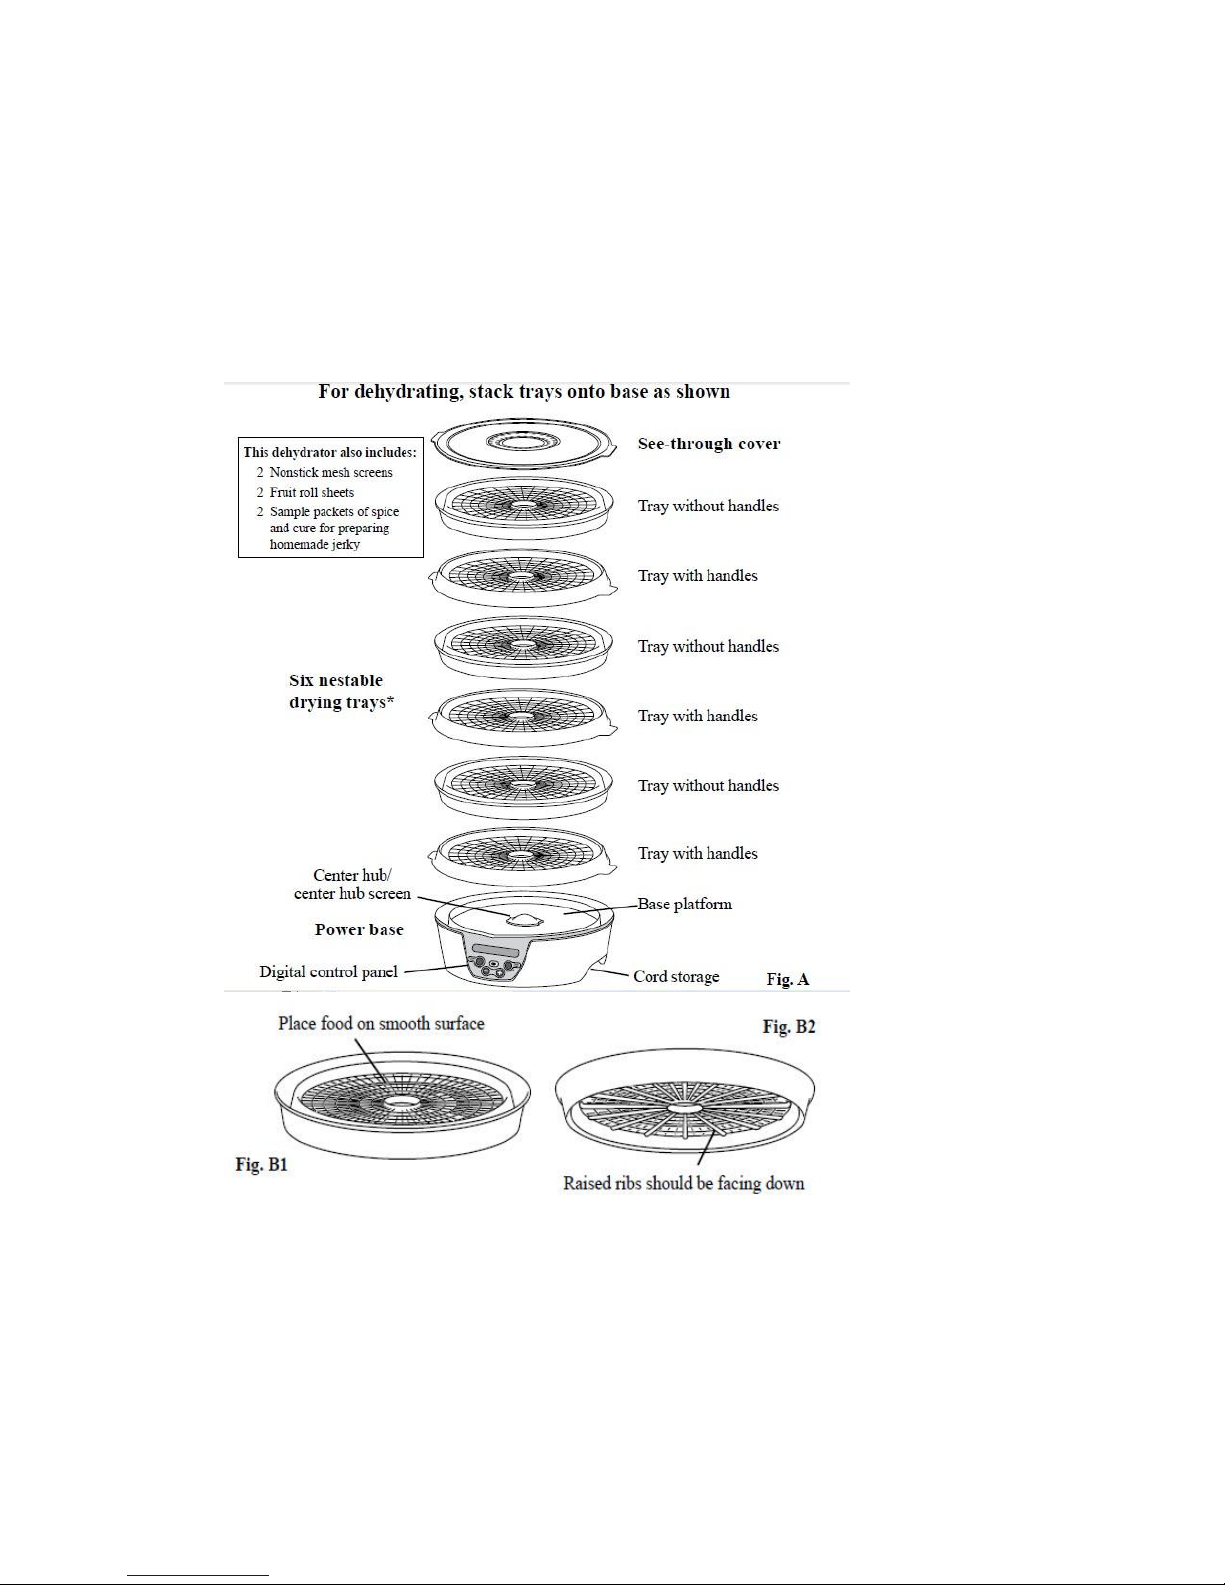
when dried,such as herbs,berries,and carrots,from falling through the tray grates. The
screens may also be used when drying foods that stick the grates,such as bananas
and tomatoes. Position the mesh screen on the dehydrator tray. Then place the food
you want to dry on the mesh screen. Once the food is dehydrated, lift the mesh screen
out of the tray,using the cutouts on the side of screen. Remove food. Bending the
screen is helpful for removing foods that have a tendency to stick.
How to Use the Fuit Roll Sheets
Afruit roll sheet should be used when making fruit rolls and strips from fresh,frozen, or
canned fruit. Refer to page 5 for instructions on making fruit rolls.
General Dehydrating Information
Safety precaution:Wash hands thoroughly prior to preparing food for
dehydrating.Likewise, thoroughly clean all utensils, cutting boards,and counters that
be used for preparing food. Wash food before preparing them for dehydrating.
.When selecting food for drying, choose those that are at peak eating quality. Avoid
overripe* or immature fruits and vegetables. Remove any parts of the food that are
bruised or blemished.
.For even drying, cut food into uniform size,shapes, and thickness.
Drying time are highly variable depending on the type and amount of
food,thickness,evenness of food pieces,humidity,air temperature,personal preference,
and even the age of the plant at the time of harvesting. That is why throughout the
book you will notice there is a range of average drying times. In some cases you may
find you may need to, or prefer to, dry you foods for shorter or longer periods than
those listed. For best results, begin checking your food at the beginning of the range
listed in the instructions. You should then gauge how often you should recheck the
food based on how the drying is progressing. With some foods,such as herbs, that
may mean every 10 minutes, and with other foods, such as fruits,that may mean
every 1-2 hours.
.Dehydration prevents microbial growth, however,chemical reaction caused by
enzymes in fruits and vegetables can occur unless the product is pretreated before
drying.. Pretreatment will prevent or minimize undesirable color and texture changes
during drying and storage. See specific sections for recommend pretreatment.
.Place food in a single layer on the trays. Do not allow food to touch or overlap.
.When drying the strong-smelling foods,such as onions and garlic, be aware that there
will be a strong odor during the drying process. That odor may linger after drying has
been complete.
. Individual pieces of food may not all dry at the same time. Foods that are
appropriately dried should be removed before those that still require additional drying.
Always check all of the trays for food that are appropriately dried.
.If one tray of food is finished before the others, remove the dried food and return the
empty tray to the unit rather than rearranging the trays.
.Do not add fresh fruits and vegetables to a partially dried load. This will add moisture
and increase the drying time.
.Allow for continuous drying. Do not unplug the dehydrator in the middle of the drying
circle and resume drying at a later time as this may result in poor quality and /or
unsafe food.
Packaing and Storage
Dried foods need to be properly packaged to prevent reabsorption of moisture and
microbial deterioration. Pack food in clean,dry, airtight containers.Glass jars or freezer

containers with tight-fitting lids are good for storage. Resealable plastic freezer bags
are also acceptable.
.Store package dried food in a dry,cool location away from light. Higher temperatures
and exposure to light will shorten the storage time and result in loss of quality and
nutrients.
.Fruit leather/rolls should keep for up to 1 month at room temperature. Vegetables
have about half the storage life as fruit. If food is to be kept longer,then store in a
freezer.
.Package vegetables and fruits in separate storage containers to avoid flavor transfer.
How to Dehydrates Fruit and Fruit Rolls.
Dried fruits and fruit rolls(or leathers) are nutritious and portable snacks. Drying fruit
intensifies the natural sweetness of the fruit because the moisture is removed.
Fruit
Selection and preparation.
Select fruits that are at the peak of the ripeness.Wash fruits to remove dirt and debris.
There are many options when it comes to drying fruit and personal preference shoud
be your guide. Fruits can be sliced,halved, or if small left whole will require the most
drying time.
Slice fruit uniformly and in piece about 1/4 inch thick. Fruits that are left whole ,such
as blueberries,cranberries and grapes, should be dipped in boiling water for 30-60
seconds and then plunged in ice water to crack the skin. This procedure will reduce
the drying time.
Pretreatment
Many fruits will darked quickly once they are peeled and/or cut and will continue to
darken even after the fruit is dried. This is due to the exposure of the natural enzymes
in some fruits to air. There are several pretreatment options to prevent this
discoloration Pretreatment is not necessary but is recommends to prevent
discoloration .Some people may detect a slight flavor change with pretreated fruit.
See the Fruit Drying Guide on page 6 to determine which fruit will benefit from the
pretreatment. You may want to dry the different options and see which you prefer.
Ascorbic acid(Vitamin C)-Ascorbic acid, available in tablet or powdered form, is
available at drugstores. Mix 2 1/2 tablespoons of powder ascorbic acid in 1 quart cold
water. Vitamin C tablet(six 500mg.tablets equal 1 teaspoons ascorbic acid) should be
crushed before mixing with water. Place cut fruit,such as bananas,peaches,apples,or
pears, in mixture and soak for 10 minutes. Remove fruit and drain well before placing
on drying trays.
Ascorbic acid mixture-These commercially available products,such as Mrs. Wages
Fresh Fruit Preserver ,are a combination of ascorbic acid and sugar and are
commonly used for fresh fruits and for canning and freezing Follow the manufacturers’
directions for use of these mixture.
Lemon juice-Mix equal parts lemon juice and cold water. Place cut fruit in solution
and soak for 10 minutes. Remove fruit and drain well before placing on drying trays.
Place piece of fruit on dehydrator trays in a single layer, close together but not
touching or overlapping.Refer to the Fruit Drying Guide on page 6 for suggested
preparation,and the drying times. Dry fruit at 135F or 57C.
Determining Dryness

Refer to the Fruit Drying Guide on page 6 and begin checking the fruit at the
beginning of the average drying time range. Remove a few pieces of fruit from each
dehydrator tray and allow to cool to room temperature. Fruits are acceptably dry when
they are soft and pliable, but not sticky. Fruit folded in half should not stick together.
Apple and banana slices can be dried until crisp, if desired. If fruits seem to have a lot
of moisture remaining, recheck every 1 to 2 hours. If fruits appear to be almost done,
check again in 30 minutes. Always check fruits from each tray.
Conditioning
After drying, allow fruit to cool for 30 minutes to 1 hour before packaging. Dried fruits
may have uneven amounts of moisture remaining because of differences in the size of
various pieces. Although fruit appears to be dry, there may still be moisture remaining
in some of the individual pieces. Conditioning is a procedure that can be used to more
evenly distribute moisture, which will reduce the chances of mold growth. It allows you
to determine if you’ve removed enough moisture before you put it into storage. To
condition, place the pieces of fruit loosely in a clean plastic or glass container and seal
and let stand for 1 week. This will allow drier pieces of fruit to absorb excess moisture
that may be present in other pieces. Daily shake the jar to separate the pieces and
observe for condemnation. If condensation develops, remove the fruit and dehydrator
for additional time. After conditioning, follow “Packaging and Storage” information on
page 4.
Uses
Dried fruits make great snacks. They can also be added to trail mixes, cereals,
muffins,breads, and other baked products. Dried fruit can be used as is or softened
prior to use. To soften dried fruit, submerge in boiling water and soak for 5 minutes or
place fruit in a steaming.
Fruit Rolls(Leather)
Fruit rolls(or fruit leather) are made by drying a thin layer of pureed fruit on a flat
surface. Once dried, the fruit layer is pulled from the surface and rolled. The term
leather derives from the leather-like texture of the pureed fruit once it is dried.
Almost any fruit or combination of fruit can be pureed and dried for fruit leather. The
quality of the fruit leather depends on whether the fruit has a low or high amount of the
naturally occurring starch called pectin. Fruits that have a high amount of pectin will
make leathers that bond together in a solid sheet and easily peel, while fruits that
have little pectin will flake and crack rather than peel. When making leather with fruits
low in pectin, add another fruit that is high in pectin to improve the texture of the
leather. Fruits low in pectin include cherries, citrus fruits, raspberries, and strawberries.
When using a low pectin fruit with a high with a high pectin fruit, use equal parts of
each to produce the best results.
Preparation
Use Fruit Roll Sheet to prepare fruit rolls. Apply a thin layer of vegetable oil or no-stick
cooking spray to the fruit roll sheet.
Caution: If using cooking spray, be sure to spray away from the dehydrator base.
Use about 1½ cups of pureed fruit roll sheet.
Select ripe or slightly overripe fruit and remove any bruised areas. Wash fruit sand
remove peel, seeds, and stems. Cut fruit into chunks and using a food processor or

blender, puree until smooth(applesauce consistency). To get the pureeing process
started, you may need to add approximately 1 tablespoon of fruit juice or water.
If desired, fruit can be pretreated to preserve its natural color. Add 1½ teaspoons of
lemon juice to each 1½ cups pureed fruit. See the Fruit Drying Guide on page 6 to
determine which fruits will benefit from pretreatment.
The natural sweetness of fruit is intensified with drying. However, if preference is for a
sweeter fruit roll, you can add honey, maple syrup, corn syrup, or sugar to the pureed
fruit if desired. Try different amounts of sweeteners, staring with 1 tablespoon for each
1½ cups of fruit puree, to find your preference. Fruit with sweeteners added will take
longer to dry than fruit that is not sweetened.Canned fruit can also be used to easily
make fruit leather. Drain juice from fruit, saving juice for later use. Place fruit in food
processor or blender and puree until smooth. Applesauce can be used directly from
the container.
For frozen fruit, thaw and puree until smooth.
Pour pureed fruit on lightly oiled fruit roll sheet and spread with a spatula to form a
uniform layer about ¼ inch thick. Place fruit roll sheet on dehydrator tray, set
temperature to 135℉or 57 ℃, and begin drying. Average drying time for all fruit rolls is
4 to 7 hours.
Determining Dryness
Acceptably dried fruit leather will be slightly tacky to the touch, but will not indent when
touched in the center. Begin checking the fruit roll after 4 hours of drying. If drying
more than one fruit roll, be sure to check all of the trays. If additional drying time is
needed, recheck every 30 minutes.
While slightly warn, starting from the outer edge, carefully peel the fruit roll from the
sheet. Loosely roll in plastic wrap or waxed paper and follow“packaging and storage”
information on page 4. For immediate enjoyment, cut in strips or roll and cut into
serving pieces.
Note:Remove fruit rolls sheets prior to cutting them.
FRUIT DRYING GUIDE
Dry fruit at 135℉or 57 ℃
Drying times are highly variable depending on the type and amount of food, thickness,
evenness of food pieces, humidity, air temperature personal preference, and even the
age of the plant at the time of harvesting.
Fruit
Preparation
Pretreatment
Average
Drying
Time(hours
)
Apples
Peel,if desired, core, and cut in rings
or slices, ⅛ to ¼” thick.
Ascorbic acid,
ascorbic, acid
mixture or lemon
juice
4-9

Apricots
Cut in half, remove pit, and cut in
quarters or ¼” thick slices.
(see apples)
8-16
Bananas
Peel and cut into ¼” thick slices.
(see apples)
6-8
Blueberri
es
Remove stems Dip in boiling water
for 30 to 60 seconds and then
plunge in ice water to crack the skin.
None
9-17
Cherries
Remove stems and pit. Cut in half,
chop, or leave whole.
None
15-23
Cranberri
es
Remove stems. Dip in boiling water
for 30 to 60 seconds and then
plunge in ice water to crack the skin.
None
10-18
Figs
Remove stems. Small figs can be
left whole. Otherwise, cut in half. Dip
whole figs in boiling water for 30 to
60 seconds and then plunge in ice
water to crack the skin.
None
8-15
Grapes
Leave whole or cut in half.Dip whole
grapes in in boiling water for 30 to 60
seconds and then plunge in ice
water to crack the skin.
None
13-21
Kiwi
Peel and cut into ¼” to ⅜thick slices.
None
4-6
Nectarine
s
Cut in half and remove pit. MAY also
quarter or slice ¼”thick
See apples
6-10(Slices
)
36-48(halv
es or
quarters)
Peaches
Peel if desired. Cut in half and
remove pit.May also quarter or slice
¼” thick.
See apples
6-10(Slices
)
36-48(halv
es or
quarters)
Pears
Peel, core, and slice ¼” thick
See apples
7-13
Pineapple
Peel, core, and slice ¼” thick
None
5-12
Plums/
Prunes
Halve or quarter and remove pit.
None
8-15
Rhubarb
Trim and discard leaves. Cut stalk
into ¼” slices
None
6-9
Strawberr
ies
Remove the leafy crown. Halve or
slice ¼” thick
None
6-12
Drying Vegetables
Dry vegetables at 125℉or 50 ℃. Vegetables dry much faster than fruits. At the end of
the drying period moisture loss is rapid. As a result, vegetables need to be checked
often towards the ends of the end of the drying time to prevent over-drying. Food turns
brown when it is over-dried. When drying smaller vegetables, such as peas or carrots,
it is recommended that you place them on a mesh screen on the tray. A mesh screen
will help prevent smaller foods from falling through the grates in the tray as they
dehydrate. See information on page 3, “How to Use the Nonstick Mesh Screens.”

Selection and Preparation
Wash vegetables to remove dirt and debris. Trim vegetables to remove fibrous or
woody portions or bruised and decayed areas, peel, and slice using the preparation
information found on the Vegetable Drying Guide on page 7. Slice or cut vegetable
into pieces that are uniform in size. See page 7 for pretreatment information about
specific vegetables.
Pretreatment
The process of blanching involves subjecting vegetables to a high enough
temperature to deactivate the enzymes. Blanching is necessary to stop the naturally
occurring enzymes from causing loss of color and flavor during drying and storage.
Blanching also relaxes the tissue walls so moisture can more readily escape during
drying and enter during dehydrating; Blanching can be done in water or steam. Water
blanching causes a greater loss of nutrients but is faster than steam blanching and
achieves a more even heat penetration.
Steam Blanching- Fill a deep pot with water and bring to a boil. Place vegetables
loosely in a basket or colander that will allow steam to freely circulate around the
vegetables. Do not fill basket or colander with more than a 2 ½ inch layer of
vegetables. Position the basket or colander in the pot, making sure it does not contact
the boiling water. Cover with a close fitting lid. Steam for the time indicated in the
Vegetable Drying Guide on page 7.
Water blanching –Fill a large pot ⅔ full with water. Cover and bring to a boil. Place
vegetables loosely in a basket or colander and submerge in the boiling water. Cover
and blanch for the time indicated in the Vegetable Drying Guide. Water should return
to a boil in less than 1 minute. If not, too many vegetables were added to the basket;
reduce the amount of vegetables added for the next batch.
Water blanch for the time indicated in the Vegetable Drying Guide below.
Immediately after steam or water blanching, dip the vegetables in cold water to
quickly cool them. Drain the vegetables and arrange them in a single layer on the
dehydrator trays. Refer to the Vegetable Drying Guide below for drying times.
Determining Dryness
Refer to the Vegetable Drying Guide below and begin checking the vegetables at the
beginning of the average drying time range.
Remove a few pieces of vegetables from each dehydrator tray and allow to cool to
room temperature. Test for dryness by breaking the pieces in half. Most vegetables
will be crisp when appropriately dried and will break easily. If vegetables do not break
easily, additional drying time is needed. If vegetables seem to have a lot of moisture
remaining, recheck every 1 to 2 hours. If vegetables appear to be almost done, check
again in 30 minutes. Always check vegetables from each tray.
Follow “Packaging and Storage” information on page 4.
VEGETABLE DRYING GUIDE
Dry vegetables at 125°F or 52°C.
Drying times are highly variable depending on the type and amount of food, thickness,
evenness of food pieces, humidity, air temperature, personal preference, and even
the age of the plant at the time of harvesting.
Vegetable
Preparation
Pretreatment water
blanching or steam
blanching
Average Drying Time
Asparagus
Cut into 1˝ pieces.
water 3½-4½ minutes
6-8 hours

steam 4-5 minutes
Beans,
green/wax
Remove ends and strings. Cut into
1˝ pieces.
water 2 minutes steam
2-2½ minutes
6-11 hours
Beets
Cook until tender. Cool and peel.
Cut into shoestring strips ⅛˝ thick.
None –Already cooked.
4-7 hours
Broccoli
Cut into serving pieces.
water 2 minutes steam
3-3½ minutes
4-7 hours
Carrots
Peel and cut off ends. Cut into ⅛˝
to ¼˝ slices.
water 3 minutes steam
3-3½ minutes
4-10 hours
Cauliflower
Cut into serving pieces.
water 3-4 minutes steam
4-5 minutes
5-8 hours
Celery
Trim ends. Cut into ¼˝ slices.
water 2 minutes
steam 2 minutes
2-4 hours
Corn, cut
Husk and remove silk. Blanch and
cut corn from cob.
water 1½ minutes s
team 2-2½ minutes
6-10 hours
Mushrooms
Wash and slice ⅜˝ thick.
None
2-6 hours
Onions
Remove outer skin. Cut off top
and root ends. Cut into ¼˝ slices.
None
3-7 hours
Peas
Shell.
water 2 minutes
steam 3 minutes
5-9 hours
Peppers and
pimientos
Remove stem, core, and inner
partitions. Cut into ¼˝ strips.
None
5-10 hours
Potatoes
Peel and cut into ¼˝ slices.
water 5-6 minutes
steam 6-8 minutes
4-8 hours
Summer
squash and
zucchini
Trim ends. Cut into ¼˝ slices.
water 1½ minutes
steam 2½-3 minutes
4-6 hours
Tomatoes
Peel, if desired. Cut into sections
¾˝ wide.
None
6-11 hours
Uses
Dried vegetables have a unique flavor and texture and are best used as ingredients for soups, stews,
casseroles, and sauces rather than stand-alone side dishes. When using in soups, dried vegetables
can be added without soaking. Dried vegetables used for other purposes need to be soaked before
cooking. To soak, start with 1½ to 2 cups of boiling water for every 1 cup of dried vegetables. Soak for
1 to 2 hours or until vegetables have returned to nearly the same size they were before dehydrating.
Additional water should be added as needed during the soaking process. After soaking, simmer the
vegetables in the soaking water until tender, allowing excess water to evaporate.
Drying Herbs
Drying fresh herbs allows your to have a ready supply of economical herbs that are
available to use all trough the year. To retain the best flavor of your herbs, it is
recommended that you dry them at the lowest temperature setting, 95°F or 35 °C.
Selection and Preparation
Pick herbs for drying just before the flowers first open. These herbs will be most
flavorful. The best time to pick herbs is early morning just after the dew has
evaporated. Rinse leeaves and stems in cool water to remove any dust or insects and
then gently shake to remove excess water. Remove dead and bruised leaves or
stems. Large leafed herbs, such as basil, sage and mint, should be removed from
their stems for faster drying. Smaller leafed herbs can be left on their stem and
removed after drying. Placing the herbs on a mesh screen will help prevent them from

falling through the grates in the tray as they dehydrate.
Determining Dryness
Herbs are acceptably dry when they are crispy and crumble easily. Refer to the Herb
Drying Guide below and begin checking the herbs at the begining of the average
drying time range. Remove a few herbs from each dehydrator tray and allow to cool to
room temperature. If the herbs do not crumble easily, recheck every hour.
Packaging and storage
Dried leaves are best stored whole and then crumbled when needed. Follow
“packaging and storage” information on page 4.
Uses
Most dried herbs are 3 to 4 times stronger than the fresh herbs, therefore when using
dried herbs in a recipe that calls for fresh herbs, use 1/4 to 1/3 of the amount called for
in the recipe.
HERB DRYING CUIDE
Dry herbs at 95°F or 35 °C.
Herb
Average drying
time
Herb
Average drying
time
Basil leaves
10-15 hours
Mint leaves
9-14 hours
Bay leaves
5-7 hours
Oregano leaves
9-12 hours
Chives
9-15 hours
Parsley leaves
6-8 hours
Cilantro leaves
6-8 hours
Rosemary leaves
8-12 hours
Dill leaves
3-5 hours
Sage leaves
12-16 hours
Fennel
3-5 hours
Tarragon leaves
5-7 hours
marjoram
9-12 hours
Thyme leaves
4-6 hours
Break veins to speed drying
Drying Jerky
Homemade jerky is a flavorful dried meat product that is especially popular with
outdoor sports enthusiasts because it is light and easy to transport. Jerky can be
made from almost any lean meat, including beef, pork, or venison.
Whenever handling meat, basic food safety precautions need to be observed.
. Wash hands thoroughly before and after handling raw meat.
. Keep meat refrigerated or frozen unitl ready to use.
. Raw meat and its juice should be kept away from other foods. Wash cutting boards,
utensils, counters, etc. With hot, soapy water after contact with raw meat. After
washing, sanitize with a solution of 1 tablespoon chlorine bleach per gallon of water.
Allow surface to air dry.
. Marinate meat under refrigeration. Discard marinade after meat is removed.
.Keep raw meat and dried jerky separate.
Preparing Jerky from Meat strips
Select lean meats such as beef and venison sirloin, rump, and round cuts and pork
loin and ham cuts. Trim meat of visible fat, connective tissue, and gristle. Freeze meat
until firm, but not solid, to make slicing easier. Slice meat into strips that are 1/4 inch
thick, 1 inch wide, and 5 to 6 inches long. Slicer meat across the grain for a more
tender jerky or with the grain for a chewier jerky.
Place marinade and meat strips in a resealable plastic storage bag. Seal bag and
shake to thoroughly coat the meat strips. Refrigerate for 8 to 12 hours. Turn bag often

to evenly coat the meat strips.
Refer to the note on page & about cooking the meat before or after dehydrating. For a
more desirable texture, cook meat after dehydration.
Meat that is precooked prior to dehydrating will have shorter drying times; however,
the end product will have a dry, crumbly texture.
If cooking the meat before dehydrating is preferred, follow the instructions below:
Cooking meat before dehydrating - After marinating meat strips, place meat
strips and liquid marinade into a shallow pan. If no liquid remains, add enough water
to cover meat strips. Bring liquid to a boil for 5 minutes.
Remove meat strips from marinade, drain, and then position strips on dehydrator
trays. Position strips on dehydrator trays close together, but not overlapping. Dry jerky
at 160℉or 71℃for 4 to 8 hours. See “Determining Dryness” information below.
If you did not cook the meat prior to dehydrating, cook it after, following the
instructions below:
Cooking meat after dehydrating - Preheat oven until the internal temperature is
275℉. (For an accurate temperature reading, check with an oven thermometer.)
Remove jerky strips from dehydrator trays and place on a baking sheet close together,
but not touching. Heat jerky in preheated oven for 10 minutes. Remove jerky from
baking sheet and cool to room temperature.
Packaging and Storage
After cooling, pat jerky with paper toweling to remove any fat droplets which may form
on the jerky. Following “Packaging and Storage” information on page 4. Jerky can be
stored 1 to 2 months at room temperature. However, to maintain the best flavor and
quality, store in the refrigerator or freezer.
Jerky Marinade
1½ -2 pounds of lean meat
¼ cup soy sauce
1 tablespoon Worcestershire sauce
1 teaspoon hickory smoke-flavored salt
½ teaspoon onion powder
¼ teaspoon garlic powder

¼ teaspoon black pepper
Combine all ingredients in a small bowl and follow “Preparing Jerky from Meat Strips”
instructions beginning on page 8.
Care and Cleaning
1. Remove plug from wall outlet before cleaning.
2. Wash the dehydrator trays and cover in warm water and a mild detergent or wash
in a dishwasher.
The fruit roll trays and the mesh screens should be washed in warm, sudsy water. Do
NOT wash these parts in a dishwasher.
If necessary, a soft brush may be used to loosen dried on food particles. Do not use
steel wool scouring pads or abrasive cleaners on any of the dehydrator parts.
3. Wipe the dehydrator base with a soft, damp cloth. DO NOT IMMERSE THE
DEHYDRATOR BASE IN WATER OR OTHER LIQUID.
The screen which covers the center hub on the dehydrator platform lifts off for
cleaning, if needed. Wash in warm water, dry thoroughly, reposition over hub, and
snap in place.
Storing the Dehydrator
Before stacking the trays onto the base for storage, turn the base upside down and
wrap the cord around the center hub, securing the cord under the clips.
For compact storage, stack the trays onto the base so all of the trays with handles are
upside down (raised ribs facing up) and all of the trays without handles are smooth
side up. Once all of the trays are stacked onto the base, turn the cover upside down
and place on top of the trays.
ENVIRONMENT
CAUTION :
Do not dispose of this product as it has with other household products. There is a
separation of this waste product into communities, you will need to inform your
local authorities about the places where you can return this product. In fact,
electrical and electronic products contain hazardous substances that have harmful
effects on the environment or human health and should be recycled. The symbol
here indicates that electrical and electronic equipment should be chosen carefully,
a wheeled waste container is marked with a cross.
Manufactured and imported :Adeva SAS 8 rue Marc Seguin 77290 Mitry-Mory FRANCE
www.hkoenig.com - contact@hkoenig.com - Tel 01 64 67 00 01

FRANCAIS
Déshydrate fruits, légumes, herbes et épices.
Fait la viande séchée et les rouleaux de fruits.
Contrôle numérique de la température et de la minuterie pour des temps et des
températures de séchage précis.
Six plateaux de séchage inclus pour une grande capacité de séchage. S´étend
jusqu'à 12 plateaux.
Est équipé d´un plateau de rangement compact.
INSTRUCTIONS
Les instructions suivantes sont importantes et recommandées par la plupart des
fabricants d'appareils portables.
INSTRUCTIONS DE SÉCURITÉ
Pour réduire le risque de blessures ou de dommages, les précautions de sécurité de
base doivent toujours être respectées lors de l'utilisation des appareils électriques, en
plus des instructions données ci dessous:
1. Lisez toutes les instructions.
2. Ne pas toucher les surfaces chaudes. Utiliser les poignées ou les boutons
pour manipuler l´appareil.
3. Pour éviter les chocs électriques, ne pas immerger le cordon, la fiche ou la base
du déshydrateur dans l'eau ou tout autre liquide.
4. Une supervision rapprochée est nécessaire lorsque tout appareil est utilisé par
ou à proximité des enfants.
5. Débranchez la prise lorsque l´appareil n'est pas utilisé et avant le nettoyage.
Laissez le déshydrateur refroidir avant de mettre ou d'enlever des pièces ou avant de
le nettoyer.
6. Ne pas utiliser l´appareil en cas de dysfonctionnement ou dommage.
7. L'utilisation d'accessoires non recommandés par le fabricant de l'appareil peut
causer des blessures.
8. Ne laissez pas le cordon d'alimentation pendre au bord de la table ou du plan de
travail. Le cordon d´alimentation ne dois pas entrer en contact avec des surfaces
chaudes ou humides.
9. Ne pas utiliser à l'extérieur.
10. Ne pas placer sur ou près d'un brûleur à gaz ou électrique, ni dans un four
chauffé.
11. Ne jamais utiliser cet appareil pour déshydrater les aliments qui contiennent de
l'alcool ou qui ont été marinés dans de l'alcool.
12. N'utiliser cet appareil que pour l'usage prévu.
CONSERVER CE MODE D’EMPLOI
Ce produit est prévu pour un usage exclusivement domestique.
Avant la première utilisation:
Familiarisez-vous avec le déshydrateur alimentaire et lisez attentivement ce manuel
d´instructions. Au déballage, votre déshydrateur alimentaire sera dans la position de
stockage. Retirez les plateaux du déshydrateur et le couvercle de la base afin de les
laver selon les instructions "Entretien et nettoyage" que vous trouverez sur la page
15.
Comment assembler et préparer les plateaux pour la déshydratation
1. Retirer les plateaux et le couvercle de l'unité.
2. Retourner la base d'alimentation et localiser le cordon pour le dérouler de la
base.
3. Fixer la base, face vers le haut, sur une surface sèche. Pour fonctionner
correctement, le déshydrateur doit avoir suffisamment d'air; par conséquent,
assurez-vous que la base et le couvercle d'aération ne sont pas obstruées. Ne
jamais placer le déshydrateur sur un tapis ou une serviette.
4. Notez que chaque plateau présente une face lisse d'un côté et une face

nervurée de l´autre. Les aliments doivent être placés sur le côté lisse. La face
nervurée doit toujours être orientée vers le bas.
5. Saisissez un des plateaux équipés poignées, Placez-le sur le plan de travail de
sorte que les mots "THIS SIDE UP”, qui sont moulés sur les poignées, soient vers le
haut. Disposez une seule couche de nourriture sur le plateau.
6. Placez le plateau rempli sur la base d'alimentation. Le premier plateau placé
sur la base d'alimentation doit avoir des poignées.
7. Sélectionnez un plateau sans poignées. Chargez la nourriture sur la surface
lisse et empilez le plateau sans poignées sur le plateau avec poignées.
8. Continuer à remplir et empiler les plateaux, en alternant plateaux avec et sans
poignées.
9. Placez le couvercle transparent sur les plateaux empilés de sorte que les mots
"THIS SIDE UP”, qui sont moulés sur le couvercle, soient vers le haut.
Comment utiliser la commande numérique

La commande numérique (Fig.c) permet un ajustement facile du réglage de la
température de déshydratation. En outre, le déshydrateur s'éteindra
automatiquement lorsque le délai est écoulé.
Pour ajuster la température
1. Appuyez sur le bouton TIME/TEMP et la température se met à clignoter dans la
fenêtre d’affichage (si l'heure clignote, appuyez de nouveau sur la touche TIME /
TEMP.)
2. Appuyez sur le bouton + ou - pour sélectionner la température désirée. Pour
changer rapidement la température, maintenez enfoncé le bouton + ou -. La
température du déshydrateur peut être réglée entre 32° C et 70° C soit 90° F et
165° F.
Remarque:Pour passer de Fahrenheit à Celsius, maintenez enfoncé le bouton TIME
/ TEMP.
Pour régler la minuterie (30 minutes à 48 heures)
1. Appuyez sur le bouton TIME / TEMP et 00:00 commencera à clignoter (si la
température clignote, appuyez de nouveau sur le bouton TIME / TEMP).
Remarque:Si le symbole ---- apparaît, l'unité est en mode “Count up”(mode
permettant 48h de fonctionnement continu). Maintenez le bouton START / STOP
pour le réinitialiser et afficher 00:00.
2. Appuyez sur le bouton + ou - jusqu'à ce que le temps souhaité s'affiche. Si vous
maintenez les boutons + ou -, le temps va changer rapidement. Pour réinitialiser le
temps et afficher 00:00,maintenez enfoncé le bouton STOP / START.
3. Une fois que vous avez réglé le temps et la température désirés, appuyez sur le
bouton START / STOP pour mettre le déshydrateur en marche. À tout moment,
vous pouvez ajuster le temps ou la température en utilisant les boutons TIME /
TEMP et + ou - . Vous pouvez aussi arrêter le déshydrateur à tout moment en
appuyant sur le bouton START / STOP.
4. Le déshydrateur s'éteindra automatiquement une fois le temps paramètre expiré
et le voyant vert clignotera. Lorsque cela se produit, vérifiez que la déshydratation
souhaitée est obtenue. Si la déshydratation est terminée, retirez la nourriture du
déshydrateur. Si du temps de séchage supplémentaire est nécessaire, suivez les
étapes précédentes de 1 à 3 pour continuer la déshydratation.
Pour utiliser le mode “Count up”(allant jusqu´à 48 heures).
1. Si START / STOP est pressée avec 00:00 montrant l'affichage de la minuterie, le
déshydrateur s'allume et l'appareil commence à compter en secondes pour la
première minute. Après 59 secondes, le temps s'affiche en heures et minutes
(HH:MM).
2. À tout moment, la température peut être réglée avec le bouton + ou -.
Remarque: le temps n´est pas réglable lorsque la minuterie est en mode count-up.
3. À tout moment, vous pouvez arrêter le déshydrateur en appuyant sur le bouton
START / STOP. Pour réinitialiser le temps de 00:00, maintenez la touche START /
STOP.
4. L'appareil s'arrête automatiquement après 48 heures.
Comment utiliser les tamis à mailles anti-adhésives
les tamis flexible s'adapte aux plateaux du déshydrateur pour empêcher les aliments
qui deviennent très petits lorsqu'ils sont séchés (ex: herbes, baies, etc) de tomber à
travers les grilles du plateau. Les tamis peuvent également être utilisé pour le
séchage des aliments qui collent aux grilles, tels que les bananes ou les tomates.
Positionnez le tamis sur le plateau du déshydrateur et placez la nourriture que vous
voulez faire sécher sur le tamis. Une fois que la nourriture est déshydratée, soulevez
le tamis du plateau (utilisez les découpes sur le côté du tamis pour le lever). Retirez
les aliments. Utilisez la flexibilité du tamis pour déloger les aliments qui ont tendance
à coller en se déshydratant.
Comment utiliser les feuilles à rouleau de fruits
Une feuille à rouleau de fruits doit être utilisée lors la fabrication de rouleaux de
fruits, de bandes fraiches, congelées ou fruits en conserve. Reportez-vous à la page
6 pour obtenir des instructions sur la fabrication de rouleaux de fruits.

Déshydratation: informations générales
Mesures de sécurité:
Se laver les mains avant de préparer la nourriture pour la déshydratation. Bien
nettoyer les ustensiles, les planches à découper et les plans de travail qui vont être
utilisés pour la préparation des aliments. Laver les aliments avant de les préparer
pour la déshydratation.
Lors de la sélection de la nourriture pour le séchage, choisissez ceux qui sont au pic
de leur qualité gustative. Évitez les fruits et légumes verts ou trop mûrs. Retirez
toutes les parties meurtries ou tachées des aliments avant de les déshydrater.
Pour un séchage uniforme, coupez les aliments à des tailles, formes, et épaisseurs
uniformes.
Le temps de séchage sont très variables selon le type et la quantité de nourriture,
l’épaisseur et l'uniformité des morceaux, l’humidité et la température de l'air, vos
préférences personnelles et même l'âge de la plante au moment de la récolte. C'est
pourquoi tout au long du livre, vous remarquerez une série de temps moyens de
séchage. Dans certains cas, vous pouvez trouver que vous devrez peut-être sécher
vos aliments pour des périodes plus ou moins longues que celles recommandées.
Pour de meilleurs résultats, commencez à vérifier l´état de déshydratation au début
de l'intervalle indiqué dans les instructions. Vous pourrez ensuite évaluer à quelle
fréquence vérifier selon la façon dont le séchage progresse et l´aliment à
déshydrater. Avec certains aliments, tels que des herbes, cela peut signifier toutes
les 10 minutes, et avec d'autres aliments, comme les fruits, cela peut signifier toutes
les 1-2 heures.
La déshydratation empêche la croissance microbienne, cependant, la réaction
chimique provoquée par les enzymes dans les fruits et légumes peut se produire à
moins que le produit soit traité avant le séchage. Le traitement permettra d'éviter ou
de minimiser les changements indésirables de couleur et la texture pendant le
séchage et le stockage. Voir les sections spécifiques pour le traitement
recommandé.
Placer les aliments en une seule couche sur les plateaux. Ne laissez pas la
nourriture se toucher ou se chevaucher.
Lors du séchage des aliments à forte odeur, comme les oignons et l'ail, soyez
conscient qu'il y aura une forte odeur pendant le processus de séchage. Cette odeur
peuvent persister après que le séchage soit complété.
Des pièces individuelles de nourriture ne sont pas tous sèches en même temps. Les
aliments qui sont séchées de manière appropriée doivent être enlevés avant celles
qui nécessitent encore un séchage supplémentaire.
Toujours vérifier tous les plateaux pour les aliments qui sont séchés de
manière appropriée.
Si un plateau de nourriture est terminé avant les autres, retirez la nourriture séchée
et remettez le plateau vide dans la machine plutôt que de réorganiser les plateaux.
N'ajoutez pas de fruits et légumes frais à une charge partiellement sèche. Cela va
ajouter de l'humidité et augmenter le temps de séchage.
Permettre un séchage en continu. Ne débranchez pas le déshydrateur au milieu du
cycle de séchage pour le reprendre ultérieurement car cela peut détériorer la qualité
des aliments ou même rendre leur consommation dangereuse dans certains cas.
Conditionnement et stockage
Les aliments séchés doivent être correctement emballés pour prévenir la
réabsorption de l'humidité et la prolifération microbienne. Emballez la nourriture dans
des récipients hermétiques, propres et déshydratés. Les bocaux en verre ou
récipients de congélation avec couvercles hermétiques sont adaptés au stockage.
Les sacs de congélation en plastique refermables sont également acceptables.
Conservez les aliments séchés emballés dans un endroit frais et sec à l'abri de la
lumière. Des températures plus élevées et l'exposition à la lumière, peuvent
raccourcir le temps de conservation et entraîner une perte de qualité et de
nutriments.
Les cuirs ou rouleaux de fruits se conservent jusqu'à un mois à température
ambiante. Les légumes ont environ la moitié de la durée de conservation des fruits.
Si vous voulez conserver la nourriture plus longtemps, placez la dans un
congélateur.
Les fruits et les légumes doivent être emballés dans des récipients séparés pour

éviter le transfert de saveur.
Comment Déshydrater les fruits et les rouleaux de fruits.
Les fruits déshydratés et les rouleaux ou cuirs de fruits sont des collations nutritives
et portables. Le séchage des fruits intensifie la douceur naturelle du fruit parce que
l'humidité est retirée.
Fruits
Sélection et préparation.
Sélectionnez les fruits qui sont à l'apogée de leur maturité. Lavez les fruits pour
enlever la saleté et les débris. Il y a beaucoup d'options quand il s'agit de séchage
de fruits: laissez vous guider par vos préférences personnelles. Les fruits peuvent
être tranchés, coupés en deux, ou s´ils sont petits, laissé entiers mais il leur faudra
plus de temps de séchage.
Trancher les fruits uniformément en pièces d'environ 1 demi centimètre d'épaisseur.
Les fruits qui sont laissés entiers, comme les bleuets, les canneberges et les raisins,
doivent être trempées dans l'eau bouillante pendant 30 à 60 secondes, puis plongés
dans de l'eau glacée pour casser la peau. Ce procédé permettra de réduire le temps
de séchage.
Traitement
Beaucoup de fruits vont s'assombrir rapidement une fois qu'ils sont pelés et / ou
coupées et continueront à s'assombrir, même après que le fruit soit séché. Cela est
dû à l'exposition des enzymes naturelles dans certains fruits à l'air. Il y a plusieurs
options de traitement pour empêcher cette décoloration. Le traitement n'est pas
nécessaire, mais est recommandé pour prévenir la décoloration. Certaines
personnes peuvent détecter un léger changement de saveur avec les fruits traités.
Voir le Guide de séchage de fruits à la page 9 pour déterminer quels fruits
bénéficieront du traitement. Vous pouvez essayer les différentes options et voir ce
que vous préférez.
L'acide ascorbique (Vitamine C) - L'acide ascorbique, disponible en comprimés ou
sous forme de poudre, disponible dans les pharmacies. Mélanger 2 cuillères et demi
à soupe de poudre acide ascorbique dans 1 quart d'eau froide. Le comprimé
vitamine C (6 comprimés de 500mg égalent 1 cuillère à café d'acide ascorbique)
devrait être écrasé avant de les mélanger avec de l'eau. Placez les fruits coupés,
comme les bananes, pêches, pommes, poires, etc, dans le mélange et laisser
tremper pendant 10 minutes. Retirer les fruits et bien les égoutter avant de les placer
sur les plateaux de séchage.
Mélange d'acide ascorbique - Ces produits disponibles dans le commerce, comme
Mrs. Wages Fresh Fruit Preserver, sont une combinaison d'acide ascorbique et de
sucre, ils sont couramment utilisés pour les fruits frais, pour la conserve et la pour la
congélation Suivez les instructions du fabricant pour l'utilisation de ces mélanges.
Le jus de citron - Mélange à part égales de jus de citron et d'eau froide. Placez les
fruits coupés dans la solution et laisser tremper pendant 10 minutes. Retirez les fruits
et égouttez-les bien avant de les placer sur les plateaux de séchage.
Placez les morceaux de fruit sur les plateaux du déshydrateur en une seule couche,
rapprochés mais sans se toucher ou se chevaucher. Reportez-vous au Guide de
séchage de fruits à la page 9 pour la préparation suggérée, et les temps de séchage.
Séchage des fruits à 135 ° F ou 57 ° C.
Détermination de la déshydratation
Reportez-vous au Guide de séchage de fruits à la page 9 et commencez par vérifier
le fruit au début de la fourchette moyenne de temps de séchage. Retirez quelques
morceaux de fruit de chaque plateau du déshydrateur et laissez refroidir à
température ambiante. Les fruits déshydratés sont correctement déshydratés quand
ils sont doux et souples, mais non collants. Les Fruits pliés en deux ne doivent pas
coller ensemble. Les pommes et les bananes tranchées peuvent être séchées
jusqu'à ce qu'elles soient croustillantes, si désiré. Si les fruits semblent avoir
beaucoup d'humidité restante, vérifiez toutes les 1 à 2 heures. Si les fruits semblent
être presque terminés, vérifiez à nouveau dans 30 minutes. Vérifiez toujours les
fruits de chaque plateau.
Conditionnement
Après séchage, laisser les fruits refroidir pendant 30 minutes à 1 heure avant

l'emballage. Les fruits déshydratés peuvent avoir des quantités inégales d'humidité
restant en raison des différences dans la taille et des différentes pièces. Bien que les
fruits semblent être déshydratés, il peut encore y avoir de l'humidité restante dans
certaines des pièces individuelles. Le conditionnement est une procédure qui peut
être utilisée pour répartir plus uniformément l'humidité, ce qui réduit les chances de
développement de moisissures. Il vous permet de déterminer si vous avez retiré
assez d'humidité avant de le conditionner. Pour le conditionnement: placez les
morceaux de fruits en vrac dans un récipient en plastique ou en verre propre, scellez
et laissez reposer pendant 1 semaine. Cela permettra aux morceaux de fruits les
plus déshydratés d'absorber l'excès d'humidité présent dans d'autres pièces.
Secouer quotidiennement le bocal pour séparer les pièces et observer une
condensation. En cas de condensation, retirez les fruits et placez les dans le
déshydrateur pour un temps de séchage supplémentaire. Après conditionnement,
suivre les instructions fournies dans la partie "conditionnement et stockage" sur les
pages 5 et 6 pour bien conserver vos aliments.
Suggestions d´utilisation
Les fruits déshydratés font d'excellentes collations. Ils peuvent également être
ajoutés aux mélanges montagnards, céréales, muffins, pains et autres produits de
boulangerie. Les fruit séchés peuvent être utilisés tels quels ou adoucis avant
utilisation. Pour adoucir les fruits déshydratés, immergez-les dans l'eau bouillante et
laissez-les tremper pendant 5 minutes ou placez les fruits dans un traitement à la
vapeur.
Rouleaux de fruits (ou Cuir de fruits)
Les rouleaux de fruits (ou Cuir de fruits) sont faits en déshydratant une mince couche
de purée de fruits sur une surface plane. Une fois déshydratée, la couche de fruit est
soulevée et roulée. Le terme “cuir de fruits”dérive de la texture semblable à du cuir
de la purée de fruits, une fois déshydratée.
La plupart des fruits ou combinaison de fruits peuvent être réduits en purée et
déshydratés pour le cuir de fruits. La qualité du cuir de fruits dépend de la quantité
d’amidon, aussi appelé “pectine naturelle”que contient le fruit. Les fruits qui ont une
grande quantité de pectine donneront des cuirs qui se lient, forment une feuille solide
et se détachent facilement, tandis que les fruits qui ont peu de pectine s'écaillent et
se cassent plutôt que de se détacher. Pour la fabrication de cuir avec des fruits
faibles en pectine, il est recommandé de les mélanger à fruit riche en pectine pour
améliorer la texture du cuir. Les fruits faibles en pectine comprennent les cerises, les
agrumes, les framboises et les fraises. Lorsque vous mélangez des fruits contenant
une quantité de pectine différente, utilisez-en des quantités égales pour de meilleurs
résultats.
Préparation
Utilisez les feuilles à rouleaux de fruits pour préparer des rouleaux de fruits.
Appliquez une fine couche d'huile végétale ou utilisez un aérosol de cuisson anti-
adhésive sur la feuille à rouleau de fruits.
Prudence: Si vous utilisez un aérosol de cuisson, pulvérisez-le loin de la base du
déshydrateur.
Utilisez environ 1 tasse et demi de purée de fruits.
Sélectionnez les fruits mûrs ou légèrement trop mûrs et supprimez toutes les zones
meurtries. Lavez les fruits et retirez la peau, les graines et les tiges. Coupez les fruits
en morceaux et à l'aide d'un robot culinaire ou au mélangeur, réduisez-les en purée
lisse (consistance de la compote de pommes). Selon les fruits choisis, il se peut que
vous deviez rajouter une cuillère à soupe de jus ou d´eau pour permettre la réduction
en purée.
Si vous le souhaitez, les fruits peuvent être traités pour préserver leur couleur
naturelle. Ajouter 1 cuillères et demi à café de jus de citron pour chaque tasse et
Table of contents
Languages:
Other Koenig Kitchen Appliance manuals
Popular Kitchen Appliance manuals by other brands

Hendi
Hendi BAIN-MARIE KICHEN 238905 user manual

Tricity Bendix
Tricity Bendix CSIE 451 OPERATING AND INSTALLATION Manual

Ernesto
Ernesto 277774 Operation and safety notes

Market Forge Industries
Market Forge Industries PREMIERE SERIES Installation operation & maintenance

Davis & Waddell
Davis & Waddell DES0186 manual

WHITE BROWN
WHITE BROWN PEPITA user manual