Kogan KADABXXSTDB User manual

KADABXXSTDB
USER MANUAL

2
Safety Information
9. Do not defeat the safety purpose of the polarized
or grounding - type plug. a polarized plug has two
blades with one wider than the other. A grounding
type plug has two blades and a third grounding
prong. The wide blade or the third prong are
provided for your safety. If the provided plug does
not fit into your outlet, consult an electrician for
replacement of the obsolete outlet.
The lightning flash with arrowhead symbol
within an equilateral triangle is intended to
alert the user to the presence of uninsulated
"dangerous voltage" within the product's
enclosure that may be of sufficient
magnitude to constitute a risk of electric
shock to persons.
10. Protect the power cord from being walked on or
pinched particularly at plugsand the point
where they exit from
the apparatus. If the power cord is damaged, it
must be repaired by a qualified repairer.
11. Only use attachments/accessories specified by
the manufacturer.
12. Use only with the cart, stand, tripod, bracket or
table specified by the manufacturer, or sold with
the apparatus. When a cart is used, use caution
when moving the cart/apparatus combination to
avoid injury from tip-over.
13. Unplug this apparatus during lightning storms or
when unused for long periods of time.
14. Refer all servicing to qualified service personnel.
Servicing is required when the apparatus has been
damaged in any way, such as power-supply cord
or plug is damaged, liquid has been spilled or
objects have fallen into the apparatus, the
apparatus has been exposed to rain or moisture,
does not operate normally, or has been dropped.
15. The apparatus shall not be exposed to dripping or
splashing and no objects filled with liquids, such as
vases, shall be placed on the apparatus.
16. The mains plug or an appliance coupler is used as
the disconnect device, the disconnect device shall
remain readily operable.
17. Please read Rating Labels at the back of the unit
for power input and other safety information.
The exclamation point within an equilateral
triangle is intended to alert the user to the
presence of important operating and
maintenance (servicing) instructions in the
literature accompanying the appliance.
WARNING: TO REDUCE THE RISK OF FIRE OR
ELECTRIC SHOCK, DO NOT EXPOSE THIS
APPLIANCE TO RAIN OR MOISTURE.
IMPORTANT SAFETY INSTRUCTIONS
To reduce the risk of electrical shock, fire, etc.:
1. Read these instructions.
2. Keep these Instructions.
3. Heed all Warnings.
4. Follow all instructions.
5. Do not use this apparatus near water.
6. Clean only with dry cloth. For stubborn stains, use
a soft cloth dampened with a weak solution of mild
detergent and water. Dry the apparatus
immediately afterwards with a clean cloth. Do not
use abrasive clothes, thinners, alcohol, or other
chemical solvents, because they may damage the
finish or remove the panel lettering.
7. Do not block any ventilation openings. The
ventilation shall not be impeded by covering the
ventilation openings with items, such as
newspapers, tablecloths, curtains, etc.
8. Do not install near any heat source such as
radiators, heat registers, stoves, or other
apparatus (including amplifiers) that produce heat.

3
Contents
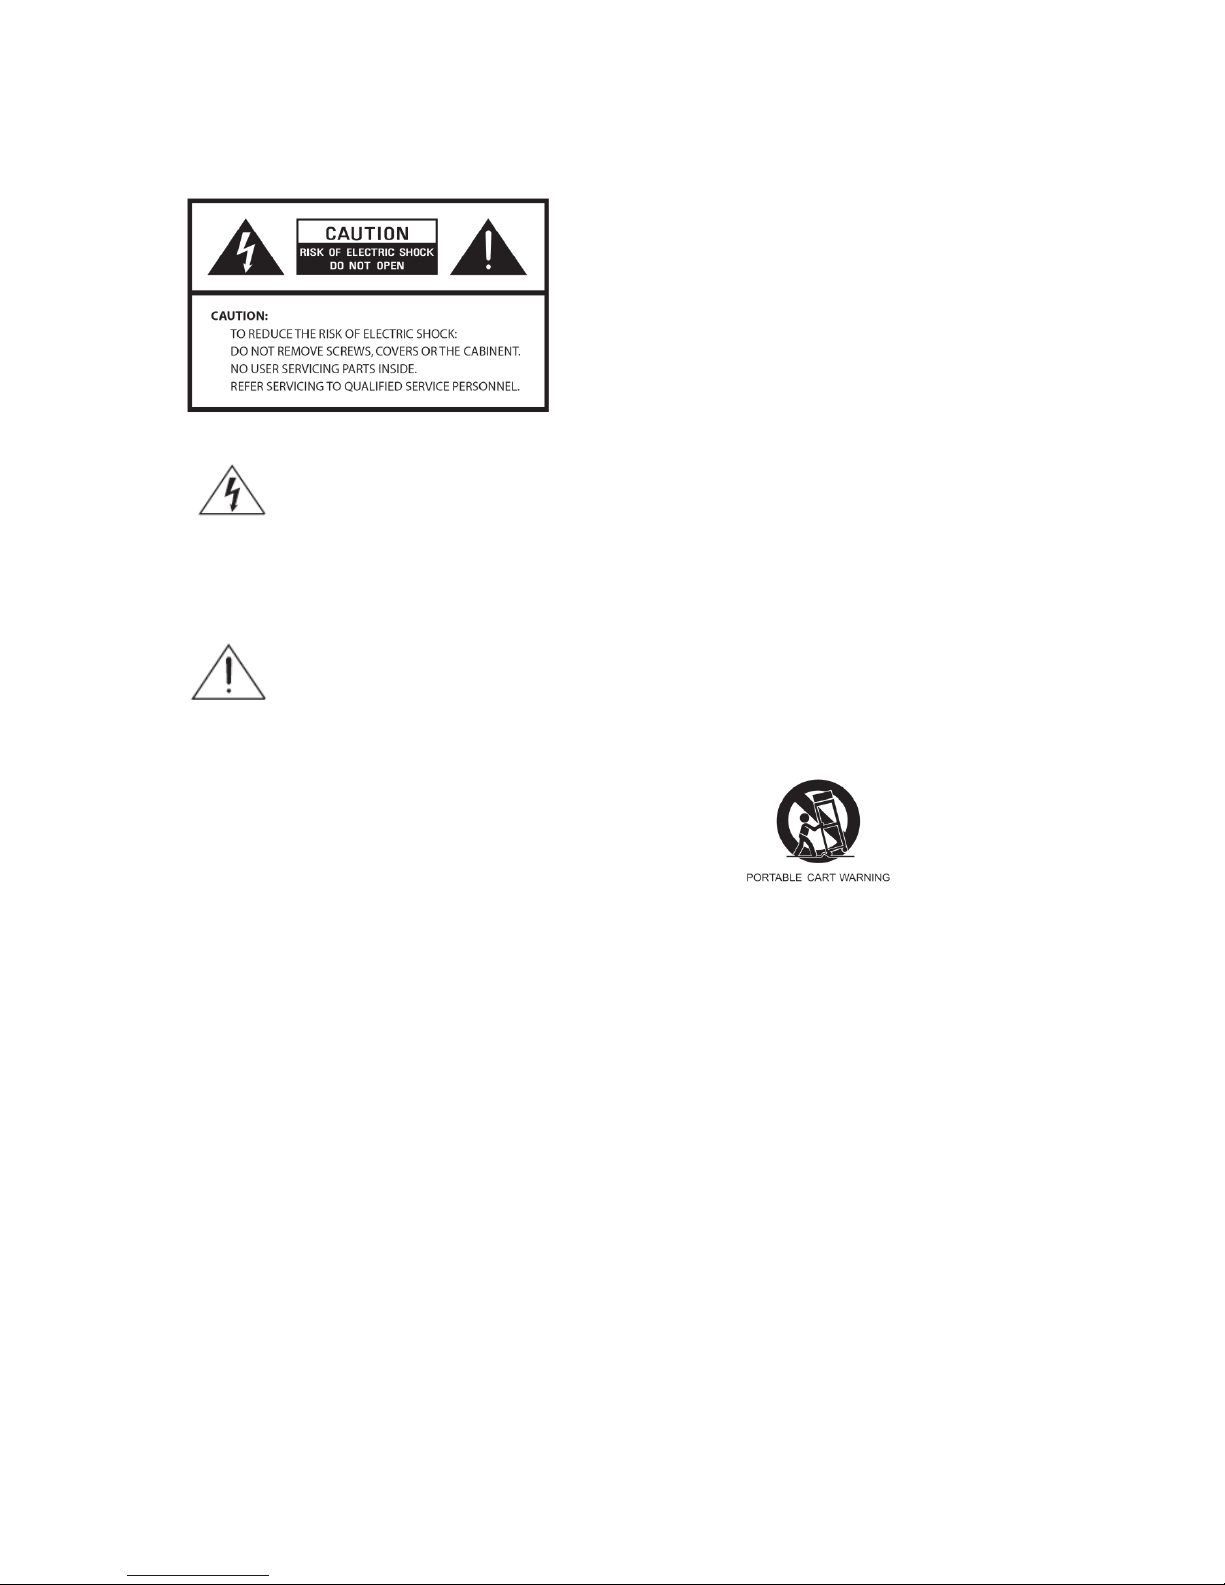
Safety Information ..................................................................................................................................................................... 2
Contents ..................................................................................................................................................................................... 3
Package Content ............................................................................................................................................................... 5
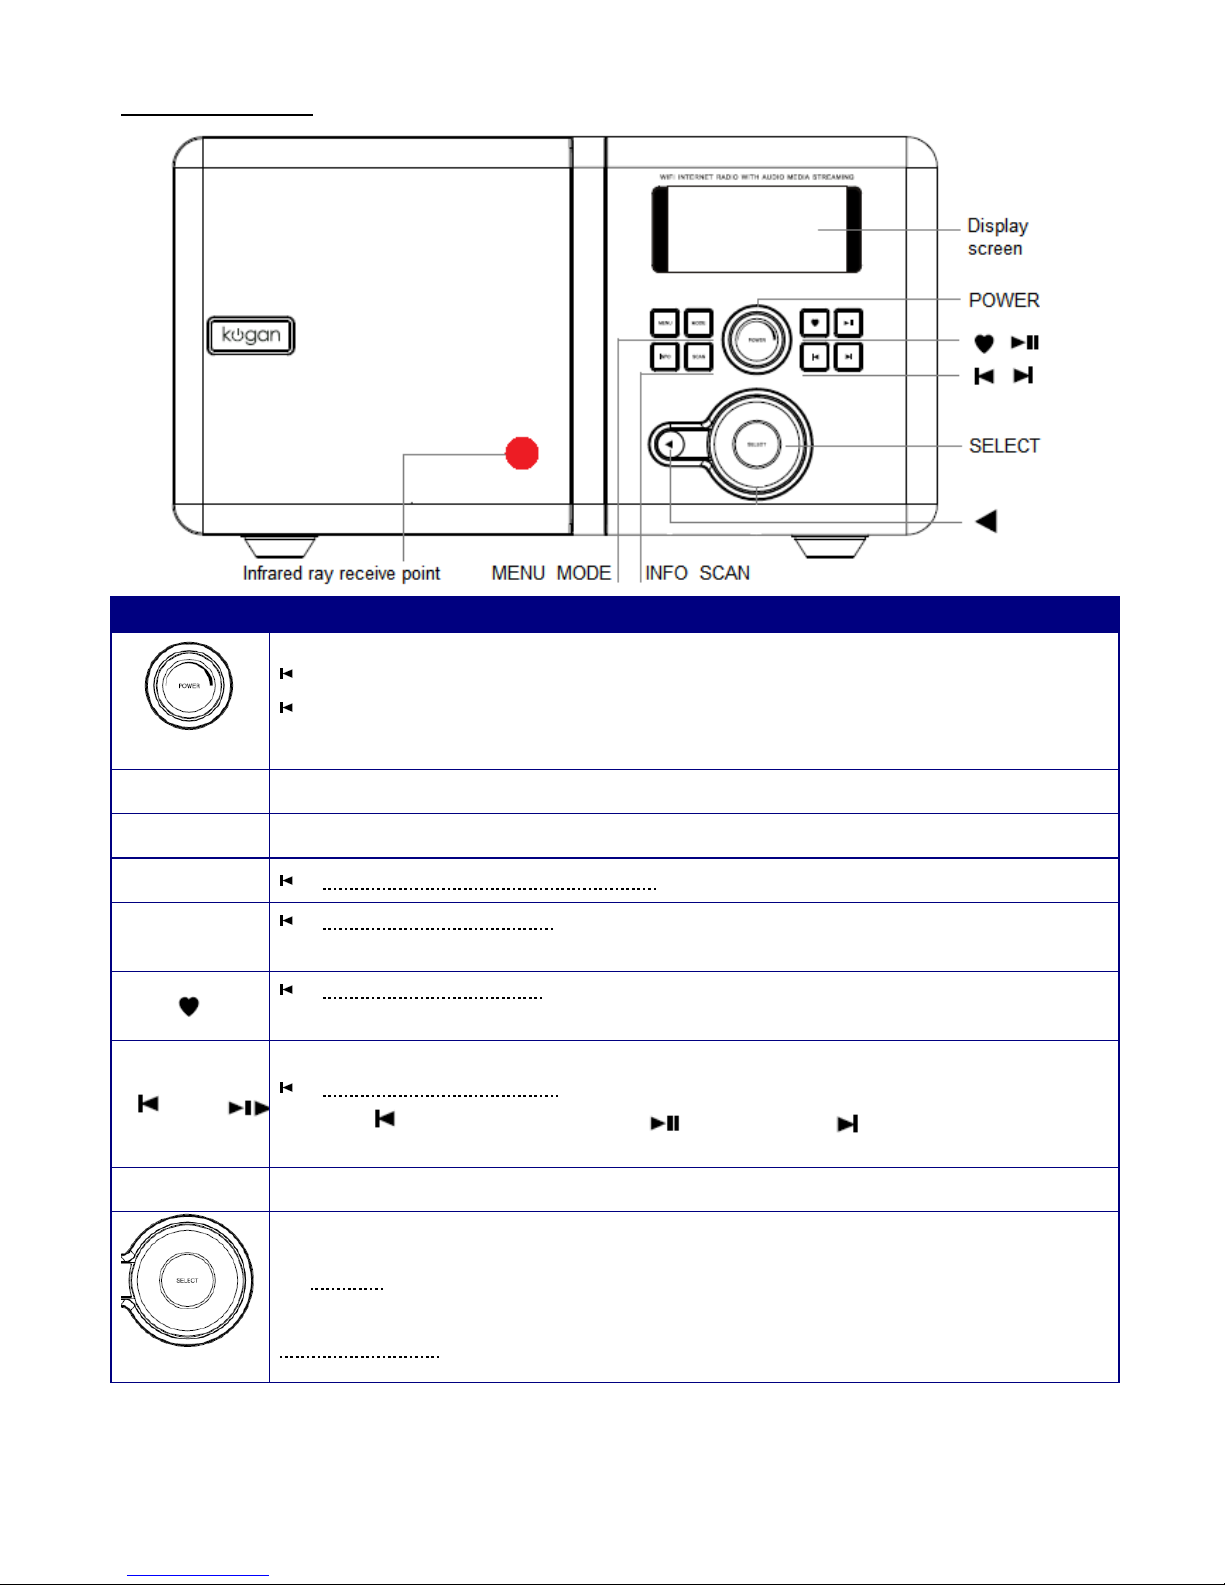
Front Overview ................................................................................................................................................................. 6
Top Overview ................................................................................................................................................................... 7
Back Overview ................................................................................................................................................................. 7
Internet Radio Quick Start Guide ............................................................................................................................................... 8
What you need before you can use your Internet Radio ................................................................................................... 8
Chapter 1 Internet Radio Mode ............................................................................................................................................... 9
1.1 Turning on ............................................................................................................................................................... 9
1.2 Setup Wizard ............................................................................................................................................................ 9
1.3 Access to Wireless Network .................................................................................................................................. 10
1.4 Local Stations ........................................................................................................................................................ 10
1.5 Choose a Station .................................................................................................................................................... 11
1.6 Select a Station through Podcasts .......................................................................................................................... 11
1.7 Get Access Code and FAQ Solutions..................................................................................................................... 11
1.8 Add Station to ‘My Favourites’ ............................................................................................................................. 12
1.9 Add Station to ‘My Added Stations’ ...................................................................................................................... 13
1.10 Connecting to Wired Network ............................................................................................................................. 14
1.11 Shift to Wireless Network .................................................................................................................................... 14
Chapter 2 Music Player Mode ............................................................................................................................................... 15
2.1 Setting up a Music Server ...................................................................................................................................... 15
2.2 Sharing Media with Windows Media Player ......................................................................................................... 15
2.3 Play Shared Media ................................................................................................................................................. 16
Chapter 3 DAB Mode ........................................................................................................................................................... 17
3.1 Getting Started ....................................................................................................................................................... 17
3.2 Shift to another DAB Station ................................................................................................................................. 17
3.3 Update Station List ................................................................................................................................................ 17
3.4 Dynamic Label Segment (DLS) ............................................................................................................................ 17
3.5 Prune Invalid .......................................................................................................................................................... 17
3.6 Manual Tune .......................................................................................................................................................... 18
3.7 DRC (Dynamic Range Control) Value .................................................................................................................. 18
3.8 To change station order .......................................................................................................................................... 18
Chapter 4 FM Mode .............................................................................................................................................................. 19
4.1 General Operation .................................................................................................................................................. 19
4.2 Scan Setting ........................................................................................................................................................... 19
4.3 Audio Setting ......................................................................................................................................................... 19
4.4 Station Presets (for Internet, DAB and FM Mode) ................................................................................................ 19
4.5 Access Preset Station (for Internet, DAB and FM Mode) ..................................................................................... 20

4
Chapter 5 iPod/iPhone Mode ................................................................................................................................................ 21
Docking and Playing Your iPod/iPhone ......................................................................................................................... 21
Chapter 6 AUX IN Mode ...................................................................................................................................................... 21
Chapter 7 General Settings .................................................................................................................................................... 22
7.1 Sleep Function ....................................................................................................................................................... 22
7.2 Setting Clock ......................................................................................................................................................... 22
7.3 Browse Station Information ................................................................................................................................... 22
7.4 Setting Alarm ......................................................................................................................................................... 23
7.5 Equaliser ................................................................................................................................................................ 24
7.6 Language ............................................................................................................................................................... 24
7.7 Factory Reset ......................................................................................................................................................... 24
7.8 Enter Setup Wizard ................................................................................................................................................ 24
7.9 SW Version and Radio ID (or System Info) .......................................................................................................... 24
7.10 Network Setup ..................................................................................................................................................... 25
7.11 Software Update .................................................................................................................................................. 25
7.12 Backlight .............................................................................................................................................................. 25
Chapter 8 Specification ......................................................................................................................................................... 26

5
Package Content
Main unit
and remote
control

6
Front Overview
Keys
All mode
POWER
Press to turn on/off Radio.
Scroll to adjust volume level.
Note: to obtain stronger signal, please extend the antenna found on the rear of the unit.
Menu
Press to access ‘main menu’ and other options.
Mode
Press to change mode.
INFO
Internet, Media Player, DAB and FM mode: Press to browse station info.
SCAN
DAB and FM mode use only:
Press to activate scan function
Internet, DAB and FM mode:
Press and hold to activate preset stations function; and short press to load preset stations.
iPod and Media Player mode:
Press to go to previous track. Press to
play/pause, Press to next track.
in setting mode, press to backward.
SELECT
a. Turn to browse options, press to confirm.
b. FM mode: while frequency is showing up, turn it to manually adjust frequency 0.05MHz per step, or press
to autoscan active stations.
While alarm sounds, press to postpone alarm.

7
Top Overview
Back Overview
Items
Remark:
Antenna. :
The radio comes with a telescopic antenna. To improve FM and DAB+ reception, angle
the antenna to obtain the best reception.
AUX IN socket:
It is for connecting the audio cable.
LAN socket:
Unique design for LAN cable.
Earphone socket
For inserting 3.5mm earphone.
Power cord socket:
With fixed power cord and plug.

8
Internet Radio Quick Start Guide
What you need before you can use your Internet Radio
Before use, you need to know :
Wireless LAN Setting:
A broadband Internet connection.
A wireless access point (Wi-Fi) connected to your broadband Internet, preferably via a router.
If your wireless network is configured to use Wired Equivalent Privacy (WEP) or Wi-Fi Protected Access (WPA)
data encryption then you need to know the WEP or WPA code so you can get the Internet Radio to
communicate with the network.
For security reason, you may need enter the Radio’s MAC address into your wireless access point. To find the
Radio’s MAC address, use menu items as follows:
Main menu System settings Network View settingsMAC Address
To enter the MAC address into your wireless access point, you must read the instructions supplied by the
wireless access point.
Before you continue, make sure that your wireless access point is powered up and connected to your broadband
Internet. To get this part of the system work, read the instructions supplied with the wireless router

9
Chapter 1 Internet Radio Mode
1.1 Turning on
1. The proper voltage for this radio is AC 100V~240V/50-60Hz. Please
check the voltage in your area before plugging in the unit.
2. Press POWER to switch on, for initial use, it will take you to ‘Setup
wizard’.
1.2 Setup Wizard
1. Continue the above step, press SELECT to confirm ‘YES’turn SELECT to your preferred ‘hour format’,
press SELECT to confirm.
2. Press SELECT to confirm ‘Update from Network’. Now, following your radio’s instruction, configure the
following parameters:
Timezone: select your local timezone.
Daylight savings: On or Off
Wlan region: Most of Europe/USA/Canada/Spain etc.
SSID: Sometimes radio may find more than one network, turn SELECT to your selecting one, then press SELECT.
Note: If a password (WEP/WPA) isn’t required by your network, radio will connect to the network automatically.
3. If a WEP/WPA key (password) is required, radio will ask you to input
the WEP/WPA code and display the password entry screen as:
Turn SELECT to cycle through the alphanumeric character list,
press SELECT to select an appointed character.
Note: WEP/WPA pass codes are case-sensitive.
If a wrong operation is being conducted, select ‘ ’ to delete
this wrong character.
Note: a.> = Backspace.
b.> the method of select , or : while cursor point to ‘ ’, anti-clockwise turn SELECT to
select , then continue anti-clockwise turn SELECT to select or in turn.
c.> means back to previous track.
d.> Radio will automatically save the WEP/WPA you’ve input, so no bother to re-enter these codes.

10
4. After selecting the final character of your password, turn SELECT to press SELECT to confirm.
5. Press SELECT again to exit, the setting is OK now!
1.3 Access to Wireless Network
1. After set the ‘setup wizard’, it will show as below. Press SELECT to enter ‘Internet radio’ mode.
Note: Or, you may also press Mode repeatedly until ‘Internet radio’ shows up, then stop pressing to enter.
or
2. While cursor point to < Station list >, press SELECT to confirm.
If it fails to connect to internet, please follow:
a.
Check your router, see it working normally or not;
b.
Relocating your radio to a stronger signal position may be necessary!
c.
Make sure your password is input correctly.
1.4 Local Stations
Make sure your radio connected to network.
‘Local China’ can be changeable according to your current location, for instance, it can be local US, local UK, etc.
It is very easy way for you to pick up local programs.
1. To enter Local stations, press MENU < Station list > < Local Australia >, press SELECT to confirm.
2. Turn SELECT to your favourite item, press SELECT to confirm, and then step by step to the program you
wanted.

11
1.5 Choose a Station
Note: ensure your radio connecting to network.
1. To access to this order, press MENU < Station list > < Stations >, press SELECT to confirm.
2. There are five options available for you to choose a station as above photo.
‘LOCATION’enables you to choose from the radio stations provided by any country which you choose from a list.
a. While pointing to < Location >, press SELECT to confirm.
b. Turn SELECT to the region you wanted, press SELECT to confirm.
c. Using the same method to choose country and then station in turn, radio will load the station.
‘GENRE’ enables you to choose radio stations according to their content such as Classic Rock, Sport, News, etc.
Note: a. Some radio stations do not broadcast 24 hours a day, and some stations are not always on-line.
b. If this station has on-demand content, it will give an option of listening to old programs that have
already been broadcast.
1.6 Select a Station through Podcasts
1. To access to this order, press MENU < Station list > < Podcasts >, press SELECT to confirm, and then turn
SELECT to your favorite option.
2. Press SELECT to confirm, and then step by step to your selecting program.
1.7 Get Access Code and FAQ Solutions
1. To access to this order, press MENU < Station list > < Help >, press SELECT to confirm.
Note: at this step, you can also listen radio FAQ solutions.
2. While highlighting < Get access code >, press SELECT to confirm. The code will be displayed.

12
1.8 Add Station to ‘My Favourites’
1. Visit website: http://www.wifiradio-frontier.com
2. Click on the register link.
3. Create account login, Access code is required. How to get this code? Please refer to previous page.
Note: want to member login? Therefore save your registered ‘Email address’and ‘Password’.
4. Now, you are entitled to take advatage of the various additional features and services offered by the
Frontier Internet Radio Portal.
5. After above setting is done, to have your radio access your new settings your radio will
need to be powered off for several minutes.
6. To play ‘My favourites’, follow these two steps:
a. Press MENU < Station list > < My favourites >, press SELECT to confirm.
b. Turn SELECT to your favorite option press SELECT to load.
Note: Your added ‘my favourites’stations will show up at ‘my favourites’subdirectory. Doing a ‘factory reset’cannot erase
them.

13
1.9 Add Station to ‘My Added Stations’
Even though the Internet Radio portal contains thousands of stations, you may want to listen to stations not listed.
You can add your own stations via the portal.
1. Visit website: http://www.wifiradio-frontier.com
2. Login as a member (at previous page, you registered).
3. You will able to take advatage of the various additional features and services offered by the Frontier
Internet Radio Portal.
4. After above setting is done, to have your radio access your new settings, turning your radio power
off for several minutes is necessary.
5. How to play ‘My added stations’? Your need two steps:
a. Press MENU < Station list > < My added stations >, press SELECT to confirm.
b. Turn SELECT to your favorite option press SELECT to loading…
Note: Your added stations will show up at ‘my added stations’subdirectory. Doing a ‘factory reset’cannot erase them.

14
1.10 Connecting to Wired Network
Step 1 – Choose LAN Setting
Note: make sure LAN cable connecting to LAN socket already.
1. Press MENU Turn SELECT to < Main Menu >, press SELECT to confirm.
2. Turn SELECT to < System settings >, press SELECT to confirm.
3. Turn SELECT to < Network >, press SELECT to confirm.
4. Turn SELECT to < Manual settings >, press SELECT to confirm.
5. Highlight < Wired >, then press SELECT to confirm.
6. Highlight < DHCP enable >, press SELECT to confirm. The LAN setting is setup!
Step 2 – Enter Internet Radio mode
1. Press MENU ’Main menu’, press SELECT to confirm, highlight ‘Internet Radio’, then press SELECT
to confirm. Or, press MODE repeatedly until < Internet Radio > is showing up, then stop pressing.
or
Step3 – Access Network
Continue the above steps, few seconds later, it will show:
If it fails to connect to network, please follow:
a. Check your Router, see if it is working normally or not.
b. Check your LAN cable, make sure it wasn’t been damaged,
c. See the port of cable which insert to LAN socket is touching well.
1.11 Shift to Wireless Network
1. Refer to previous page ‘choose LAN setting’ steps 1-4, turn SELECT to < Wireless >, press SELECT.
2. While highlighting < DHCP enable >, press SELECT to confirm, and then do the step by step guide
to access to wireless network.
Now, wireless setting is OK!

15
Chapter 2 Music Player Mode
2.1 Setting up a Music Server
In order for your radio play music files from a computer, the computer must be set up to share files or media.
UPnP media sharing allows devices like this radio to play music from a shared media library, navigating through
tag menus such as Artist, Album or Genre.
If you are running a suitable server system such as a PC with Windows Media Player10 or later (WMP), and your
music library is well-tagged, then it is recommended to use media sharing.
Only the UPnP server needs to be set up.
2.2 Sharing Media with Windows Media Player
The most common UPnP server is Windows Media Player (10 or later). Alternatively, other UPnP platforms and servers
may be used. To set up WMP for media sharing, perform the following steps:
1. Ensure that the PC is connected to the network.
2. Ensure that the radio is powered on and connected to the same network.
3. In WMP, add to the media library the audio files and folders you want to share with your radio (Library > Add to
Library…).
4. In WMP, enable media sharing (Library > Media sharing…).
5. Make sure that the radio has access to the shared media by selecting it and clicking Allow. You can also set a
name for the shared media in Settings… Click OK to close the dialogue boxes.
6. The PC is now ready to stream the music to the radio. The WMP UPnP service runs in the background.

16
There is no need to start WMP explicitly.
2.3 Play Shared Media
1. Press Mode repeatedly until < Music player > is showing up.
Note: Or, enter < Main menu >, and then turn SELECT to < Music player >, press SELECT to confirm.
2. While highlighting < Shared media >, press SELECT to confirm, and then navigate to your desired
Music. Press or to shift tracks. Press to play or pause.
3. Adjust the volume by turning the POWER knob.
Repeat Play Mode
Press MENU turn SELECT to < Repeat play: Off >, press SELECT to shift ‘Off’ to ‘On’, or press SELECT
again shift from ‘On’ to ‘Off’.
Shuffle Play Mode
Press MENU turn SELECT to < Shuffle play: Off >, press SELECT to shift ‘Off’ to ‘On’.
Prune Servers
1. Press MENU < Prune servers >, press SELECT to confirm.
2. Turn SELECT to ‘Yes’ while your radio asks you ‘Prune shared media wake on LAN servers?’, press SELECT to
confirm.
Now Playing Information
1. While a track is playing, the screen shows its track, artist and album if provided. There is also a progression bar with
figures for elapsed time and total track time.
2. To view further information, press INFO repeatedly, screen will display information such as Artist, Album, Playback
buffer indicating bar and Today’s Date etc.

17
Chapter 3 DAB Mode
3.1 Getting Started
1. Press Mode repeatedly until < DAB radio > is showing up. On initial use it will perform a full scan and store
stations list in memory,
Note: or press MENU to enter < Main menu >, and then turn SELECT to < DAB >, press SELECT to confirm.
2. Once the scanning is completed, the DAB+ stations will be displayed in alphanumeric order. The first station in the
list will be selected.
Note: if no DAB+ signal is found in your area, it may be necessary to relocate your radio to a stronger signal area.
3.2 Shift to another DAB Station
1. While a DAB+ program is playing, you can move back to the previous screen at any time by pressing (or
BACK on remote control), or pressing MENU to go to ‘station list’
2. While highlighting ‘Station list’, press SELECT to confirm.
3. Turn SELECT to cycle through stations list, and then press SELECT to confirm.
3.3 Update Station List
It’s a good idea to carry out a ‘scan’ from time to time to keep your DAB+ station list up-to-date. You can press
MENU turn SELECT to < Scan >, press SELECT to confirm.
3.4Dynamic Label Segment (DLS)
1. This is scrolling text information supplied by the DAB+ station. It may comprise information on music title or
detail of the program which is provided by the broadcaster.
2. To view further information, press INFO repeatedly while a DAB+ program is playing, screen will appear displaying
information such as Artist, Album, Playback buffer indicating bar and Today’s Date etc.
3.5Prune Invalid
1. Press MENUturn SELECT to < Prune invalid >, press SELECT to confirm.
2. Turn SELECT to ‘YES’, and press SELECT to confirm.

18
3.6Manual Tune
1. Press MENUturn SELECT to < Manual tune >, press SELECT to confirm.
2. Turn SELECT to step between the channels and press SELECT to select the current channel.
Note: If there is a multiplex corresponding to this channel
and frequency, then the display will show a tuning meter
with the signal strength and the multiplex name after a few
seconds.
3. Press SELECT again to exit this order.
3.7DRC (Dynamic Range Control) Value
You can set the level of the compression of stations to eliminate the differences in dynamic range or sound level
between radio stations.
Note: a. Setting DRC to off indicates no compression.
b. Setting DRC to low indicates little compression.
c. Setting DRC to high shows maximum compression.
1. Press MENU turn SELECT to < DRC >, press SELECT to confirm.
2. Turn SELECT to your preferred option, then press SELECT to confirm.
3.8To change station order
1. The path is: press MENU < Station order >, press SELECT to confirm.
Note: There are 3 options: Alphanumeric, Ensemble and Valid. ‘ #’shows before the default of your setting option to indicate
current station order.
STATION ORDER
DESCRIPTION
Alphanumeric
Display all stations in alphanumeric order.
Ensemble
List the current broadcasting stations before inactive stations.
Valid
Remove inactive stations from the station list.
2. Turn SELECT to your preferred option, press SELECT to confirm.

19
Chapter 4 FM Mode
4.1 General Operation
1. Press Mode to shift to < FM Radio > from DAB mode. For initial use, it will start at the beginning of the FM
frequency range (87.50MHz). Otherwise, the last listened FM station will be selected.
Note: or enter < Main menu >
turn SELECT to < FM >, press SELECT to confirm.
2. While frequency is showing up, turn SELECT to manually adjust frequency 0.05MHz per step.
3. For auto-search, while frequency is showing up, simply press SELECT or SCAN.
Note: a. To ‘auto-search’ to the next active station, repeat step 3.
b. The unit will display the frequency changing until it stops on the next station.
4.2 Scan Setting
By default, FM scans stop at any available station. This may result in a poor signal-to-noise ratio (hiss) from weak
stations.
To change the scan settings to stop only at stations with good signal strength, press MENU < Scan setting >
Strong stations only? Yes, press SELECT to confirm.
4.3 Audio Setting
By default, all stereo stations are reproduced in stereo. For weak stations, this may result in a poor signal-to-noise
ratio (hiss).
To play weak stations in mono, press MENU < Audio setting > Listen in mono only? Yes, press
SELECT to confirm.
4.4 Station Presets (for Internet, DAB and FM Mode)
Note: Your radio can store 10 Internet, 10 DAB+ and 10 FM stations preset. This order only limit to Internet, DAB and FM
mode.

20
To store the current station, 2 ways:
via main unit:
1. Press and hold until it shows :’Save Preset’ , and then turn SELECT to your desired station number 1-10.
2. Press SELECT to confirm, your radio will display ‘Preset stored’. Your radio will return to its normal
working condition and the preset icon will appear on the display.
via remote control:
1. Press and hold your target Preset No. 1-10 until it says : ‘Preset stored’.
4.5 Access Preset Station (for Internet, DAB and FM Mode)
Note: this order only limit to Internet, DAB and FM mode, To select a stored station:
via main unit:
1. Press Mode to go to relative mode: Internet, DAB or FM mode.
2. Press , it will show ‘Recall Preset’, and then turn SELECT to your desired one.
3. Press SELECT to confirm.
via remote control:
1. Press MODE to go to relative mode: Internet, DAB or FM mode.
2. Directly press your target Preset No. 1-10. Station will start playing.
Table of contents
Other Kogan Docking Station manuals