Kogan KATMX25AIOA User manual

<dDyϮϱ/K
USER MANUAL

Instruction Manual
Model: KATMX25AIOA
1. Caution:
* This appliance is intended to be used in household and similar applications .
* This appliance is not intended for use by persons (including children) with reduced physical,
sensory or mental capabilities, or lack of experience and knowledge, unless they have been
given supervision or instruction concerning use of the appliance by a person responsible for
their safety.
* Please do unplug the power cord when cleaning the machine or long time without using. f the supply
cord is damaged, it must be replaced by the manufacturer, its service agent or similarly qualified
persons in order to avoid a hazard.
* Do not dispose of electrical appliances as unsorted municipal waste, use separate collection facilities.
Contact your local government for information regarding the collection systems available.
f electrical appliances are disposed of in landfills or dumps, hazardous substances can leak into the
groundwater.
* Please do not immerse the housing into water or clean it with a great lot of water to avoid the danger of
electric shock or machine damage. Use moist cloth to scrub and don’t let water flow in.
* Stir blade is SHARP! Be careful when dismantling or reassembling.
* Food capacity should not exceed 2L.
* Please do not turn on the cover till the machine stopped stirring, especially when the speed is above 5.

* When heating or taking out the SS jar after heating, do not touch the SS body to avoid scalding.
* When opening the SS jar cover or steamer cover, be cautious to avoid the vapor scald. Do not touch
the cover when heating.
* Children should be supervised to ensure that they do not play with the appliance. Make sure to place
the machine out of the reach of children. Warn children the machine could become hot and
shouldn’t be touched.
* Please press the measure cup down when the speed is above 5 or crushing frozen food by the Turbo
function.
* This machine may move under operation. Please place the machine on a steady table and ensure it
remains a safe distance from table edges to avoid falling.
* Please make sure to keep enough space above unit when under use.
* The machine will stop if overloaded. Be cautious as the red LED will be kept powered on with an audio
beep if overloaded (Figure 1). The orange LED will be kept powered on with an audio beep if unit is
overheating (Figure 2).
* Before using,the consumer should turn the power switch to “ ” position. After use, turn the power
switch to “O” position.
2. Technical data:
Machine Max. Power: 1400W
Motor power: 600W
Heating Wattage: 1300W
Stir blade unloading: RPM 200—10,000.
Material of SS jar: SS 304. Max working capacity is 2L
Voltage: 220-240V~
Length of Power cord: 1.3M
Figure 1 Figure 2

3. Introduction:
Accessories:
SS jar, Cover, Basket, Butterfly, Blade guard, Measuring cup, Food steamer and Spatula.
SS Jar Cover Basket
Butterfly Blade Guard Measure Cup Food Steamer
Spatula

4. Tips be ore using:
How to place the SS jar correctly and set up the program:
Before the first using, clean the SS jar thoroughly. Put the jar into the housing in right direction (Figure 3),
hold the handle of SS jar and turn the SS jar anti-clockwise slowly to the correct position. (Figure 4).
After putting in ingredients, push the cover shaft into the handle groove (Figure 5), then cover the SS jar.
Press the cover down firmly (Figure 6) to ensure the cover fasten is locked on housing, then turn the
switch clockwise (Figure 7).
Then, plug the power cord; switch on the electrical button on the back bottom of the housing (Figure 8).
Set time, temperature and speed on control panel, then press Start/Stop to start the machine.
Arrow matches
u lock
Arrow matches
lock
Match the place. Press here.
Figure 4
Figure 5 Figure 6
Figure 7
Switch
Figure 8
Figure 3

How to take o SS jar correctly:
Press Start/Stop button to stop the machine, then turn the switch on top anti-clockwise and then press
the cover release button (Figure 9) until the latch unlocks. The jar cover shouldn’t be left standing upright
(Figure10), instead you need to take it off after you're finished (Figure 11). Finally, hold the handle of SS
jar and turn the jar slowly clockwise from the (Figure 4) position to the (Figure 3) position. The SS jar can
then be taken off from housing.
LCD display:
Plug unit in and switch on the electrical button in housing. f the SS jar is not placed correctly or the top
switch is not switched correctly, the LCD will display as (Figure 12). When SS jar is placed correctly and
top switch is switched correctly, the LCD would display as (Figure 13).
Time, temperature and speed can be adjusted under this condition.
Note: For sa ety considerations, when cover is closed correctly, the top switch can not be
switched to the right place. Please do not switch it by orce.
Blade assembly
Nut
Figure 14Figure 12 Figure 13
Butto
Figure 9 Figure 10 Figure 11

How to dismantle blade assembly (Figure 14 is blade assembly):
With one hand reaching into the SS jar to hold the semi-circle section on blade assembly (Figure 15),
use the other hand to turn off the nut in an anti-clockwise direction(Figure 16), then pull out the blade
assembly.
Caution: The stir﹗ring blade is very sharp. To avoid injury, please do not touch the edge directly when
dismantling. User should hold the upper part when removing or replacing the blade assembly to avoid
the blade assembly falling off, possibly leading to an accident.
How to assemble blade assembly: reverse the process o dismantle blade assembly.
Usage and how to use the accessories:
1. SS jar cover: To cover the jar, the sealed ring inside can avoid food, soup or vapor spillage; When
assembled, the seal ring “ESTA CARA A LA TAPA↑,FACE UP ↑” warning words should face towards
you. (see below Figure 17). Otherwise, the liquid may spill.(Figure 18)
2. Measure cup: To cover the jar cover and also to measure liquid food.
3. Basket: Multi-function accessory. Can filter fruit juice and vegetable juice, also can cook vegetables
such as potatoes, tomatoes, onions… etc.
t is very easy to remove the basket. Use the spatula to hook the middle part of the basket handle, as
shown in (Figure 19).
Figure 15 Figure 16
Semicircle sectio
o blade assembly
Loose the ut
Figure 18Figure 17

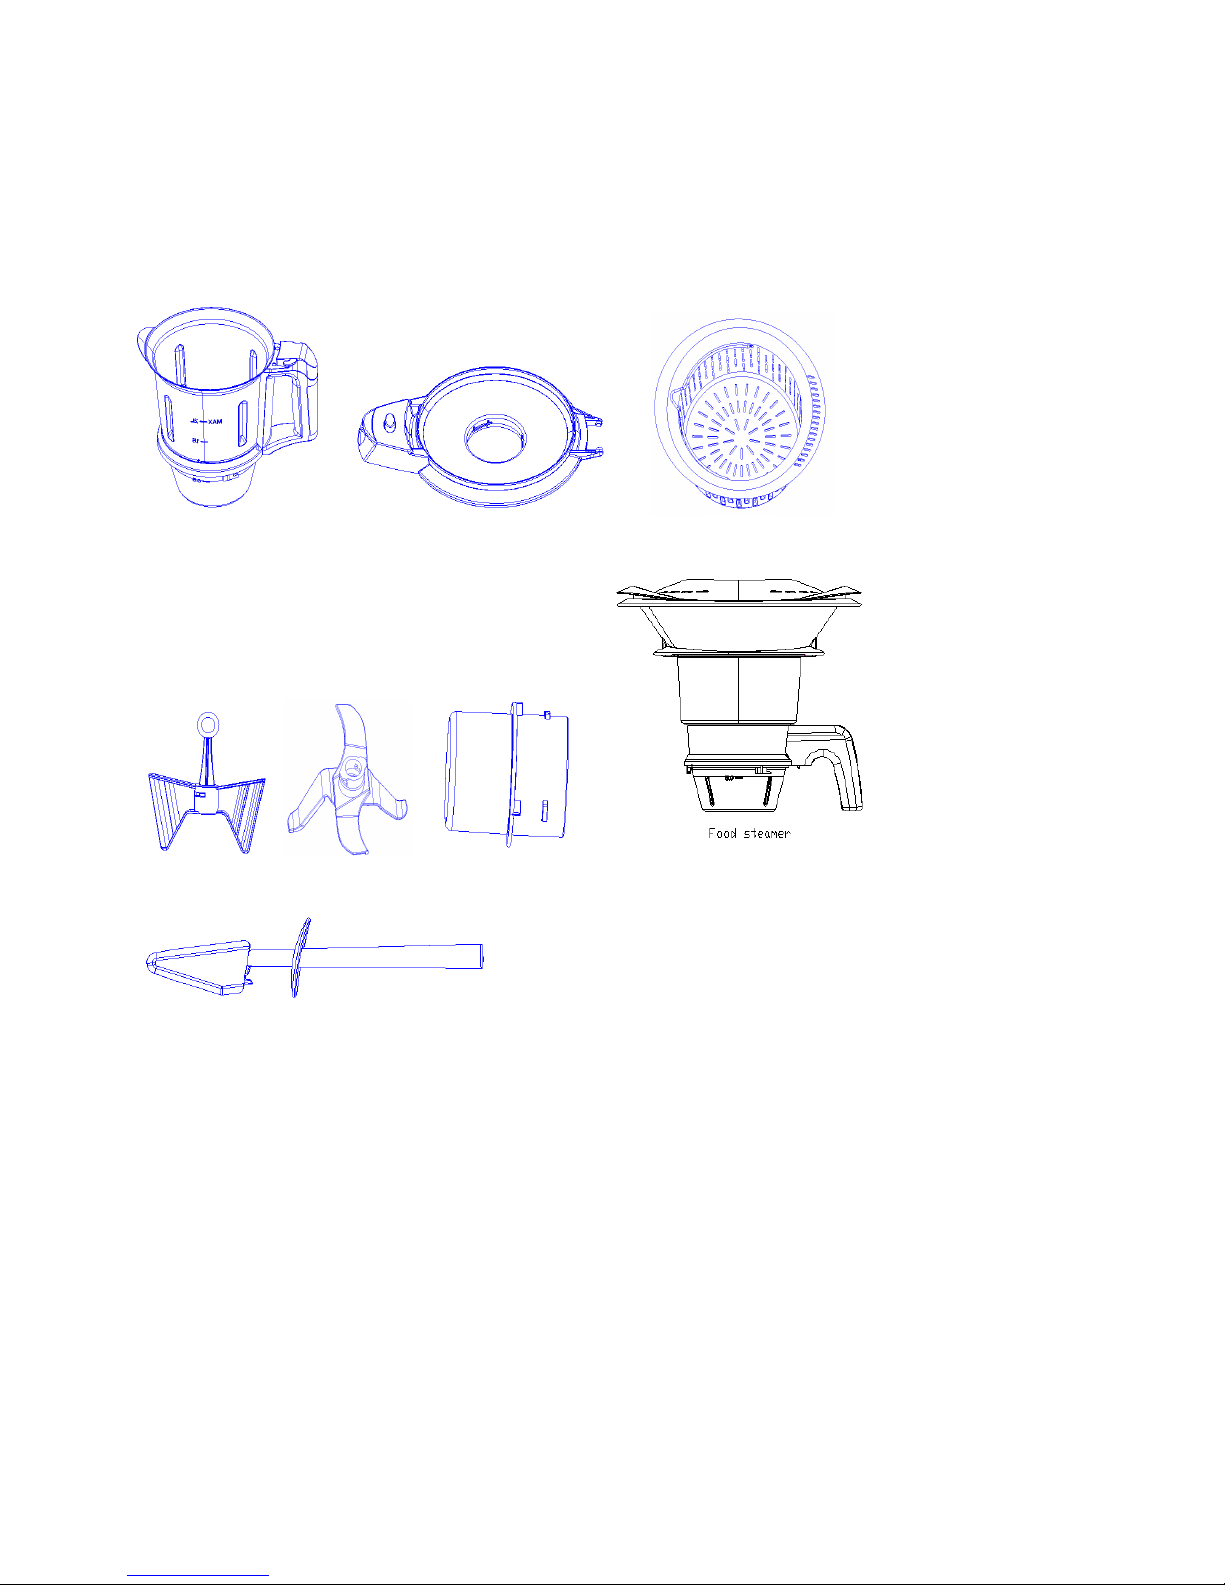
4. Spatula: Use to scrape ingredients from SS jar inner wall. When filtering juice, it can also be used to fix
basket, and at same time to ensure separate juice and solid ingredients. (Figure 20)
5. Butterfly (must use with Blade guard together): ts continuous blending can ensure optimum mixing,
and avoid sticking when heating milk, making butter pudding or fruit sauces.
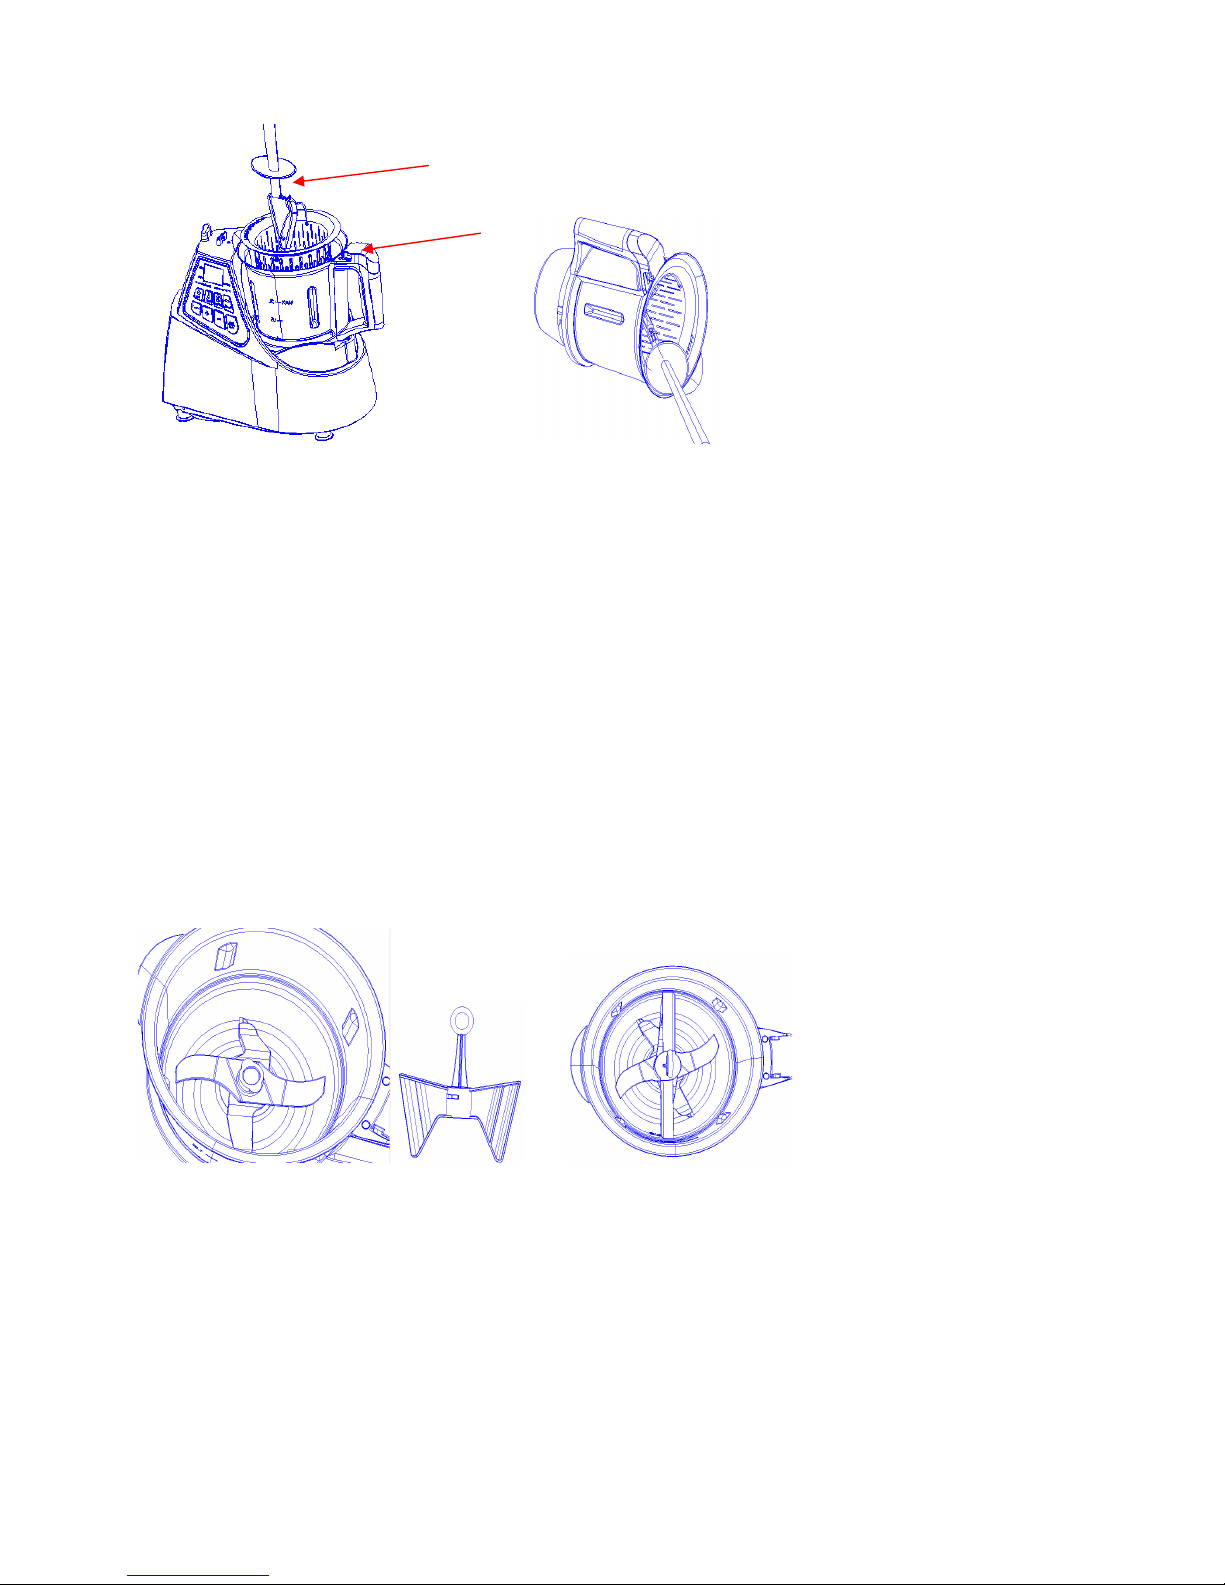
How to assemble and dismantle butterfly(Figure21): To assemble butterfly (Figure 22):Using the two
half -circle of the blade guard as a guide, insert the butterfly covering the blade guard, and then rotate
down clockwise. To dismantle it, hold the SS jar handle with one hand while the other hand holds the
blade guard top to pull it off in force. (Attention:When using the butterfly, the speed has to be set to
max 4 speed. )
6. Blade guard: Blend & mix soft or liquid foods. Method with using or assembling the blade guard :
Before assembling, the user should take off the blade assembly from the SS jar, and then put the blade
guard covering in the top surface of the blade. While twisting slighting down, get together assembling in
SS jar and screw down the bottom nut. (the blade guard is used under speed 4)
7. Steaming pot: nclude steaming pot, steaming disc, and steaming cover. Could be used to steam big
quantity food with similar tastes, such as vegetables, potatoes, thickly sliced meats, sausages and fish…
etc.
Caution: please pay attention to avoid being scalded by vapor.
Figure 19
Basket ha dle
Spatula
Figure 20
Figure 21 Figure 22

How to use steaming pot in correct way:
Step 1: Put at least 500g water in SS jar (Figure23).
Step 2: Please assemble the SS jar into its position on the unit (Figure 24), and then put food (such as
rice and potato) in filter. Put cover on and ensure the bottom is fastened well and twisted into right
place.
Put food in steaming pot and put the easily cooked food on bottom, and the not so easily cooked food on
top. f necessary, the steaming disc could be used to put food on.
Step 3: Cover the steaming pot (Figure 25) so that steaming air won’t be released.
Important reminder:
When the steaming pot is used, please keep children well away from machine and notify them of the
dangers of the steam.
Figure 23 Figure 24
Figure 25

Operation: Set up time and steaming temperature on control panel, then press start/stop button. The
cooking will start accordingly. Steam vapors go to steaming pot through holes in the stainless steel jar
cover, and the food will cook.
When opening steam cover, please be careful to put the cover slightly angled, so that the hot steam
vapors spill out rearward, and cooled water can flow into the steaming pot. Take off the cover and put on
the table, then take up steaming pot and hold for several seconds. Let cooled water drip into the
stainless steel jar cover, then put the steaming pot in the steaming cover.
Using Instruction:
Control panel signal explain (Figure 26):
T ME ▶ Display ”Time” indication
TEMP ▶Display ” Temperature” indication ◀SPEED Display “Speed” indication
Control panel using instruction:
Time﹕Choose time button
Temp: Choose temperature button
Speed: Choose speed button
Dough: Dough pattern button
Turbo/Push: The highest speed button
+: Adding time, temperature and speed button
-: Reducing time, temperature and speed button
Start/Stop: Start/ Stop button
Figure 26

I you would like to heat or cook ood, please ollow as below steps to operate﹕
Step 1: Set up time
Set up time by time button, and max is 90min.
Press time button and “Time” ▶
characters should be highlighted, then press the “+” button to add more
time, press “-“ button to remove time. Holding down “+” or “-“ button will add or reduce time quickly.
Set up time: Press once “+” or “-“ to change times in periods of 1 minute. Double press quickly to
indicate seconds.
Step 2: Set up temperature
Before cooking, please choose cooking temperature firstly. f you don’t need heat, please go to step 3.
Set up temperature: Press “Temp” button, the indicator should be highlighted, then press “+” to raise the
temperature. Press the “-“ button to reduce temperature. Hold “+” or “-“ button down to raise or lower
temperature quickly.
Note: Every press on “+” or “-“ will add or reduce 10 degrees Celsius.
Temperature adjusting scope: Heating temperature could be selected from 30 to 120 degrees Celsius.
Step 3: Blade assembly stirring speed set up
Stirring speed set up: Press “speed” button, the indicator will be highlighted. Press the “+” button to add
speed and press “-“ to reduce speed. Hold “+” or “-“ down to change the speed settings quickly.
Note: When blending, adjust speed to 1-5. When making a sauce, adjust speed to 5-9.
Step 4: Press “Start/Stop” button
After pressing “Start/Stop” button, you will hear the operation tone and the machine will begin working.
After starting, the set-up time will count down to “00:00”, and the machine would beep when the process
is finished. n operation status, press “Start/Stop” again and the machine will stop.
Important notes:
1. f you do not select the heating function or time, but only set up stirring speed, the machine can be
started and will run under auto time. The max working time is 20min. When the unit has been working
for 20mins; the machine will stop automatically and beep.
2, When selecting the heating function, it’s necessary to set up time and speed, and then start heating or
cooking. f you set up the heating temperature but do not set a time, the machine will not start up.
When heating is finished, (i.e. the time countdown reaches “00:00”), the machine will stop heating, but
the blade inside the stainless steel jar will continuously stir for 10 min to stop the food burning or sticking
to the jar. Once the timer is complete, the stirring will stop and the unit will beep.
3, When choosing the heating function, speed can be set up in max. 5 speed.
4. When the time countdown reaches “00:00”, the machine will beep. The machine will beep again
after 5 minutes if no action has been performed in this time.

Dough pattern:
Use this pattern to make yeast dough or bread dough (LCD display as figure 27)
Operation: Set up time first, then press the “Dough” button. Finally press the “Start/Stop” button. This
pattern will operation in pre-set program, working in 3 speed for 3 second, then stop for 4 seconds and
then repeat.
Example: Put 500g flour into stainless steel jar (stainless steel jar should be completely dry), then place
stainless steel jar into position. Set up 3 minutes, press “Dough” button, then press “Start/Stop” button.
Machine will work under its pre-set program. Following the procedure, put 300g water slowly into
stainless steel jar (amount should all be poured in within one minute). Dough will be done within 3
minutes.
Note: When use dough pattern, stainless steel jar should be dry before put flour to avoid flour sticking to
the jar during the blending process. Flour shouldn’t exceed 500g, water shouldn’t exceed 300g, set-up
time shouldn’t exceed 3 min. The proportion between flour and water is 5:3, and results may be
improved if you add some extracted oil into flour,
Caution: To take blade after dough completion, please be caution to avoid sharp blade injuries to your
hand.
This machine may move when making dough, so please place it on a steady heat-resistant table, a safe
distance from the edges to avoid falling.
Please do not uses the machine without guards in place, and ensure they don't fall off during operation.
Turbo (Pulse) button
No need to set up time and stirring speed, just press the “Turbo (Pulse)” button continuously, and
machine would operate in max speed. The machine will stop when the button is released.
This button is used to crash hard food such as ice cubes.
Note: This button will not function under dough pattern.
Caution: f using Turbo (Pulse) for heated food, the weight of food should not exceed 1000g. The
measuring cup should be positioned on stainless steel jar cover to avoid scalding by food spillage.
Figure 27

Cleaning:
Before first use, the machine should be thoroughly cleaned, including all food-contactable accessories.
To clean stainless steel jar and cover: disassemble blade assembly and sealing ring firstly (please take
reference of prior instructions)
Use hot water or washing machine to clean stainless steel jar internal part and housing (exclude blade).
You can also clean the spatula, butterfly, blade guard, filter, measuring cup, cover and steamer at same
time.
Note: In the event o a sticky or un-easily cleaned matter stuck to the stainless steel jar or
stainless steel accessory, please make use o a special stainless steel detergent.
How to clean blade assembly:
Hold blade assembly bottom and place it under tap to flush. A scrubbing brush also could be used.
Notice: Please pay attention when dismantling blade assembly to avoid injuring your hand.
How to clean steamer:
Please use dishwasher to clean steamer and cover. A soft cloth and detergent can also be used.
How to clean housing:
Use soft cloth or detergent to clean. Please do not use water directly to avoid water go into internal
housing areas.
Notice: Unplug unit prior to cleaning.

Instruction when using recipes
ngredients order: When prepare the food by your recipe, please consider the order of every process.
Caution: Please ensure the stainless steel jar capacity shouldn’t exceed 2 litres.
Setting-up order:
You will get the best results by following this suggested order:
f you want to cook food, please set up time, temperature, speed, and press “Start/Stop” button.
f you want to blend or chop food, please set up time, speed, and press “Start/Stop” button.
Example: Cooking Food
a. Set up time 45min
b. Choose temperature 120°
c. Set up speed 3
d. Press “Start/Stop” button.
Example: Chopping Vegetables
a. Set up time 30 seconds
b. Set up speed 6
c. Press “Start/Stop” button.
Example: Crushing ce Cubes
Do not exceed 300g ice cube in SS jar.
a. Set up 1 min
b. Set up speed at 9
c. Press “Start/Stop” button
Example: Blending Carrot Juice
Do not exceed 400g carrot in stainless jar and 600g water
a. Set up 1 min
b. Speed set up at 9
c. Press “Start/Stop” button
Example: coffee grinding
Do not put more than 200 grams of coffee beans into jar
a. Set up 2 min
b. Speed set up at 9
c. Press start/stop button
Table of contents
Other Kogan Food Processor manuals