manuals.online logo
Brands
  1. Home
  2. •
  3. Brands
  4. •
  5. Kohler
  6. •
  7. Plumbing Product
  8. •
  9. Kohler MODULO 72801T-4 User manual

Kohler MODULO 72801T-4 User manual

This manual suits for next models

9

Other Kohler Plumbing Product manuals

Kohler K-75449-BV User manual

Kohler

Kohler K-75449-BV User manual

Kohler TAUT 24572X-4A User manual

Kohler

Kohler TAUT 24572X-4A User manual

Kohler AVID 97367T-4 User manual

Kohler

Kohler AVID 97367T-4 User manual

Kohler SYMBOL 72641T User manual

Kohler

Kohler SYMBOL 72641T User manual

Kohler Margaux K-16230-4 User manual

Kohler

Kohler Margaux K-16230-4 User manual

Kohler K-14660 Assembly instructions

Kohler

Kohler K-14660 Assembly instructions

Kohler K-6331 User manual

Kohler

Kohler K-6331 User manual

Kohler Margaux Series User manual

Kohler

Kohler Margaux Series User manual

Kohler Mira Showers Escape Thermostatic 9.8 kW User manual

Kohler

Kohler Mira Showers Escape Thermostatic 9.8 kW User manual

Kohler K-8211 Assembly instructions

Kohler

Kohler K-8211 Assembly instructions

Kohler ADAGIO K-731T User manual

Kohler

Kohler ADAGIO K-731T User manual

Kohler K-2816 Operating and maintenance instructions

Kohler

Kohler K-2816 Operating and maintenance instructions

Kohler K-3671 Assembly instructions

Kohler

Kohler K-3671 Assembly instructions

Kohler Electric Shower User manual

Kohler

Kohler Electric Shower User manual

Kohler K-15599X User manual

Kohler

Kohler K-15599X User manual

Kohler Sterling 7613 Series User manual

Kohler

Kohler Sterling 7613 Series User manual

Kohler K-12183 Assembly instructions

Kohler

Kohler K-12183 Assembly instructions

Kohler K-302 Assembly instructions

Kohler

Kohler K-302 Assembly instructions

Kohler K-4761 User manual

Kohler

Kohler K-4761 User manual

Kohler Kumin K-103K36-SANA-CP User manual

Kohler

Kohler Kumin K-103K36-SANA-CP User manual

Kohler CUFF 37310M-4 Operation manual

Kohler

Kohler CUFF 37310M-4 Operation manual

Kohler Mira Logic L19B Operation manual

Kohler

Kohler Mira Logic L19B Operation manual

Kohler Aleo 77751X-4CD User manual

Kohler

Kohler Aleo 77751X-4CD User manual

Kohler STANCE User manual

Kohler

Kohler STANCE User manual

Popular Plumbing Product manuals by other brands

Moen SANI-STREAM 8797 manual

Moen

Moen SANI-STREAM 8797 manual

Grohe Allure Brilliant 19 784 manual

Grohe

Grohe Allure Brilliant 19 784 manual

Cistermiser Easyflush EVO 1.5 manual

Cistermiser

Cistermiser Easyflush EVO 1.5 manual

BEMIS FNOTAB100 Installation instruction

BEMIS

BEMIS FNOTAB100 Installation instruction

Hans Grohe ShowerTablet Select 700 13184000 Instructions for use/assembly instructions

Hans Grohe

Hans Grohe ShowerTablet Select 700 13184000 Instructions for use/assembly instructions

Akw Stone Wash Basin Installation instructions manual

Akw

Akw Stone Wash Basin Installation instructions manual

Enlighten Sauna Rustic-4 user manual

Enlighten Sauna

Enlighten Sauna Rustic-4 user manual

Moen ShowHouse S244 Series quick start guide

Moen

Moen ShowHouse S244 Series quick start guide

Sanela SLWN 08 Mounting instructions

Sanela

Sanela SLWN 08 Mounting instructions

Franke 7612982239618 operating instructions

Franke

Franke 7612982239618 operating instructions

Heritage Bathrooms Granley Deco PGDW02 Fitting Instructions & Contents List

Heritage Bathrooms

Heritage Bathrooms Granley Deco PGDW02 Fitting Instructions & Contents List

Tres TOUCH-TRES 1.61.445 instructions

Tres

Tres TOUCH-TRES 1.61.445 instructions

STIEBEL ELTRON WS-1 Operation and installation

STIEBEL ELTRON

STIEBEL ELTRON WS-1 Operation and installation

Miomare HG00383A manual

Miomare

Miomare HG00383A manual

BELLOSTA revivre 6521/CR1 quick start guide

BELLOSTA

BELLOSTA revivre 6521/CR1 quick start guide

American Standard Heritage Amarilis 7298.229 parts list

American Standard

American Standard Heritage Amarilis 7298.229 parts list

BorMann Elite BTW5024 quick start guide

BorMann

BorMann Elite BTW5024 quick start guide

Moen 1225 quick start guide

Moen

Moen 1225 quick start guide

manuals.online logo
manuals.online logoBrands
  • About & Mission
  • Contact us
  • Privacy Policy
  • Terms and Conditions

Copyright 2025 Manuals.Online. All Rights Reserved.

1232849-2A-A 1
BEFORE YOU BEGIN
All information is based on the latest product information available at the time of publication. Kohler Co. reserves
the right to make changes in product characteristics, packaging, or availability at any time without notice.
Please leave these instructions for the consumer. They contain important information.
NOTES:
1. Flush the water supply pipes thoroughly to remove debris.
2. Inspect the supply tubing for damage and leakage. Replace and maintain as necessary.
3. Observe local plumbing codes. Shut off the main water supply.
4. Check for leaks before covering the pipes, repair as needed.
5. Please ensure only apply water pressure test on the product, and empty the air in pipe and faucet thoroughly
before the test. Please ensure test pressure below 0.8MPa(8bar) and test duration within 30 minutes.
1232849-2A-A 4
INSTALLATION INSTRUCTIONS
72801T-4 72803T-4M 72805T-4 72807T-4 72809T-4 Recessed Bath Shower Trim And Valve
72802T-4 72804T-4M 72806T-4 72808T-4 72810T-4 Recessed Shower Only Trim And Valve
72801T-4 72803T-4M 72805T-4 72807T-4 72809T-4 Recessed Bath Shower Trim And Valve
72802T-4 72804T-4M 72806T-4 72808T-4 72810T-4 Recessed Shower Only Trim And Valve
MODULOMODULO
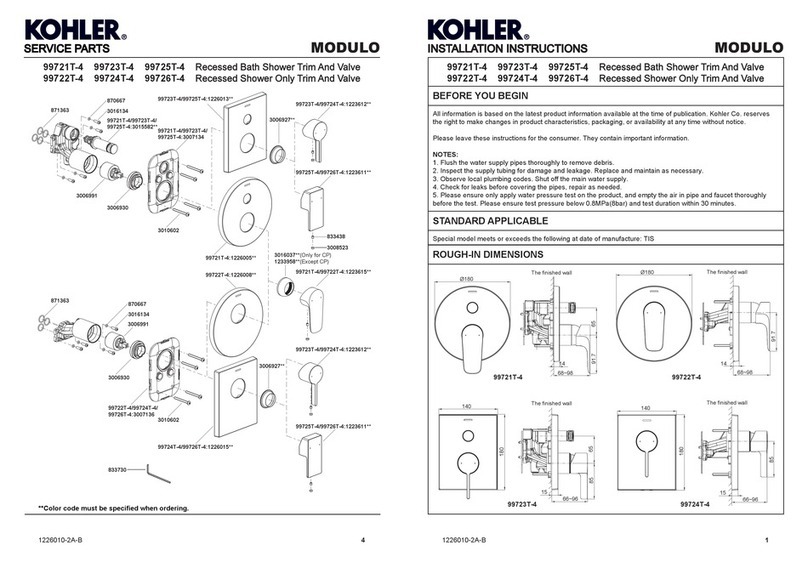
ROUGH-IN DIMENSIONS
SERVICE PARTS
**Color code must be specified when ordering.
The finished wall
The finished wall
The finished wall The finished wall
98~128
79~109 79~109
98~128
15
15
Ø180 Ø180
Ø180 Ø180
81
81
65
84
84
65
72801T-4 72802T-4
72803T-4M 72804T-4M
15
15
72801T/72802T/72803T/72804T/
72809T/72810T:
833730
72801T/72803T/72805T/
72807T/72809T:1231000**
72801T/72802T/72803T/72804T/
72809T/72810T:833438
72801T/72802T/72803T/72804T/
72809T/72810T:1032012**
72802T/72804T/72806T/
72808T/72810T:1230996**
72801T/72802T/72803T/72804T/
72809T/72810T:3006927** 72801T/
72802T:1231668**
72803T/
72804T:1231673**
72809T/
72810T:1231674**
72801T/72803T/72805T/
72807T/72809T:3015582**
871363
871363
3006991
3006991
3006930
3006930
870667
3016134
870667
3016134
72801T/72803T/72805T/
72807T/72809T:3007134
72802T/72804T/72806T/
72808T/72810T:3007136
3010602
3010602
72805T/72806T:3006928**
72807T/72808T:1145541**
72807T/72808T:1145540**
72805T/
72806T:836530
72805T/72806T:78148**
72805T/72806T:834554
72805T/72806T:832940
72807T/72808T:832940
72807T/72808T:834554
72807T/72808T:1138646**
72805T/
72806T:78042**
1232849-2A-A 2
1232849-2A-A 3
INSTALLATION CHECKOUT
CLEANING INSTRUCTIONS
All Finishes: Clean the finish with mild soap and warm water. Wipe entire surface completely dry with clean soft
cloth. Many cleaners may contain chemicals, such as ammonia, chlorine, toilet cleaner etc, which could adversely
affect the finish and are not recommended for cleaning.
Do not use abrasive cleaners or solvents on Kohler faucets and fittings.
INSTALLATION
NOTE: Install mounting box
kit(1) according to the rough-in
dimensions of 98699T-NA.
Cut the protrudent part of the
mounting box kit out of the
finished wall. Unscrew the
screw(2), remove the protect
cover kit(3).
Remove the protection(5) on the
valve kit(4). NOTE: Don’t drop the
o-rings(6). The holes on the bottom
of the valve kit should be aligned
with the holes in the mounting box.
Install the valve kit into the mounting
box kit, tighten the screws(7).
Slide the cover kit(8) onto the valve
with the plugs(9) facing outside
(NOTE: Don’t squeeze out the rings
10,11). Push it against the wall.
Secure it with the screws(12).
Slide the faceplate(13) onto the valve with
slots(14) downwards. Push it against the
wall. Screw the bonnet(15) on the valve.
For 72801T, 72802T, 72803T, 72804T,
72809T & 72810T:
Install the handle(16) on the valve stem.
Tighten the screw(18) with hex wrench
(17). Press plug button(19) to the hole.
For 72805T, 72806T, 72807T & 72808T:
Install the adapter(20) onto the valve
stem(only for 72805T & 72806T). Tighten
the handle(21) by the screw(23) with
washer(22). Press plug button(24).
Ensure that all coupling nuts are tight.
Ensure that the handle is in the off position.
Turn on the main water supply, and check for leaks. Repair as needed.
1
2
3
4
5
6
7
8
9
10
12
11
4
The finished wall The finished wall
The finished wall
The finished wall
The finished wall
The finished wall
72805T-4 72806T-4
72807T-4 72808T-4
72809T-4 72810T-4
87~117 87~117
65
88
88
Ø180
80~110
65
82
78~108 78~108
65
84
84
80~110
82
Ø180 Ø180
Ø180 Ø180
Ø180
15 15
15
15
15 15
13
14
15
1819
17
16
22
21
23
20
24