Kolcraft Universal 2 Car Seat Carrier User manual

©2008 Kolcraft®Enterprises, Inc. S61-T 4/08
Universal 2 Car Seat Carrier Instruction Sheet
Carriola Universal 2 para asientos de automóvil
Mode d’emploi du Châssis Siège Auto Universal 2

2
Failure to follow these instructions could result in serious injury or death.
Your child’s safety depends on you. Proper Carrier usage cannot be
assured unless you follow these instructions. DO NOT USE CARRIER UNTIL
YOU READ AND UNDERSTAND THESE INSTRUCTIONS.
IMPORTANT SAFETY INFORMATION:
How to Keep Your Child Safe While Using this Carrier
•Adult Assembly Required.
•AVOID SERIOUS INJURY FROM FALLING OR SLIDING OUT:
• This product is only to be used with certain Infant Car Seats.
See list on Page 3 for compatible Infant Car Seats.
• When using this product, infant must always be secured in the car
seat with the car seat harness and car seat secured with red
restraint strap.
•DO NOT fill basket above warning strap. Car Seat can become
unstable if items in basket touch Car Seat.
•NEVER LEAVE YOUR CHILD UNATTENDED WHILE IN CARRIER.
Accidents can happen quickly while your back is turned. You must
always keep your child in view while your child is in the Carrier,
even when sleeping. Your child may become tangled in the Infant
Car Seat or Carrier straps or pads and suffocate.
• Always balance the weight of the Carrier evenly. To prevent the
Carrier from becoming unstable or tipping:
• Do not allow tray to lift Infant Car Seat. Car Seat must rest on
front & rear bars for proper installation.
• Do not place parcels or hang accessory items on the Carrier,
Infant Car Seat, or over the handle.
• Do not put more than 10 lbs (5.44 kg) in the basket.
• Do not allow children to play with or hang onto the Carrier.
•Make Sure the Carrier is fullyunfolded and securelylatched before
attaching your Infant Car Seat.This prevents finger pinching and
injuries caused by the Carrier collapsing.
• Onlytransport infants that are within the size and weight limitations
of your Infant Car Seat, as described in the instruction manual
provided by the Infant Car Seat manufacturer.
•
DO NOT carryadditional children, goods or accessories in or on this
carrier except as permitted in these instructions.
WARNING
Continued on next page

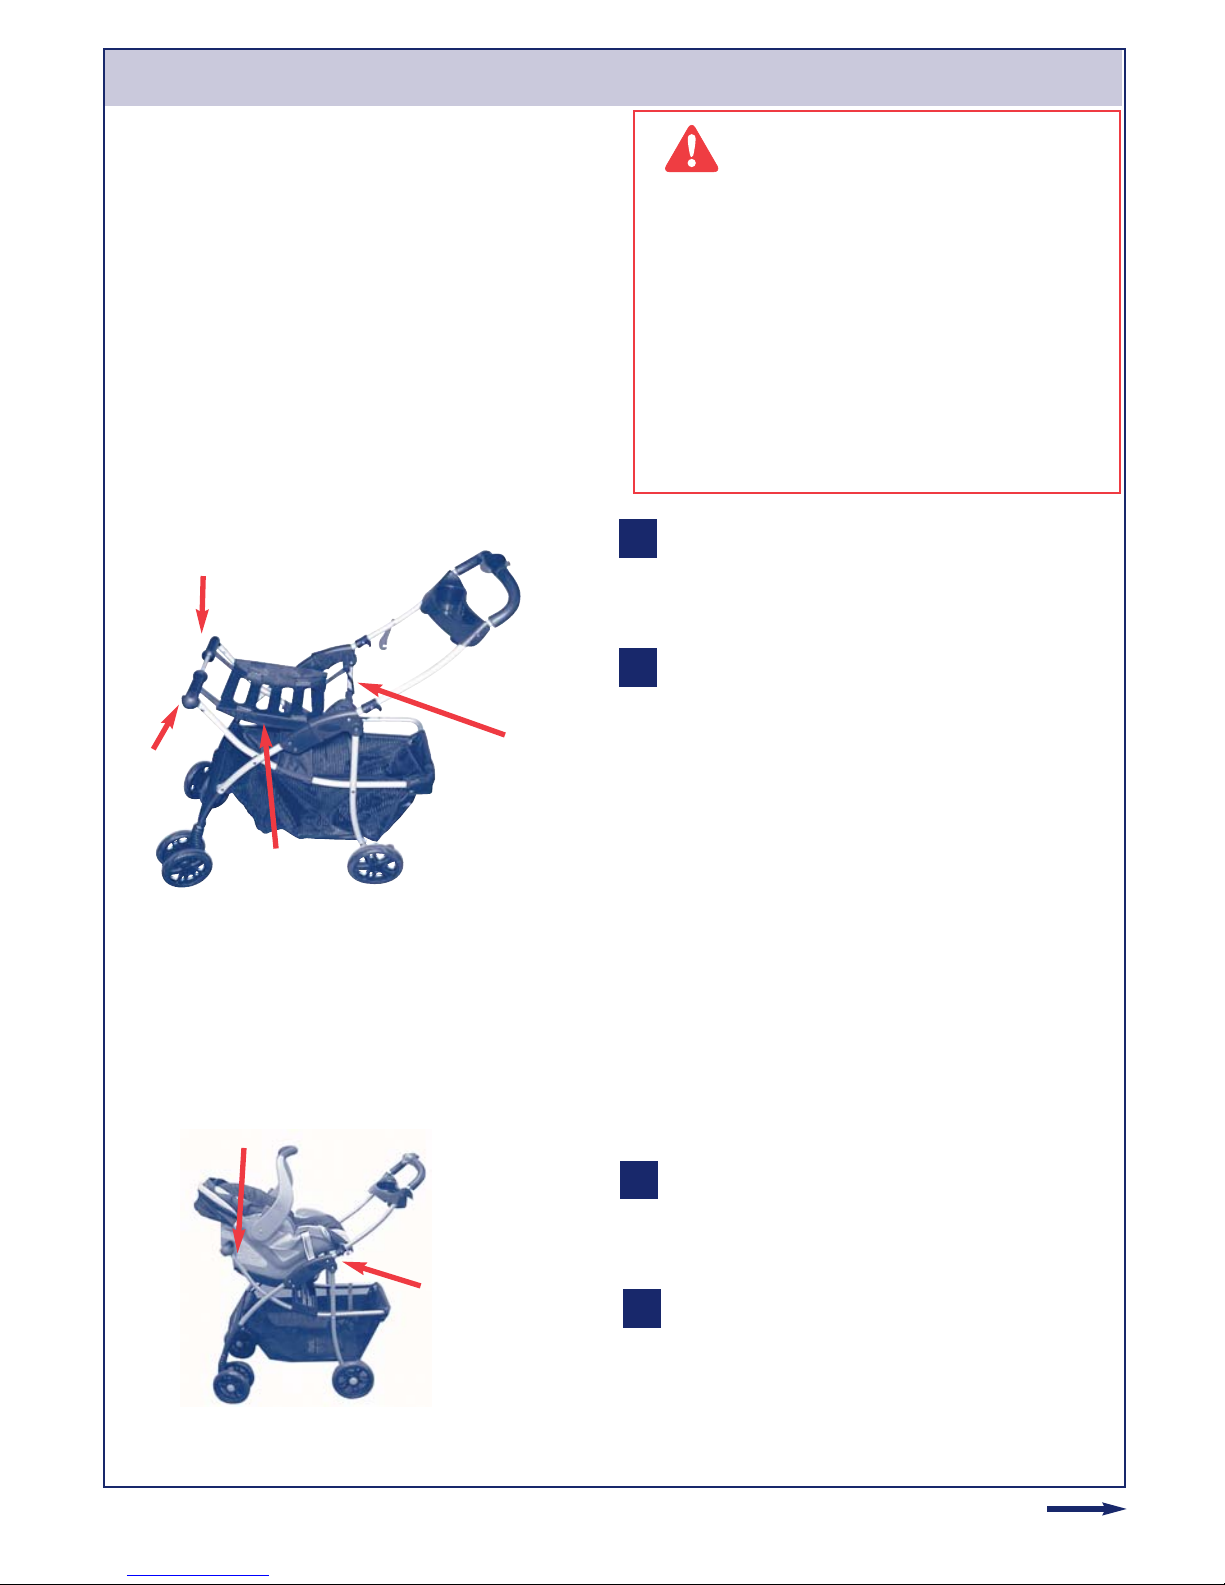
• To ensure your Infant Car Seat is properly installed on the carrier,
make sure it is:
• Facing the person pushing the carrier.
• Tightly secured to the carrier with the red restraint straps.
• If at any time your Infant Car Seat does not secure properly to the
carrier, or if you have questions about assembly or use of the
carrier, Do Not use this product. Call Kolcraft at 1-800-453-7673.
•Always set the wheel brakes when Carrier is not moving, especially
on an incline. This prevents the Carrier from rolling away.
•Make sure children are clear of any moving parts if you adjust the
stroller, otherwise they may be injured.
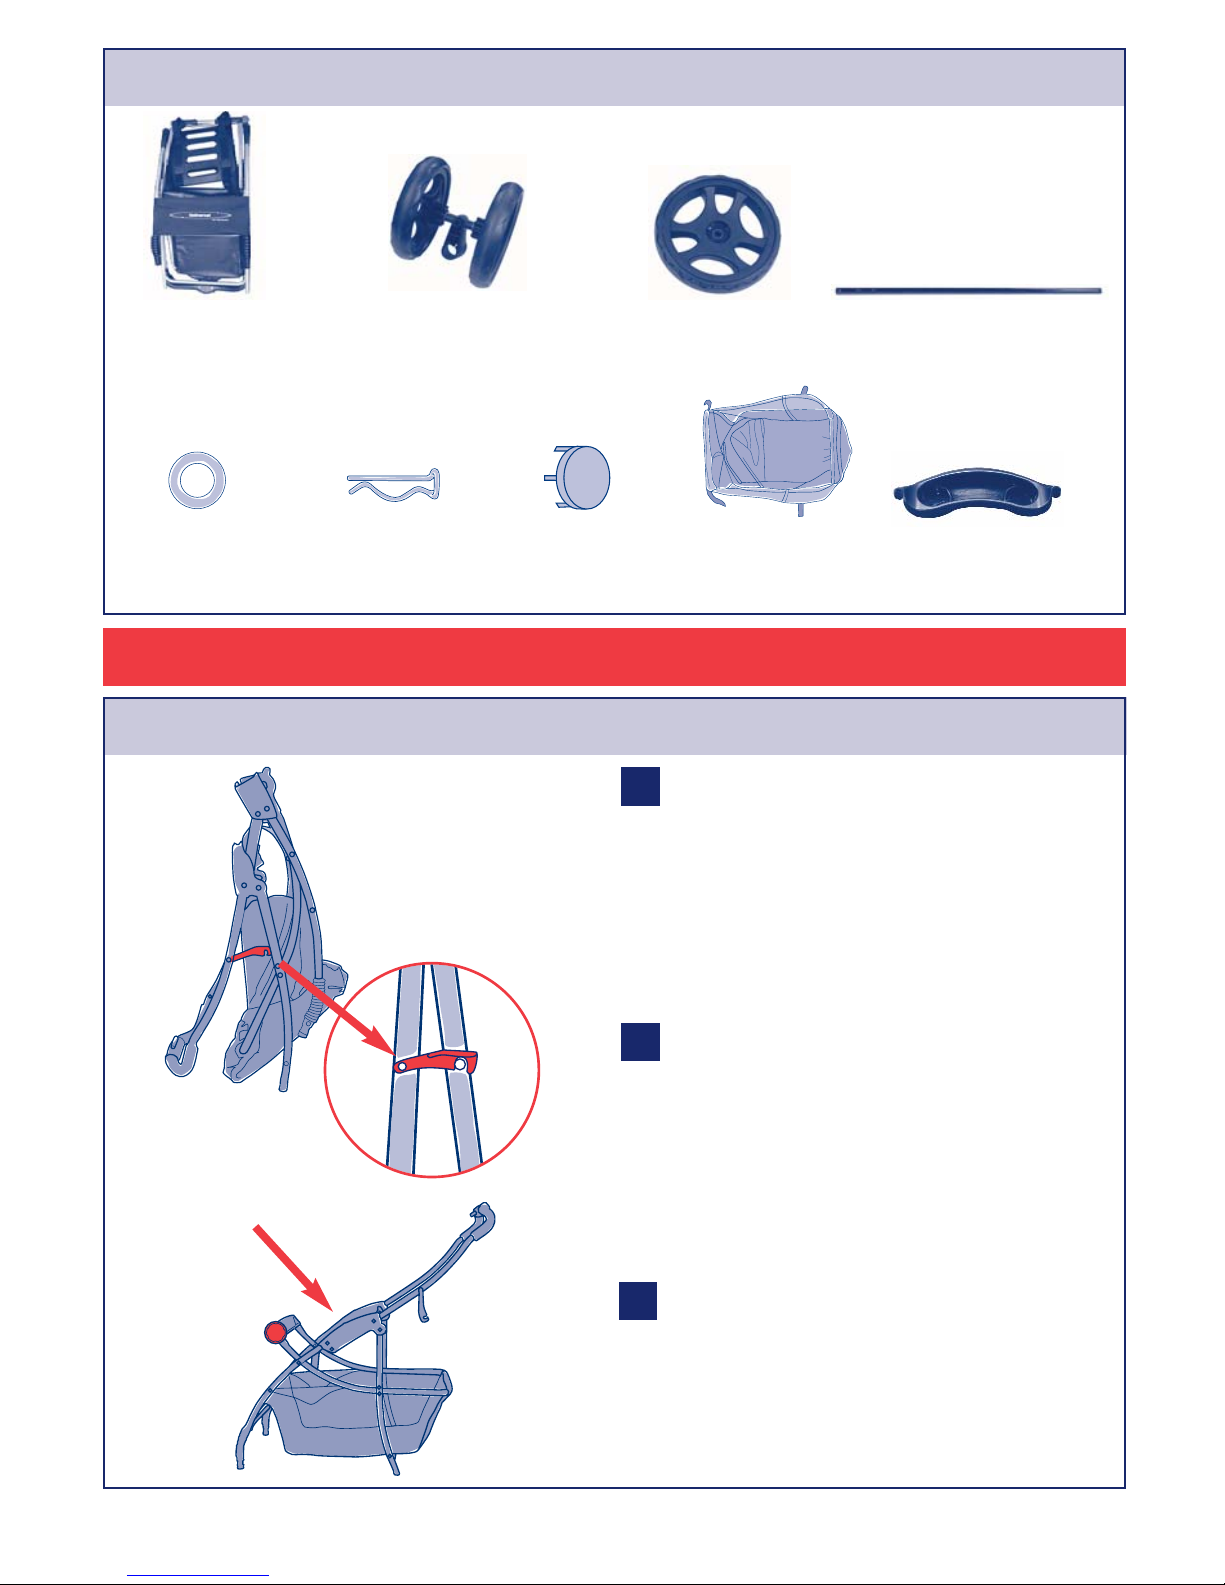
•Take care when folding and unfolding to prevent finger pinching.
• Product may become unstable if a parcel bag, other than the one
recommended by the manufacturer is used.
•Never use this Carrier on stairways or escalators.
•DO NOT lift Carrier by bars or by secured Infant Car Seat.
•This is not an exercise Carrier! Do not use this product while running,
jogging, in-line skating or participating in other athletic activities.
•DO NOT put child in basket.
•THE FOLLOWING INFANT CAR SEATS CAN BE USED IN THIS
CARRIER:
If your Infant Car Seat is not one of the models listed above, DO NOT
use this Carrier.Other Infant
Car Seat models will not attach properlyto
the Carrier and may result in serious injuryto your child.
•DO NOT USE THE FOLLOWING CAR SEATS IN THIS
CARRIER
! This
list is not inclusive:
Baby Trend®, Britax®, Century®, Combi®, Cosco®, EvenFlo®, Graco®, Peg Pérego®and Safety
1st®are trademarks of their respective owners. They are not associated with Kolcraft
Enterprises, Inc. and no approval by them is to be implied.
•Cosco®Eddie Bauer®Caress
•Cosco®Eddie Bauer®
Opus®35®
•Cosco®First Ride DX
•Cosco®Turn-A-Bout®
•Evenflo®Cozy Carry™
•Evenflo®Discovery™
•
Evenflo®On-My-Way™
•Britax®Companion®
•Britax®Handle with Care®
•Century®Avanta™Series
•
Century
®
Vanté
™
5
•Combi®Connection™
•
Combi
®
Tyro
™
•
Cosco
®
Arriva
®
Series
•
Cosco
®
Designer
®
•
Evenflo®Portabout™
•
Graco®Safe Seat™
•
Graco®Snug Ride™Series
•
Peg Pérego Primo Viaggio SIP
•
Safety 1st®Designer®22™
•
Safety 1st®Starter™
3
•Baby Trend®Latch-Loc
•Baby Trend®Flex-Loc
•Britax®Baby Safe™
•Century®535/580/590 Series
•Century®Assura®Series
•Century®Smart Fit™Series
•Chicco®Key Fit
•
Cosco
®
Dream Ride
®
•
Fisher Price
®
Stay in View
™
•Evenflo®Embrace™
•All Gerry®Infant Car Seats
•
Peg Pérego Primo Viaggio
•Kolcraft®Infant Rider®
•Kolcraft®Secura™

4
To Open Carrier
Release locking latch.
Unfold as shown. Make sure both locks
click into place.
Press down on each lock to ensure you
have carrier properly locked in position.
Parts List
2
1
How to Assemble Your Carrier
Front Wheels (2)
1
3
2
Parent TrayBasket
Stroller Frame Rear Wheels (2)
Washer (2) Cotter Pin (2) Hub Cap (2)
Rear Axle

5
Tab
To Assemble Front Wheels
Remove any cardboard inserts or plastic
ties used to protect the product during
shipment.
Turn
Carrier
over as shown.
Align front wheel assembly as shown.
Tab must be facing away from pin
(towards you).
Push wheel assembly onto pin until it
snaps into place.
Repeat for other wheel. Tug firmly on
each wheel assembly to be sure
assemblies are securely in place.
NOTE: To remove front wheels, pull tab
and lift wheel off.
1
2
3
2
3
4
5
4
Position complete rear axle assembly
with brakes as shown, with brake levers
pointing towards Carrier handle.
Push both brake assemblies onto rear
leg tubes at the same time.
Make sure plastic tabs on brake assem-
blies lock into holes on rear legs as
shown.
Line up tabs in each of the hub caps
with slots in the wheel, snap hub caps
into place.
To Assemble Rear Wheels
1
2
4
1
3
3
Tab locks into hole

To Attach Parent Tray
WARNING
Do not place more than 3 lbs. (1.36 kg)
in this tray to avoid tipping!
Do not place hot liquids in this tray.
Hot liquids can burn your child.
To assemble parent tray. Align tray holes
with posts near handle and snap on.
To remove parent tray, pull each side up
and out.
1
2
6
1

How to Properly Use Your New Carrier
To Operate Brakes
1Push levers on both wheel assemblies
down to lock.
Pull levers up to unlock.
2
WARNING
DO NOT fill basket above warning strap.
Infant Car Seat can become unstable if
items in basket touch Infant Car Seat.
Maximum basket weight 10 lbs. (5.44 kg)
To Secure Infant Car Seat
1
4
Lock both foot brakes to keep stroller
from rolling.
To fasten car seat restraint belts - open
up loop of the restraint belt. Adjust belt
until the buckles almost touch.
Pull end tab of restraint belt to set. Push
buckles together to secure.
To unsnap Restraint Belt - press tabs.
2
3
4
2
3
3
7
Unlock 2
1
Lock

8
To secure your Britax®Handle with Care®Infant Car Seat
•When using this product, to avoid
serious injury from falling or sliding
out, infant must always be secured in
the Infant Car Seat with the Car Seat
harness. Refer to Infant Car Seat
Instructions for proper adjustment.
•Do not allow tray to lift car seat. Car
Seat must rest on front & rear bars for
proper installation. Failure to follow
these instructions could result in
serious injury.
Rear Bar
Front Bar
WARNING
Front Bar
Rear Bar
Britax
Tray
Continued on next page
1Adjust tray to its lowest position. To
adjust, pull knob out and twist.
With one hand, grasp the Infant Car Seat
handle (in its upright, carrying position).
With your other hand, grasp Infant Car
Seat near baby’s feet. Gently position the
Infant Car Seat above
Carrier
so the
baby faces the handle.
Place rear rocker of the Infant Car Seat
underneath the front bar as shown.
Gently place front portion of Infant Car
Seat Rocker underneath the rear bar.
Raise tray until it touches the bottom of
the car seat. Do not allow tray to lift Car
Seat.
2
3
4
5
1
3 & 4
Knob

9
Secure Car Seat to
Carrier
by feeding
Restraint Straps through Infant Car Seat
belt slots and buckle. Tighten Restraint
Straps.
NOTE: Your Infant Car Seat may have a
level indicator. It is not necessary for use
with this carrier and the indicator may fall
outside the recommended area. The
level indicator is for use while the Infant
Car Seat is in an automobile.
Make sure Infant Car Seat is secure. Test
Infant Car Seat installation by moving it
in all directions to ensure a tight fit to
Carrier
.
TO REMOVE CAR SEAT
Unbuckle Restraint Straps and remove
them from Car Seat belt slots.
With one hand grasp the Infant Car Seat
handle (in its upright, carrying position).
With your other hand, grasp Infant Car
Seat near baby’s feet. Gently pull up on
the front portion of Infant Car Seat and
remove.
8
9
6
7
Rear Bar
Restraint Straps
Front Bar 6
10

10
1
2
To Secure All Other Acceptable Infant Car Seats
Adjust tray to its lowest position. To
adjust, pull knob out and twist.
With one hand, grasp the Infant Car Seat
handle (in its upright, carrying position).
With your other hand, grasp Infant Car
Seat near baby’s feet. Gently position the
Infant Car Seat above
Carrier
so the
baby faces the handle.
Lower the Infant Car Seat between the
front & rear bars.
Raise tray until it touches the bottom of
the car seat. Do not allow tray to lift Car
Seat.
3
Rear Bar 4
Continued on next page
Front Bar
•When using this product, to avoid
serious injury from falling or sliding
out, infant must always be secured in
the Infant Car Seat with the Car Seat
harness. Refer to Infant Car Seat
Instructions for proper adjustment.
•Do not allow tray to lift car seat. Car
Seat must rest on front & rear bars for
proper installation. Failure to follow
these instructions could result in
serious injury.
WARNING
Front Bar
Rear Bar
Tray
1
Knob

11
Secure Car Seat to
Carrier
by feeding
Restraint Straps through Infant Car Seat
belt slots and buckle. Tighten Restraint
Straps.
NOTE: Shopping cart lever will not lock
onto the carrier. To secure infant car seat
to carrier, use restraint straps.
Special Instructions
for Car Seats without
belt slots: Secure Infant Car Seat to
Carrier
by bringing Restraint Straps over
the sides of the seat near the base of
the seat handle and buckle them
together. Tighten Restraint Straps.
Make sure Infant Car Seat is secure. Test
Infant Car Seat installation by moving it
in all directions to ensure a tight fit to
Carrier
.
NOTE: Your Infant Car Seat may have a
level indicator. It is not necessary for use
with this carrier and the indicator may
fall outside the recommended area. The
level indicator is for use while the Infant
Car Seat is in an automobile.
TO REMOVE CAR SEAT
Unbuckle Restraint Straps and remove
them from Car Seat belt slots.
With one hand grasp the Infant Car Seat
carry handle (in its upright, carrying
position).
With your other hand, grasp Infant Car
Seat near baby’s feet. Gently pull up on
the front portion of Infant Car Seat and
remove.
NOTE: Some Infant Car Seats
may
lock
on, but not on all car seats. With your
other hand, press back shopping cart
lever on Adjustment Bar.
7
8
Note: Shopping Cart Lever
5
6
Rear Bar
Restraint Straps
Front Bar 5
9

Care & Maintenance
12
To Fold Carrier
1
2
3
4
Lock brakes.
Push red button with thumb, then press
red lever under handle.
NOTE: If 1-hand fold feature does not
operate properly, pull up latches on
frame to fold.
Fold
Carrier
.
NOTE: Fold
Carrier
so wheels straddle
frame. DO NOT allow wheels to press
against frame as this may damage tires.
Engage locking latch.
4
2
• To keep your stroller running smoothly and avoid squeaking wheels use a silicon
or graphite based lubricant. It is important to get it into the axle and the wheel
assembly.
• Clean metal parts with a damp cloth and wipe dry.
• Clean woven fabric or vinyl parts with mild soap and water solution.
• Dry wet stroller with a soft cloth to prevent rusting.
• When storing stroller, never stack other items on top of it; this may damage the stroller.
• Periodically check for worn parts, loose screws, torn materials or stitching.
• Replace any damaged parts immediately.

13
Personal Record Card
Once in a while, we are less than perfect and one of our products reaches a customer with a
problem. In most cases, we can solve your problem with replacement parts. Please contact
us before you return one of our products to the store. Once a product is returned, it cannot
be resold. The materials and the energy used to make it are wasted.
Please fill in the information in the space provided and attach a copy of your purchase
receipt. You will need this information to obtain warranty service.
You can find the Model Number and Date of Manufacture on a sticker located on the rear
stroller leg, or sewn on the back of the seat.
Please direct anycomments, questions or replacement part requests to:
Kolcraft®Enterprises, Inc. Consumer Service Department
10832 NC Highway 211East
Aberdeen, NC 28315
1-800-453-7673 in U.S. & Canada, 1-910-944-9345 outside U.S. & Canada
Eastern Standard Time, 8 am-6:45 pm Monday - Thursday, 8 am-3:30 pm Friday
fax: 910-944-3536
e-mail: [email protected]
Model / Style Number: __________________________
Date of Manufacture:____________________________
Date of Purchase: _______________________________
Kolcraft®warrants this product to be free of defects in materials and workmanship, as
follows: For a period of ONE YEAR from the date of purchase, Kolcraft will repair or
replace, at its option, the defective product. If you have a problem or are not satisfied
with this product, please contact the Consumer Service Department at Kolcraft.
REPAIR OR REPLACEMENT AS PROVIDED UNDER THIS WARRANTY IS THE EXCLUSIVE
REMEDY OF THE CONSUMER. KOLCRAFT SHALL NOT BE LIABLE FOR ANY
INCIDENTAL OR CONSEQUENTIAL DAMAGES FOR BREACH OF ANY EXPRESS OR
IMPLIED WARRANTY ON THIS PRODUCT, EXCEPT TO THE EXTENT REQUIRED BY APPLI-
CABLE LAW. ANY IMPLIED WARRANTY OF MERCHANTABILITY OR FITNESS FOR A PAR-
TICULAR PURPOSE ON THIS PRODUCT IS LIMITED TO THE DURATION OF THIS WAR-
RANTY.
Some states do not allow the exclusion or limitation of warranties set forth above, so the
above exclusions may not apply to you. This warranty gives you specific legal rights, and
you may also have other rights which vary from state to state. We sincerely thank you for
your purchase of this Kolcraft product.
To obtain warranty service, please call Kolcraft’s Consumer Service Department at
1-800-453-7673 in U.S. and Canada, 1-910-944-9345 outside U.S. and Canada or contact
If the product is returned to Kolcraft’s Consumer Service Department for repair or
replacement, it must be shipped prepaid and adequately insured.
For further information visit www.kolcraft.com
Recall WEBSITE: HELP KEEP YOUR CHILD SAFE. Check www.recall.gov to see if any
products you use with your child or any of your child's toys have been recalled.
Limited Warranty
Turn to page 39 to see a list of
replacement parts

14
ADVERTENCIA
El no cumplir con las instrucciones y las advertencias podria causar
lesiones graves y hasta la muerte.
La seguridad de sus hijos depende de
usted. No puede asegurarse un uso apropiado del porta asientos a menos que usted
siga estas instrucciones. NO USE EL PORTA ASIENTOS HASTA QUE HAYA LEIDO Y
ENTENDIDO ESTAS INSTRUCCIONES.
INFORMACIÓN IMPORTANTE DE SEGURIDAD:
Cómo mantener a su hijo seguro mientras utiliza éste porta asientos
•
Ensamblado por un adulto es necesario.
•EVITE DAÑOS SERIOS CAUSADOS POR CAÍDAS O AL DESLIZARSE DEL ASIENTO.
• Este producto es para ser usado solamente con ciertos asientos
infantiles. Vea la lista de los Asientos de Automóvil para Niños
compatibles abajo.
• Para usar este producto el niño debe encontrarse asegurado en el
asiento en todo momento y el asiento de automóvil para niños
debe de estar asegurado con las correas rojas.
•NO llene la canasta sobre la cinta de advertencia. El asiento puede
volverse inestable si la canasta entra en contacto con el asiento del
carro.
•NUNCA DEJE A SU NIÑO SOLO EN EL PORTA ASIENTOS.Pueden
ocurrir accidentes repentinamente mientras usted se encuentra de
espaldas. Debe mantener a su niño siempre a la vista mientras esté
en el porta asientos, aunque él esté durmiendo. Su niño pudiera
quedar atrapado entre las correas o sofocarse con los colchoncitos.
•Siempre distribuya el peso del porta asientos. Para evitar que el
porta asientos se vuelva inestable o se vuelque:
•
No permita que la charola eleve el asiento de automóvil para el niño.
El asiento para automóvil debe descansar en las barras frontal y
trasera para que la instalación sea la apropiada.
• No ponga objetos o cuelgue accesorios del porta asientos, el
asiento infantil o el mango.
•
No ponga objetos que pesen más de 5,44 kg (10 lbs) en la canasta.
• No permita que los niños jueguen con el porta asientos o se
cuelguen de ella.
•Asegure que el porta asientos esta desplegado yfijo antes de
asegurar su asiento infantil.Esto evitará daños a los dedos y heri-
das causadas por un plegamiento inesperado.
•Transporte únicamente niños del tamaño ypeso límite especifica-
dos en su asiento infantil, como se describe en el manual de
instrucciones de su fabricante.
•
NO acaree más niños, productos o accesorios de los permitidos en las
instrucciones de este porta asientos.
Continuación en la página siguiente

15
• Para asegurarse que el asiento Infantil de auto este bien instalado
en el porta asiento asegure que:
• Se encuentre de frente a la persona empujando el porta asientos.
• Este apretado asegurado a el porta asientos con los cinturones
rojos de seguridad.
• Si su porta asientos infantil no se encuentra bien asegurado a la
base o si tiene alguna duda sobre el ensamblaje o uso del
porta asientos, NO USE ESTE PRODUCTO. Llame a Kolcraft al
1-800-453-7673.
•Siempre ponga el freno de las ruedas cuando el porta asientos no
esté en movimiento, especialmente cuando esté en una superficie
inclinada. Esto evitará que el porta asientos ruede accidentalmente.
•
Si necesitara ajustar la carriola, asegúrese de que los niños no estén
en contacto con las piezas móviles, de lo contrario podrían lesionarse.
•Tome cuidado cuando este doblando o desdoblando para prevenir
pellizcos a los dedos.
• El producto puede hacerse inestable si una bolsa de paquete, otra
de la que es recomedada por el fabricante es usada.
•
Nunca utilice este producto en escaleras o escaleras automáticas.
•
No levante el porta asientos por las barras o por el asiento infantil.
•
¡Este producto no estádiseñado para hacer ejercicio! No utilize
este producto para correr, trotar, patinar o participar en otras
actividades atléticas!
•No ponga su niño en la canasta.
•
LOS SIGUIENTES ASIENTOS DE AUTOMÓVIL PUEDEN SER
USADOS EN ESTE PORTA ASIENTOS:
Si su asiento infantil no es ninguno de los modelos anteriores, no use
este porta asientos.Otros modelos no se ajustarán apropiadamente
al porta asientos ypuede causar lesiones serias a su niño.
•
NO USE LOS SIGUIENTES MODELOS DE ASIENTOS INFANTILES
EN EL
PORTA ASIENTOS
.Esta lista no es exclusiva ni esta completa.
Baby Trend®, Britax®, Century®, Combi®, Cosco®, EvenFlo®, Graco®, Peg Perego®y Safety 1st®
son marcas registradas de sus respectivos dueños. No están asociados con Kolcraft
Enterprises, Inc. y no existe ninguna aprobación implícita.
•Baby Trend®Latch-Loc
•Baby Trend®Flex-Loc
•Britax®Baby Safe™
•Century®535/580/590 Series
•Century®Assura®Series
•Century®Smart Fit™Series
•Chicco®Key Fit
•
Cosco
®
Dream Ride
®
•
Fisher Price
®
Stay in View
™
•Evenflo®Embrace™
•All Gerry®Infant Car Seats
•
Peg Pérego Primo Viaggio
•Kolcraft®Infant Rider®
•Kolcraft®Secura™
•Cosco®Eddie Bauer®Caress
•Cosco®Eddie Bauer®
Opus®35®
•Cosco®First Ride DX
•Cosco®Turn-A-Bout®
•Evenflo®Cozy Carry™
•Evenflo®Discovery™
•
Evenflo®On-My-Way™
•Britax®Companion®
•Britax®Handle with Care®
•Century®Avanta™Series
•
Century
®
Vanté
™
5
•Combi®Connection™
•
Combi
®
Tyro
™
•
Cosco
®
Arriva
®
Series
•
Cosco
®
Designer
®
•
Evenflo®Portabout™
•
Graco®Safe Seat™
•
Graco®Snug Ride™Series
•
Peg Pérego Primo Viaggio SIP
•
Safety 1st®Designer®22™
•
Safety 1st®Starter™

16
Para desplegar el porta asientos
Suelte el seguro
Despliegue el porta asientos como se
indica. Cerciórese de que ambos seguros
entren en su sitio.
Presione cada seguro hacia abajo para
asegurar que el porta asientos esté en
posición fija.
Lista de partes
2
1
Cómo ensamblar su el porta asientos
Ruedas delanteras (2)
1
3
2
Bandeja para
adultos
Canasta
Estructura de la
carriola
Ruedas traseras (2)
Arandela (2) Pasador (2) Tapón del cubo (2)
Eje trasero

17
Lengüeta
Para ensamblar las ruedas delanteras
Remueva cualquier inserción de cartón o
plástico para proteger el producto
durante el envío.
Coloque el porta asientos orientado
como se muestra en el dibujo.
Alinée la unidad de las ruedas delanteras
como se muestra en el dibujo. La
lengüeta debe estar orientado en direc-
ción opuesta al pasador (hacia usted).
Presione la unidad de las ruedas contra
el pasador hasta que quede bien ajusta-
da en su lugar.
Repita la operación con las otras ruedas.
Jale firmemente de cada una de las
unidades de ruedas para asegurarse de
que estén bien ajustadas y en su lugar.
NOTA: Para quitar las ruedas
delanteras, presione las lengüetas y
sáquelas.
1
2
3
2
3
4
5
4
Coloque el armazón del eje trasero com-
pleto con los frenos como se muestra y
con las palancas de freno hacia el
mango del porta asiento.
Inserte ambas unidades de freno en los
tubos de las patas traseras simultánea-
mente.
Asegúrese de que las lengüetas plásticas
de las unidades de freno queden asegu-
radas en los agujeros de las patas
traseras, como se muestra en el dibujo.
Alinée las lengüetas de cada uno de los
tapones protectores con las ranuras de
la rueda y presione hasta que queden
bien asegurados.
Para ensamblar las ruedas traseras
1
2
4
1
3
3
Lengüeta se asegu-
ra en el agujero

18
Para instalar la bandeja para adultos
ADVERTENCIA
No ponga más de 1,36 kg (3 libras) de
peso en esta bandeja para evitar
volcaduras. No coloque liquidos
calientes en esta bandeja. Liquidos
calientes pueden quemar a su niño.
Para ensamblar la bandeja para adultos.
Alinée los hoyos de la bandeja con los
postes del mango y asegúrela.
Para remover la bandeja para adultos,
jale de cada lado, hacia arriba y hacia
afuera.
1
2
1

19
Cómo usar su nuevo porta asientos
Para usar los frenos
1Empuje hacia abajo las palancas en
ambos ensamblajes de ruedas para
asegurarlas.
Jale las palancas hacia arriba para
quitarles el seguro.
2
No llene la canasta más arriba de la correa.
El asiento puede volverse inestable si los
artículos que se encuentran dentro de la
canasta tocan el asiento infantil. El peso
máximo que puede cargar la canasta son
5,44 kg (10 libras.)
Para asegurar el asiento infantil
1
4
Asegure los dos frenos de pie para
evitar que la carriola ruede.
Para abrochar los cinturones del asiento
de auto, abrá el lazo del cinturón de
ajuste. Ajuste el cinturón hasta que las
hebillas casi se toquen.
Jale el extremo del cinturón para ajustar-
lo. Abroche las hebillas para asegurarlas.
Para desabrochar la hebilla del cinturón
del asiento, presione las lengüetas.
2
3
4
2
3
3
Quitar 2
1
Poner
ADVERTENCIA

20
Para asegurar su Britax®Handle with Care®asiento de auto para niños
•Al usar este producto, evite daños
serios causados por caídas o al deslizarse
del asiento. El niño debe estar asegura-
do en el asiento. Use siempre el cinturón.
Consulte las instrucciones del asiento de
bebé para auto para ajustario adecuada-
mente.
•No permita que la charola eleve el
asiento. El asiento para automóvil
debe descansar en las barras frontal y
trasera para que la instalación sea la
apropiada. No seguir estas instruc-
ciones puede producir heridas graves.
Barra trasera
Barra delantera
ADVERTENCIA
Barra delantera
Barra
trasera
Britax
Charola
Continuación en la página siguiente
1Ajuste la charola a su posición más baja.
Para ajustar, jale el botón y gírelo.
Con una mano agarre el mango del
asiento infantil (en su posición vertical
de acarreo). Con la otra mano, agarre el
asiento infantil cerca de los pies. Ponga
el asiento cuidadosamente sobre el
porta asiento con la cara del niño hacia
el mango.
Ponga la parte trasera del mecedor del
asiento por debajo de la barra delantera,
como se muestra.
Coloque con cuidado la parte delantera
del la mecedora del asiento infantil
debajo de la barra trasera.
Eleve la charola hasta que toque el
fondo del asiento. No permita que la
charola eleve el asiento infantil.
2
3
4
5
1
3 & 4
Botón
Table of contents
Languages:
Other Kolcraft Baby Carrier manuals

Kolcraft
Kolcraft UNIVERSAL CAR SEAT CARRIER User manual

Kolcraft
Kolcraft Jeep User manual

Kolcraft
Kolcraft UNIVERSAL CAR SEAT CARRIER User manual

Kolcraft
Kolcraft Universal Express Rider User manual

Kolcraft
Kolcraft cloud SPORT User manual

Kolcraft
Kolcraft 2-in-1 Baby Carrier User manual

Kolcraft
Kolcraft umbrella stoller User manual

Kolcraft
Kolcraft CLOUD COOL MESH User manual