manuals.online logo
Brands
  1. Home
  2. •
  3. Brands
  4. •
  5. Kolcraft
  6. •
  7. Baby Swing
  8. •
  9. Kolcraft G03S 9/08 User manual

Kolcraft G03S 9/08 User manual

Popular Baby Swing manuals by other brands

Hudora Comfort INSTRUCTIONS ON ASSEMBLY AND USE

Hudora

Hudora Comfort INSTRUCTIONS ON ASSEMBLY AND USE

Fisher-Price M5585 manual

Fisher-Price

Fisher-Price M5585 manual

stilum patis2 Mounting instructions

stilum

stilum patis2 Mounting instructions

Fisher-Price K7192 manual

Fisher-Price

Fisher-Price K7192 manual

Fisher-Price 79739 instructions

Fisher-Price

Fisher-Price 79739 instructions

Fisher-Price G5914 manual

Fisher-Price

Fisher-Price G5914 manual

highwood Lehigh Porch Swing Assembly guide

highwood

highwood Lehigh Porch Swing Assembly guide

Graco OASIS owner's manual

Graco

Graco OASIS owner's manual

stilum seta Maintenance instructions

stilum

stilum seta Maintenance instructions

stilum simius2 Maintenance instructions

stilum

stilum simius2 Maintenance instructions

Central Park 5629033 manual

Central Park

Central Park 5629033 manual

Canvas BAFFIN 088-2292-4 Assembly instructions

Canvas

Canvas BAFFIN 088-2292-4 Assembly instructions

ABC Design Kiddie Ride On Instructions for use

ABC Design

ABC Design Kiddie Ride On Instructions for use

TP Pirate Boat TP903 Instructions for assembly, maintenance and safe use

TP

TP Pirate Boat TP903 Instructions for assembly, maintenance and safe use

Fisher-Price FLG84 manual

Fisher-Price

Fisher-Price FLG84 manual

Clas Ohlson 31-5722 quick start guide

Clas Ohlson

Clas Ohlson 31-5722 quick start guide

AOODOR 800-052 Assembly & instruction manual

AOODOR

AOODOR 800-052 Assembly & instruction manual

Sunjoy L-GZ330PCO-1 manual

Sunjoy

Sunjoy L-GZ330PCO-1 manual

manuals.online logo
manuals.online logoBrands
  • About & Mission
  • Contact us
  • Privacy Policy
  • Terms and Conditions

Copyright 2025 Manuals.Online. All Rights Reserved.

03S 9/08
Height Adjustable Swing Instru tion Sheet
Instrucciones para el columpio de altura ajustable
2
To prevent serious injury or death from children falling or being
strangled in straps. Your child’s safety depends on you. Proper swing
usage cannot be assured unless you follow these instructions.
DO NOT USE SWIN UNTIL YOU READ AND UNDERSTAND
THESE INSTRUCTIONS.
IIMMPPOORRTTAANNTT SSAAFFEETTYY IINNFFOORRMMAATTIIOONN::
HHooww ttoo KKeeeepp YYoouurr CChhiilldd SSaaffee WWhhiillee UUssiinngg tthhiiss PPrroodduucctt
•CCAAUUTTIIOONN:: AAdduulltt AAsssseemmbbllyy RReeqquuiirreedd..
•N
NE
EV
VE
ER
R
L
LE
EA
AV
VE
E
Y
YO
OU
UR
R
C
CH
HI
IL
LD
D
U
UN
NA
AT
TT
TE
EN
ND
DE
ED
D
W
WH
HI
IL
LE
E
I
IN
N
S
SW
WI
IN
N
.
Accidents can happen quickly while your back is turned. You must
always keep your child in view while your child is in swing, even
when sleeping.
•A
AL
LW
WA
AY
YS
Suse restraint system provided to keep child from standing
up or falling out of the swing.
• Use only in recline position until child can hold head up unassisted.
• Discontinue use of swing when child attempts to climb out or
becomes too active to safely use swing or weighs 25 lbs. (11 kg).
•D
DO
O
N
NO
OT
Traise or lower seat, fold or move swing while occupied by
child.
• Strangulation Hazard:
• D
DO
O
N
NO
OT
Tplace items with a string around child’s neck (hood
strings, pacifier cords, etc.)
• D
DO
O
N
NO
OT
Tsuspend strings over swing or attach strings to toys.
• D
DO
O
N
NO
OT
Tplace the swing near any cords such as window blind
cords, phone cords or drapery pulls.
•D
DO
O
N
NO
OT
Tlift by tray.
• Lock swing legs in place before use and use only on a level surface.
•D
DO
O
N
NO
OT
Tallow other children to play around swing while in use.
•D
DO
O
N
NO
OT
Tuse the swing without the seat cover.
• This product is not intended for commercial use.
WARNING
3
ADVERTENCIA
Para prevenir a los niños contra heridas graves o muerte debido a
caídas o estrangulación con las correas. La seguridad de su niño
depende de usted. No se puede asegurar el uso apropiado del
columpio a menos que usted siga estas instrucciones. NO USE EL
COLUMPIO HASTA QUE USTED HAYA LEIDO Y COMPRENDIDO
ESTAS INSTRUCCIONES.
IINNFFOORRMMAACCIIÓÓNN IIMMPPOORRTTAANNTTEE DDEE SSEEUURRIIDDAADD::
CCóómmoo mmaanntteenneerr aa ssuu nniiññoo sseegguurroo mmiieennttrraass uussaa eessttee pprroodduuccttoo
•PPRREECCAAUUCCIIÓÓNN::Requiere ensamblado sólo por un adulto.
•NNUUNNCCAA DDEEJJEE AA SSUU NNIIÑÑOO SSOOLLOO EENN EELL CCOOLLUUMMPPIIOO. Accidentes
pueden ocurrir de repente mientras se encuentre de espaldas.
Debe mantener a su niño siempre a la vista mientras
esté en el columpio, aun si está durmiendo.
• SSIIEEMMPPRREEuse el sistema de seguridad provisto para evitar
que su niño se pare en el columpio o se caiga.
• Use sólo en posición reclinada hasta que el niño pueda
mantener su cabeza erguida sin ayuda.
• Descontinúe el uso del columpio si el niño se intenta salir o sea
demasiado activo para usarlo seguramente o cuando pese
11 kilos (25 libras).
•NNOOsuba o baje el asiento, doble o mueva el columpio mientras
el niño esté en él.
• Peligro de estrangulamiento:
• NNOOponga objetos con cintas alrededor del cuello del niño
(capuchas con cordones, listones sonajeros, etc.)
• NNOOponga cintas suspendidas sobre el columpio o sujete
juguetes con cordones.
• NNOOponga el columpio cerca de persianas, teléfonos, cortinas
o cualquier objeto con cordones.
• NNOOlevante el columpio por la bandeja.
• Asegure las patas del columpio en su sitio antes de usarlo y
únicamente sobre superficies planas.
•NNOO ppeerrmmiittaaque otros niños jueguen cerca del columpio cuando
se encuentre en uso.
•NNOOuse el columpio sin la cubierta del asiento.
• Este producto no es para usos comerciales.
4
Parts List Lista de piezas
Front Legs (2)
Patas frontales (2)
Passive Side
Housing
Armazón lateral
pasiva
Seat Shell & Seat Pad
Armazón del asiento y
cojín de asiento
Active Side
Housing
Armazón lateral
activa
Front Feet
Pie delantero Rear Feet
Pie trasero Tray
Bandeja
Trouble Shooting Resolución de problemas
NNOOTTEE::If your spring-loaded button becomes
out of place, take pliers and feed button into
hole.
NNOOTTAA::Si el botón con resorte se sale de su
sitio, vuelva a meter el botón en su sitio con
unas pinzas.
Correct
Alignment
Alineación
correcta
Wrong
Alignment
Alineación
incorrecta
Tools Needed: Phillips Screwdrivers
Herramienta necesitada: Destronillador Phillips
5
To Assemble Frame Ensamblaje del marco
1Select front leg A, which has an A printed on
the top of the leg, and connect it to rear leg
A which has an A stamped on the frame
bracket at the top of leg.
Seleccione la pata frontal A, que tiene una A
impresa en la parte superior de la pata, y
conéctela a la pata trasera A, que tiene una
A en la abrazadera del marco en la parte
superior de la pata.
NNOOTTEE::Rear leg A is the active side housing
that has the speed control unit at the top.
NNOOTTAA::La pata trasera A es la parte activa
que tiene la unidad de control de velocidad
en la parte superior.
Pinch the two spring-loaded buttons at the
top of front leg A and slide the top of the leg
into the frame bracket at the top of rear leg
A.
Apriete los dos botones con resortes en la
parte superior de la pata frontal A y deslice la
parte superior de la pata, en la abrazadera
del marco, en la parte superior de la pata
trasera A.
With the top of front leg A inside the frame
bracket, press the third spring-loaded button
on the leg and fully insert front leg A into the
frame bracket. Ensure that the top two but-
tons snap into position through the holes in
the frame bracket.
Con la parte superior de la pata frontal A
dentro del soporte del marco, presione el
tercer botón con resortes en la pata e inserte
totalmente la pata frontal A en el soporte del
marco. Asegúrese de que los dos botones
superiores se ajustan en la posición adecuada
a través de los agujeros en la abrazadera del
marco.
Rotate front leg A until the third spring-
loaded button locks into position through the
hole in the frame bracket.
ire la pata frontal A hasta que el tercer
botón con resortes se ajuste en la posición
adecuada a través del agujero en en el
soporte del marco.
Continued on next page
Continúa en la página siguiente
Frame
Bracket
Soporte del
marco
1
2
3
4
2
4
Active Side
Housing
Armazón
lateral activa
Front Leg
Pata
delantera
Rear Leg
Pata trasera
6
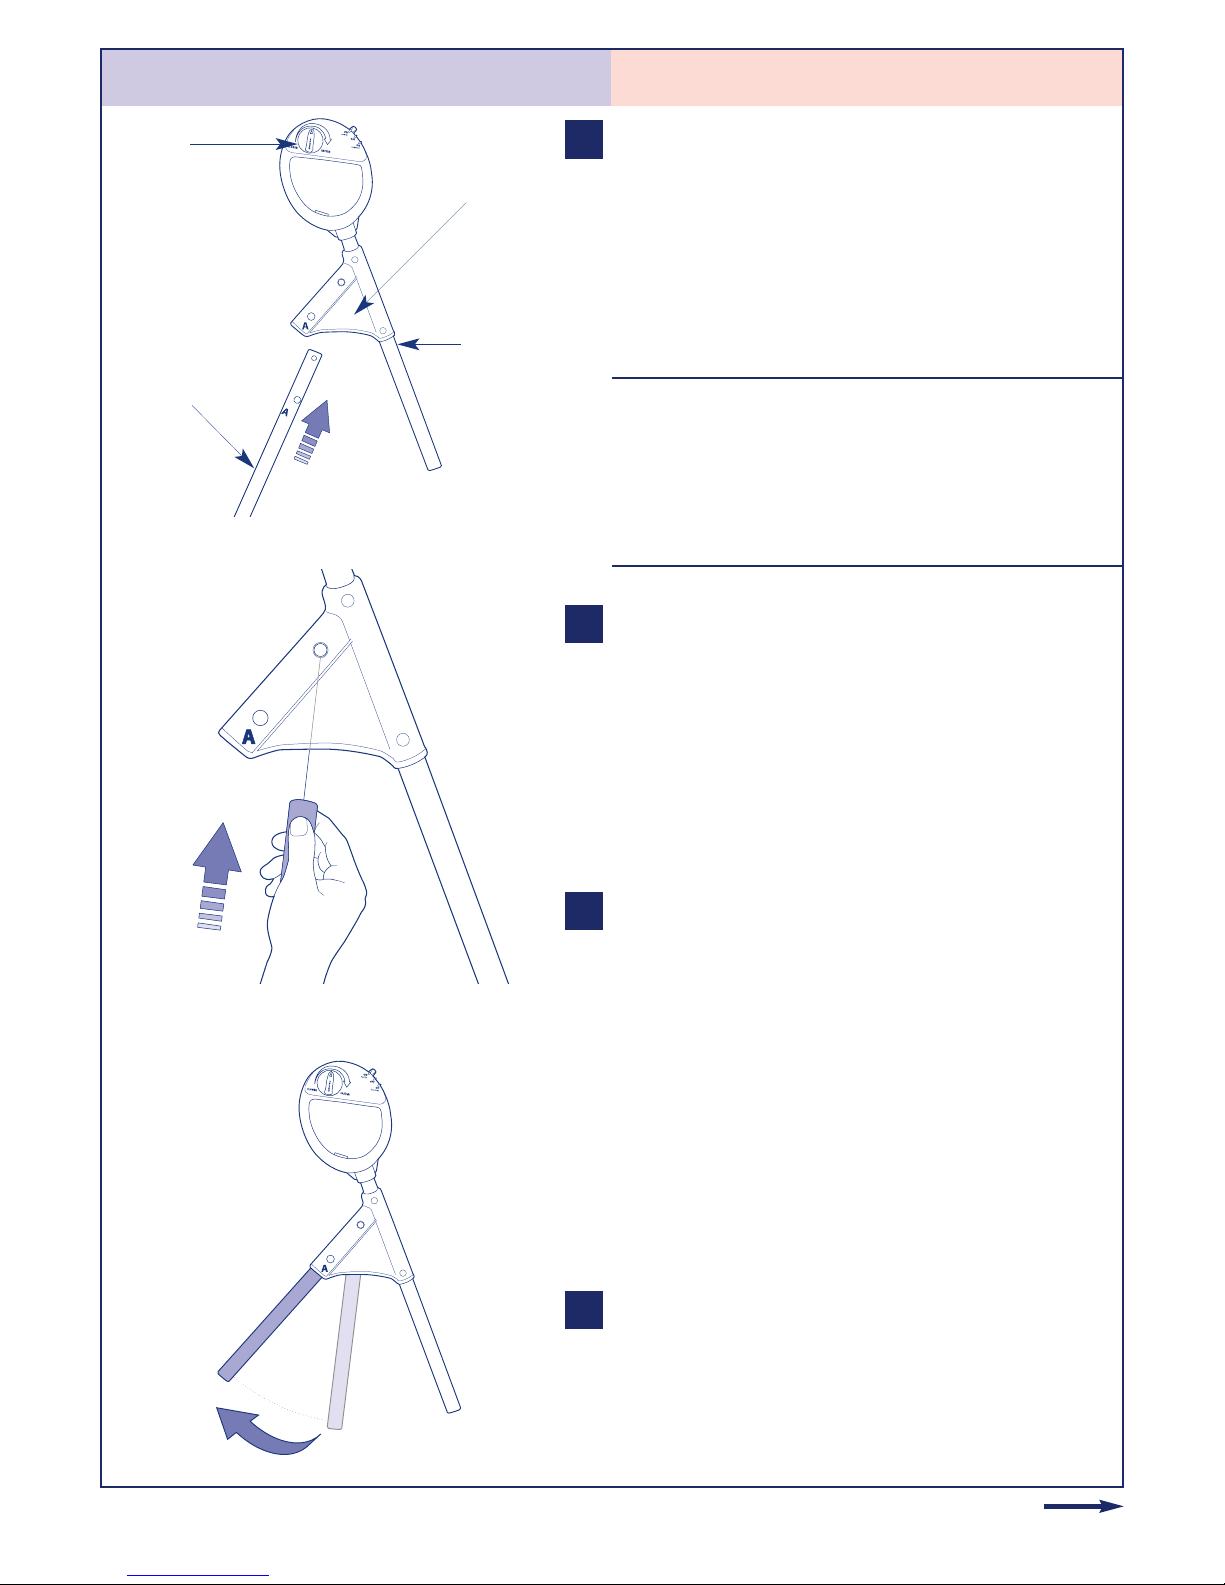
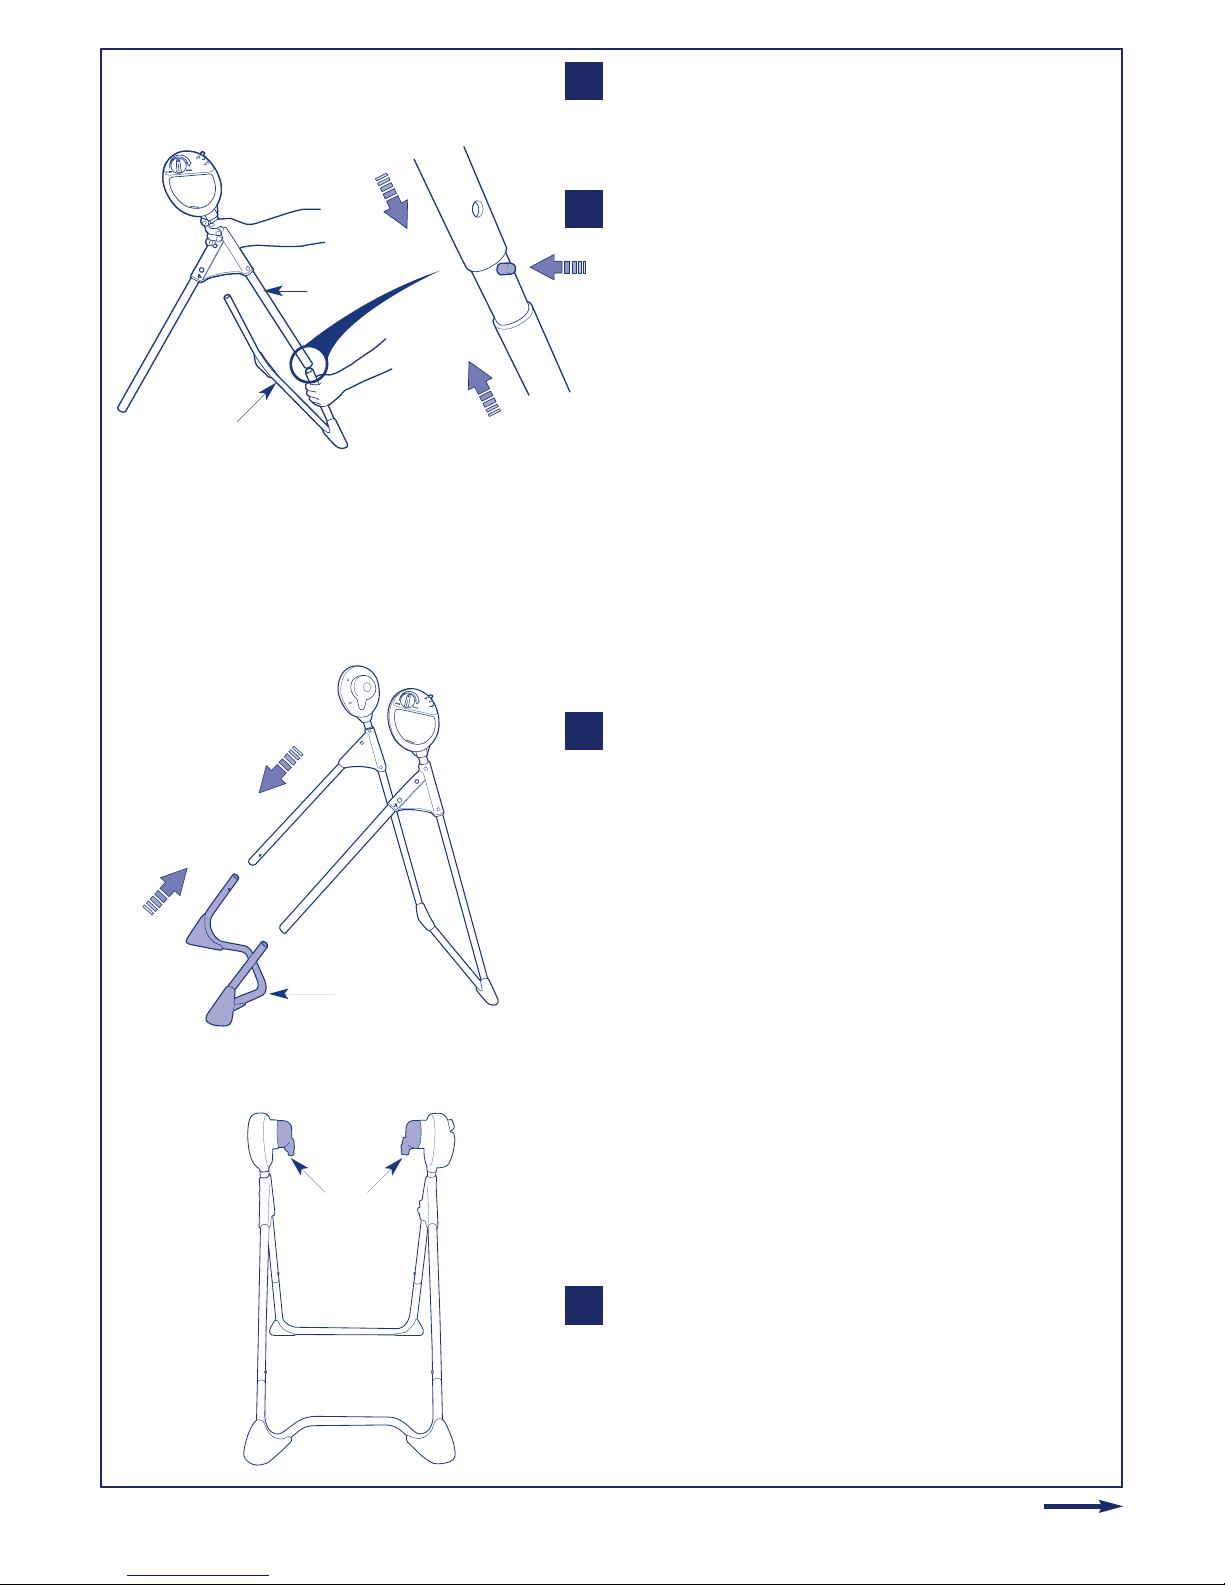
Repeat these steps to connect front leg B to
rear leg B.
Repita los pasos para conectar la pata frontal
B, a la pata trasera B.
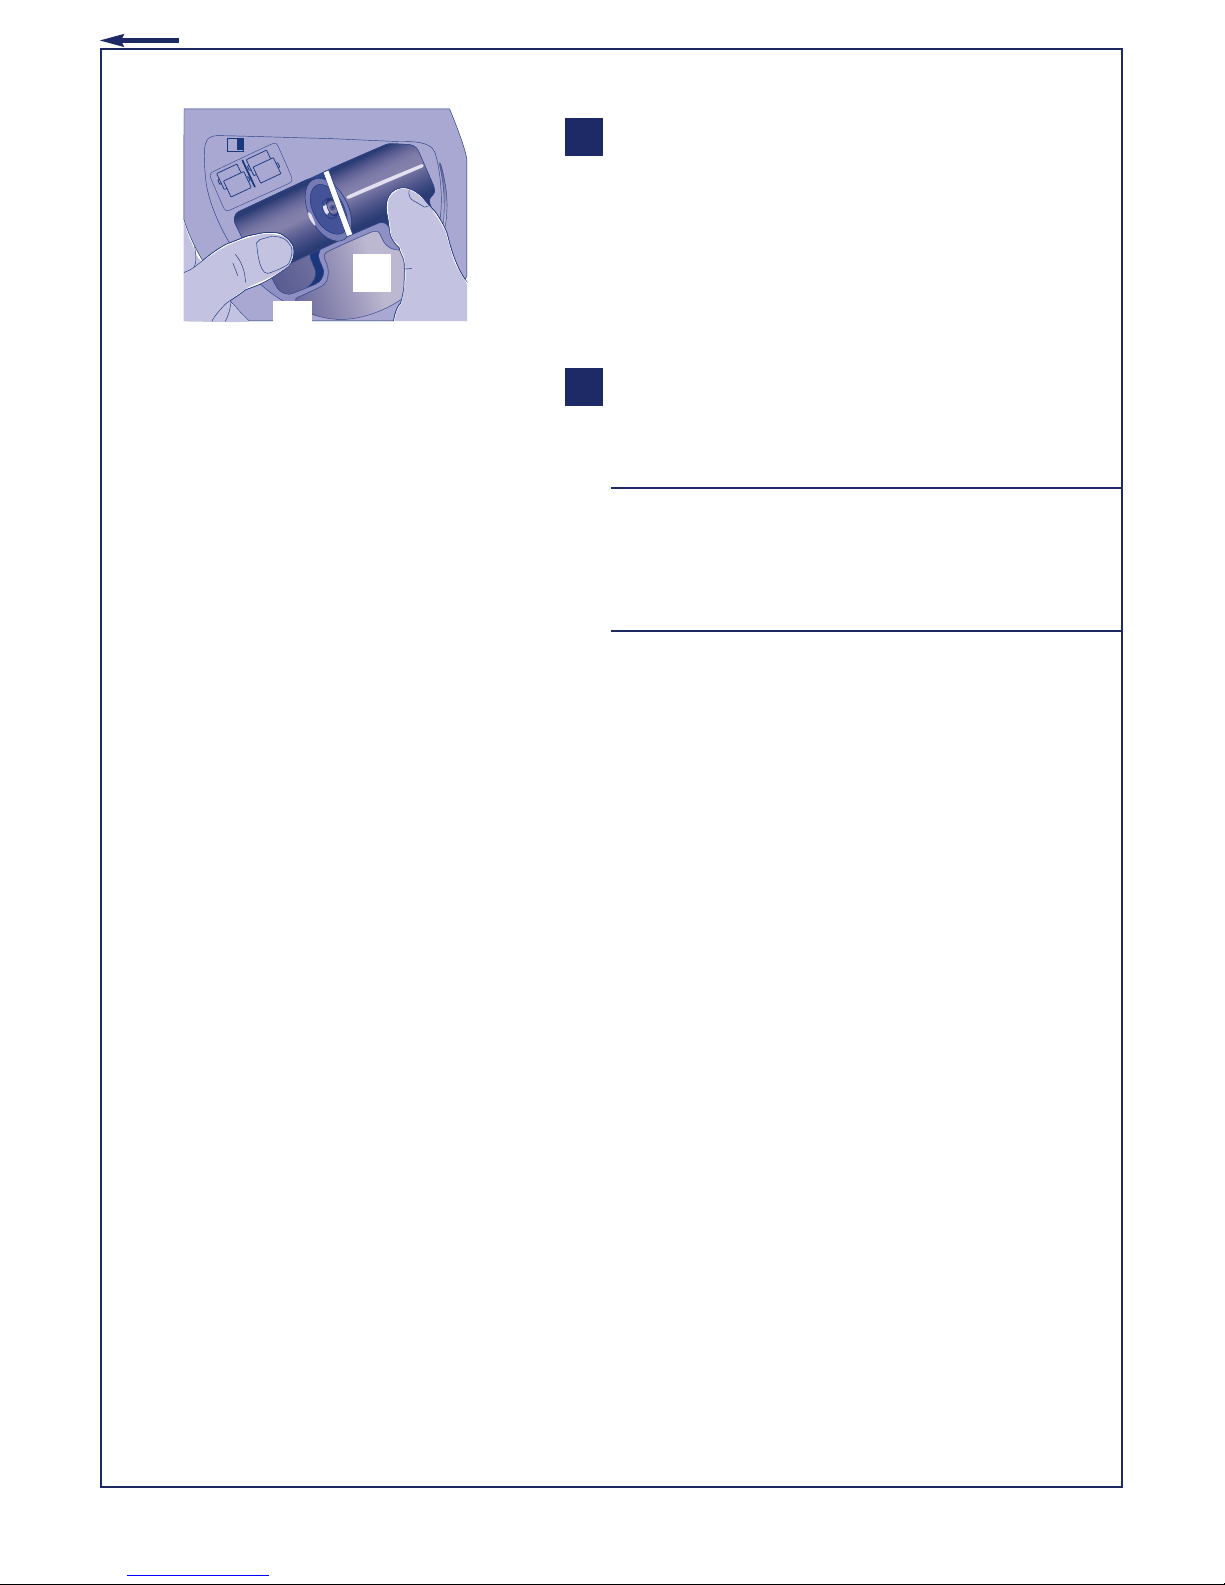
Select the rear feet and position them so that
the plastic feet are flat on the floor and the
leg ends point upwards at an angle. Slot the
rear legs onto the top of the rear feet ensur-
ing that the seat connectors face into the
swing. Depress the spring-loaded buttons on
the top of the rear feet and slot the compo-
nents together.
Seleccione los pies traseros y posiciónelos de
manera que los pies de plástico estén planos
en el suelo y que el extremo de la pata
apunte hacia arriba en un ángulo. Inserte las
patas traseras en la parte superior de los pies
traseros asegurándose que los conectores del
asiento están mirando al columpio. Presione
los botones con resortes en la parte superior
de los pies traseros asegurándose de que los
conectores del asiento estén mirando al
columpio. Presione los botones cargados con
botones en la parte superior de los pies
traseros e inserte los componentes juntos.
After attaching the rear legs to the rear feet,
select the front feet and position them so
that the plastic feet are flat on the floor and
the leg ends point upwards at an angle. Slot
the front legs onto the top of the front feet.
Press the spring-loaded buttons on the top of
the front feet and slot the components
together. Ensure that the buttons snap into
position.
Después de unir las patas traseras a los pies
traseros, seleccione los pies frontales y posi-
ciónelos de manera que los pies de plástico
estén planos en el suelo y los extremos de
las patas apunten hacia arriba en un ángulo.
Inserte las patas frontales en la parte superior
de los pies frontales.
Presione los botones con resortes en la parte
superior de los pies frontales e introduzca los
componente juntos. Asegúrese de que los
botones se encajan en su posición.
Ensure that the seat connectors face into the
swing when assembling the frame of the
swing, see diagram.
Asegúrese de que los conectores de los
asientos están mirando hacia el columpio
cuando ensamble el marco del columpio.
Vea el diagrama.
Continued on next page
Continúa en la página siguiente
5
6
7
8
8
7
6
Seat
Connectors
Conectores
del asiento
Front Leg
Pata
delantera
7
TTrroouubbllee SShhoooottiinngg::If Active Hub Assembly
does not fit into Rear Leg, make sure you are
connecting it to the Rear Leg (straight tube).
To avoid mis-assembly, the Front Leg will not
assemble to Rear Hub Leg.
R
Re
es
so
ol
lu
uc
ci
ió
ón
n
d
de
e
p
pr
ro
ob
bl
le
em
ma
as
s:
:Si la armazón activa
no encaja en la pata trasera, cerciórese que
está conectando la pata trasera (tubo dere-
cho). Para evitar errores, la pata delantera no
casa con el eje de la pata trasera.
To Assemble Seat Ensamblaje del asiento
Align left and right Seat Tubes with left and
right Seat Connectors.
Alinee los tubos del asiento derecho e
izquierdo con los conectores derecho e
izquierdo del asiento.
Align spring-loaded buttons with ramps in
Seat Connectors. Press in buttons with thumb
and lift tube into hub opening. Make sure
springloaded buttons lock into place. Seat
should be hanging level on its own.
Alinee los botones con resortes con las ram-
pas en los conectortes de asiento. Presione
los botones con los pulgares e introduzca el
tubo en el hueco del eje. Asegúrese que los
botones con resortes queden asegurados en
su sitio. El asiento debe colgar derecho por sí
mismo.
1
2
Seat Connector
Connectortes
de asiento
Spring-Loaded
Button
Botón de
resorte
8
INSTALL INORDER
12
3
4
31
2
Continued on next page
Continúa en la página siguiente
To Assemble Tray Ensamblaje de la charola
Align tray over seat.
Alinee la bandeja sobre el asiento.
Press down on tray and snap tabs over both
locks.
Presione la bandeja hacia abajo hasta que los
laterales entren sobre ambos soportes.
NNOOTTEE::Tray may be opened from either side
while remaining connected to seat.
NNOOTTAA::La bandejapuede ser abierta de
cualquier lado mientras esté conectada al
asiento.
1
1 & 2
2
To Install Batteries Instalación de las baterías
Insert a flat head screwdriver tip (or quarter)
into battery door. ently push tab back and
up to release door.
Inserte un desarmador p ano (o una moneda)
en a cubierta de as baterías. Empuje a
cubierta suavemente hacia atrás y hacia arriba
para abrir a puerta.
Insert four “D” cell batteries (not included) in
the following order as shown. Make sure that
the batteries are assembled properly or else
the swing will NOT work.
Inserte cuatro baterías tipo “D” (no inc uidas)
en e orden que se muestra. Asegúrese que
las pilas son ensambladas correctamente si
no el columpio no funcionará.
Move battery tabs to the right and insert first
battery into back left lower position of battery
compartment. Push battery flat against back
of battery compartment and push tab down.
Insert second battery on top of first battery.
Mueva os atera es de as baterías a a
derecha e inserte a primera batería en a
posición trasera inferior izquierda de a caja
de pi as. Empuje a pi a hasta que quede
comp etamente contra a pared de a caja de
pi as y empuje a ceji a hacia abajo. Inserte a
segunda pi a sobre a batería #1.
1
2
ON
Seat Down
ON
Seat Up
OFF
1
12
4 3
2
Back
Atrás
Front
Frente
3
9
Move front battery tab down and to the left
and insert third battery up into compartment.
Hold tab and battery up to allow the inser-
tion of fourth battery.
Mueva e atera de frente hacia abajo y a a
izquierda e inserte a batería pi a hacia a
parte superior de a caja. Sujete e atera y a
pi a hacia arriba para poder insertar a pi a
número cuatro.
Replace battery cover making sure tabs snap
securely into place.
Co oque a cubierta para as batería y
asegúrese que os atera es queden fijos.
NNOOTTEE::If Swing does not turn on, the
batteries are in the wrong order.
NNOOTTAA::Si e co umpio no funciona, as
baterías no están en e orden correcto.
CCAAUUTTIIOONN::Do not mix old and new batteries.
Do not mix alkaline, standard (carbon-zinc) or
rechargeable (nickel-cadmium) batteries.
Remove batteries before storing this product
for a prolonged period of time.
PPRREECCAAUUCCIIÓÓNN::Favor de no mezclar las
baterías viejas con las nuevas. No mezcle las
baterías alcalinas, las regulares (carbono-zinc)
o las recargables (níquel-cadmio). Saque las
baterías antes de guardar este producto por
un período prolongado de tiempo.
4
5
INSTALLINORDER
12
3
4
4
4
3
10
To Use Restraint Uso del sistema de seguridad
Place child in swing.
Coloque al niño en el columpio.
Bring straps across child’s waist. Snap both
buckles into crotch strap plate. Make sure
you hear both buckles click into place.
Coloque las correas alrededor de la cintura
del niño y enganche ambas hebillas en la
placa de la entrepierna. Asegúrese de que
oiga un “clic” en ambas hebillas al hacerlo.
Adjust safety belts to fit snugly around your
child.
Ajuste el cinturón de restricción de manera
que sostenga cómodamente a su niño.
1
2
WARNING
Always use restraint system. ADVERTENCIA
Siempre use el sistema de seguridad.
2
3
How To Properly Use Your New Swing / Uso correcto de su nuevo columpio
3
Newborn Position -
To Adjust Height Posición para recién nacido -
Ajuste de la altura
This Height Adjustable Swing was designed
to be used immediately after returning home
from the hospital. Its unique Newborn &
Infant height adjustments gives comfort and
enjoyment to your baby throughout approxi-
mately, his/her first six months of life.*
El columpio de altura ajustable ha sido
diseñado para usarse inmediatamente al
regreso a casa del hospital. Su exclusivo
ajuste infantil y para recién nacido proporciona
comodidad, permitiéndole disfrutar a su
bebé a lo largo de los primeros seis meses
de vida.*
*Discontinue use of swing when child
attempts to climb out or becomes too active
to safely use swing or weighs 25 lbs. (11 kg).
*Deje de usar el columpio cuando el niño
intente salir o se vuelva demasiado activo
para usarlo seguramente o cuando pese 11
kilos (25 libras).
Continued on next page
Continúa en la página siguiente