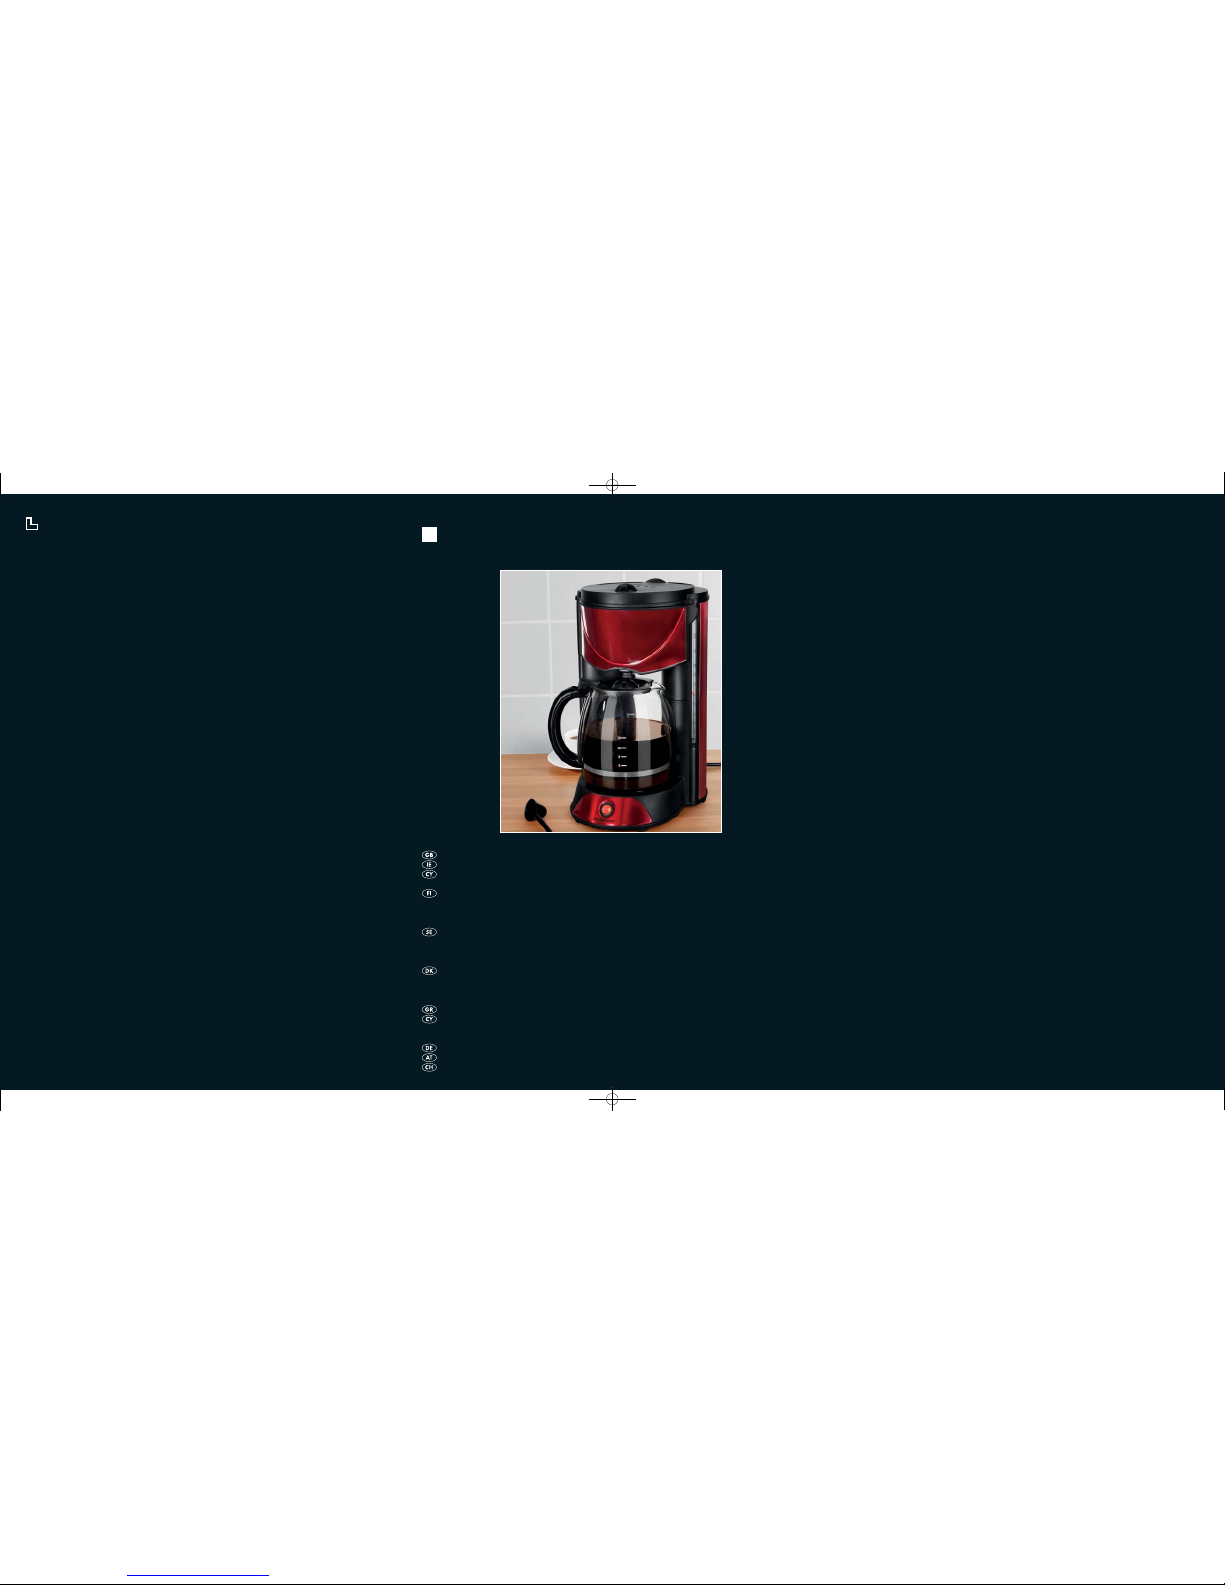
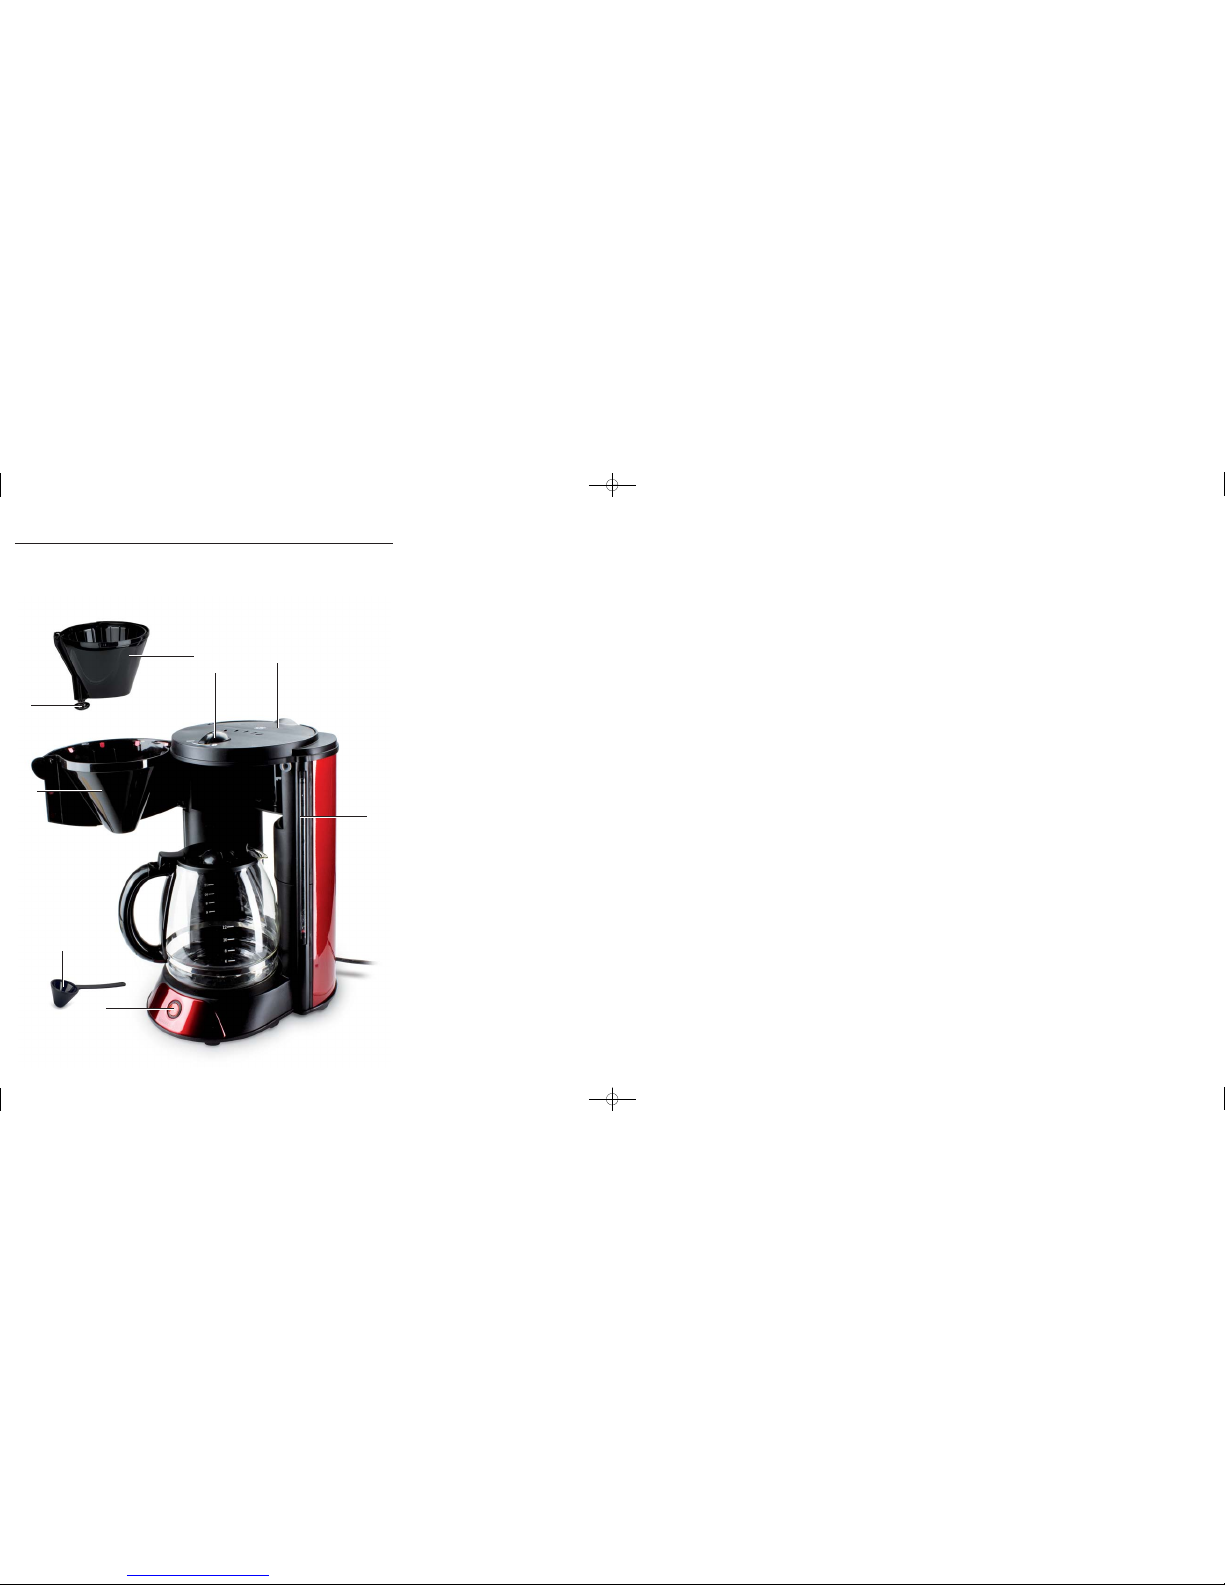
Kompernass KH 1081 User manual

KOMPERNASS GMBH · BURGSTRASSE 21 · D-44867 BOCHUM
www.kompernass.com
ID-Nr.: KH1081-10/09-V2
Coffee Maker
KH 1081
3
Coffee Maker
Operating instructions
Kahvinkeitin
Käyttöohje
Kaffemaskine
Betjeningsvejledning
ΚΚααφφεεττιιέέρραα
Οδηγίες χρήσης
Kaffeemaschine
Bedienungsanleitung
Kaffebryggare
Bruksanvisning
CV_KH1081_38021_LB3.qxd 29.10.2009 9:06 Uhr Seite 1

KH 1081
5
7
123
4
6
8
CV_KH1081_38021_LB3.qxd 29.10.2009 9:06 Uhr Seite 4

- 1 -
CONTENT PAGE
Safety instructions 2
Intended Application 3
Delivery Contents 3
Description 3
Appliance Overview 3
Setting up and connecting to the power supply 3
Operation 4
Before the first usage .......................................................................................................................4
Fill with ground coffee ....................................................................................................................4
Fill the appliance with water ...........................................................................................................5
Modifying the aroma.......................................................................................................................5
Switching On and Off......................................................................................................................5
Cleaning 5
Scale removal 6
Troubleshooting 6
Disposal 7
Technical data 7
Warranty and Service 7
Importer 8
Read the operating instructions carefully before using the appliance for the first time and preserve this
booklet for later reference. Pass the manual on to whomsoever might acquire the appliance at a later date.
IB_KH1081_38021_LB3 29.10.2009 14:27 Uhr Seite 1

- 2 -
COFFEE MAKER
KH 1081
Safety instructions
Risk of electrocution!
• Connect the coffe machine only to correctly in-
stalled and earthed power sockets. Ensure that
the voltage supplied through the power socket
tallies completely with the details given on the
appliance rating plate.
• Remove the plug from the wall socket when you
move the coffee machine, fill it with water, if it
malfunctions, before cleaning it and when it is
not in use.
Under no cirmstance may the coffee machine
be submersed in liquids. Do not expose the
appliance to humidity and do not use it outdoors.
Should liquids enter the housing, unplug the
appliance power socket from the power socket
immediately and arrange for it to be repaired
by a qualified technician.
• Never touch the coffee machine, the power cable
or the plug when your hands are wet.
• To disconnect, always pull the plug itself out of
the power socket, do not pull on the power cable.
• Do not fold or crush the power cable.
• To avoid potential risks, arrange for a defective
appliance to be checked and possibly repaired
by qualified technicians, or contact our Customer
Service Department.
• Arrange for defective power plugs and/or cables
to be replaced as soon as possible by a qualified
technician or by our Customer Service Department
to avoid the risk of injury.
• Do not use an extension cable.
Risk of fire!
• Do not leave the coffee machine unattended
when it is in use.
• NEVER operate the coffee machine without
mains water and NEVER fill it to more than the
Max. marking.
• Do not use an external timing switch or a separa-
te remote control system to operate the applian-
ce.
Risk of personal injury!
• NEVER use the glass jug of the coffee machine
in a microwave oven.
• This appliance is not intended for use by individuals
(including children) with restricted physical,
physiological or intellectual abilities or deficiences
in experience and/or knowledge unless they are
supervised by a person responsible for their
safety or receive from this person instruction in
how the appliance is to be used.
• Children should be supervised to ensure that
they do not play with the device.
Risk of Burns!
• NEVER touch the hot surfaces of the coffee machi-
ne, especially the heating plate and the glass
jug.
Risk of scalds!
This symbol warns you about escaping steam.
Risk of scalding!
Please follow the safety instructions
• Do not hold your hands in the rising steam.
• Always close the filter container before swit-
ching on, there exists a risk of scalds from
steam and hot water.
• NEVER use the glass jug of the coffee machine
in a microwave oven.
IB_KH1081_38021_LB3 29.10.2009 14:27 Uhr Seite 2

- 3 -
• Do not move the coffee machine during the
brewing process.
• Remove the jug first when the brewing process
is complete and the filter has fully drained itself.
Risk of stumbling!
• Lay the power cable in such a way that no one
can tread on or trip over it.
• Do not use an extension cable.
Warning regarding appliance
damage!
• NEVER operate this appliance when it is empty
(without water). If you do, the glass jug could
shatter.
Intended Application
The coffee maker is intended exclusively for brewing
coffee. This coffee maker is intended exclusively for
use in private households. Pay heed to all of the
information in this operating manual, especially the
safety instructions. All other uses are deemed to be
improper and may result in property damage or even
in personal injury. We shall not accept liability for
damages caused due to improper use of the
appliance.
Delivery Contents
Coffee machine
Glass jug
Measuring spoon
Operating Instructions
Description
You can prepare hot filter coffee with the coffee
machine.Brewed coffee can be kept warm in the jug
by leaving it on the heating plate with the appliance
switched on.
Appliance Overview
1Filter insert
2Aroma selector switch
3Water tank lid
4Water volume indicator
5On/Off switch with integrated control lamp
6Measuring spoon
7Filter holder
8Coffee exit
Setting up and connecting to
the power supply
Risk of electrocution!
Under no circumstances should the appliance be
located close to water, especially sinks and waterfilled
vessels. Use the coffee machine only on a dry
surface. The proximity of water presents a danger,
even when the appliance is switched off. After use,
always remove the plug from the power socket.
Risk of fire!
Never locate the coffee machine close to sources of
heat.
The appliance could be damaged.
Attention!
To avoid damage to the coffee machine and its
place of location, use the coffee machine only
on a level and heat-resistant surface.
IB_KH1081_38021_LB3 29.10.2009 14:27 Uhr Seite 3

- 4 -
• Remove all packaging materials from the applian-
ce.
• Place the appliance on a dry, flat and heat-resistant
surface.
• Place the glass jug on the heating plate in the
appliance.
• Open the filter holder 7.
• Place the filter insert 1in such that the coffee
exit 8projects through the opening.
• Close the filter holder 7.
• Finally, insert the plug into the power socket.
Operation
Before the first usage
Attention!
• Never fill the water tank with a total volume of
more than 12 cups of mains water.
NEVER fill the water tank with less than 3 cups
of water. Otherwise, the coffee machine could
be damaged. Use the markings on the water-fill
indicator 4.
• Unplug the coffee machine immediately after use.
The appliance is completely free of electrical
power ONLY when it is unplugged.
• Fill the water tank only with mains water.
Using anything else could damage the appliance.
1. Open the glass jug and the water tank lid 3.
2. Carefully rinse the glass jug with mains water.
Fill the water tank with mains water. Pay heed to
pouring the water slowly into the water tank, so
that it can run through both tank openings.
Empty it again by carefully tipping the appliance
over a sink and allowing the mains water to pour
out.
3. Fill the glass jug with 12 cups of mains water.
4. Pour the water completely into the water tank.
5. Close the water tank.
6. Place the emptied glass jug on the heating pla-
te.
7. Switch the coffee machine on with the On/Off
switch 5 (I). The integrated control lamp
glows. Wait until the brewing process is comple-
te.
8. Empty the glass jug.
9. Switch the coffee machine off with the On/Off
switch 5(O). The integrated control lamp goes
out.
10.Wait until the appliance has cooled down.
Fill with ground coffee
1. Swing the filter holder 7to the side. The filter
bag 1must be put in.
2. Place a filter bag (size 1x4) with folded over si-
des into the filter compartment 1.
3. Fill it with the measuring spoon 6.
Note:
Place approx. one heaped measuring spoon of
ground coffee in per cup. Should the coffee be pre-
ferred a little weaker, you can reduce the amount of
coffee per cup.
4. Close the filter holder 7. Ensure that the coffee
throughflow 8lies in the middle and above the
glass jug.
IB_KH1081_38021_LB3 29.10.2009 14:27 Uhr Seite 4

- 5 -
Fill the appliance with water
Note:
Use only freshly drawn mains water to brew coffee!
1. Open the water tank cover 3.
2. Fill the glass jug with water.
Attention!
• Never fill the water tank with a volume greater
than 12 cups of water. Never fill the water tank
with a volume of less than 3 cups of water. If
you do, the appliance could be damaged. Use
the marker on the water volume indicator 4.
3. Pour the amount of water required for the volu-
me of ground coffee into the water tank. Use
the marker on the water volume indicator 4.
Ensure that the water is poured in slowly, so that
it can run between the two water tanks ope-
nings.
4. Close the water tank cover 3.
Modifying the aroma
• Select the desired coffee strength on the aroma
selector switch 2. The setting gives strong
coffee, the setting gives mild coffee.
Switching On and Off
• When you are ready to switch the coffee machine
on, place the On/Off switch 5at the position
“On” (I). The integrated control lamp glows.
• When you are ready to switch the coffee machine
off, place the On/Off switch 5at the position
“Off” (O). The integrated control lamp goes out.
• Remove the plug from the mains socket if you
are intending to discontinue using the coffee ma-
chine.
Cleaning
In order to obtain an optimal taste result from every
brewing process you should clean the coffee machine
after every use.
• Remove the plug from the mains socket.
Risk of electrocution!
Before you clean the Coffee Maker you MUST remove
the plug from the power socket. Under no circumstances
may the appliance be immersed in water or held
under running water during cleaning.
Risk of Burns!
Always wait until the coffee maker has cooled down
before cleaning it. Otherwise, the appliance could
become damaged.
Attention!
Do not use household detergents or sharp/pointed
objects to remove soiling. . These could damage
the appliance.
• Wipe the housing of the coffee machine and
the glass jug with a soft cloth lightly moistened
with a soapy solution. At the same time remove
any deposits that may have settled in the glass
jug.
• After every usage remove the filter bag 1from
the filter holder 7.
• Rinse it under flowing water.
• Clean the measuring spoon 6in a mild soapy
solution and then rinse it with clear water.
IB_KH1081_38021_LB3 29.10.2009 14:27 Uhr Seite 5

- 6 -
Scale removal
The mineral content (hardness) in the water causes,
over a period of time, a calcification of the coffee
machine. This calcification impairs the appliance in
its function and diminishes the quality of the brewed
filter coffee.
Enquire at your local waterworks about the
hardness level of your mains water.The need for
decalcification comes early in hard water areas,
somewhat later in soft water areas.
Use a decalcifier designed for household
appliances and pay heed to the usage
instructions.
1. Switch the coffee machine off and allow it to
cool down completely.
2. Place the scale removal product in the water tank.
3. Insert the stipulated volume of water.
4. Place the glass jug on the heating plate.
5. Switch the coffee machine on with the On/Off
switch 5.
6. Wait until the brewing process is completed.
Switch the coffee machine off and remove the
plug from the mains power socket.
7. Carefully rinse the glass jug with mains water.
Fill the water tank with mains water. Pay heed to
pouring the water slowly into the water tank, so
that it can run through both tank openings.
Empty it again by carefully tipping the appliance
over a sink and allowing the mains water to pour
out.
8. To finish, complete two brewing processes with
just mains water, as described in the section
"Before the first usage".
When completed, you can continue to use the
coffee machine.
Troubleshooting
Symptom Possible causes and
solutions
The coffee machine
does not switch on.
• The plug is not inserted
into the power socket.
Insert the plug into a
power socket.
• A domestic electrical
fuse is defective. Check
the domestic fuses and,
if necessary, renew the
defective one.
• The power socket is de-
fective. Try another wall
socket.
• The coffee machine is
possibly defective.
Arrange for the coffee
machine to be checked
over by specialists.
The quality of the
brewed coffee is
deteriorating.
• The coffee machine is
calcified. Decalcify the
coffee machine.
IB_KH1081_38021_LB3 29.10.2009 14:27 Uhr Seite 6

- 7 -
Disposal
Do not dispose of the appliance in your
normal domestic waste. This product is
subject to the European directive
2002/96/EC.
Dispose of the appliance through an approved disposal
centre or at your community waste facility.
Observe the currently applicable regulations.
In case of doubt, please contact your waste disposal
centre.
Dispose of the packaging materials in an
environmentally responsible manner.
Technical data
Mains voltage: 230 V~, 50 Hz
Nominal power: 1000 W
Warranty and Service
The warranty for this appliance is for 3 years from
the date of purchase. The appliance has been ma-
nufactured with care and meticulously examined be-
fore delivery. Please retain your receipt as proof of
purchase. In the event of a warranty claim, please
make contact by telephone with our Service Depart-
ment. Only in this way can a post-free despatch for
your goods be assured.
The warranty covers only claims for material and
maufacturing defects, but not for transport damage,
for wearing parts or for damage to fragile compo-
nents, e.g. buttons or batteries. This product is for
private use only and is not intended for commercial
use. The warranty is void in the case of abusive and
improper handling, use of force and internal tampe-
ring not carried out by our authorized service
branch. Your statutory rights are not restricted in
any way by this warranty.
The warranty period will not be extended by repairs
made unter warranty. This applies also to replaced
and repaired parts. Any damage and defects extant
on purchase must be reported immediately after un-
packing the appliance, at the latest, two days after
the purchase date. Repairs made after the expira-
tion of the warranty period are subject to payment.
DES UK LTD
Tel.: 0871 5000 700 (£ 0,10 / minute)
e-mail: support.uk@kompernass.com
Kompernass Service Ireland
Tel: 1850 930 412 (0,082 EUR/Min.)
Standard call rates apply. Mobile operators may vary.
e-mail: support.ie@kompernass.com
IB_KH1081_38021_LB3 29.10.2009 14:27 Uhr Seite 7

- 8 -
Importer
KOMPERNASS GMBH
BURGSTRASSE 21
D-44867 BOCHUM, GERMANY
www.kompernass.com
IB_KH1081_38021_LB3 29.10.2009 14:27 Uhr Seite 8

- 9 -
SISÄLLYSLUETTELO SIVU
Turvaohjeet 10
Määräystenmukainen käyttö 11
Toimituslaajuus 11
Kuvaus 11
Laite 11
Sijoitus ja kytkennät 11
Käyttö 12
Ennen ensimmäistä käyttöä...........................................................................................................12
Kahvijauheen lisääminen...............................................................................................................12
Veden täyttäminen .........................................................................................................................12
Aromin säätäminen........................................................................................................................13
Virrankytkentä ja -katkaisu.............................................................................................................13
Puhdistaminen 13
Kalkinpoisto 13
Toimintahäiriöiden korjaaminen 14
Hävittäminen 14
Tekniset tiedot 14
Takuu ja huolto 15
Maahantuoja 15
Säilytä käsikirja myöhempää käyttöä varten. Jos myyt laitteen, anna käsikirja uudelle omistajalle!
IB_KH1081_38021_LB3 29.10.2009 14:27 Uhr Seite 9

- 10 -
KAHVINKEITIN
KH 1081
Turvaohjeet
Sähköiskun vaara
• Liitä kahvinkeitin ainoastaan määräysten mukaan
asennettuun ja maadoitettuun pistorasiaan.
Varmista, että tyyppikilvessä mainittu jännite vastaa
verkkopistokkeen jännitettä.
• Vedä verkkopistoke pistorasiasta, kun liikutat tai
täytät kahvinkeitintä, kun esiintyy häiriö, ennen
laitteen puhdistusta sekä silloin, kun et käytä sitä.
Älä missään tapauksessa upota kahvinkeitintä
nesteeseen. Laitetta ei saa altistaa kosteudelle
eikä sitä saa käyttää ulkona. Jos laitteen koteloon
kuitenkin sattuu pääsemään nestettä, irrota
välittömästi laitteen verkkopistoke pistorasiasta
ja anna pätevien alan ammattilaisten korjata
laite.
• Älä kosketa kahvinkeitintä, virtajohtoa tai pistoketta,
kun kätesi ovat märät.
• Irrota laite verkkovirrasta ainoastaan pistokkeesta
vetämällä. Älä vedä johdosta.
• Älä taivuta tai purista sähköjohtoa.
• Anna viallinen laite välittömästi pätevälle huolto-
liikkeelle korjattavaksi tai käänny huoltopalvelumme
puoleen, jotta vaaroilta vältyttäisiin.
• Anna valtuutetun ammattihenkilöstön vaihtaa vau-
rioitunut verkkojohto tai verkkopistoke välittömästi
uuteen vaarojen välttämiseksi.
• Älä käytä jatkojohtoa.
Tulipalon vaara!
• Pidä toiminnassa olevaa kahvinkeitintä silmällä.
• Älä koskaan käytä kahvinkeitintä ilman vesijohto-
vettä, äläkä koskaan täytä laitetta Max-merkintää
enempää.
• Älä käytä laitetta ulkoisen ajastimen tai erillisen
kaukovaikutusjärjestelmän avulla.
Loukkaantumisvaara!
• Älä käytä kahvinkeittimen lasikannua mikro-
aaltouunissa.
• Tätä laitetta ei ole tarkoitettu sellaisten henkilöiden
(mukaan lukien lapset) käyttöön, joiden rajoitetut,
fyysiset, aistilliset tai henkiset kyvyt tai kokemuksen
ja/tai tiedon puute estävät käytön, lukuun ottamatta
tilanteita, joissa heitä valvoo turvallisuudesta
vastaava henkilö tai joissa he ovat saaneet tältä
ohjeita laitteen käytöstä.
• Lapsia on valvottava ja on varmistettava, etteivät
he leiki laitteella.
Palovammojen vaara!
• Älä milloinkaan kosketa kahvinkeittimen kuumia
pintoja, varsinkaan kuumennuslevyä tai lasikannua.
Palovammavaara!
Tämä symboli varoittaa esiintyvästä höyrystä.
Palovammavaara! Noudata turvaohjeita:
• Älä pidä käsiäsi laitteesta nousevassa vesihöyryssä.
• Sulje laitteen suodatinpidike aina ennen laitteen
päällekytkemistä. Nouseva höyry ja kuuma vesi
voivat aiheuttaa palovamman vaaran.
• Älä käytä kahvinkeittimen lasikannua mikro-
aaltouunissa.
• Älä liikuta kahvinkeitintä, kun se on käytössä.
• Ota kannu pois vasta sitten, kun keittäminen on
päättynyt ja suodatin on tyhjä.
IB_KH1081_38021_LB3 29.10.2009 14:27 Uhr Seite 10

- 11 -
Kompastumisvaara!
• Sijoita verkkojohto siten, että sen päälle ei voi
astua tai ettei siihen voi kompastua.
• Älä käytä jatkojohtoa.
Laitevaurioiden vaara!
• Älä koskaan käytä laitetta tyhjänä (ilman vettä).
Muutoin lasikannu voi haljeta.
Määräystenmukainen käyttö
Kahvinkeitin on tarkoitettu ainoastaan kahvin valmis-
tamiseen. Tämä kahvinkeitin on tarkoitettu ainoastaan
käytettäväksi kotitalouksissa. Noudata tämän käyttö-
ohjeen kaikkia ohjeita, erityisesti turvaohjeita. Mikä
tahansa muu käyttö on määräysten vastaista ja saattaa
johtaa esine- tai henkilövahinkoihin. Valmistaja ei ota
vastuuta vahingoista, jotka johtuvat määräystenvas-
taisesta käytöstä.
Toimituslaajuus
Kahvinkeitin
Lasikannu
Mittalusikka
Käyttöohje
Kuvaus
Kahvinkeittimellä voi valmistaa kuumaa suodatinkahvia.
Valmista kahvia voi pitää lämpimänä päälle kytketyn
laitteen lämpölevyllä.
Laite
1Suodatinkori
2Arominvalintakytkin
3Vesisäiliön kansi
4Vesimäärän näyttö
5Virtakytkin ja integroitu merkkivalo
6Mittalusikka
7Suodatinpidike
8Kahvinvalutin
Sijoitus ja kytkennät
Sähköiskun vaara
Älä missään tapauksessa sijoita kahvinkeitintä veden,
kuten tiskialtaan tai vedellä täytettyjen astioiden,
läheisyyteen. Käytä kahvinkeitintä ainoastaan kuival-
la alustalla. Veden läheisyys aiheuttaa mahdollisen
vaaratilanteen, myös silloin, kun laite ei ole päällä.
Irrota siksi verkkopistoke jokaisen käyttökerran jälkeen.
Tulipalon vaara!
Älä aseta kahvinkeitintä lämpölähteiden läheisyyteen.
Laite saattaa vahingoittua.
Huomio!
Käytä kahvinkeitintä ainoastaan tasaisella ja
kuumuutta kestävällä alustalla, jotta laitteen ja
käyttöpaikan vaurioilta vältyttäisiin.
• Poista kaikki pakkausmateriaalit laitteesta.
• Aseta laite tasaiselle ja kuumuudenkestävälle
pinnalle.
• Aseta lasikannu laitteen lämpölevylle.
• Avaa suodatinpidike 7.
• Aseta suodatinkori 1paikoilleen niin, että
kahvinvalutin 8tulee ulos aukosta.
• Sulje suodatinpidike 7.
• Työnnä verkkopistoke pistorasiaan.
IB_KH1081_38021_LB3 29.10.2009 14:27 Uhr Seite 11

- 12 -
Käyttö
Ennen ensimmäistä käyttöä
Huomio!
• Älä koskaan täytä vesisäiliöön vesijohtovettä
enempää kuin yhteensä 12 kupillista varten.
Älä koskaan täytä vesisäiliöön vettä vähempää
kuin 3 kupillista varten. Muunlainen käyttö voi
vahingoittaa kahvinkeitintä. Käytä vesimäärän
näyttöä 4.
• Irrota kahvinkeitin heti käytön jälkeen virtaverkosta.
Laite on virraton vain silloin, kun verkkopistoke
on vedetty irti pistorasiasta.
• Täytä vesisäiliöön ainoastaan vesijohtovettä.
Muunlainen käyttö voi vahingoittaa kahvinkeitintä.
1. Avaa lasikannu ja vesisäiliön kansi 3.
2. Huuhtele lasikannu huolellisesti vesijohtovedellä.
Täytä vesisäiliöön vesijohtovettä. Varmista, että
kaadat veden vesisäiliöön hitaasti, jotta vesi pääsee
juoksemaan vesisäiliön molempien aukkojen kautta.
Tyhjennä vesisäiliö jälleen kääntämällä laite varovasti
ylösalaisin pesualtaan yläpuolella ja kaatamalla
vesijohtovesi ulos.
3. Täytä lasikannu vesijohtovedellä 12 kupillista
varten.
4. Täytä vesijohtovesi kokonaan vesisäiliöön.
5. Sulje vesisäiliö.
6. Aseta tyhjennetty lasikannu lämpölevylle.
7. Kytke kahvinkeitin päälle (I) virtakytkimellä 5.
Integroitu merkkivalo palaa. Odota, kunnes
keittotapahtuma on valmis.
8. Tyhjennä lasikannu.
9. Kytke kahvinkeitin pois päältä (O) virtakytkimellä 5.
Integroitu merkkivalo sammuu.
10. Odota, kunnes laite on jäähtynyt.
Kahvijauheen lisääminen
1. Käännä suodatinpidike 7sivulle. Suodatinkorin
1on oltava paikoillaan.
2. Aseta suodatinpussi (koko 1x4) sivut käännetty-
nä suodatinkoriin 1.
3. Täytä kahvijauhetta mittalusikalla 6.
Ohje:
Täytä n. kukkurallinen kahvilusikallinen jauhettua
kahvia suodatinkahvikupillista kohti. Jos
suodatinkahvista halutaan laihempaa, voidaan
jauhetun kahvin määrää kuppia kohti vähentää.
4. Sulje suodatinpidike 7. Varmista, että kahvinva-
lutin 8on keskellä lasikannun yläpuolella.
Veden täyttäminen
Ohje:
Käytä kahvin valmistukseen vain juomakelpoista
vettä!
1. Avaa vesisäiliön kansi 3.
2. Täytä lasikannu vedellä.
Huomio!
• Älä koskaan täytä vesisäiliöön vettä yhteensä
enempää kuin 12 kupillista varten. Älä koskaan
täytä vesisäiliöön vähempää vettä kuin 3 kupilli-
sta varten. Muuten kahvinkeitin voi vaurioitua.
Käytä vesimäärän näyttöä 4.
3. Kaada haluttua suodatinkahvin määrää vastaa-
vasti vettä vesisäiliöön. Käytä siihen apuna vesi-
määrän näyttöä 4. Varmista, että vesi kaade-
taan vesisäiliöön hitaasti, jotta vesi voi valua
molempien vesisäiliön aukkojen läpi.
4. Sulje vesisäiliön kansi 3.
IB_KH1081_38021_LB3 29.10.2009 14:27 Uhr Seite 12

- 13 -
Aromin säätäminen
• Säädä haluamasi kahvin voimakkuus aromin
valintakytkimellä 2. Asennossa valmistuu
vahvaa kahvia, asennossa mietoa.
Virrankytkentä ja -katkaisu
• Kun haluat kytkeä kahvinkeittimen päälle, aseta
virtakytkin 5asentoon "Päälle" (I). Integroitu
merkkivalo palaa.
• Kun haluat kytkeä kahvinkeittimen pois päältä, aseta
virtakytkin 5asentoon "Pois" (O). Integroitu
merkkivalo sammuu.
• Jos et käytä kahvinkeitintä, vedä verkkopistoke
pistorasiasta.
Puhdistaminen
Jotta jokainen keittokerta takaisi sinulle optimaalisen
makunautinnon, tulisi kahvinkeitin puhdistaa jokaisen
käyttökerran jälkeen.
• Vedä verkkopistoke irti pistorasiasta.
Sähköiskujen vaara
Verkkopistoke on aina irrotettava pistorasiasta ennen
kahvinkeittimen puhdistusta. Laitetta ei saa puhdistet-
taessa missään tapauksessa kastaa veteen tai pitää
juoksevan veden alla.
Palovammojen vaara!
Odota, että kahvinkeitin on viilentynyt, ennen kuin
puhdistat sen. Muussa tapauksessa laite saattaa
vahingoittua.
Huomio!
Älä käytä lian puhdistamiseen kotitalouspuhdistusaineita
tai teräviä esineitä. Ne saattavat vahingoittaa
kahvinkeitintä.
• Pyyhi kahvinkeittimen kotelo ja lasikannu kevyesti
miedolla saippualiuoksella kostutetulla pehmeällä
liinalla. Poista mahdollisesti lasikannuun kertyneet
kerrostumat.
• Ota jokaisen käytön jälkeen suodatinkori 1suo-
datinpidikkeestä 7.
• Huuhtele se juoksevan veden alla.
• Puhdista mittalusikka 6miedossa saippuavedes-
sä ja huuhtele se puhtaalla vedellä.
Kalkinpoisto
Veden kalkkipitoisuudet (kovuusaste) aiheuttavat
kahvinkeittimen kalkkiutumisen, kun sitä käytetään.
Kalkki vaikuttaa heikentävästi laitteen toimintoihin ja
laskee keitetyn suodatinkahvin laatua.
Voit tiedustella vesijohtovetesi kovuusastetta
vesilaitokseltasi. Kovuusasteen ollessa suurempi
on kalkin poistaminen tarpeen aikaisemmin,
alhaisemmalla kovuusasteella myöhemmin.
Käytä kalkinpoistoon tarkoitettuja kotitalouslaitteita
ja ota käyttöohjeet huomioon.
1. Kytke kahvinkeitin pois päältä ja anna se jäähtyä
kokonaan.
2. Lisää kalkinpoistoainetta vesisäiliöön.
3. Täytä vesisäiliöön suurin sallittu vesimäärä.
4. Aseta lasikannu lämpölevylle.
5. Kytke kahvinkeitin päälle virtakytkimellä 5.
6. Odota, kunnes keittäminen on täysin päättynyt.
Kytke kahvinkeitin pois päältä ja irrota virtapisto-
ke pistorasiasta.
7. Huuhtele lasikannu huolellisesti vesijohtovedellä.
Täytä vesisäiliöön vesijohtovettä. Varmista, että
kaadat veden vesisäiliöön hitaasti, jotta vesi pääsee
juoksemaan vesisäiliön molempien aukkojen kautta.
Tyhjennä vesisäiliö jälleen kääntämällä laite
varovasti ylösalaisin pesualtaan yläpuolella ja
kaatamalla vesijohtovesi ulos.
IB_KH1081_38021_LB3 29.10.2009 14:27 Uhr Seite 13

- 14 -
8. Anna lopuksi kahvinkeittimen keittää kahdesti
pelkällä vesijohtovedellä luvussa "Ennen ensimmäistä
käyttöä" kuvatulla tavalla.
Tämän jälkeen laitetta voi taas käyttää tavallisesti.
Toimintahäiriöiden korjaaminen
Oire Mahdolliset syyt ja
ratkaisut
Kahvinkeittimen virta
ei kytkeydy päälle.
• Verkkopistoke ei ole pisto-
rasiassa. Työnnä verkko-
pistoke pistorasiaan.
• Kotitalouden sulake on
rikki. Tarkasta sulakkeet
ja vaihda tarvittaessa.
• Pistorasia on rikki.
Kokeile toista pistorasiaa.
• Kahvinkeitin on mahdolli-
sesti rikki. Toimita kahvin-
keitin ammattilaisen
tarkastettavaksi.
Keitetyn kahvin laatu
on huonontunut.
• Kahvinkeitin on kalkkiutunut.
Poista kalkki kahvinkeitti-
mestä.
Hävittäminen
Älä hävitä laitetta tavallisen talousjätteen
mukana. Tämä tuote on eurooppalaisen
direktiivin 2002/96/EC mukainen.
Anna laite hyväksytyn jätehuoltoyrityksen tai kunnallisen
jätelaitoksen hävitettäväksi.
Noudata ajankohtaisia voimassa olevia määräyksiä.
Ota epäselvissä tilanteissa yhteyttä paikalliseen
jätehuoltoviranomaiseen.
Hävitä kaikki pakkausmateriaalit ympäristöys-
tävällisellä tavalla.
Tekniset tiedot
Verkkojännite: 230 V ~, 50 Hz
Nimellisteho: 1000 W
IB_KH1081_38021_LB3 29.10.2009 14:27 Uhr Seite 14

- 15 -
Takuu ja huolto
Laitteen takuu on 3 vuotta ostopäivästä. Laite on
valmistettu huolellisesti ja tarkistettu tarkasti ennen
toimitusta. Säilytä ostokuitti todisteeksi takuun voi-
massaolosta.
Ota takuutapauksessa puhelimitse yhteyttä huoltopi-
steeseesi. Vain näin voidaan taata tuotteesi maksu-
ton lähettäminen huoltoon.
Takuu koskee ainoastaan materiaali- ja valmistusvir-
heitä, ei kuitenkaan kuljetusvaurioita, kuluvia osia tai
herkästi vaurioituvien osien, esim. kytkinten tai akku-
jen vaurioita.
Tuote on tarkoitettu ainoastaan yksityiseen, ei kau-
palliseen käyttöön.
Väärä tai asiaton käyttö, väkivallan käyttö ja mui-
den kuin valtuutetun huoltopisteen suorittamat kor-
jaukset aiheuttavat takuun raukeamisen. Tämä takuu
ei rajoita kuluttajan lakisääteisiä oikeuksia.
Takuukorjaus ei pidennä takuuaikaa. Tämä koskee
myös vaihdettuja ja korjattuja osia. Mahdollisista jo
ostettaessa olemassa olevista vahingoista ja puuttei-
sta on ilmoitettava välittömästi pakkauksesta purka-
misen jälkeen, kuitenkin viimeistään kaksi päivää
ostopäiväyksen jälkeen. Takuuajan jälkeen suoritetut
korjaukset ovat maksullisia.
Kompernass Service Suomi
Tel.: 010 30 935 80
(Soittamisen hinta lankaliittymästä: 8,21 snt/puh + 5,9 snt/min /
Matkapuhelimesta: 8,21 snt/puh + 16,90 snt/min)
e-mail: suppor[email protected]
Maahantuoja
KOMPERNASS GMBH
BURGSTRASSE 21
D-44867 BOCHUM, GERMANY
www.kompernass.com
IB_KH1081_38021_LB3 29.10.2009 14:27 Uhr Seite 15

- 16 -
IB_KH1081_38021_LB3 29.10.2009 14:27 Uhr Seite 16

- 17 -
Innehållsförteckning Sidan
Säkerhetsanvisningar 18
Föreskriven användning 19
Leveransens omfattning 19
Beskrivning 19
Komponenter 19
Uppställning och anslutning 19
Användning 20
Innan du börjar använda apparaten...........................................................................................20
Fyld malet kaffe på........................................................................................................................20
Fyld vand på ..................................................................................................................................20
Ställa in kaffearom.........................................................................................................................21
Sätta på och stänga av apparaten..............................................................................................21
Rengöring 21
Avkalka 21
Åtgärda fel 22
Kassering 22
Tekniska data 22
Garanti och service 23
Importör 23
Spara den här anvisningen för senare frågor – och överlämna den tillsammans med apparaten om du
överlåter den till någon annan person!
IB_KH1081_38021_LB3 29.10.2009 14:27 Uhr Seite 17

- 18 -
KAFFEBRYGGARE
KH 1081
Säkerhetsanvisningar
Risk för elchock!
• Kaffebryggaren får bara anslutas till ett godkänt
och jordat eluttag. Kontrollera att eluttaget har
samma spänning som angivelsen på apparatens
typskylt.
• Dra ut kontakten ur eluttaget när du flyttar och
fyller på kaffebryggaren, vid störningar, innan
du rengör den och när den inte används.
Du får absolut inte doppa ner kaffebryggaren
i vätska. Den får inte utsättas för fukt och inte
användas utomhus. Om det ändå råkar komma
in vätska i apparaten ska du omedelbart dra
ut kontakten och lämna in den till en yrkesman
för reparation.
• Ta aldrig i kaffebryggare, nätkabel eller kontakt
med våta händer.
• Håll alltid i kontakten när du drar ut den ur uttaget,
dra inte i själva kabeln.
• Nätkabeln får inte veckas eller klämmas.
• Låt omedelbart en kvalificerad fackverkstad
reparera defekta apparater eller vänd dig till
kundtjänst för att inte utsätta dig för onödiga
risker.
• Låt genast en auktoriserad yrkesman eller kundt-
jänst byta ut skadade elkablar eller kontakter
för att inte utsätta dig för onödiga risker.
• Använd inga förlängningskablar.
Brandrisk!
• Lämna aldrig kaffebryggaren utan uppsikt när
den används.
• Sätt aldrig på kaffemaskinen utan att först fylla
på vatten och fyll aldrig på mer vatten än upp
till maxmarkeringen.
• Använd ingen extern timer eller separat fjärrkontroll
för att styra apparaten.
Risk för personskador!
• Sätt aldrig kaffebryggarens glaskanna i mikro-
vågsugnen.
• Den här apparaten ska inte användas av personer
(inklusive barn) med begränsad fysisk, sensorisk
eller mental förmåga eller bristande erfarenhet
och kunskap om de inte först övervakats eller
instruerats av någon ansvarig person.
• Se noga till så att barnen inte leker med apparaten.
Risk för brännskador!
• Rör inte vid heta ytor på kaffebryggaren, särskilt
inte vid värmeplattan och glaskannan.
Risk för brännskdor!
Den här symbolen ska varna för het ånga.
Risk för brännskador!
Följ säkerhetsanvisningarna:
• Håll inte händerna där den heta ångan tränger ut.
• Stäng alltid filterhållaren innan du sätter på
kaffebryggaren, annars kan du bränna sig på
ångan och det heta vattnet som tränger ut.
• Sätt aldrig kaffebryggarens glaskanna
i mikrovågsugnen.
• Flytta inte kaffebryggaren medan den brygger.
• Lyft inte av kannan förrän kaffet är färdigbryggt
och filtret har runnit av.
IB_KH1081_38021_LB3 29.10.2009 14:27 Uhr Seite 18
Other manuals for KH 1081
2
Table of contents
Languages:
Other Kompernass Coffee Maker manuals

Kompernass
Kompernass KH 1115 User manual

Kompernass
Kompernass KH 1112 User manual

Kompernass
Kompernass KH 1098 User manual

Kompernass
Kompernass KH 10081 User manual

Kompernass
Kompernass KH 1114 User manual

Kompernass
Kompernass KH 1098-01/09-V2 User manual

Kompernass
Kompernass KH 1112 User manual

Kompernass
Kompernass KH 1114 User manual

Kompernass
Kompernass KH 1098 User manual

Kompernass
Kompernass KH1112-01/09-V2 User manual