Korg EXB-SMPL User manual

KORG INC.
15-12, Shimotakaido 1-chome, Suginami-ku, Tokyo, Japan
C2001KORG INC. 1309 DTH
Printed in Japan
OWNER’S MANUAL
MANUEL D’UTILISATION
BEDIENUNGSANLEITUNG
取扱説明書
This device complies with Part 15 of the FCC Rules.
Operation is subject to the following two conditions: (1) This
device may not cause harmful interference, and (2) this
device must accept any interference received, including
interference that may cause undesired operation.
Complies with Canadian ICES-003 Class B.
Conforme au Reglement Canadian NMB-003 classe B.
THE FCC REGULATION WARNING (for U.S.A.)
This equipment has been tested and found to comply with the limits for a
Class B digital device, pursuant to Part 15 of the FCC Rules.These limits
are designed to provide reasonable protection against harmful interfer-
ence in a residential installation. This equipment generates, uses, and
can radiate radio frequency energy and, if not installed and used in ac-
cordance with the instructions, may cause harmful interference to radio
communications. However, there is no guarantee that interference will
not occur in a particular installation. If this equipment does cause harm-
ful interference to radio or television reception, which can be determined
by turning the equipment off and on, the user is encouraged to try to
correct the interference by one or more of the following measures:
• Reorient or relocate the receiving antenna.
• Increase the separation between the equipment and receiver.
• Connect the equipment into an outlet on a circuit different from that to
which the receiver is connected.
• Consult the dealer or an experienced radio/TV technician for help.
Unauthorized changes or modification to this system can void the user's
authority to operate this equipment.
Marque CE de conformité aux normes de sécurité européennes
La marque CE attachée à nos produits alimentés par secteur indique que
ces produits sont conformes à la directive EMC (89/336/CEE) ainsi qu'à la
directive relative à la marque CE (93/68/CEE). Cette marque est valable jus-
qu'au 31 décembre 1996.
La marque CE attachée après le 1 janvier 1997 indique que ces produits
sont conformes à la directive EMC (89/336/CEE), à la directive relative à la
marque CE (93/68/CEE) ainsi qu'à la directive relative au courant de basse
tension (73/23/CEE).
Enfin, la marque CE attachée à nos produits alimentés par batterie indique
que ces produits sont conformes à la directive EMC (89/336/CEE) ainsi qu'à
la directive relative à la marque CE (93/68/EEC).
CE-Marke der EG-Norm
Die CE-Marke auf unseren netzgespeisten Geräten deutet auf deren Über-
einstimmung mit den EMC- und CE-Richtilinien der EG (respektive 89/336/
EWG und 93/68/EWG) hin. Diese Abzeichen ist bis zum 3. Dezember 1996
gültig.
Die CE-Marke ab 1. Januar 1997 deutet auf Übereinstimmung mit den EMC-
, CE- und Niederspannungsstrom-Richtilinien der EG (respektive 89/336/
EWG, 93/68/EWG und 93/68/EWG) hin.
Die CE-Marke auf unseren batteriegespeisten Geräten deutet auf deren
Übereinstimmung mit den EMC- und CE-Richtilinien der EG (respektive 89/
336/EWG und 93/68/EWG) hin.

Warning
When installing, servicing, or replacing parts for this product, do not
perform any action that is not prescribed in the owner's manual.
Do not apply excessive force to the electronic components or connectors
on the circuit board, and do not disassemble it. Electrical shock, fire, or
malfunction may result.
Before installing this product, disconnect the power supply cable of the
device in which it is being installed, and disconnect any cables that con-
nect peripheral devices. Failure to do so may cause electrical shock or
malfunctions.
Caution
Do not allow this product to become wet, and do not place objects on top
of it. Doing so will cause malfunctions.
Before touching this product, touch a metal part of the device into which
it will be installed, so that any static electricity in your body will be dis-
charged. Failure to do so will risk damaging the electronic components
by static electricity.
When handling this product, be careful not to touch the leads (wires pro-
truding from the electronic components) on the rear side of the circuit
board. Injury may result.
When installing this product, do not touch any unrelated parts or circuit
boards. Electric shock or malfunction may result.
When installing this product, be careful not to cut yourself on any sharp
edges or parts of this product or of the device into which this product is
being installed.
When installing this product, be careful not to drop screws etc. into the
device into which this product is being installed.
The manufacturer makes no warrantee regarding possible mal-
functions or damage that may result from improper use or modi-
fication. The manufacturer also will take no responsibility for
any damages that may result from loss or disappearance of data.
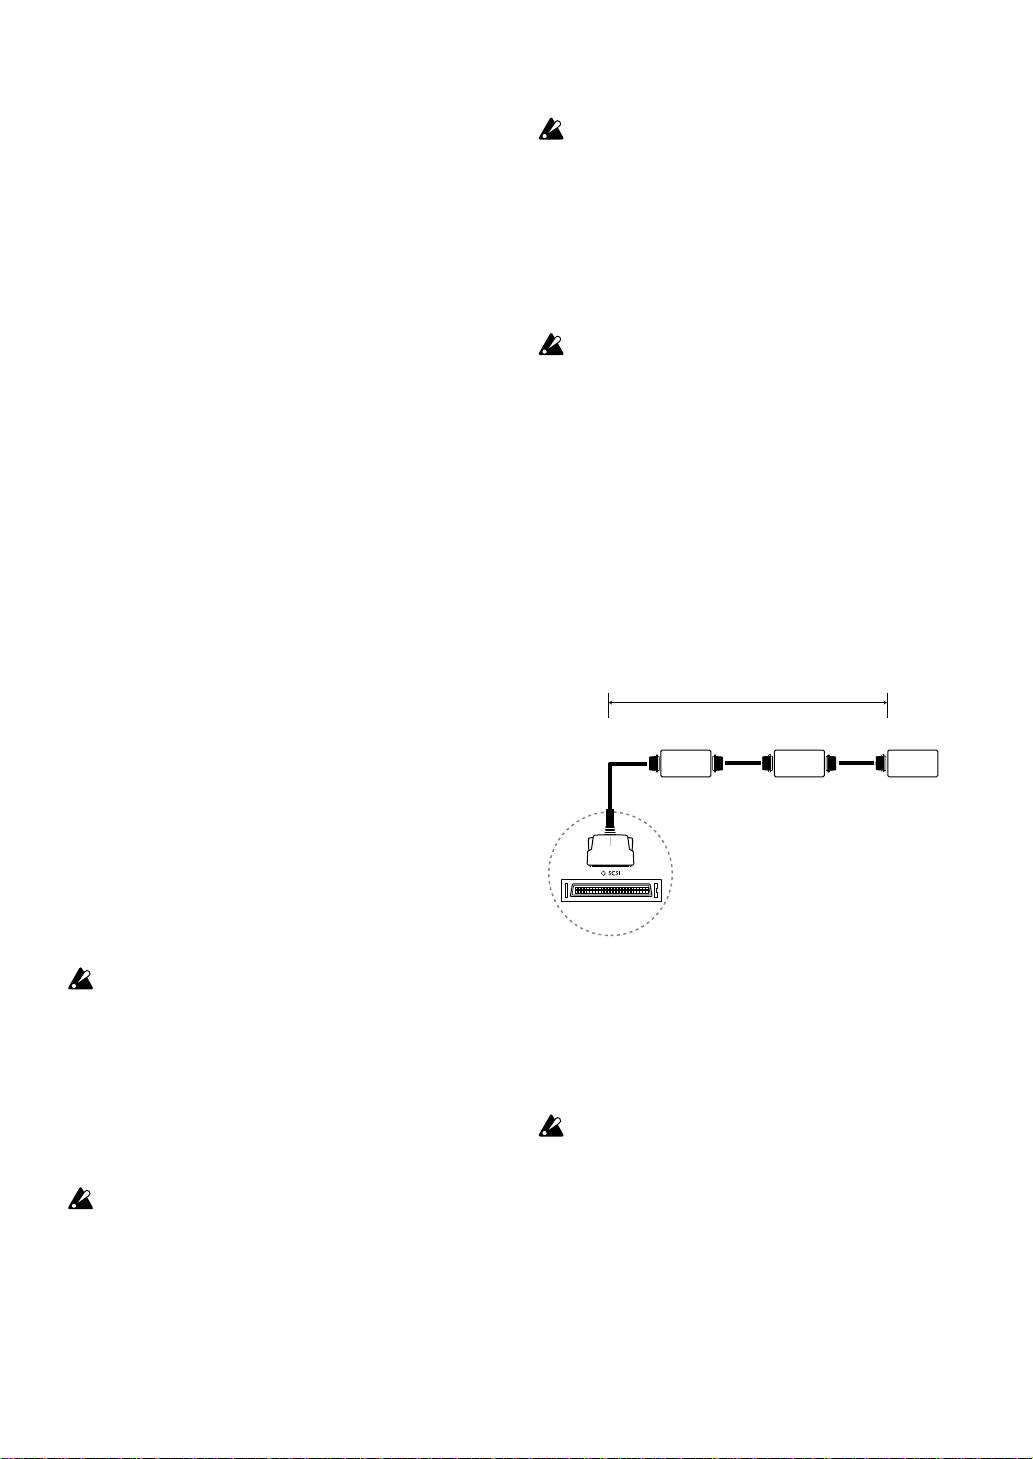
Installing this product
For the procedure of installing this product, refer to the owner's manual
of the device into which the product is being installed. If you have any
questions, please contact Korg distributor.
Cautions when installing an option board
In order to install the board correctly, please pay attention to the follow-
ing points.
Be careful of static electricity, which may damage components inside
the product or on the board. Before beginning the installation, touch an
unpainted metal part of the chassis or the grounding terminal of a grounded
device to discharge any static electricity that may be present in your body.
Perform the installation according to the steps given in the directions,
making sure that the board is installed correctly and in the correct orien-
tation.
Verify that the option board has been installed correctly. If installation is
incorrect, faulty connections or a shorted power supply can cause mal-
functions.
All the screws that are removed will be used, so be careful not to lose
any.
Using screws of the incorrect shape or length can cause malfunctions or
damage to the product. Use only the screws that were included with the
option board or the screws that were fastened in the instrument.
When installing or removing the board, be careful not to drop parts or the
option board into the instrument.
Make sure that the attaching screws are tightened firmly, and are not
loose.
Handle the board with care. Subjecting it to physical shock (by dropping
or pressing it) may cause damage or malfunctions.
Be careful not to touch any exposed metal portions of the circuit board,
or any parts that are not essential to the installation process.
Avertissement
Lors de l’installation, d’interventions techniques ou du remplacement de
pièces pour ce produit, toujours respecter scrupuleusement les instructions
du manuel d’utilisation. Ne jamais prendre des mesures qui ne sont pas
indiquées.
Ne pas forcer de manière excessive sur les composants électroniques ou
sur les connecteurs du circuit ni les démonter. Vous risqueriez de vous
électrocuter, de provoquer un incendie ou un mauvais fonctionnement.
Avant d’installer ce produit, débrancher le câble d’alimentation de l’appa-
reil dans lequel il doit être installé et débrancher tous les câbles qui le
relient à des périphériques afin d’éviter tout risque d’électrocution ou de
mauvais fonctionnements.
Attention
Toujours tenir ce produit à l’écart de l’humidité et ne jamais placer d’élé-
ments lourds dessus afin d’éviter de provoquer un mauvais fonctionne-
ment.
Avant de toucher ce produit, toucher un élément métallique de l’appareil
dans lequel il doit être installé de sorte à décharger toute électricité stati-
que éventuelle présente dans votre corps. L’électricité statique risquerait
en effet d’endommager les composants électroniques.
Lors des manipulations de ce produit, faire attention de ne pas toucher les
fils (sortant des composants électroniques) situés sur la face arrière du
circuit car vous risqueriez de vous blesser.
Lors de l’installation de ce produit, ne jamais toucher d’éléments ou de
circuits inutilement. Vous risqueriez de provoquer un choc électrique ou
un mauvais fonctionnement.
Lors de l’installation de ce produit, veiller à ne pas se couper sur les bords
ou éléments tranchants du produit ou de l’appareil dans lequel il doit être
installé.
Lors de l’installation du produit, veiller à ne pas laisser tomber de vis, etc.
dans l’appareil dans lequel il doit être installé.
Le fabricant ne peut pas être tenu responsable de mauvais fonc-
tionnements possibles ou de dégâts dus à une mauvaise utilisa-
tion ou à des modifications. Il ne pourra pas non plus être tenu
responsable des conséquences de toute perte ou disparition de
données.
Installation du produit
Pour la méthode d’installation de ce produit, se reporter au manuel d’utili-
sation de l’appareil dans lequel il doit être installé. En cas de questions,
veuillez contacter le distributeur Korg.
Précautions à prendre lors de l’installation d’une carte en
option
Afin que la carte soit installée correctement, veuillez considérer les points
suivants.
Faire très attention à l’électricité statique qui pourrait endommager les
éléments internes du produit ou ceux situés sur la carte. Avant de procéder
à l’installation, toucher une partie métallique non peinte du châssis ou de
la borne de mise à la terre d’un appareil relié à la terre afin de décharger
toute l’électricité statique qui pourrait se trouver dans votre corps.
Réaliser l’installation en respectant les points mentionnés dans les instruc-
tions fournies, en veillant à installer la carte correctement et dans le sens
adéquat.
Vérifier si la carte en option est installée correctement. Si ce n’est pas le
cas, des connexions défectueuses ou une alimentation court-circuitée ris-
quent de provoquer des mauvais fonctionnements.
Toutes les vis que vous avez retirées doivent être réutilisées. Veiller à ne
pas les perdre.
L’utilisation de vis de dimensions, de formes ou de longueurs incorrectes
peut provoquer un mauvais fonctionnement du produit ou l’endommager.
Utiliser uniquement les vis livrées avec la carte en option ou les vis qui
étaient fixées à l’instrument.
Lors de l’installation ou du retrait de la carte, faire très attention de ne pas
laisser tomber des éléments ou la carte en option dans l’instrument.
Vérifier si les vis de fixation sont bien attachées et si elles sont serrées
correctement.
Manipuler la carte avec soin. Eviter de la soumettre à des chocs physiques
(en la laissant tomber ou en appuyant dessus) car vous risqueriez de l’en-
dommager ou de provoquer un mauvais fonctionnement.
Eviter soigneusement de toucher toute partie métallique exposée de la carte
de circuits ou tout élément qui ne s’avère pas essentiel pour la procédure
d’installation.

警告
本製品の取り付け、修理、部品の交換などで、取扱説明書に記
載されている以外のことは絶対にしないでください。
本製品の基板上の電子部品やコネクタには無理な力を加え
たり、分解したりしないでください。感電、火災、故障の原因に
なります。
本製品を取り付ける前に、取り付ける機器の電源プラグと、周
辺機器との接続コードを必ず抜いてください。感電や機器の
破損の原因になります。
注意
本製品を液体でぬらしたり、異物をのせたりしないでくださ
い。故障の原因になります。
本製品を触る前に、取り付ける機器の金属部に触れ、静電気
を取り除いてください。静電気により電子部品を破損する恐
れがあります。
本製品を取り扱うときは、基板裏側のリード(電子部品の足
部)に触れないように作業してください。けがをする恐れが
あります。
本製品を取り付ける際は、接続と関係のない部品や基板には
絶対に触れないでください。感電や故障の原因なります。
本製品を取り付ける際は、本製品や取り付ける機器の金具等
で手を切らないように作業してください。
本製品を取り付ける際は、取り付ける機器の中にネジなどを
落とさないように作業してください。
誤った使用や改造による故障、破損の保証はいたしませ
ん。また、データの消失、破損による損害についても、当
社は一切の責任を負いかねますのでご了承ください。
本製品の取り付け方
本製品の取り付け方法については、取り付ける機器の取扱説明書をご
覧ください。ご不明な点はコルグ・インフォメーションへお問い合わせ
ください。
オプション・ボード取り付け時の注意
正しく取り付けるときは、以下の項目に注意して作業を行ってくださ
い。
・ 製品内部やボード上の部品に影響をおよぼす静電気の発生に注意し
てください。取り付け作業をするときは、あらかじめ体の静電気を逃
がすように塗装面以外の金属部分に触れておいたり、アースがとれ
ている機器のアース線に触れたりなどしてください。
・ 取り付ける部品や、取り付け方向を間違えないように、手順どおりに
作業してください。
・ オプション・ボードの取り付けが、確実に行われていることを確認し
てください。取り付けが不十分だと、接触不良や電源のショートをお
こして故障の原因になることがあります。
・ はずしたネジはすべて使用するので、なくさないようにしてくださ
い。
・形や長さの違うネジを使用すると、製品の故障や破壊の原因になる
ことがあります。オプション・ボードの付属品、または本体に取り付け
られているネジ以外は使用しないでください。
・ 取り付けまたは取り外しのとき、部品やオプション・ボードなどを本体
内部へ落とさないようにしてください。
・ 取り付けたネジは、ゆるみがなく確実に締まっていることを確認して
ください。
・ ボードの取り扱いは十分に注意してください。衝撃(落としたり、強く
押さえる)を与えると、製品の故障や破壊の原因になることがありま
す。
・ 基板の金属が露出している部分や、取り付けに必要のない部分に触
れないようにしてください。
Warnung
Nehmen Sie während der Installation, bei Reparatur oder Austausch kei-
ne Maßnahmen vor, die nicht in dieser Anleitung beschrieben sind.
Wenden Sie keine übermäßige Kraft auf die elektronischen Bauteile oder
die Anschlüsse auf der Platine an, und nehmen Sie das Bauteil nicht aus-
einander. Dies kann zu Stromschlag, Brand oder Fehlfunktion führen.
Ziehen Sie vor der Installation das Netzkabel des Gerätes ab, in das die
Karte eingebaut werden soll, und lösen Sie auch alle Verbindungen zu
Peripheriegeräten. Wenn dies nicht beachtet wird, kann dies zu Strom-
schlag oder Fehlfunktion führen.
Vorsicht
Lassen Sie dieses Produkt nicht naß werden, und stellen Sie keine Ge-
genstände auf das Produkt. Dies kann zu Fehlfunktion führen.
Bevor Sie das Produkt in die Hand nehmen, berühren Sie ein Metallteil
des Gerätes, in das Sie die Karte installieren möchten, um eventuell vor-
handene statische Elektrizität abzuleiten. Bei Nichtbeachtung können die
Bauteile auf der Karte durch statische Entladungen zerstört werden.
Achten Sie bei der Handhabung des Produkts darauf, nicht die Leiter-
bahnen auf der Unterseite der Karte zu berühren, Sie könnten sich daran
verletzen.
Berühren Sie keine anderen Teile oder Platinen im Innern des Instru-
ments. Dies kann zu Stromschlag oder Fehlfunktion führen.
Achten Sie beim Einbau dieses Produkts darauf, sich nicht an
scharfkantigen Bestandteilen des Produkts oder des Instruments, in dem
diese Karte installiert werden soll, zu verletzen.
Achten Sie bei der Installation darauf, in dem Instrument, in dem diese
Karte installiert werden soll, keine Schrauben usw. zu verlieren.
Der Hersteller übernimmt keine Garantie für Fehlfunktionen
oder Schäden, die durch unsachgemäßen Einbau oder Verän-
derungen am Produkt entstanden sind. Der Hersteller über-
nimmt des weiteren ebenfalls keine Garantie auf Integrität oder
Erhalt Ihrer Daten.
Einbau dieses Produkts
Für Einzelheiten zur Installation dieses Produkts lesen Sie bitte die Be-
dienungsanleitung des Instruments, in das sie eingebaut werden soll. Wenn
Sie diesbezüglich Fragen haben sollten, wenden Sie sich an Ihren näch-
sten Korg-Händler.
Vorsichtsmaßnahmen für den Einbau einer
Erweiterungskarte
Um die Karte (Platine) sachgemäß einbauen zu können, sollten Sie fol-
gende Punkte beachten:
Achten Sie auf statische Elektrizität, die Komponenten des Produkts bzw.
auf der Platine beschädigen könnte. Berühren Sie vor dem Einbau ein
blankes (nicht lackiertes) Metallteil oder den Massekontakt eines geer-
deten Gerätes, um jegliche statische Elektrizität abzuleiten, die sich in
Ihrem Körper befinden könnte.
Führen Sie den Einbau genau nach den Schritten der Beschreibung durch,
und achten Sie darauf, daß die Karte richtig und in der richtigen Ausrich-
tung eingebaut wird.
Prüfen Sie, ob die Erweiterungskarte richtig eingesetzt wurde. Wenn die
Karte fehlerhaft eingesetzt wurde, können falsche oder fehlende Verbin-
dungen oder eine kurzgeschlossene Stromversorgung Fehlfunktionen
verursachen.
Alle gelösten Schrauben werden bei oder nach dem Einbau wieder benö-
tigt; achten Sie daher darauf, keine davon zu verlieren.
Die Verwendung von Schrauben falscher Größe oder Form kann zu Fehl-
funktionen oder Schäden am Produkt führen. Verwenden Sie ausschließ-
lich die mit der Karte mitgelieferten Schrauben oder diejenigen, die sich
im Instrument befanden.
Achten Sie beim Ein- oder Ausbau der Karte darauf, keine Teile oder die
Karte selbst in das Instrument fallen zu lassen.
Achten Sie auf festen Sitz der Schrauben. Lose Schrauben können her-
ausfallen und Kurzschlüsse verursachen.
Behandeln Sie die Karte mit Vorsicht. Fallenlassen oder starkes Verbie-
gen kann zuFehlfunktion bzw. Schäden führen.
Achten Sie darauf, keine Metallteile der Leiterplatte oder Teile zu berüh
ren, die nicht für den Einbauvorgang notwendig sind.

アフターサービス
左記の保証規定によりアフターサービスをいたします。アフターサービスにつ
いてご不明の点は下記へお問い合わせください。
▼▲▼ 株式会社コルグ ▼▲▼
インフォメーション 〒168-0073東京都杉並区下高井戸1-11-17
☎(03)5376-5022
東京営業所 〒168-0073東京都杉並区下高井戸1-11-17
☎(03)3323-5241
名古屋営業所〒466-0825名古屋市昭和区八事本町100-51
☎(052)832-1419
大阪営業所 〒531-0072大阪市北区豊崎3-2-1淀川5番館7F
☎(06)6374-0691
福岡営業所 〒810-0012
福岡市中央区白金1-3-25第2池田ビル1F
☎(092)531-0166
修理等のお問い合わせは最寄りの各営業所、または下記までお問い合わせ
ください。
営業技術課 〒143-0001東京都大田区東海5-4-1
明正大井5号営業所コルグ物流センター内
☎(03)3799-9085
保証規定
ご注意(必ずお読みください )
この製品は、当社の厳密な製品検査に合格したものです。万一保証期
間内に製造上の不備に起因する故障の生じた場合は下記の保証規
定により無償修理いたします。
保証条件
1.本保証書の有効期間はお買い上げ日より1ケ年です。
2.次の場合の修理は保証期間内であっても有料修理となります。
●消耗部品(電池など)を交換する場合。
●お取扱い方法が不適当のために生じた故障の場合。
●天災(火災、浸水等)によって生じた故障。
●故障の原因が本製品以外の、他の機器にある場合。
●コルグサービスステーション及び、コルグ指定者以外の手により修 理、
改造された部分の処理が不適当であった場合。
●保証書に販売店名、お買い上げ日などが記入されていない場合ある
いは、字句を書き替えられた場合。
●本保証書の提示がない場合。
●日本国外で使用される場合。
尚、当社が修理した部分が再度故障した場合は保証期間外であっても、
修理した日より3ケ月以内に限り無償修理となります。
3.修理や運送費用が、製品の価格より高くなることもありますので、あらかじ
めコルグ・サービスステーションまたはインフォメーションへご相談ください。
運送にかかる往復の費用は、お客様のご負担とさせていただきます。
4.保証期間が切れますと修理は有料になりますが、引き続き、製品の修理
は責任を持ってさせていただきます。修理用性能部品(電子回路など)
は通常8年間を基準に保有しております。ただし外装部品(パネルなど)
の修理は類似の代替品を使用することもありますのでご了承ください。
5.お客様が保証期間中に移転された場合でも、保証は引き続きお使いい
ただけます。移転先のコルグ製品お取り扱い楽器店、またはコルグ営業
技術課までお問い合わせください。
お願い
本保証書に販売年月日の記入がない場合は無効となります。
※修理は、お買い上げの販売店に必ず本保証書を提示の上、ご依頼
ください。記入不可能な場合はお買い上げ年月日を証明できる領収書
等と一緒にご保管ください。
※本書は再発行致しませんので、紛失しないよう大切に保管して下さ
い。
本書は上記の保証規定により無料修理を行うことをお約束するものです。
お買い上げの日から満1年の間に万一故障が発生した場合は製品と共に
本書をお買い上げの販売店にご持参の上、修理をご依頼ください。
コルグEXB-SMPL 保証書 (日本国内有効)
おなまえ
おところ
お買上げ日 年 月 日
販売店名

Introduction
Thank you for purchasing the Korg EXB-SMPL sampling
upgrade. In order to enjoy long and trouble-free use, please
read this owner's manual carefully.
Features of this product
The EXB-SMPL upgrade provides the same 48 kHz 16-bit
linear mono/stereo sampler functionality as the award-
winning TRITON-series. Powerful editing features include
Time Slice, Time Stretch, Crossfade Looping and more, all
with graphic representation of your waveform data.
The EXB-SMPL comes with 16 Mbytes of sample memory
allowing approximately 2 minutes 54 seconds of mono
sampling. By adding 72 pin SIMM modules you can expand
the memory to a maximum of 64Mbytes (using two 32
Mbyte SIMM modules).
Using the included SCSI connector you can access data
stored on CD-ROM and other media, with support for stereo
or mono AIFF files, Windows WAVE files, and AKAI
S1000/S3000 sample data. Internal sampling data can also
be exported in AIFF and WAVE format.
For details on the specifications, use, and functionality of the
EXB-SMPL, refer to the operation manual of the device into
which it is being installed.
Installing the EXB-SMPL
For details on installing the EXB-SMPL and verifying that it
has been installed correctly, refer to the operation manual of
the device into which it is being installed.
If you have any questions, please contact Korg distributor.
External SCSI device connections and
settings
Up to seven external SCSI devices can be connected via a
SCSI cable.
The EXB-SMPL uses a D-Sub half-pitch 50 pin connector
format, but since the external SCSI device to be connected
may have varying types of connector, refer to the operation
manual of your external SCSI device to check the connector
type, and purchase the appropriate type of SCSI cable.
It is not possible to connect the EXB-SMPL connector to
your computer and use a SCSI device (such as a hard disk
or CD-ROM drive) that is installed in the computer.
1Turn off the power of the instrument (in which the EXB-
SMPL is installed) and of your external SCSI device.
Be sure to turn off the power of the instrument and the
external SCSI device before you connect or disconnect
SCSI cables or change the ID number of the external
SCSI device.
If the power of the instrument or the external SCSI device
is on when you connect or disconnect SCSI cables or
change the ID number of the external SCSI device, the
instrument or the external SCSI device may malfunction,
or data may be lost.
2On the external SCSI device, set the ID number (0–6).
If you are connecting two or more external SCSI devices (in
a “daisy-chain”), set each external SCSI device to a different
ID number so that they can be distinguished.
For details on setting the ID number, refer to the owner's
manual for your external SCSI device.
If you set two or more external SCSI devices to the same
ID number, malfunctions or loss of data may result.
3Connect the SCSI connector of the instrument to the
SCSI connector of the external SCSI device.
Pay attention to the orientation of the cable connector, and
make connections correctly. If the cable connector has a
lock (thumb-screw or tab), be sure it is fastened securely.
If you connect two or more external SCSI devices (in a
“daisy-chain”), be sure that the total length of the
connection cables does not exceed 3 meters.
4Attach a terminator (terminating resistor) to the external
SCSI device so that the connection is terminated.
If two or more external SCSI devices are connected (in a
“daisy-chain”), terminate the device that is furthest from
the instrument in which the EXB-SMPL is installed.
Even if only one external SCSI device is connected, it
must be terminated.
Termination can be done either by attaching a terminator
to the external SCSI device or by switching on a
terminator built into the external SCSI device. Refer to
the operation manual for your SCSI device.
SCSI
ID2ID1ID0
SCSI SCSI SCSI SCSI
Terminate the last device
Total SCSI cable length must be 3 meters or less
Hard Disk
Removable Disk Hard Disk
Removable Disk
5Turn on the power of the external SCSI device(s), and
then turn on the power of the instrument (in which the
EXB-SMPL is installed).
The power must be turned on in the order of external
SCSI device ➞instrument.
The power must be turned off in the order of instrument
➞ external SCSI device.
Never turn off the power while the external SCSI device is
being accessed (e.g., while the LED of the external SCSI
device is lit).
6By operating the device in which the EXB-SMPL is
installed, verify that the connected external SCSI device
is displayed.
For details on how to recognize an external SCSI device,
refer to the operation manual of the device in which the
EXB-SMPL is installed.
Using an external SCSI device
Refer to the owner's manual of the instrument for details on
formatting an external SCSI device such as a hard disk, and
on loading and saving data.

Introduction
Nous vous remercions d’avoir fait l’acquisition de la mise à niveau
des échantillonnages de la carte Korg EXB-SMPL.
Afin de pouvoir l’utiliser longtemps2 et sans problèmes, nous vous
demandons de bien vouloir lire attentivement le présent manuel
d’utilisation.
Caractéristiques de ce produit
La mise à niveau de l’EXB-SMPL fournit la même fonctionnalité
d’échantillonneur mono/stéréo 16 bit linéaire, 48 kHz, que la série
primée TRITON. Les puissantes fonctions d’édition comprennent
le Time Slice, le Time Stretch, le Crossfade Looping et bien
d’autres, toutes avec une représentation graphique de la forme
d’onde des données.
L’EXB-SMPL est livrée avec 16 Mo de mémoire d’échantillon
permettant environ 2 minutes 54 secondes d’échantillonnage mono.
En ajoutant des modules SIMM à 72 broches, la mémoire peut être
étendue jusqu’à 64 Moctets (si on utilise deux modules SIMM de
32 Moctets).
Le connecteur SCSI inclus permet d’accéder aux données
mémorisées sur CD-ROM et autres supports et il accepte les
fichiers stéréo ou mono AIFF, les fichiers Windows WAVE et les
données d’échantillons AKAI S1000/S3000. Il permet également
d’exporter les données d’échantillonnage internes en formats AIFF
et WAVE.
Pour plus de renseignements sur les spécifications techniques,
l’utilisation et la fonctionnalité de l’EXB-SMPL, consulter le
manuel d’utilisation de l’appareil dans lequel la carte doit être
installée.
Installation de la carte EXB-SMPL
Pour plus de détails sur l’installation de l’EXB-SMPL et pour
vérifier si la carte est installée correctement, consulter le manuel
d’utilisation de l’appareil dans lequel elle doit être installée.
En cas de questions, veuillez contacter le distributeur Korg.
Raccordements et réglages de l’appareil
SCSI externe
Cette carte permet de raccorder jusqu’à sept appareils SCSI
externes au moyen d’un câble SCSI.
L’EXB-SMPL utilise un format de connecteur D-Sub à 50 broches
et à demi-pas; comme l’appareil SCSI à raccorder peut être muni de
différents types de connecteurs, il convient cependant de consulter
le manuel d’utilisation de l’appareil SCSI externe pour vérifier le
type de connecteur nécessaire et acheter le type de câble SCSI
adéquat.
Il n’est pas possible de raccorder le connecteur EXB-SMPL à
un ordinateur pour utiliser un appareil SCSI (comme un
disque dur ou un lecteur de CD-ROM) installé dans
l’ordinateur.
1Mettre hors tension l’instrument (dans lequel la carte EXB-
SMPL est installée) et l’appareil SCSI externe.
Toujours couper l’alimentation de l’instrument et de l’appareil
SCSI externe avant de brancher ou de débrancher des câbles
SCSI ou avant de changer le numéro d’ID de l’appareil SCSI
externe.
Si l’instrument ou l’appareil SCSI externe est sous tension
lorsque vous branchez ou que vous débranchez des câbles
SCSI ou lorsque vous changez le numéro d’identification ID
de l’appareil SCSI externe, l’un ou l’autre pourrait mal
fonctionner ou des données risqueraient d’être perdues.
2Sur l’appareil SCSI externe, régler le numéro d’ID (0–6).
Si vous branchez deux ou davantage d’appareils SCSI externes
(«en chaîne»), régler chaque appareil SCSI externe sur un
numéro d’ID différent afin de pouvoir les différencier.
Pour plus de détails sur le réglage des numéros d’ID, voir le
manuel d’utilisation de votre appareil SCSI externe.
Si vous réglez deux ou davantage d’appareils SCSI externes
sur le même numéro d’ID, vous pourriez observer un
mauvais fonctionnement ou perdre des données.
3Raccorder le connecteur SCSI de l’instrument au connecteur
SCSI de l’appareil SCSI externe.
Faire attention de bien orienter le connecteur du câble et
d’effectuer les connexions correctement. Si le connecteur du
câble est équipé d’un verrouillage (vis à doigt ou taquet), le
serrer correctement.
Si vous branchez deux ou davantage d’appareils SCSI
externes («en chaîne»), vérifier que la longueur totale des
câbles de connexion ne dépasse pas 3 mètres.
4Fixer une terminaison (résistance de terminaison) à l’appareil
SCSI externe de manière à terminer la connexion.
Si vous branchez deux ou davantage d’appareils SCSI externes
(«en chaîne»), terminez l’appareil le plus éloigné de l’instru-
ment dans lequel la carte EXB-SMPL est installée. Même si
vous ne raccordez qu’un seul appareil SCSI externe, celui-ci
doit être terminé.
La terminaison peut se faire en fixant un élément de terminaison
à l’appareil SCSI externe ou en activant un élément de
terminaison intégré dans ce même appareil SCSI. Consulter le
manuel d’utilisation de l’appareil SCSI pour plus de détails.
SCSI
ID2ID1ID0
SCSI SCSI SCSI SCSI
Terminer le
dernier appareil
La longueur totale du câble SCSI doit être
égale ou inférieure à 3 mètres
Disque dur
Disque amovible Disque dur
Disque amovible
5Mettre le (ou les) appareil(s) SCSI externe(s) sous tension avant
de mettre l’instrument (dans lequel la carte EXB-SMPL est
installée) sous tension.
Mettre les appareils SCSI externes sous tension dans l’ordre
appareil SCSI externe ➞instrument.
Mettre les appareils hors tension dans l’ordre instrument ➞
appareil SCSI externe.
Ne jamais mettre les appareils hors tension pendant l’accès à
l’appareil SCSI externe (c’est-à-dire lorsque le voyant DEL
de l’appareil SCSI externe est allumé).
6Activer l’appareil dans lequel la carte EXB-SMPL est installée
pour vérifier si l’appareil SCSI externe raccordé apparaît sur
l’affichage.
Pour plus de détails sur la reconnaissance d’un appareil SCSI
externe, consulter le manuel d’utilisation de l’appareil dans
lequel la carte EXB-SMPL est installée.
Utilisation d’un appareil SCSI externe
Consulter le manuel d’utilisation de l’instrument pour les
explications concernant le formatage d’un appareil SCSI externe
(disque dur, etc.) ainsi que pour le chargement et la sauvegarde de
données.

Für Einzelheiten zur Einstellung der SCSI-ID-Nummern lesen
Sie auch die Anleitung Ihres externen SCSI-Gerätes.
Wenn Sie zwei oder mehrere SCSI-Geräte auf die gleiche ID
einstellen, kann dies zu Fehlfunktionen oder Datenverlust
führen.
3Verbinden Sie die SCSI-Anschlüsse des Instruments und des
externen
SCSI-Gerätes mit einem passenden SCSI-Kabel.
Achten Sie auf die richtige Ausrichtung und guten Sitz des
SCSI-Steckers. Wenn der Stecker eine Befestigungsmöglichkeit
bietet (Schrauben oder Drahtlaschen), sichern Sie den Anschluß
wie vorgesehen.
Wenn Sie zwei oder mehrere externe SCSI-Geräte in einer
Kette anschließen, achten Sie darauf, daß die Gesamt-
kabellänge 3 Meter nicht überschreitet.
4Stecken Sie auf den freien Anschluß des letzten SCSI-Gerätes
(falls vorhanden) einen sogenannten Terminator (Abschluß-
widerstand), so daß das Ende der Kette terminiert ist.
Wenn Sie zwei oder mehrere externe SCSI-Geräte in einer Kette
anschließen, terminieren Sie das Gerät, das am weitesten von
dem Instrument mit der EXB-SMPL-Karte entfernt ist. Auch
dann, wenn nur zwei Geräte miteinander verbunden sind, muß
das zweite Gerät terminiert werden.
Terminierung kann entweder durch das Anbringen eines
Abschlußwiderstandsteckers an das externe SCSI Gerät
durchgeführt werden oder indem man den im externen SCSI-
Gerät eingebauten Abschlußwiderstand aktiviert. Beziehen Sie
sich bitte auf die Bedienungsanleitung für Ihr SCSI-Gerät.
SCSI
ID2ID1ID0
SCSI SCSI SCSI SCSI
Terminieren Sie
das letzte Gerät
Die Länge aller Kabel darf bis zu 3 m betragen
Fest- oder
Wechselplatte Fest- oder
Wechselplatte
5Schalten Sie das (die) externe(n) SCSI-Gerät(e) ein und
schalten Sie zuletzt das Instrument (in dem die EXB-SMPL
eingebaut ist) ein.
Die Geräte müssen in der Reihenfolge:
Externes Gerät ➞Instrument eingeschaltet werden.
Die Geräte müssen in der Reihenfolge:
Instrument ➞Externes Gerät ausgeschaltet werden.
Schalten Sie niemals Geräte ab, während bei einem der
Geräte ein Zugriff erfolgt (z. B. wenn die LED eines externen
SCSI-Gerätes leuchtet).
6Überprüfen Sie, daß das SCSI-Gerät angezeigt wird, indem Sie
das Gerät, in welchem das EXB-SMPL installiert ist, anspre-
chen.
Für Hinweise, wie ein externes SCSI-Gerät erkannt werden
kann, beziehen Sie sich bitte auf die Bedienungsanleitung des
Gerätes, in welches das EXB-SMPL eingebaut ist.
Benutzung eines externen SCSI-Gerätes
Für Einzelheiten über die Formatierung und zum Speichern und
Laden von Daten von einem externen SCSI-Gerät lesen Sie die
Anleitung des Instruments.
Einleitung
Vielen Dank, daß Sie sich für das EXB-SMPL Sampling Upgrade
von Korg entschieden haben.
Um einen jahrelangen, problemfreien Betrieb zu gewährleisten,
lesen Sie diese Anleitung bitte sorgfältig durch.
Produkteigenschaften
Das EXB-SMPL Upgrade ist mit der gleichen 48 kHz 16-Bit
linearen Mono/Stereo Sampler Funktionalität ausgestattet, wie die
preisgekrönte TRITON-Serie. Die effizienten Bearbeitungs-
eigenschaften enthalten Time Slice, Time Stretch, Crossfader
Looping und noch mehr, alle mit grafischer Wellenform-Darstel-
lung Ihrer Daten.
Das EXB-SMPL wird mit 16 MB Sample-Speicher geliefert, und
ermöglicht ein Mono-Sampling von etwa 2 Minuten und 54
Sekunden. Indem Sie ein 72-Pin SIMM Modul hinzufügen, können
Sie den Arbeitsspeicher auf maximal 64 MB (unter Verwendung
von zwei 32 MB SIMM Modulen) erweitern.
Unter Verwendung des mitgelieferten SCSI-Steckers haben Sie
Zugriff auf die Daten, die auf CD-ROM und anderen Medien
gespeichert sind, wobei Stereo oder Mono AIFF-Dateien, Windows
Wave Dateien und AKAI S1000/S3000 Sample Dateien unterstützt
werden. Interne Sampledaten können ebenfalls in AIFF und WAVE
Format exportiert werden.
Weitere Hinweise zu den technischen Daten, der Verwendung und
der Funktionalität des EXB-SMPL finden Sie in der Bedienungsan-
leitung des Geräts, in das es installiert wird.
Einbau des EXB-SMPL
Für Hinweise zum Einbau des EXB-SMPL, und um zu verifizieren, daß
es korrekt installiert worden ist, beziehen Sie sich bitte auf die
Bedienungsanleitung des Gerätes, in das es installiert wird.
Wenn Sie diesbezüglich Fragen haben sollten, wenden Sie sich an
Ihren nächsten Korg-Händler.
Anschluß und Einstellung externer
SCSI-Geräte
Es können bis zu sieben externe SCSI-Geräte über SCSI-Kabel
angeschlossen werden.
Das EXB-SMPL verwendet ein Sub-D Half-Pitch 50-Pin-
Steckerformat. Da aber das externe SCSI-Gerät, das angeschlossen
werden soll, unterschiedliche Arten von Verbindungen haben kann,
beziehen Sie sich bitte auf die Bedienungsanleitung Ihres SCSI-
Geräts, um die Steckerverbindung zu überprüfen, und besorgen Sie
sich gegebenenfalls das entsprechende SCSI-Kabel.
Man kann nicht den EXB-SMPL-Stecker am Computer
anschließen und gleichzeitig ein SCSI-Gerät (wie etwa eine
Festplatte oder ein CD-ROM Laufwerk), das im Computer
installiert ist, verwenden.
1Schalten Sie das Instrument (in dem die EXB-SMPL eingebaut
ist) sowie das externe SCSI-Gerät aus.
Achten Sie immer darauf, daß alle entsprechenden SCSI-Geräte
ausgeschaltet sind, bevor Sie SCSI-Verbindungen herstellen
oder lösen, und auch bevor Sie die SCSI-ID der Geräte
umschalten.
Wenn das Instrument oder das externe SCSI-Gerät einge-
schaltet sind, während Sie SCSI-Verbindungen herstellen
oder lösen, oder die SCSI-ID der Geräte umschalten, kann es
zu Fehlfunktionen des Instruments oder des externen SCSI-
Gerätes kommen, oder es entsteht Datenverlust.
2Stellen Sie am externen SCSI-Gerät die ID-Nummer (0–6) ein.
Wenn Sie zwei oder mehrere externe SCSI-Geräte in einer Kette
anschließen, müssen Sie für jedes Gerät eine eigene SCSI-ID
(Identifikationsnummer) einstellen, damit diese sich gegenseitig
erkennen und unterscheiden können.

はじめに
このたびは、コルグサンプリング・アップグレードEXB-SMPLをお買
い上げいただきまして誠にありがとうございます。本製品を末永くご
愛用いただくためにも、この取扱説明書をよくお読みになって正しい
方法でご使用ください。
本製品の特長
TRITONシリーズと同等の48kHz、16bitリニアのモノ/ステレオ・
サンプリング機能に対応しています。
付属の16MbyteSIMMメモリー(サンプル用RAMメモリー)1枚で
モノラル約2分54秒のサンプリングが可能です。
さらに16Mbyteまたは32Mbyteの72ピンSIMMメモリーを増設
可能です。(合計2枚まで)
タイム・スライス、タイム・ストレッチ 、クロスフェード・ループ、リンクな
どによる自在な波形編集でブレイク・ビーツ製作に威力を発揮します。
サンプリング・データやシーケンス等の各種データを外部SCSIデバ
イスに保存するSCSI端子を内蔵しています。
CD-ROMドライブ等からAKAI(S1000/S3000)のサンプル&プロ
グラム・ファイル、コルグ、AIFF、WAVEフォーマットのサンプル・ファイ
ルなどのロードが可能です。サンプル用RAMメモリー上のサンプル・
データをAIFFまたはWAVEフォーマットのサンプル・ファイルとして外
部メディアへのエクスポート(書き出し)にも対応しています。
本製品の仕様や使用方法、機能についての詳細は、取り付ける本体の
取扱説明書をご覧ください。
本製品の取り付け方
本製品の取り付け方法と取り付け後の確認については、取り付ける本
体の取扱説明書をご覧ください。ご不明な点はコルグ・インフォメー
ションへお問い合わせください。
外部 SCSI デバイスについて
外部SCSIデバイスの接続と設定
外部SCSIデバイスは7台まで接続でき、接続にはSCSIケーブルを
使用します。
EXB-SMPLの端子形状はD-Subハーフピッチ50pinですが、接
続する外部SCSIデバイスの端子形状はそれぞれ異なりますので、接
続する外部SCSIデバイスの取扱説明書で端子形状を確認してから、
SCSIケーブルを購入してください。
EXB-SMPLの端子とコンピュータを接続し、コンピュータに内
蔵されているハードディスクやCD-ROMドライブなどのSCSI
デバイスを使用することはできません。
① 本体と外部SCSIデバイス両方の電源をオフにします。
SCSIケーブルの抜き差しや、外部SCSIデバイスのIDナンバー
の変更は、本体と外部SCSIデバイスの電源をオフにしてから行
なってください。
本体や外部SCSIデバイスの電源がオンのときに、SCSIケー
ブルの抜き差しや外部SCSIデバイスのIDナンバーを変更す
ると、本体や外部SCSIデバイスの故障やデータ破損の原因に
なります。
② 外部SCSIデバイスのIDナンバー(0〜6)を設定します。
複数の外部SCSIデバイスを接続(ディジーチェーン)するときは、
それぞれを区別するために外部SCSIデバイスごとに異なるIDナ
ンバーを設定します。
IDナンバーの設定の方法については外部SCSIデバイスの取扱
説明書をご覧ください。
複数の外部SCSIデバイスで同じIDナンバーを設定すると、故
障やデータ破損の原因になります。
③ 本体のSCSI端子と、外部SCSIデバイスのSCSI端子を接続しま
す。
接続端子の向きに注意してケーブルを接続してください。ロック
(ツメ)のあるものは確実にとめてください。
複数の外部SCSIデバイスを接続(ディジーチェーン)するとき
は、接続に使用するケーブルの長さが合計で3m以下になるよ
うにしてください。
④ 外部SCSIデバイスに、ターミネータ(終端抵抗)を取り付け、終端
処理を行います。
複数の外部SCSIデバイスを接続(ディジーチェーン)するときは、
末端の外部SCSIデバイスに対し、終端処理を行います。
接続する外部SCSIデバイスが1台のときも、その外部SCSIデバ
イスに終端処理を行います。
終端処理は、外部SCSIデバイスにターミネータを取り付けるもの
や、外部SCSIデバイスに内蔵されているターミネータをオンにす
るものがあります。それぞれのSCSIデバイスの取扱説明書をご
覧ください。
SCSI
ID2ID1ID0
SCSI SCSI SCSI SCSI
ターミネーショ
ン
処理をする
SCSIケーブルの長さの合計を3メートル以内にする
Hard Disk
Removable Disk Hard Disk
Removable Disk
⑤ 外部SCSIデバイスの電源をオンにしてから、本体の電源をオンに
します。
電源を入れる場合、外部SCSIデバイス→本体の順に電源をオン
にしてください。
電源を切る場合、本体→外部SCSIデバイスの順に電源をオフにし
てください。
外部SCSIデバイスがアクセス中のとき(外部SCSIデバイス
のアクセス・ランプが点灯しているときなど)は、絶対に電源を
切らないでください。
⑥本体で、接続した外部SCSIデバイスが表示されることを確認して
ください。
外部SCSIデバイスを認識させる方法は、取り付ける本体の取扱説
明書をご覧ください。
表示されない場合は、速やかに本体とSCSIデバイスの電源をオ
フにして、本体とSCSIデバイスの接続、EXB-SMPLの取り付け
を確認して適切に接続してください。
外部SCSIデバイスを使用する
ハードディスク等の外部SCSIデバイスのフォーマットや、各データの
ロード、セーブの方法については、取り付ける本体の取扱説明書をご
覧ください。
Table of contents
Languages:
Other Korg Music Equipment manuals
Popular Music Equipment manuals by other brands

Quantum Audio
Quantum Audio QM-168 instruction manual

Propellerhead
Propellerhead PULSAR Operation manual

Primacoustic
Primacoustic LONDON BASS TRAP installation manual

Roland
Roland S-4000S specification

AUSTRALIAN MONITOR
AUSTRALIAN MONITOR AM-Tone1 Installation and operation manual

Neunaber
Neunaber ELEMENTS Series user guide