Korg Sledgehammer User manual

Precautions
Location
Using the unit in the following locations can result in a malfunction.
• In direct sunlight
• Locations of extreme temperature or humidity.
• Excessively dusty or dirty locations.
• Locations of excessive vibration.
• Close to magnetic elds.
Power supply
Be sure to turn the power switch to OFF when the unit is not in use. Remove the battery
in order to prevent it from leaking when the unit is not in use for extended periods.
Interference with other electrical devices
Radios and televisions placed nearby may experience reception interference. Operate
this unit at a suitable distance from radios and televisions.
Handling
To avoid breakage, do not apply excessive force to the switches or controls.
Care
If the exterior becomes dirty, wipe it with a clean, dry cloth. Do not use liquid cleaners
such as benzene or thinner, or cleaning compounds or ammable polishes.
Keep this manual
After reading this manual, please keep it for later reference.
Keeping foreign matter out of your equipment
Never set any container with liquid in it near this equipment. If liquid gets into the
equipment, it could cause a breakdown, re, or electrical shock. Be careful not to let
metal objects get into the equipment.
THE FCC REGULATION WARNING (for USA)
NOTE: This equipment has been tested and found to comply with the limits for
a Class B digital device, pursuant to Part 15 of the FCC Rules. These limits are
designed to provide reasonable protection against harmful interference in a
residential installation. This equipment generates, uses, and can radiate radio
frequency energy and, if not installed and used in accordance with the instructions,
may cause harmful interference to radio communications. However, there is no
guarantee that interference will not occur in a particular installation. If this equip-
ment does cause harmful interference to radio or television reception, which can
be determined by turning the equipment off and on, the user is encouraged to try
to correct the interference by one or more of the following measures:
• Reorient or relocate the receiving antenna.
• Increase the separation between the equipment and receiver.
• Connect the equipment into an outlet on a circuit different from that to which
the receiver is connected.
• Consult the dealer or an experienced radio/TV technician for help.
If items such as cables are included with this equipment, you must use those
included items.
Unauthorized changes or modication to this system can void the user’s authority
to operate this equipment.
Notice regarding disposal (EU only)
When this “crossed-out wheeled bin” symbol is displayed on the product,
owner’s manual, battery, or battery package, it signies that when you
wish to dispose of this product, manual, package or battery you must do
so in an approved manner. Do not discard this product, manual, package
or battery along with ordinary household waste. Disposing in the correct
manner will prevent harm to human health and potential damage to the
environment. Since the correct method of disposal will depend on the
applicable laws and regulations in your locality, please contact your local
administrative body for details. If the battery contains heavy metals in
excess of the regulated amount, a chemical symbol is displayed below the
“crossed-out wheeled bin” symbol on the battery or battery package.
IMPORTANT NOTICE TO CONSUMERS
This product has been manufactured according to strict specications and volt-
age requirements that are applicable in the country in which it is intended that
this product should be used. If you have purchased this product via the internet,
through mail order, and/or via a telephone sale, you must verify that this product
is intended to be used in the country in which you reside.
WARNING: Use of this product in any country other than that for which it is
intended could be dangerous and could invalidate the manufacturer’s or distribu-
tor’s warranty.
Please also retain your receipt as proof of purchase otherwise your product may
be disqualied from the manufacturer’s or distributor’s warranty.
CALIFORNIA USA ONLY
This Perchlorate warning applies only to primary CR (Manganese Dioxide) Lithium
coin cells sold or distributed ONLY in California USA.
“Perchlorate Material–special handling may apply, See www.dtsc.ca.gov/haz-
ardouswaste/perchlorate.”
This device complies with Part 15 of the FCC Rules.
Operation is subject to the following two conditions: (1) This device may not cause
harmful interference, and (2) this device must accept any interference received,
including interference that may cause undesired operation.
CAN ICES-3 B / NMB-3 B.
Thank you for purchasing the Korg
Sledgehammer Clip-on Tuner.
Merci d’avoir choisi l’accordeur
Sledgehammer Clip-on Tuner de Korg.
Vielen Dank, dass Sie sich für das
Clip-on Stimmgerät Sledgehammer
von Korg entschieden haben.
Gracias por comprar el anador
Sledgehammer Clip-on de Korg.
このたびは、コルグ Clip-on Tuner Sledgehammerをお買い上げいただきまして、まことにありがとうございます。OWNER’S MANUAL
MANUEL D’UTILISATION
BEDIENUNGSANLEITUNG
MANUAL DE USUARIO
取扱説明書■お願い1.保証書に販売年月日等の記入がない場合は無効となります。記入できないときは、お買い上げ年月日を証明できる領収書等と一緒に保管してください。2.保証書は再発行致しませんので、紛失しないように大切に保管してください。アフターサービス修理または商品のお取り扱いについてのご質問、ご相談は、お客様相談窓口へお問い合わせください。お客様相談窓口 PHS等一部の電話ではご利用できません。固定電話または携帯電話からおかけください。受付時間月曜~金曜10:00~17:00(祝祭日、窓口休業日を除く)●サービス・センター:〒168-0073 東京都杉並区下高井戸1-15-12保証書コルグ
Sledgehammer
本保証書は、別記の保証規定により無償修理をお約束するものです。お買い上げ日年月日販売店名

Inguitarmode,the1ststringovertighteningwarningindicator( )willlight
tohelppreventthe1ststringfrombreakingasaresultofovertightening.
Note name indicators for bass mode: LB, 4E, 3A, 2D, 1G, HC
(LB stands for low B, and HC stands for high C.)
Calibration (reference pitch) settings (
*M
)
Each time you turn the right shule switch upward, the calibration value
(reference pitch) increases in 1 Hz steps. The seing range is between 436
and 445 Hz.
440 → 441 → 442 ... 445 → 436 → 437 ... 440 → 441...
Keep the right shule switch turned upward for at least one second to
reset the calibration to 440 Hz.
Specifying at/capo settings (
*M
)
Each time you keep the right shule switch turned downward, the seing
changes between at and capo, with the current seing shown by the
FLAT/CAPO indicator.
Flat ( ) → Capo ( ) → Flat ( )...
To change the at seing, turn the right shule switch
downward while the FLAT indicator is lit up.
The seing range is between 1 and 5 semitones lower.
1 → 2 → 3 → 4 → 5 → 0 → 1...
To change the capo seing, turn the right shule switch
downward while the CAPO indicator is lit up.
The seing range is between 1 and 7 semitones higher.
1 → 2 → 3 → 4 → 5 → 6 → 7→ 0 → 1...
When the at or capo seing is changed 0, the FLAT/CAPO indicator turns o
aer a few seconds, and the default seing (no at or capo tuning) is applied.
Bothatandcapotuningscanbesetinguitarmode,butonlyattuningcanbe
setinbassmode,andneitheratnorcapotuningcanbesetinchromaticmode.
Attaching to the instrument and range of motion
The Sledgehammer tunes by picking up the vibrations of the instrument.
Therefore, be sure to aach the Sledgehammer to the headstock of your
instrument in order to tune it. In addition, the Sledgehammer can be freely
moved so that the display is easy to read.
TheSledgehammermaybedamagedifyouapplyexcessiveforcewithinits
rangeofmotion,oraempttomoveitbeyonditsintendedrangeofmotion.
360°
180°
30°
30°
45°
45°
PleasecarefullyaachtheSledgehammertoyourinstrument.LeavingtheSledge-
hammeraachedforalongtimemaydamageormarktheinstrument'ssurface.
Dependingonvariousfactorssuchasage-relatedchangeorthesurfacenish,there
isapossibilitythatyourinstrumentmaybedamagedbyaachingthisproduct.
Specications
Scale: 12-note equal temperament
Range (sine wave): Chromatic A0 (27.50 Hz)–C8 (4186 Hz)
Guitar B1 at5 (46.25 Hz)–E4 capo7 (493.88 Hz)
Bass B0 at5 (23.12 Hz)–C3 (130.81 Hz)
Precision: +/-1 cent
Reference pitch:
A4 =
436–445 Hz (1 Hz steps)
Flat tuning: 1–5 semitones (in semitone steps)
Capo tuning: 1–7 semitones (in semitone steps)
Dimensions: 63 mm(W) X 62 mm(D) X 52 mm(H)
2.48’’ (W) X 2.44’’ (D) X 2.05 ’’ (H)
Weight: 25 g/0.88 oz. (including baery)
Baery life: approximately 8 hours
(tuner continuously operating, A4 input)
Included items: CR2032 lithium baery (3V)
*M
Seings are remembered even when the power is o. However, set-
tings will be initialized when you replace the baery (default, Tuner
mode: Chromatic, calibration: 440 Hz, FLAT/CAPO: normal)
• Specications and appearance are subject to change without notice for
improvement.
2 semitones
lower
3 semitones
higher
Parts of the Sledgehammer
Installing the battery
Makesuretoturnthepowerobeforeyouinstallorreplacethebaery.
When it is time to replace the baery, the baery indicator ( ) will light up.
The Sledgehammer will continue to function for a while longer, but tuning
will become less accurate. Replace the baery as soon as possible.
1. While lightly pressing the part marked A, pull the baery holder in
the direction of the arrow to slide it out.
2. Making sure to observe the correct polarity, insert the baery so that
the “+” side of the baery is visible.
3. Return the baery holder to its original position.
Backlight
The backlight will illuminate brightly when sound is input or when a
buon is pressed. When there has been no user input for approximately
three seconds, the backlight will dim slightly in order to prevent the bat-
tery from being depleted.
Tuning
Tuning procedure
1. Turn the le shule switch upward. Each time you turn the shule
switch, the Sledgehammer will be turned on or o.
If the power is le on for approximately 3 minutes without any user
input, it will turn o automatically.
2. If necessary, change the tuner mode, calibration (reference pitch) and
at/capo seings.
The procedure with the tuner mode set to chromatic (factory default;
no mode indicator) is described below.
3. Play a single note on your instrument.
The display will show the name of the note that’s closest to the pitch
detected. Tune your instrument to the correct pitch so that the desired
note name appears on the display.
4.
Once again play a single note on your instrument, and adjust the tun-
ing so that the center segment of the meter (indicated by ) is lit up.
The pitch is sharp.
In tune.
The pitch is flat.
Evenifthepitchiswithintherangeofdetection,itmaynotbepossibletodetect
thepitchofaninstrumentalsoundthatcontainslargenumbersofovertones
orasoundthathasarapiddecay.
Themetermayrespondtovibrationsitpicksupfromtheenvironment;however,
thiswillnotaecttuningoftheinstrument.
Setting the tuner mode (
*M
)
Each time you turn the le shule switch downward, the
tuner mode changes, with the current mode shown by the
mode indicator.
Chromatic (no indicator) → Guitar ( ) → Bass ( ) →
Chromatic...
In addition, in the guitar and bass modes, the string number closest
to the detected pitch appears to the le of the note name indicator.
Note name indicators for guitar mode: 7B, 6E, 5A, 4D, 3G, 2B, 1E
Reference pitch indicator
FLAT/CAPO indicator
MODE indicator
Battery indicator
Note name indicator
1st string overtightening warning indicator
Left shuttle switch
Battery holder
Right shuttle switch
A
5th guitar
string
4th bass
string

Précautions
Emplacement
L'utilisation de cet instrument dans les endroits suivants peut en entraîner
le mauvais fonctionnement.
• En plein soleil.
• Endroits très chauds ou très humides.
• Endroits sales ou fort poussiéreux.
• Endroits soumis à de fortes vibrations.
• A proximité de champs magnétiques.
Alimentation
Lorsque vous n’utilisez pas l’appareil, n’oubliez pas de le mettre hors
tension. Retirez les piles pour éviter toute fuite lorsque l’appareil ne sera
pas utilisé pendant de longues périodes de temps.
Interférences avec d'autres appareils électriques
Les postes de radio et de télévision situés à proximité peuvent par
conséquent souffrir d'interférences à la réception. Veuillez dès lors faire
fonctionner cet appareil à une distance raisonnable de postes de radio
et de télévision.
Maniement
Pour éviter de les endommager, manipulez les commandes et les boutons
de cet instrument avec soin.
Entretien
Lorsque l'instrument se salit, nettoyez-le avec un chiffon propre et sec.
Ne vous servez pas d'agents de nettoyage liquides tels que du benzène
ou du diluant, voire des produits inammables.
Conservez ce manuel
Après avoir lu ce manuel, veuillez le conserver soigneusement pour toute
référence ultérieure.
Evitez toute intrusion d'objets ou de liquide
Ne placez jamais de récipient contenant du liquide près de l'instrument.
Si le liquide se renverse ou coule, il risque de provoquer des dommages,
un court-circuit ou une électrocution. Veillez à ne pas laisser tomber des
objets métalliques dans le boîtier (trombones, par ex.).
Note concernant les dispositions (Seulement EU)
Quand un symbole avec une poubelle barrée d’une croix appa-
rait sur le produit, le mode d’emploi, les piles ou le pack de piles,
cela signie que ce produit, manuel ou piles doit être déposé
chez un représentant compétent, et non pas dans une poubelle
ou toute autre déchetterie conventionnelle. Disposer de cette
manière, de prévenir les dommages pour la santé humaine et
les dommages potentiels pour l’environnement. La bonne mé-
thode d’élimination dépendra des lois et règlements applicables
dans votre localité, s’il vous plaît, contactez votre organisme adminis-
tratif pour plus de détails. Si la pile contient des métaux lourds au-
delà du seuil réglementé, un symbole chimique est afché en dessous
du symbole de la poubelle barrée d’une croix sur la pile ou le pack de
piles.
REMARQUE IMPORTANTE POUR LES CLIENTS
Ce produit a été fabriqué suivant des spécications sévères et des
besoins en tension applicables dans le pays où ce produit doit être
utilisé. Si vous avez acheté ce produit via l’internet, par vente par
correspondance ou/et vente par téléphone, vous devez vérier que ce
produit est bien utilisable dans le pays où vous résidez.
ATTENTION: L’utilisation de ce produit dans un pays autre que celui
pour lequel il a été conçu peut être dangereuse et annulera la garantie
du fabricant ou du distributeur. Conservez bien votre récépissé qui est
la preuve de votre achat, faute de quoi votre produit ne risque de ne
plus être couvert par la garantie du fabricant ou du distributeur.
安全上のご注意火災・感電・人身傷害の危険を防止するには以下の指示を守ってください
警告
この注意事項を無視した取り扱いをすると、死亡や重傷を負う可能性が予想されます・次のような場合には、直ちに電池をぬく。 ○異物が内部に入ったとき ○製品に異常や故障が生じたとき修理が必要なときは、コルグお客様相談窓口へ修理を依頼してください。・本製品を分解したり改造したりしない。・修理/部品の交換などで、取扱説明書に書かれている以外のことは絶対にしない。・大音量や不快な程度の音量で長時間使用しない。大音量で長時間使用すると、難聴になる可能性があります。万一、聴力低下や耳鳴りを感じたら、専門の医師に相談してください。・本製品に異物(燃えやすいもの、硬貨、針金など)を入れない。・温度が極端に高い場所(直射日光の当たる場所、暖房機器の近く、発熱する機器の上など)での使用や保管はしない。・振動の多い場所で使用や保管はしない。・ホコリの多い場所で使用や保管はしない。・風呂場、シャワー室で使用や保管はしない。・雨天時の野外などのような湿気の多い場所で、使用や保管はしない。・本製品の上に液体の入ったもの(水や薬品等)を置かない。・本製品に液体をこぼさない。・濡れた手で本製品を使用しない。
注意
この注意事項を無視した取り扱いをすると、傷害を負う可能性、または物理的損害が発生する可能性があります・正常な通気が妨げられない所に設置して使用する。・ラジオ、テレビ、電子機器などから十分に離して使用する。ラジオやテレビ等に接近して使用すると、本製品が雑音を受けて誤動作する場合があります。また、ラジオ、テレビ等に雑音が入ることがあります。・外装のお手入れは、乾いた柔らかい布を使って軽く拭く。・長時間使用しないときは、電池の液漏れを防ぐために電池を抜く。・電池や本体は幼児の手の届かないところに保管する。・電池を過度の熱源(日光、火など)にさらさない。・ボタンやツマミに必要以上の力を加えない。故障の原因になります。・外装のお手入れに、ベンジンやシンナー系の液体、コンパウンド質、強燃性のポリッシャーは使用しない。・不安定な場所に置かない。保証規定(必ずお読みください)本保証書は、保証期間中に本製品を保証するもので、付属品類(ヘッドホンなど)は保証の対象になりません。保証期間内に本製品が故障した場合は、保証規定によって無償修理いたします。1.本保証書の有効期間はお買い上げ日より1ケ年です。2.次の修理等は保証期間内であっても有償修理となります。・消耗部品(電池など)の交換。・お取扱い方法が不適当のために生じた故障。・天災(火災、浸水等)によって生じた故障。・故障の原因が本製品以外の他の機器にある場合。・不当な改造、調整、部品交換などにより生じた故障または損傷。・保証書にお買い上げ日、販売店名が未記入の場合、または字句が書き替えられている場合。・本保証書の提示がない場合。尚、当社が修理した部分が再度故障した場合は、保証期間外であっても、修理した日より3ケ月以内に限り無償修理いたします。3.本保証書は日本国内においてのみ有効です。
ThiswarrantyisvalidonlyinJapan.
4.お客様が保証期間中に移転された場合でも、保証は引き続きお使いいただけます。詳しくは、お客様相談窓口までお問い合わせください。5.修理、運送費用が製品の価格より高くなることもありますので、あらかじめお客様相談窓口へご相談ください。発送にかかる費用は、お客様の負担とさせていただきます。6.修理中の代替品、商品の貸し出し等は、いかなる場合においても一切行っておりません。本製品の故障、または使用上生じたお客様の直接、間接の損害につきましては、弊社は一切の責任を負いかねますのでご了承ください。本保証書は、保証規定により無償修理をお約束するためのもので、これによりお客様の法律上の権利を制限するものではありません。

Vorsichtsmaßnahmen
Aufstellungsort
Vermeiden Sie das Aufstellen des Geräts an Orten, an denen
• es direkter Sonneneinstrahlung ausgesetzt ist;
• hohe Feuchtigkeit oder Extremtemperaturen auftreten können;
• Staub oder Schmutz in großen Mengen vorhanden sind;
• das Gerät Erschütterungen ausgesetzt sein kann.
• in der Nähe eines Magnetfeldes.
Stromversorgung
Stellen Sie den Netzschalter auf OFF, wenn das Gerät nicht benutzt wird. Wenn Sie
das Gerät über einen längeren Zeitraum nicht benutzen, nehmen Sie die Batterien
heraus, damit sie nicht auslaufen.
Störeinüsse auf andere Elektrogeräte
Dieser kann bei in der Nähe aufgestellten Rund-funkempfängern oder Fernsehge-
räten Empfangsstörungen hervorrufen. Betreiben Sie solche Geräte nur in einem
geeigneten Abstand von diesem Erzeugnis.
Bedienung
Vermeiden Sie bei der Bedienung von Schaltern und Reglern unangemessenen
Kraftaufwand.
Reinigung
Bei auftretender Verschmutzung können Sie das Gehäuse mit einem trockenen,
sauberen Tuch abwischen. Verwenden Sie keinerlei Flüssigreiniger wie beispiels-
weise Reinigungsbenzin, Verdünnungs- oder Spülmittel. Verwenden Sie niemals
brennbare Reiniger.
Bedienungsanleitung
Bewahren Sie diese Bedienungsanleitung gut auf, falls Sie sie später noch einmal
benötigen.
Flüssigkeiten und Fremdkörper
Stellen Sie niemals Behältnisse mit Flüssigkeiten in der Nähe des Geräts auf. Wenn
Flüssigkeit in das Gerät gelangt, können Beschädigung des Geräts, Feuer oder
ein elek-trischer Schlag die Folge sein. Beachten Sie, daß keinerlei Fremdkörper
in das Gerät gelangen.
Hinweis zur Entsorgung (Nur EU)
Wenn Sie das Symbol mit der „durchgekreuzten Mülltonne“ auf Ihrem
Produkt, der dazugehörigen Bedienungsanleitung, der Batterie oder
dem Batteriefach sehen, müssen Sie das Produkt in der vorgeschrie-
benen Art und Weise entsorgen. Dies bedeutet, dass dieses Produkt
mit elektrischen und elektronischen Komponenten nicht mit dem
normalen Hausmüll entsorgt werden darf. Für Produkte dieser Art
existiert ein separates, gesetzlich festgelegtes Entsorgungssystem.
Gebrauchte elektrische und elektronische Geräte müssen separat
entsorgt werden, um ein umweltgerechtes Recycling sicherzustellen. Diese
Produkte müssen bei benannten Sammelstellen abgegeben werden. Die
Entsorgung ist für den Endverbraucher kostenfrei! Bitte erkundigen sie sich
bei ihrer zuständigen Behörde, wo sie diese Produkte zur fachgerechten
Entsorgung abgeben können. Falls ihr Produkt mit Batterien oder Akkumula-
toren ausgerüstet ist, müssen sie diese vor Abgabe des Produktes entfernen
und separat entsorgen (siehe oben). Die Abgabe dieses Produktes bei einer
zuständigen Stelle hilft ihnen, dass das Produkt umweltgerecht entsorgt wird.
Damit leisten sie persönlich einen nicht unerheblichen Beitrag zum Schutz der
Umwelt und der menschlichen Gesundheit vor möglichen negativen Effekten
durch unsachgemäße Entsorgung von Müll. Batterien oder Akkus, die Schad-
stoffe enthalten, sind auch mit dem Symbol einer durchgekreuzten Mülltonne
gekennzeichnet. In der Nähe zum Mülltonnensymbol bendet sich die chemi-
sche Bezeichnung des Schadstoffes.
Cd oder NiCd steht für Cadmium, Pb für Blei und Hg für Quecksilber.
WICHTIGER HINWEIS FÜR KUNDEN
Dieses Produkt wurde unter strenger Beachtung von Spezikationen und Span-
nungsanforderungen hergestellt, die im Bestimmungsland gelten. Wenn Sie
dieses Produkt über das Internet, per Postversand und/oder mit telefonischer
Bestellung gekauft haben, müssen Sie bestätigen, dass dieses Produkt für
Ihr Wohngebiet ausgelegt ist.
WARNUNG: Verwendung dieses Produkts in einem anderen Land als dem, für
das es bestimmt ist, verwendet wird, kann gefährlich sein und die Garantie des
Herstellers oder Importeurs hinfällig lassen werden. Bitte bewahren Sie diese
Quittung als Kaufbeleg auf, da andernfalls das Produkt von der Garantie des
Herstellers oder Importeurs ausgeschlossen werden kann.
Precauciones
Ubicación
El uso de la unidad en las siguientes ubicaciones puede dar como
resultado un mal funcionamiento:
• Expuesto a la luz directa del sol.
• Zonas de extremada temperatura o humedad.
• Zonas con exceso de suciedad o polvo.
• Zonas con excesiva vibración.
• Cercano a campos magnéticos.
Fuente de alimentación
Apague la unidad cuando no la use la batería. Retire las baterías si no
va a usar la unidad durante un tiempo largo.
Interferencias con otros aparatos
Las radios y televisores situados cerca pueden experimentar interferen-
cias en la recepción. Opere este dispositivo a una distancia prudencial
de radios y televisores.
Manejo
Para evitar una rotura, no aplique excesiva fuerza a los conmutadores
o controles.
Cuidado
Si exterior se ensucia, límpiese con un trapo seco. No use líquidos
limpiadores como disolvente, ni compuestos inamables.
Guarde este manual
Después de leer este manual, guárdelo para futuras consultas.
Mantenga los elementos externos alejados del equipo
Nunca coloque ningún recipiente con líquido cerca de este equipo,
podría causar un cortocircuito, fuero o descarga eléctrica. Cuide de que
no caiga ningún objeto metálico dentro del equipo.
Nota respecto a residuos y deshechos (solo UE)
Cuando aparezca el símbolo del cubo de basura tachado sobre un
producto, su manual de usuario, la batería, o el embalaje de cualqui-
era de éstos, signica que cuando quiere tire dichos artículos a la
basura, ha de hacerlo en acuerdo con la normativa vigente de la
Unión Europea. No debe verter dichos artículos junto con la basura
de casa. Verter este producto de manera adecuada ayudará a evitar
daños a su salud pública y posibles daños al medioambiente. Cada
país tiene una normativa especíca acerca de cómo verter productos poten-
cialmente tóxicos, por tanto le rogamos que se ponga en contacto con su
ocina o ministerio de medioambiente para más detalles. Si la batería contiene
metales pesados por encima del límite permitido, habrá un símbolo de un
material químico, debajo del símbolo del cubo de basura tachado.
NOTA IMPORTANTE PARA EL CONSUMIDOR
Este producto ha sido fabricado de acuerdo a estrictas especicaciones y
requerimientos de voltaje aplicables en el país para el cual está destinado.
Si ha comprado este producto por internet, a través de correo, y/o venta
telefónica, debe usted vericar que el uso de este producto está destinado
al país en el cual reside. AVISO: El uso de este producto en un país distinto
al cual está destinado podría resultar peligroso y podría invalidar la garantía
del fabricante o distribuidor. Por favor guarde su recibo como prueba de
compra ya que de otro modo el producto puede verse privado de la garantía
del fabricante o distribuidor.

Parties du Sledgehammer
Mise en place de la pile
Coupeztoujoursl’alimentationavantdechangerlapile.
Quand la pile doit être remplacée, l’indicateur de pile ( ) s’allume.
Le Sledgehammer continue à fonctionner un certain temps mais l’accordage
devient moins précis. Remplacez la pile aussi vite que possible.
1. Appuyez légèrement sur l’emplacement A tout en glissant le comparti-
ment de la pile dans le sens de la èche pour l’extraire.
2. Remplacez la pile en veillant à respecter la polarité: la face “+” de la pile
doit être visible.
3. Remeez en place le compartiment de la pile.
Rétroéclairage
Le rétroéclairage s’allume de façon vive quand un signal arrive ou quand
vous actionnez un bouton. Si aucun signal ne parvient à l’accordeur pendant
environ 3 secondes, il diminue légèrement l’intensité du rétroéclairage pour
économiser l’énergie de la pile.
Accordage
Procédure d’accordage
1. Tournez le sélecteur rotatif gauche vers le haut. Chaque tour de ce sélec-
teur active et coupe alternativement l’alimentation du Sledgehammer.
Si vous laissez l’appareil allumé pendant environ 3 minutes sans capter
aucun son, il s’éteindra automatiquement.
2. Si nécessaire, changez les réglages de mode d’accordeur, de calibrage et
d’accord en bémol (Flat)/avec Capo.
La procédure ci-dessous décrit le mode d’accordeur chromatique (réglage
par défaut, pas d’indicateur de mode).
3. Jouez une note isolée sur l’instrument.
L’écran ache le nom de la note la plus proche de la hauteur détectée. Accor-
dez grossièrement votre instrument de sorte à faire apparaître la note voulue.
4. Jouez à nouveau une note isolée sur l’instrument et accordez-la jusqu’à
ce que le segment central de l’indicateur (repéré par ) s’allume.
Trop haut.
Juste.Trop bas.
Mêmesilanotesetrouveàl’intérieurdelaplagededétection,ellepeutnepasêtre
détectéesilesondel’instrumentdemusiquecontientungrandnombred’harmo-
niquesouuntempsdedescenterapide.
Ilsepourraitquel’accordeurréagisseàdesvibrationsambiantesqu’ilcapte;cela
n’aectetoutefoispasl’accorddel’instrument.
Réglage du mode d’accordeur (
*M
)
Chaque fois que vous tournez le sélecteur rotatif gauche vers le bas, le mode
d’accordeur change et le mode actif est indiqué par l’indicateur de mode.
Mode chromatique (pas d’indicateur) → Guitare ( ) → Basse
( ) → Chromatique...
En outre, en modes guitare et basse, l’écran ache le numéro
de la corde la plus proche de la hauteur détectée à gauche de
l’indicateur du nom de note.
Indicateurs du nom de note en mode guitare:
7B (Si), 6E (Mi), 5A (La), 4D (Ré), 3G (Sol), 2B (Si), 1E (Mi)
Enmodeguitare,l’avertissementdesurtensiondela1recorde( )s’allumepour
prévenirunerupturedelacordecauséeparunetensiontropforte.
Indicateur de la
note de référence
Indicateur du MODE
Indicateur de pile
Indicateur du nom de la note
Indicateur de
FLAT/CAPO
Avertissement de surtension de la 1re corde
Sélecteur rotatif gauche
Compartiment de la pile
Sélecteur rotatif droit
A
5e corde
de guitare
4e corde
de basse
Indicateurs du nom de note en mode basse:
LB (Si grave), 4E (Mi), 3A (La), 2D (Ré), 1G (Sol), HC (Do aigu)
Réglages de calibrage (diapason) (
*M
)
Chaque fois que vous tournez le sélecteur rotatif droit vers le haut, la valeur
de calibrage (diapason) augmente par pas de 1 Hz. La plage de réglage s’étend
de 436 à 445 Hz.
440 → 441 → 442 ... 445 → 436 → 437 ... 440 → 441...
Vous pouvez initialiser le diapason à 440 Hz en maintenant le sélecteur rotatif
droit tourné vers le haut pendant au moins une seconde.
Réglages bémol (Flat)/capo (
*M
)
Chaque fois que vous maintenez le sélecteur rotatif droit tourné
vers le bas, le réglage alterne entre le mode bémol (Flat) et capo,
et l’écran ache le statut avec l’indicateur FLAT/CAPO.
Bémol ( ) → Capo ( ) → Bémol ( )...
Pour modier le réglage d’accord en bémol, tournez le sélec-
teur rotatif droit vers le bas quand l’indicateur FLAT est allumé.
La plage de réglage s’étend de 1 à 5 demi-tons plus bas que la hauteur standard.
1 → 2 → 3 → 4 → 5 → 0 → 1...
Pour modier le réglage d’accord avec capo, tournez le sélecteur rotatif droit
vers le bas quand l’indicateur CAPO est allumé.
La plage de réglage s’étend de 1 à 7 demi-tons plus haut que la hauteur standard.
1 → 2 → 3 → 4 → 5 → 6 → 7→ 0 → 1...
Quand le paramètre bémol (Flat) ou capo est réglé sur 0, l’indicateur FLAT/
CAPO s’éteint après quelques secondes et le réglage par défaut (accord sans
bémol ni capo) est activé.
Lesréglagesd’accordsenbémoletaveccapopeuventêtreeectuésenmodeguitare,
maisenmodebasse,seulleréglaged’accordenbémolestdisponible.Lemode
chromatiquenepermetpaslesréglagesbémol/capo.
Fixation sur l’instrument et plage de manœuvre de l’accordeur
Le Sledgehammer détermine l’accordage en captant les vibrations de l’instru-
ment. Veillez donc à xer le Sledgehammer sur la tête de votre instrument pour
garantir un accordage able. En outre, vous pouvez déplacer et manœuvrer le
Sledgehammer comme bon vous semble pour une lisibilité parfaite de son écran.
Vousrisquezd'endommagerl'Sledgehammersivouslemanipulezavecuneforce
excessiveousivoustentezdelemanipulerendehorsdesaplagedemanœuvre.
S’ilvousplait,aachezsoigneusementleSledgehammeràvotreinstrument.Le
laisseraachépendantunlongmomentpeutrayerlasurfacedevotreinstrument.
Selondiversfacteurstelsquelanition,l’âgeetl’étatdel’instrument,ilsepourrait
quelesystèmedexationàpinceabîmelanitiondel’instrument.
Spécications
Gamme: 12 notes tempérament égal
Plage de détection (onde sinus):
chromatique A0 (27,50 Hz)–C8 (4186 Hz)
guitare B1 at5 (46,25 Hz)–E4 capo7 (493,88 Hz)
basse B0 at5 (23,12 Hz)–C3 (130,81 Hz)
Précision: +/-1 centième
Note de référence:
A4 =
436 à 445 Hz (paliers de 1 Hz)
Accord en bémol (Flat): 1–5 demi-tons (par pas de demi-ton)
Accord avec capo: 1–7 demi-tons (par pas de demi-ton)
Dimensions: 63 mm (L) x 62 mm (P) x 52 mm (H)
Poids: 25 g (pile comprise)
Autonomie de la pile
: Environ 8 heures (utilisation continue de l’accor-
deur, entrée de la note A4)
Accessoires fournis: Pile au lithium CR2032 (3 V)
*M
Les réglages sont conservés même quand l’appareil est mis hors tension.
Néanmoins, les réglages seront réinitialisés si vous remplacez la pile
(réglages par défaut, mode d’accordeur: chromatique, calibrage: 440 Hz,
FLAT/CAPO: normal).
• Les caractéristiques et l’aspect du produit sont susceptibles d’être modiés
sans avis préalable en vue d’une amélioration.
2 demi-tons
plus bas
3 demi-tons
plus haut
360°
180°
30°
30°
45°
45°

Teile des Sledgehammer
Einsetzen der Batterie
SaltenSiedasGerätaus,bevorSiedieBaerieeinlegenoderausweseln.
Wenn es an der Zeit ist, die Baerie auszutausen, leutet die Baerieanzeige
().
Der Sledgehammer funktioniert dann zwar no eine Weile, allerdings lässt
seine Genauigkeit dann ebenfalls na. Weseln Sie die Baerie also so snell
wie mögli aus.
1. Drüen Sie leit auf die mit A markierte Zunge und ziehen Sie die Bae-
riehalterung in Pfeilritung heraus..
2. Um die korrekte Polarität zu gewährleisten, legen Sie die neue Baerie so
ein, dass die „+“-Seite sitbar ist.
3. Sließen Sie die Baeriehalterung wieder.
Hintergrundbeleuchtung
Die Hintergrundbeleutung wird aktiviert, wenn ein Eingangssignal empfangen
wird bzw. wenn Sie eine Taster drüen.
Drei Sekunden na dem letzten Bedienvorgang lässt die Helligkeit der Hinter-
grundbeleutung etwas na, um die Baerie zu sonen.
Tuning
Stimmen
1. Drehen Sie den linken Kombisalter na oben. Mit jedem Dreh dieses
Kombisalters na oben salten Sie den Sledgehammer ein bzw. aus.
Wenn das Gerät ca. 3 Minuten ohne jedwede Nutzereingabe eingesaltet bleibt,
saltet es automatis aus.
2. Ändern Sie bei Bedarf den Stimm-Modus, die Kalibrierung und die Einstel-
lungen für Flat/Capo.
Die Vorgehensweise mit dem romatisen Stimm-Modus (Werkseinstel-
lung, keine Modus-Anzeige) wird unten stehend besrieben.
3. Spielen Sie eine Einzelnote auf dem Instrument.
Das Display zeigt den Namen der Note an, die der gespielten Note am nästen kommt.
Stimmen Sie Ihr Instrument so, dass der Name der gewünsten Note angezeigt wird.
4. Spielen Sie erneut eine Einzelnote auf Ihrem Instrument und stimmen Sie
so lange, bis das milere Metersegment (dur angezeigt) leutet.
Richtig gestimmt. Zu hoch.
Zu tief.
AuwenndieTonhöheinnerhalbdesErkennungsbereisist,kanndieTonhöheeven-
tuellnitritigermieltwerden,wennderKlangeinesInstrumentssehrobertonrei
istoderrasabklingt.
DasStimmgerätkannaufSwingungenausderUmgebungreagieren.Diesbeein-
trätigtallerdingsnitdieStimmungdesInstruments.
Einstellen des Stimm-Modus (
*M
)
Mit jedem Dreh des linken Kombisalters na unten ändert
si der Stimmgerätmodus, der jeweils in der MODE-Anzeige
angezeigt wird.
Chromatis (keine Anzeige) → Gitarre ( ) → Bass ( ) →
Chromatis …
Außerdem erseint im Gitarren- und Bass-Modus links neben der Notennamen-
Anzeige die Saitennummer, die der erkannten Tonhöhe am ähnlisten ist.
Notennamen-Anzeige für Gitarren-Modus: 7B, 6E, 5A, 4D, 3G, 2B, 1E
ImGitarren-ModuserseintdieWarnanzeigebeizufestangezogener1.Saite( ),
umeineBesädigungder1.SaitedurzufestesAnziehenzuverhindern.
Bezugstonhöhenanzeige
Warnanzeige bei zu fest angezogener 1. Saite
MODE-Anzeige
Batterieanzeige
Notennamen-Anzeige
FLAT/CAPO-Anzeige Linker Kombischalter
Rechter Kombischalter
Batteriehalterung
A
4. Basssaite
5. Gitarrensaite
Notennamen-Anzeige für Bass-Modus:
LB, 4E, 3A, 2D, 1G, HC (LB steht für ein tiefes B und HC steht für ein hohes C)
Kalibrierungseinstellungen (Referenzton) (
*M
)
Mit jedem Dreh des reten Kombisalters na oben erhöhen Sie den Kalibrie-
rungswert (Bezugstonhöhe) in Srien von 1 Hz. Der Einstellberei reit von
436 bis 445 Hz.
440 → 441 → 442 ... 445 → 436 → 437 ... 440 → 441...
Wenn Sie den reten Kombisalter mindestens eine Sekunde lang na oben
gedreht halten, wird die Kalibrierung auf 440 Hz zurügesetzt.
Festlegen der Flat-/Capo-Einstellungen (
*M
)
Wenn Sie den reten Kombisalter na unten gedreht halten, springt die
Einstellung zwisen Flat und Capo um und wird jeweils in der FLAT/CAPO-
Anzeige angezeigt.
Flat ( ) → Capo ( ) → Flat ( ) …
Um die Flat-Einstellung zu ändern, drehen Sie bei leutender
FLAT-Anzeige den reten Kombisalter na unten.
Die Einstellberei liegt zwisen 1 und 5 Halbtöne tiefer.
1 → 2 → 3 → 4 → 5 → 0 → 1...
Um die Capo-Einstellung zu ändern, drehen Sie bei leutender
CAPO-Anzeige den reten Kombisalter na unten.
Die Einstellberei liegt zwisen 1 und 7 Halbtöne höher.
1 → 2 → 3 → 4 → 5 → 6 → 7→ 0 → 1...
Wenn die Flat- oder Capo-Einstellung auf 0 geändert wird, schaltet sich die FLAT/
CAPO-Anzeige nach wenigen Sekunden aus, und die Standardeinstellung (kein
Flat und kein Capo) wird aktiviert.
SowohlFlat-alsauCapo-StimmungkönnenimGitarren-Moduseingestelltwerden,
währendimBass-ModusnurdieFlat-StimmungundimromatisenModusweder
Flat-noCapo-Stimmungeingestelltwerdenkönnen.
Anbringen an das Instrument und Bewegungsspielraum
Das Sledgehammer stimmt Ihr Instrument, indem es dessen Swingungen auf-
nimmt. Aus diesem Grund sollte das Sledgehammer zum Stimmen an die Kopfplat-
te Ihres Instruments angebrat werden. Darüber hinaus kann das Sledgehammer
frei bewegt werden, um die Ablesbarkeit des Displays zu verbessern.
DasSledgehammerkannbesädigtwerden,wenninnerhalbdesBewegungsspielraums
übermäßigeKraaufdasGerätausgeübtwirdbzw.wennversutwird,esüberden
Bewegungsspielraumhinauszubewegen.
BiebefestigensiedasSledgehammervorsitiganihremInstrument.Wennsiedas
SledgehammerfürlängereZeitanihremInstrumentbefestigtlassen,kanndieszu
VeränderungenanderOberäedesInstrumentsführen.
AbhängigvonversiedenenFaktorenwiez.B.altersbedingteVeränderungender
Laierung/OberäeIhresInstrumentes,kannesvorkommendasseinAnbringen
diesesProduktszueinerBesädigungführt.
Technische Daten
Skala: 12 Noten gleiswebende Stimmung
Berei (Sinuswelle): romatis A0 (27,50 Hz)–C8 (4186 Hz)
Gitarre B1 at5 (46,25 Hz)–E4 capo7 (493,88 Hz)
Bass B0 at5 (23,12 Hz)–C3 (130,81 Hz)
Präzision: +/-1 Cent
Bezugstonhöhe: A4 = 436–445 Hz (in Srien von 1 Hz)
Flat-Stimmung: 1-5 Halbtöne (in Halbtonsrien)
Capo-Stimmung: 1-7 Halbtöne (in Halbtonsrien)
Abmessungen: 63 mm (B) x 62 mm (T) x 52 mm (H)
Gewit: 25 g (mit Baerie)
Baerielebensdauer: ca. 8 Stunden (kontinuierlier Betrieb mit eingesalte-
tem Stimmgerät, A4-Eingang)
Lieferumfang: CR2032 Lithiumbaerie (Knopfzelle, 3 V)
*M
Die Einstellungen bleiben gespeiert, wenn das Gerät ausgesaltet wird. Die
Einstellungen werden zurückgesetzt, wenn Sie die Baerie ersetzen (Werksein-
stellung, Stimm-Modus: romatis, Kalibrierung: 440 Hz, FLAT/CAPO: normal).
• Änderungen der tenisen Daten und des Designs ohne vorherige Ankündi-
gung vorbehalten.
2 Halbtöne
tiefer
3 Halbtöne
höher.
360°
180°
30°
30°
45°
45°

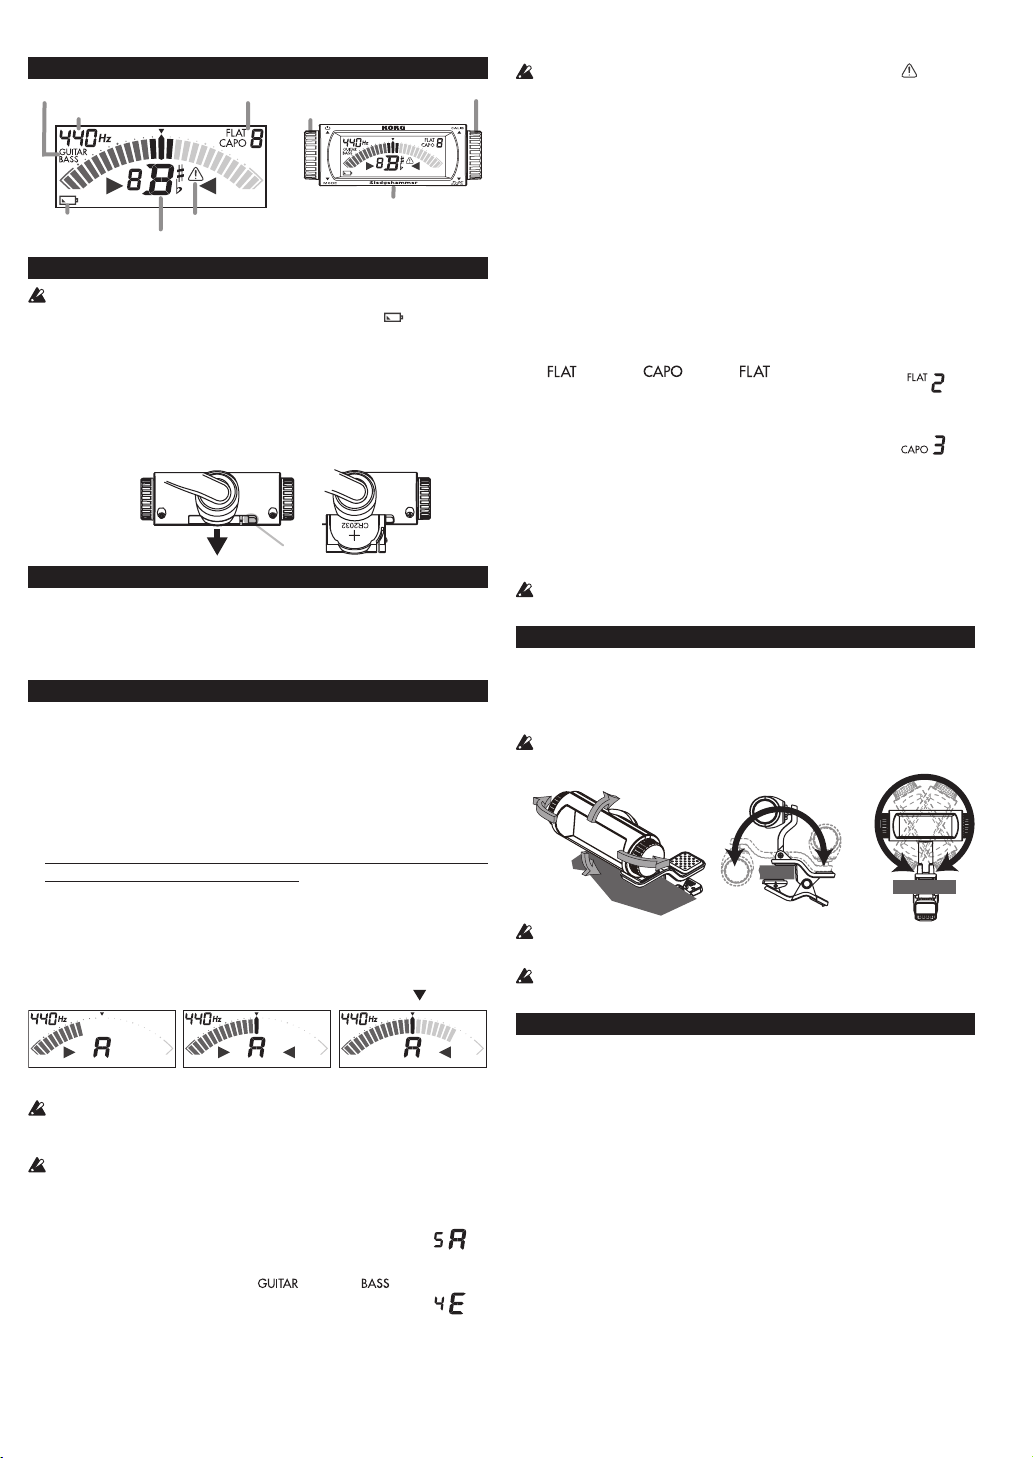
Partes del Sledgehammer
Indicado de tono
de referencia
Indicador de MODE
Indicador
de batería
Indicador de
nombre de nota
Indicador
FLAT/CAPO
Indicador de advertencia de apriete
excesivo de la 1ª cuerda
Interruptor de lanzadera izquierdo
Interruptor de lanzadera derecho
Soporte de la batería
Instalación de la Batería
Apaguelaunidadantesdeinstalaroreemplazarlabatería.
Cuando llegue el momento de tener que reemplazar la batería, se iluminará el
indicador de batería ( ).
El Sledgehammer seguirá funcionando un tiempo, pero la anación será menos
precisa. Reemplace la batería tan pronto como sea posible.
1. Mientras presione ligeramente la parte marcada con A, tire del soporte de la
batería en el sentido de la echa para deslizarlo hacia fuera.
2. Inserte la batería asegurándose de que la polaridad es correcta, de forma que
la cara “+” de la batería sea visible.
3. Vuelva a colocar la soporte de la batería en su posición original.
Retroiluminación
La retroiluminación se hace más brillante cuando hay sonido de entrada o cuando
se pulsa un botón. Si el usuario no realiza ninguna acción durante aproximada-
mente tres segundos, la retroiluminación se atenuará ligeramente para evitar que
la batería se agote.
Anación
Procedimiento de anación
1.
Gire el interruptor de lanzadera izquierdo hacia arriba. Cada vez que se gira el
interruptor de lanzadera hacia arriba, el Sledgehammer se enciende o se apaga.
Si la alimentación se deja encendida durante unos 3 minutos sin ningún
sonido de entrada, seapagará de forma automática.
2. En caso necesario, cambie el modo de anador, la calibración y los ajustes de
bemol/cejilla.
El procedimiento con el modo de anador establecido en cromático (valor de
fábrica; sin indicador de modo) se describe a continuación.
3. Toque una sola nota en su instrumento.
La pantalla mostrará el nombre de la nota más cercana al tono detectado. Ane su
instrumento con el tono correcto para que aparezca el nombre de la nota deseada.
4. De nuevo, toque una nota en su instrumento y ajuste la anación de forma
que se ilumine el segmento central del medidor (indicado por ).
El tono es agudo.
Afinada.
El tono es grave.
Aunqueeltonoestédentrodelrangodedetección,puedequenoseaposibledetectarel
tonodeunsonidoquecontengagrancantidaddearmónicosoquetengaunarápidacaída.
Elmedidorpuederesponderalasvibracionesquerecogedelentorno;sinembargo,eso
noafectaráalaanacióndelinstrumento.
Ajuste del modo de anador (
*M
)
Cada vez que se gira el interruptor de lanzadera izquierdo hacia
abajo, el modo de anador cambia, y el indicador de modo muestra
el modo actual.
Cromático (sin indicador) → Guitarra ( ) → Bajo ( ) →
Cromático...
Además, en los modos de bajo y guitarra, el número de cuerda más cercano al tono
detectado aparece a la izquierda del indicador de nombre de nota.
Indicadores de nombre de nota para el modo de guitarra:
7B, 6E, 5A, 4D, 3G, 2B, 1E
A
5ª cuerda
de guitarra
4ª cuerda
de bajo
Enelmododeguitarra,elindicadordeadvertenciadeaprieteexcesivodela1ªcuerda
()seiluminaráparaayudarleaevitarquela1ªcuerdaserompadebidoalapriete
excesivo.
Indicadores de nombre de nota para el modo de bajo:
LB, 4E, 3A, 2D, 1G, HC (LB indica B baja, y HC indica C alta).
Ajustes de la calibración (tono de referencia) (
*M
)
Cada vez que se gira el interruptor de lanzadera derecho hacia arriba, el valor de
calibración (tono de referencia) aumenta en pasos de 1 Hz. El intervalo de ajuste
está entre 436 y 445 Hz.
440 → 441 → 442 ... 445 → 436 → 437 ... 440 → 441...
Mantenga girado el interruptor de lanzadera derecho hacia arriba durante
al menos un segundo para reajustar la calibración a 440 Hz.
Especicación de ajustes de bemol/cejilla (
*M
)
Cada vez que se mantiene girado el interruptor de lanzadera
derecho hacia arriba, el ajuste cambia entre bemol y cejilla, con el
ajuste actual mostrado por el indicador FLAT/CAPO.
Bemol ( ) → Cejilla ( ) → Bemol ( )
Para cambiar el ajuste de bemol, gire el interruptor de lanzadera
derecho hacia abajo con el indicador FLAT iluminado.
El intervalo de ajuste está entre 1 y 5 semitonos más bajo.
1 → 2 → 3 → 4 → 5 → 0 → 1...
Para cambiar el ajuste de cejilla, gire el interruptor de lanzadera derecho hacia
abajo con el indicador CAPO iluminado.
El intervalo de ajuste está entre 1 y 7 semitonos más alto.
1 → 2 → 3 → 4 → 5 → 6 → 7→ 0 → 1...
Cuando el ajuste de bemol o cejilla se cambia a 0, el indicador FLAT/CAPO se
desactiva unos segundos después, y se aplica el ajuste por defecto (sin anación
de bemol ni de cejilla).
Laanacióndebemolycejillasepuedeestablecerenelmododeguitarra,peroúnica-
mentelaanacióndebemolsepuedeestablecerenelmododebajo;enelmodocromático
noesposibleajustarningunadelasdosanaciones.
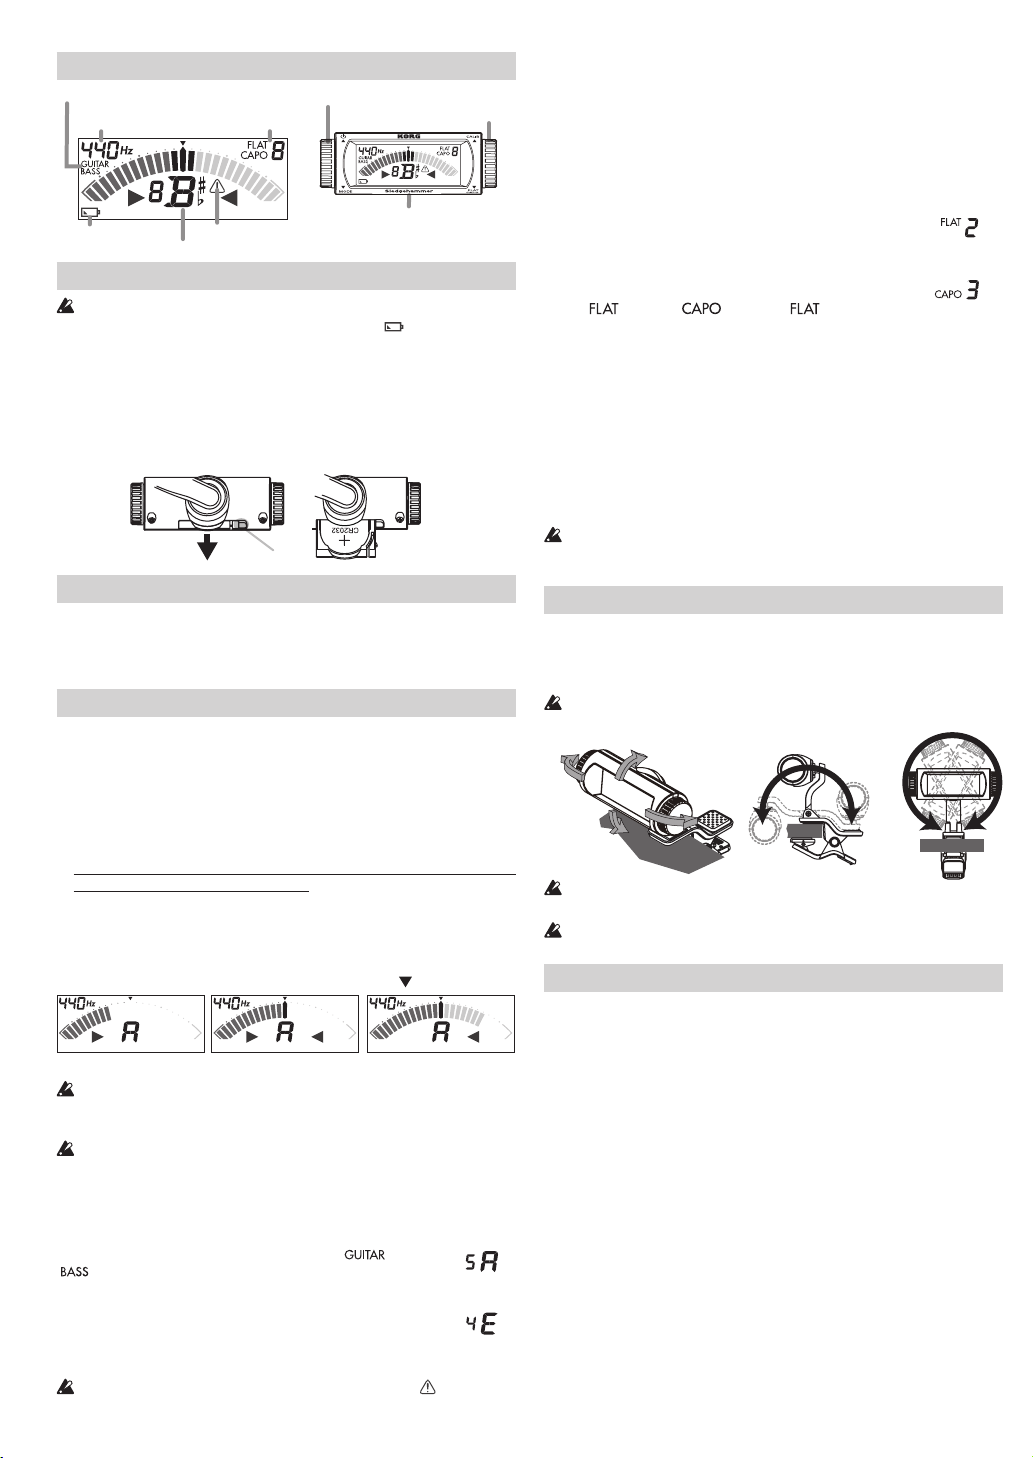
Colocación en el instrumento e intervalo de movimiento
El sistema Sledgehammer realiza la anación recogiendo las vibraciones del
instrumento. Por ello, asegúrese de colocar el Sledgehammer en el cabezal del
instrumento para poder anarlo. Además, el Sledgehammer se puede mover
libremente para leer la pantalla con facilidad.
ElSledgehammerpuederesultardañadosiejerceunafuerzaexcesivaensuintervalode
movimiento,osiintentadesplazarlomásalládesuintervalodemovimientoprevisto.
PorfavorsujeteconcuidadoeSledgehammerasuinstrumento.SidejaelSledgeha-
mmersujetoalinstrumentoduranteunlargoperiodo,puededañarlasuperciedel
instrumento.
Dependiendodevariosfactores,comoelenvejecimientodelacabadodelasupercie,
existelaposibilidaddequesuinstrumentopuedadañarseporlacolocacióndelanador.
Especicaciones
Escala: 12 notas, temperamento igual
Rango (onda sinusoidal): chromatique A0 (27,50 Hz)–C8 (4186 Hz)
guitare B1 at5 (46,25 Hz)–E4 capo7 (493,88 Hz)
basse B0 at5 (23,12 Hz)–C3 (130,81 Hz)
Precisión: +/-1 centésima
Tono de referencia: A4 = 436–445 Hz (en pasos de 1 Hz)
Anación de bemol: 1-5 semitonos (en pasos de semitono)
Anación de cejilla: 1-7 semitonos (en pasos de semitono)
Dimensiones: 63 mm(Anch.) x 62 mm (Prof.) x 52 mm (Alt.)
Peso: 25 g (incluyendo batería),
Vida útil de la batería: aproximadamente 8 horas
(anador funcionando continuamente, entrada A4)
Elementos incluidos: batería de litio CR2032 (3V)
*M Los ajustes se recuerdan incluso al apagar la unidad. No obstante, los ajustes
se inicializarán al reemplazar la batería (valor por defecto, modo de anador:
cromático, calibración: 440 Hz, FLAT/CAPO: normal).
• Las especicaciones y el aspecto están sujetas a cambios sin previo aviso por mejora.
2 semitonos
más bajo
3 semitonos
más alto.
360°
180°
30°
30°
45°
45°

ベース・モード時の音名表示LB、4E、3A、2D、1G、HC (LBはLowB、HCはHighCになります。)キャリブレーション(基準ピッチ)の設定(
*M
)シャトル・スイッチRを上方向に回すたびにキャリブレーションの値(基準ピッチ)を1Hz単位で変更することができます。設定範囲は436~445Hzです。440→441→442...445→436→437...440→441...上方向に回ししたままにすると約1秒後に440Hzにリセットされます。フラット/カポの設定(
*M
)シャトル・スイッチRを下方向の回したままにするたびに、フラット設定とカポタスト設定が切り替わり、FLAT/CAPO表示に設定が表示されます。フラット()→カポタスト()→フラット()...フラットの設定をするときは、FLAT表示のときにシャトル・スイッチRを下方向に回します。設定範囲は1半音下げから5半音下げまでです。1→2→3→4→5→0→1...カポの設定をするときは、CAPO表示のときにシャトル・スイッチRを下方向に回します。設定範囲は1半音上げから7半音上げまでです。1→2→3→4→5→6→7→0→1...フラットまたはカポの設定を0にすると、FLAT/CAPO表示が数秒後に消灯し、標準設定(フラット、カポ設定なし)になります。
ギター・モードではフラット、カポタストの設定ができますが、ベース・モードではフラット設定のみ、クロマチック・モードではフラット、カポタストの設定はできません。
楽器への取り付けと可動範囲本機は楽器本体の振動を拾ってチューニングを行います。そのため、必ずご使用になる楽器のヘッド部分に取り付けて、チューニングを行ってください。また、本機は、液晶表示が見やすいように自由に動かすことができます。
可動範囲内であっても、過度な力で無理に向きを変えると破損する恐れがあります。
360°
180°
30°
30°
45°
45°
楽器への取り付け、取り外しはていねいに行ってください。また、長時間取り付けたままにすると、取り付け跡が残る場合があります。楽器の経年変化や塗装などの状態によっては、本機の装着により損傷を与える恐れがあります。
仕様音律: 12平均律 測定範囲(サイン波): クロマチック A0(27.50Hz)~C8(4186Hz)ギター B1at5(46.25Hz)~E4capo7(493.88Hz)ベース B0at5(23.12Hz)~C3(130.81Hz)測定精度: ±1セント以内基準ピッチ範囲: A4=436~445Hz(1Hz単位)フラット・チューニング:1~5半音(半音ステップ)カポタスト対応: 1~7半音(半音ステップ)外形寸法: 63mm(W)X62mm(D)X52mm(H)質量: 25g(電池含む) 電池寿命: 約8時間(チューナー動作、A4入力 連続動作時)付属品: 動作確認用CR2032型リチウム電池(3V) 1個
*M
各設定は、電源を切っても記憶しています。ただし、電池を交換した場合は、設定が初期化されます(チューナー・モード:クロマチック、キャリブレーション:440Hz、フラット/カポ:設定なし)。・仕様および外観は、改良のため予告なく変更する場合があります。2半音下げ
3半
音上げ各部の名称電池の入れ方
電池を入れるときや交換するときは、本機の電源を切って行ってください。付属の電池は機能チェック用ですので、寿命の短い場合があります。
電池の交換時期になると、電池表示()が点灯します。しばらくの間は動作しますが、チューニングが正確にできなくなります。速やかに新しい電池と交換してください。1. 電池ホルダーのAの部分を押しながら、矢印の方向にスライドして引き出します。2. 極性に注意してプラス(+)の表示が見えるように電池を挿入します。3. 電池ホルダーを元に戻します。バックライト音を入力したときと、シャトル・スイッチ操作時にバックライトが明るく点灯します。約3秒間、音の入力が無くシャトル・スイッチ操作もしないと、電池消耗を防ぐため、低輝度の点灯になります。チューニングチューニングの方法1. シャトル・スイッチLを上方向に回します。回すたびに電源が入る、切れるを繰り返します。電源が入ったまま音の入力がない状態が約3分続くと、自動的に電源が切れます。2. 必要に応じてチューナー・モード、キャリブレーション(基準ピッチ)、フラット/カポの設定をします。以下は、チューナー・モードがクロマチック(工場出荷時:モード表示なし)の場合の説明になります。3. 楽器を単音で鳴らします。認識した音に一番近い音名が表示されます。合わせたい音名が表示されるように、楽器をおおまかにチューニングしてください。4.
楽器を単音で鳴らして、メーターの中央(▼)の位置が点灯するようにチューニングします。
測定範囲内の音程でも、倍音を多く含んだ楽器音や減衰の早い楽器音については、測定できない場合があります。周囲の環境によっては振動を拾いメーターが反応する場合がありますが、楽器のチューニングには影響ありません。
チューナー・モードの設定(
*M
)シャトル・スイッチLを下方向に回すたびにチューナー・モードが切り替わり、モード表示に現在のモードが表示されます。クロマチック(表示なし)→ギター()→ベース()→クロマチック...なお、ギターとベース・モードのときは、音名表示の左横に認識した音に一番近い弦番号が表示されます。ギター・モード時の音名表示7B、6E、5A、4D、3G、2B、1E
ギター・モードでは、1弦は巻き過ぎによって弦が切れるのを防ぐため、1弦巻き過ぎ警告表示()が点灯します。
FLAT/
CAPO表示
モード表示
基準ピッチ表示電池表示1弦巻き過ぎ警告表示音名表示シャトル・スイッチL電池ホルダーシャトル・スイッチRA高いほうにずれているときチューニングが合っているとき低いほうにずれているときギター5弦ベース4弦
Table of contents
Languages:
Other Korg Music Equipment manuals