Krüger Technology KGV7000 User manual

Steam and vacuum cleaner
with detergent or hydroject function.
Limpiadora
de vapor y aspiración con función detergente o enjuague con agua caliente.
INSTRUCTION
MANUAL
MANUAL DE INSTRUCCIONES


Fig. 1.1
Fig. 13
Fig. 1.2
Fig. 2
Fig. 5 Fig. 3

Fig.
Fig 4 Fig 4.1 Fig 4.2
51
51
Fig. 7 Fig. 8 Fig. 9

4
Fig. 10 Fig. 11
Fig.12

5
ENGLISH
5
ESPAÑOL
69
SUMMARY
1
SAFETY
WARNINGS
PG.
8
2
TECHNICAL
SPECIFICATIONS
PG.
9
3
PRELIMINARY
OPERATIONS
3.1
ASSEMBLING
INSTRUCTIONS
PG.
9
3.2
VACUUM
FUNCTION
3.3
STEAM
FUNCTION
3.4
DETERGENT TANK (ONLY
FOR
DETERGENT FUNCTION
MODEL)
3.5 HYDROJET
TANK (ONLY
FOR HYDROJET
FUNCTION
MODEL)
3.6
SWITCHING
ON
3.7
FUNCTION
PROGRAMMING
4
MESSAGES
DISPLAY
PG.
12
5
WET AND DRY
VACUUM
5.1
DUST RETENTION
IN WATER
PG.
13
6
STEAM
CLEANING
PG.
13
7
STEAM AND DETERGENT CLEANING
(only
for detergent function version)
PG.
14
8
STEAM AND HYDROJET CLEANING
(only
for hydrojet function version)
PG.
14
9
STEAM AND VACUUM
CLEANING
PG.
15
10
DSL
FUNCTION
(DIGITAL STEAM
LOCK)
PG.
15
11
AUTOMATIC SYSTEM AGAINST BOILER
EMPTYING
PG.
15
12
FINAL
OPERATIONS
PG.
16
13
BOILER
MAINTENANCE
PG.
16
14
SPECIAL
MAINTENANCE
PG.
16
15
ACCESSORIES
PG.
17
16
RESIDUAL
RISKS
PG.
18
17
WARRANTY
PG.
19

6
LEGEND
PRODUCT
DESCRIPTION
(1.1, 1.2, 2)
1. Handle
2. Basket for accessories
3. Extension pipes support
4. Pirouetting wheels
5. Water tank
6. Detergent/Water tank
7. Power cor
d
8. Steam Hose support
9. Digital display
10. Socket for steam hose
11. Manometer
12. Main switch (on/off)
APPLIANCE
FUNCTIONS
VIEW
(3)
A. Lack of detergent Alarm
B. Min/Max level in the waste bucket Alarm
C. Lack of water in the tank Alarm
D. Ready Steam
E. Lack of water for hydrojet function Alarm
F. Digital Display
WATER FILTER SYSTEM
(5)
18.
Waste
bucket cover
19.
Removable
dividing
element
with guiding bar
20.
Removable
waste bucket
STANDARD ACCESSORIES
(6)
19. Nozzle extension
20. Steam hose
23. Rectangular brush with polyester bristles
24. Rectangular brush with stainless
steel bristles
25. Rectangular brush with brass bristles
26. Anti-limestone
product
27. Detergent (only for detergent function
version)
28. Polishing and drying
cloth
29. Steam only accessories adapter
30. Double thermoisolated extension pipe
31. Locking ferrule
32. Large brush 40 cm equipped with:
32a. Double profile bristled frame
(for dry
vacuuming)
32b. Double profile rubber frame
(wash / dry function)
32c. Double profile stiff frame
33. Transparent mouth
34. Long aluminium nozzle
35. Universal mouth
35a. Steam and vacuum vertical mouth
35b. Horizontal mouth
36a. 60 mm brush with polyester bristles
36b. 30 mm brush with steel bristles
36c. 30 mm brush with polyester bristles
37. 25 cm window cleaner
38. 15 cm window cleaner equipped with:
38a. rubber frame
38b. bristled frame
40. 24cm transparent mouth

7
MOD.
STAINLESS
STEEL
KGV
7000
INSTRUCTION
MANUAL
STEAM AND VACUUM
CLEANER
WITH
DETERGENT/HYDROJET
FUNCTION
Translation of the orginal version

8
1.
SAFETY
WARNINGS
•
Befor
e
using
the
appliance
for
the
first
time
CAREFULL
Y
READ
the
operating
instructions.
•
Before plugging in the device, make sure that the supply voltage corresponds to that indicated on
the specifications of the device and that the electrical outlet is grounded and
has
protection differential.
•
Do
not
disconnect
the
plug by
pulling
the
power
cor
d.
Keep
the
power
cor
d
away
fr
om
heat,
steam
and oil.
•
Do
not
touch
the
device
with
wet
hands
or
feet
when
plugged
in.
•
Never
leave
the
device
unattended
when
plugged
in.
Unplug
the
device
when
not
in
use.
•
Befor
e
cleaning
ovens,
r
efrigerators,
lamps,etc.,
unplug
the
appliances.
•
Do
not
immerse
the
device
into
water or
other
liquids.
•
The
device
is
not
to
be
used
by
childr
en
or
persons
who
do
not
know how
to
operate
it.
•
Do not
vacuum flammable
liquids as there is risk of fire /
explosion.
•
Use the unit only on flat
surfaces.
•
Never
fill
the
boiler’
s
water
tank
with
detergents,
perfumes
or
other
chemicals.
Risk
of
fir
e/explosion.
•
Only
use
drink
water,
and
never
distilled
water.
•
Keep away
fr
om
the
steam
r
elease.
Danger
of
scalding!
•
Never
point
dir
ect
steam
in
the
dir
ection
of
people
or animals. Danger
of
scalding!
•
Never
point
dir
ect
steam
in
the
dir
ection
of
electrical
appliances.
•
Do not put any
stress
on the
hoses
or the
accessories
while in use.
It’
s
useless
and harmful.
The
cleaning efficiency is generated by the steam or the vacuum power, or by the combination of steam
and detergent. The appliance can be implemented in a number of ways, also thanks to the variety
of steam delivery settings.
•
Steam
should
not
be
applied
(or
should
be
used
with
gr
eat
car
e)
in
the
following
cases:
-items or
pieces
of furniture
covered
in
leather, synthetic
velvet or very
delicate fabric;
-waxed
or
painted
floors as
steam
can
remove
wax or
paint;
-silk
printed
or
painted glass;
-polished
wooden
surfaces;
-in direct contact with glue or silicone sealings (the steam power and the high temperature might
remove both glue and silicone).
In
these cases
the
instruction
leaflets relating to the
product
to be
cleaned should
be
referred
to; if
these are not available, short tests should be carried out, applying low steam power, on unobtrusive
areas or samples of the products to be cleaned.
More over, especially during winter, glass should be “preheat” by spraying middle/lowsteam power
with the nozzle, which should beheld 30/40 cm away from the glass. After this procedure, cleaning
can be carried out according to the instructions.
•
Never
use
the
steam
cleaner
to
clean
electrical
or
electronic
equipment
(computer,
TVs,lamps,
telephones, etc.) even when these are unplugged from electrical outlets.
•
Applies only to
Professional
KGV7000 with
detergent:
it’
s
possible
to add a non foaming
detergent
to the steam power. Three different regulations of detergent to be added to steam release can be
selected on the control handle
(see
control panel, Fig. 3).
•
The
right
functioning
of
the
machine
is
guaranteed
only
with
the
KS
Gr
oup
detergent
•
The
combined cleaning
system
with
steam
and
detergent
should
only
be
used
on items
which
do
not deteriorate if they come into contact with such substances.
•
Do not use the
machine
in potentially
explosive areas:
risk of
fir
e/explosion.
•
Vacuum various
chemicals
may result in
dangerous
r
eactions.
•
To
prevent
the
machine
to move involuntarily, use the
brakes
on the
wheels.
WARNING: any maintenance must be carried out on the machine off and
disconnected from the electric net.

9
2.
TECHNICAL
SPECIFICATIONS
Schuko Version
Boiler Consumption
Pressure
Tension
Frequency
Pump power
Motor power
3200W
9/10 bar
230V
50 Hz
48 W
1200W
USA Version
Boiler Consumption
Pressure
Tension
Frequency
Pump power
Motor power
1750W
9/10 bar
120V
60Hz
41W
1000W
3.
PRELIMINARY
OPER
ATIONS
3.1
ASSEMBLING INSTRUCTIONS
Inside the packaging you will find the machine, a handle (1, Figure 1.1), a basket for accessories (2,
Fig 1.1),
two
tanks (5,
6,
Figure 1.1), accessories
and a bag
containing
the
following components (Fig.
13):
13. sealing o-rings for accessories
14. five M4 screws (spare parts for housing)
15. Drainage key
16. Blowhole cap sponge
17. Waste bucket rectangular sponge
MOUNTING THE
HANDLE
(1, Figure 1.1) AND THE BASKET FOR ACCESSORIES (2, Fig
1.1)
The handle is a 20mm diameter tube that is useful to push the machine from the rear. You can find
it
in the accessories box and it has to be put inside the two supports located at the rear of the
machine. This detail is also used as a support for the basket for accessories
(2)
that is contained in
the accessories box and can be mounted on the handle. It is a container for accessories, clothes
and any tools you want to carry to be
used
with the
machine.
Only original KS Group
accessories
ar
e
authorized, any sharp, hot or under tension item should not be transported. The basket is designed
to withstand a maximum weight of 5 kg, it is therefore prohibited the transport of greater weight
as
it
may cause instability to the machine with consequent danger of crushing the user. Inside the right
side of the handle there is a clip that allows you, once the handle is pushed in, to hook it safely to the
machine (one of the two supports has a gap that allows the clip to be fixed). To put in or remove the
handle you can press the clip (Fig. 15).
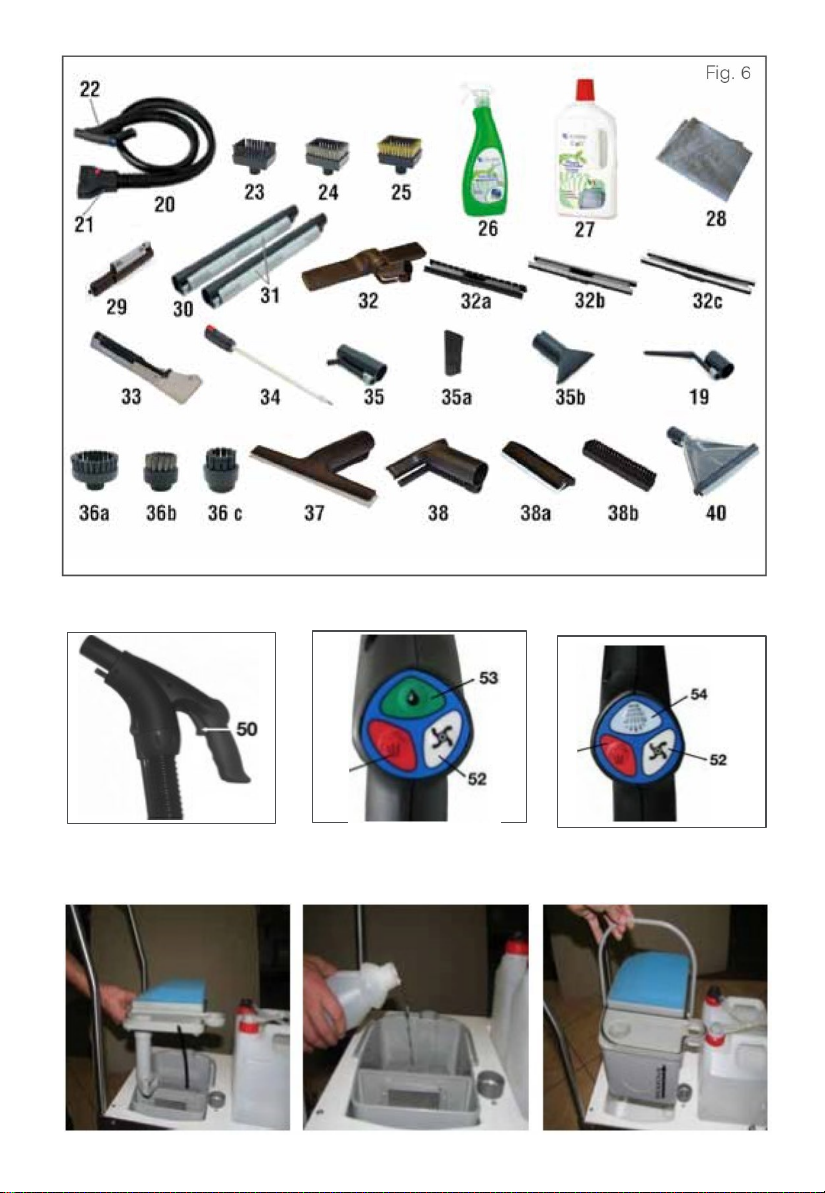
MOUNTING OF THE TANKS (5, 6, Fig.
1.1)
In the packing there are two tanks: one for water and the other for detergent / water jet. They must
be placed in the compartment at the front of the machine. Once the tanks have been installed, you
can screw the two caps placed on the machine.

10
CAUTION: make sure that the tank containing water is correctly positioned (black cap). To
make it easier there is a label indicating “WATER ONLY”.
Never reverse the tanks during the filling operation.
3.2 VACUUM FUNCTION
Lift the cover and the sealing element to cover tank (18, Fig. 5) and pour drink water in
the tank (Fig. 8): about 500
cc.
Put the sealing element
(18)
and the cover back in place.
CAUTION: An electronic system with warning signal prevents the vacuuming function
from activating if there is no or unsufficient water in the compartment of the tank.
The level float gauge inside the tank indicates the water level. In case there is too much water
in the tank, empty it.
CAUTION: It is very important to use the anti-foam product recommended by the
manufaturer in order to prevent the formation of foam in the dirty water basket. The
manufacturer assumes no responsibility for damages resulting from failure to comply with
this requirement and
/
or use of products other than those recommended.
CAUTION: It is very important to keep clean the dirty water basket clean and its components,
especially the float element. Make sure it is free to slide in and not obstructed in any way,
this may cause malfunction of the level detection in the dirty water basket and can cause
damage to the machine. The manufacturer assumes no
responsibility
for damages resulting
from failure to comply with this r
equir
ement.
CAUTION: when the vacuum function is on, the machine has a sound emission of 76 db.
3.3 STEAM FUNCTION
Unscrew the tank cap (5, Fig. 1.1) and fill it exclusively with drink water. It’s strictly forbidden to fill
the boiler’s water tank with detergents, perfumes or other chemicals.
All water entering the machine is filtered by a patented magnetic technology that allows limestone
to
break the bonds between the molecules that cause the creation of limestone, in this way, although
it
is not possible to stop limestone creation, you can limit it. (It is important to remember that this device
does not replace the obligation to provide frequent maintenance, like boiler draining or the use
of
anti-limestone product recommended
by KS Group that
prevents damage caused
by the
limestone).
Caution: It is absolutely compulsory to add to the water tank, both water and hydrojet, the
anti-limestone product recommended by the manufacturer. The amount to be added for each
liter of water is 2.5 grams, the lack or use of the wrong amount of anti-limestone causes
serious problems that damage the major organs of the cleaner. The manufacturer grants no
warranty for problems resulting from failure
/
misuse of the product, the use of a
dif
ferent
product and in general from damage caused by limestone.

11
3.4
DETERGENT
TANK
(only
for
detergent
function
version)
Unscrew the tank cap (6, Fig. 1.1) and pour detergent thinned with water.
WARNING:
Use
only
the detergent recommended by the manufacturer. It’s strictly forbidden to
pour foaming detergents in the tank, or detergents which may develop toxic gases or irritating
substances when they come into contact with heat. If incompatible products are used, the
cleaner may be subject to irreparable damage.
3.5 HYDROJET
TANK
(only for hydrojet function
version)
Unscrew the tank cap (6, Fig. 1.1) and fill in with water.
Caution: it is always essential to put the anti-limestone product into the tank water, otherwise
in a short time the pipes will be filled with limestone and the machine will fail quickly. The
manufacturer grants no warranty for problems resulting from failure
/
misuse of the anti-
limestone product, the use of a different product from KS Group anti-limestone product and in
general from damages caused by limestone.
3.6
SWITCHING
ON
Plug the power supply cable (7) (Fig. 1.1) into a suitable socket, as stated on the technical
specifications label. Push the lower part of the main switch
(12) (Fig.2).
The green light on the switch
will illuminate.
3,7
FUNCTIONS
PROGRAMMING
By operating the control handle, both the amount of steam to be released and the vacuum power
can be programmed. The device is supplied with electronic circuits which allow to optimize the
performance, inline with the specific needs of the user.

12
4
SIGNALLING MESSAGES
DISPLAY
When the tank is
empty,
display
shows
the
message
“LACK OF WATER” alarm, the pump and
the
solenoid cannot operate until the tank is filled. To do so, you must turn off the machine using the
green switch on the front part of the machine, unscrew the water cap and fill the water tank, switch
on the machine that will perform the normal startup routine.
WARNING: If there is no water in the tank, the machine will start the alarm 15 seconds.
Water is pumped from tank to the boiler and the pump can be heard as a continuous
dr
one.
When the water level in the boiler touches the probe, the pump stops and the resistance is fed
(“HEATING”).

13
5. WET AND DRY VACUUM
- Perform the operations described in par. 3
- Insert the flexible hose’s plug (21) (Fig. 2) in the socket (10) and make sure it’s properly fitted by
pulling slightly at
it.
- Fit the desired vacuum accessory:
The
white button
(52) (Fig. 4),
located on the steam hose handle, allows you to turn on / off the engine
and select the suction power between three different possible settings. The commutation between
the different
available
settings is shown on the display
(“SELECTION PANEL”).
To turn on the vacuum,
you should press and quickly release the white button, to increase its regulation, you should
pr
ess
the white button continuously: medium, maximum regulations will be selected and again minimum
/
medium / maximum, release the button when the display shows the desired regulation. At any time,
you can deactivate the suction with pressure / quick release of the white button. With the engine
of
f,
pressing
the
vacuum,
the engine
will
restart
from the last
selected regulation;
this memory is clear
ed
once turning off the steam cleaner.
The vacuum cleaner can only work if the basket is in its position and containing the minimum wa
t
e
r
l
e
v
e
l
;
ot
h
e
r
w
i
s
e
,
the
s
i
g
n
a
lli
n
g
“WASTE BUCKET EMPTY”
will
appear
on the
d
i
s
p
l
ay
and
it
w
ill
be impossible to use the function until water is put inside to ensure a minimum level of fil
t
r
a
t
ion.
When the dirt in the
bucket
is
above
the
maximum
level, the
message
“FULL WASTE BUCKET”
is
displayed, the visual/ light signal will remain active until the removal of the alarm condition, while the
buzzer remains active for only 5 seconds. Restored the proper level of water in the waste bucket, if
you push the vacuum button again, the vacuum engine turns on. If, during engine functioning, the
water level in the basket reaches the maximum level, the alarm intervenes again and the engine
stops. Restore the proper water level in the waste bucket and turn on the engine.
Caution: It is of essential importance the use of anti-foam product recommended by the
manufacturer to prevent its formation in the waste bucket. The manufacturer assumes no
responsibility
for damages resulting from failure to comply with this requirement and
/
or use
of products other than those recommended.
5.1 DUST
RETENTION
IN WATER
The Mod. Professional KGV7000 makes use of a patented wet retention system of dirt which has
been collected in the waste bucket
(20)
(Fig. 5). In the tank a water whirlpool captures the finest dry
particles, while the larger ones are retained by a stainless steel mesh filter. This system allows fresh
air to be released, with holding the vacuumed dust, pollen and mites, which are later eliminated by
simply emptying and cleaning the waste bucket.
6. STEAM CLEANING
- Perform the preparatory operations described in par. 3
- Insert the flexible hose’s plug (21) in the socket (10) (Fig. 2) and make sure it’s properly fitted by
pulling slightly at
it.
- Fit the desired steam cleaning accessory (directly to the flexible hose and/or to the extension
hoses).
The steam control is made possible through the constant pressure made on the red button
(51)
(Fig.
4.1)
located
on
the
pistol
grip;
steam
activation,
takes
place
after
a
quick pr
ess
of
the
button
used;
the display shows the minimum steam regulation. To increase the amount of steam, push and hold

14
the red button on the control handle until you reach the desired regulation among minimum/medium/
maximum, then release the button. Steam delivery is controlled by the trigger 50, Fig. 4) under the
handle. If you want to use the vacuum function without the possibility to inadvertently activate the
steam trigger, you can temporarily disable the steam by quickly pressing the corresponding red
button
on the pistol grip, the
graphics
of the
steam selection
will
be
disabled;
to
re-enable
just r
epeat
the pressure on the red button (the steam will be activated using the selected setting before switch
off). The machine can deliver steam only if there is water inside the tank, if during the use the water
level goes under the minimum, the “Lack of water” alarm activates.
When the alarm is on, the machine stops delivering steam (if the detergent / hydrojet function is
on, the machine stops this function too). In order to get back to the normal functioning switch the
machine off, unscrew the water tank cap, remove the tank and fill it with water. Now, switch the
machine on again and go on working.
7. STEAM AND
DETERGENT
CLEANING
(only for detergent function version)
It allows the mixing of steam with a special detergent which increases the cleaning power, this
function is achieved by means of a vibration pump, fishing detergent from the tank and mixes
intermittently detergent with steam through a metal union.
When the detergent is missing, an alarm activates and the display shows “Lack of detergent” alarm.
The LED
light
(A,
Fig.
3)
turns on and a beep duration of 5 seconds activates, after which it will remain
only the intermittent LED to remind us that the detergent is finished, without disturbing the user
with
the continuous repetition of sound. It is possible to continue to work with only steam/vacuum. The
water is caught and mixed with steam and supplied from the hose. After lack of detergent alarm it is
necessary to fill in the tank and, after the acoustic sound stop, you can activate detergent function.
The control of the detergent function takes place through the green button (53) (Fig. 4.1) on the
handle, a quick press of the button will activated the function, repeating the operation it will be
interrupted. The detergent function can be selected in any condition but it may work only when at
least one of the two solenoid valves works (cannot be supplied without steam).
This function does not allow regulation (works according to a logic ON/OFF).
Caution: it is essential to use only Detergents approved by the manufacturer, the use of
detergents that are not approved
/
tested can cause damage to the machine and people to
whom the manufacturer does not may be responsible.
8. STEAM AND
HYDROJET
CLEANING
(only for hydrojet function version)
The control of the hydrojet function takes place through the light blue button (54) (Fig. 4.2) on the
handle, a quick press of the button under the handle will activate the function, repeating the operation
it
will be interrupted. The hydrojet function can be selected in any condition but it may
work only when steam is activated. This function does not allow regulation (works according to a
logic ON/OFF).
Caution: when hydrojet function is activated, hot water and steam come out of the
steam hose, at the same time pressure rapidly grows. Do not touch the steam jet coming
from the accessories.
When water in the tank is missing, an alarm activates a LED
(E,
Fig. 3), a writing on the display and a
5-second beep, after which it will remain only the intermittent LED to remind us that the water in the

15
hydrojettank is finished, without disturbing the user with the continuous repetition of sound. You can
continue working with only the steam / vacuum. The water is caught, mixed and filtered through a
patented anti-limestone filter with magnetic technology, along with steam and supplied by the hose.
After lack of water alarm it is necessary to fill in the tank and, after the acoustic sound, you should
turn on hydroject function.
Caution: it is always essential to put the anti-limestone product into the tank water, otherwise
in a short time the pipes will be filled with limestone and the machine will fail quickly. The
manufacturer grants no warranty for problems resulting from failure
/
misuse of the anti-
limestone product, the use of a different product from KS Group anti-limestone and in general
from damages caused by limestone.
9. STEAM AND VACUUM CLEANING
It’s possible to combine the steam cleaning and the dry/wet vacuum functions. Follow the instructions
given in par. 6 and 7.
10. DSL
FUNCTION
(Digital Steam Lock)
In this model, you’ll find also the DSL feature (Digital Steam Lock): with the same method used for
vacuum and hydrojet, also for steam there’s the possibility to disable the activation of this feature.
If
you want to
change
the
regulation
you
should
keep
pressed
the red
button;
to
enable
DSL,
you
could anytime shortly push red button and this will disable the steam activation. All steam led lights
on the signalling board will be turned off and the trigger, doesn’t work (activates no steam exit).
To disable DSL, it’s only necessary repeat the short pressure of red button, and steam features will
be available again.
DSL is extreme useful if you need, for example, to use vacuum without have the possibility
to
activate accidentally steam or hot water injection
(very
important if you need to clean fragile objects
or electronics components where steam and water can damage or be dangerous).
11.
AUTOMATIC SYSTEM AGAINST
BOILER EMPTYING
In order to prevent the boiler to empty, the machine controls water pump functioning by varying
intensity and frequency. Under conditions of normal use and efficiency, the pump is controlled by
the electronic board with a frequency depending on the amount of water in the boiler and on the
steam used, in order to maintain an optimal ratio. However, it may happen that the fill has obstacles
/ barriers
(air
bubbles, dirt from the tank, limestone, various cracks ...). In these cases, the frequency
of pump use is automatically increased for several minutes in order to overcome the obstacle, if
successful, the operation does not affect machine performance and the user can continue working
without interruption (during this process the pump vibration may increase significantly, the value
of
the general noise of the machine does not exceed 76 Db).
If the problem persists and is not solved automatically, to avoid emptying the boiler, power to heating
element is removed, while the pump continues to be driven at high frequencies. In this situation, the
pressure drops dramatically and it sets to zero in a few minutes. In this case, you should switch
off
and then on the machine (turn the main switch to 0 and then to 1 after a few seconds). The machine
will control the main functions and will look further to solve the problem controlling the water pump
continuously. If the problem is resolved, the machine will return to
READY STEAM
status ensuring full
functionality, but if the problem persists contact the service centre / seller for a service call. The main
causes of failures in the system of filling water in the boiler are: limestone, dirt in the water tanks, air

16
bubbles in the tank pipes, breakage of the pump / deaseration valve due to the use of products
other than those recommended by the manufactur
er
.
12. FINAL
OPER
ATIONS
Cleaning the
accessories
after using the
device
is an
essential procedure;
this
safeguards the
efficiency of the appliance and prevents deposits in the flexible hose, the extension hoses and in the
waste bucket, which besides being unhealthy may cause them to smell bad.
Act as follows:
-
Lift
the
cover
and
r
emove
the
r
ecovery
tank
and
its
components
(Fig.
9);
-
Dispose
of
waste
water;
-
Unmount
all the internal
parts
of the
waste
tank
and wash
it all;
-
Put
the
washed
parts
in
the
right
position inside
the
waste
tank;
-
Pour
clean
water
in
the
compartment
(Fig.
8),approx. 500
cc.;
- Aspirate about half liter clean water to rinse the
ducts.
- Perform it twice.
To sterilize it altogether, briefly steam the cover and the tank (20) (Fig. 5) including its components
and all extension hoses and accessories which may have been used.
- Rinse and replace on the appliance.
- As has already been stated in the Safety warnings, NOR
PERFUMES
OR
OTHER
SUBSTANCES
SHOULD BE POURED IN THE BOILER’S WATER
TANK,
AND ONLY
DRINK
WATER AND NEVER
DISTILLED WATER
SHOULD BE USED.
13. BOILER’S MAINTENANCE
The machine must be vertically positioned on a flat surface.
(Before performing any maintenance operation, unplug the appliance from the electrical outlet).
In order to minimize the negative effects of limestone, the boiler should be fully drained every
2/3
months. Act as follows:
1 –make sure that the appliance has cooled down
2 –using the enclosed box spanner
(15)
(Fig. 13), unscrew the draining nut (Fig. 11)
3 –carefully shake the appliance and allow the water and the lime scale in the boiler to run
out
4 –screw the draining nut and the plastic cap back on
This
procedure contributes
significantly to avoid
problems
arising from
limestone.
KS Group
steam
production, expected that in the boiler, there is always a quantity of water, so that the limestone
remains in solution and does not solidify. This allows first to
severely
restrict the incidence of damage
caused by limestone and then to be able to easily remove it from the boiler through the operation
of draining.
Caution: Burn danger! Drainage operation must be carried out following the above described
instructions.
Fig. 10
14.
SPECIAL
MAINTENANCE
- Always contact the nearest Service Centre or the manufacturer, in case of
failure
and/or malfunction.
Any unauthorized alteration will void the warranty and may cause danger.
- Never open the device.

17
- Never try to dismantle the device. Always refer to the Service Centre or the Main Office.
- Always make sure that the plug and cable are not damaged. In case they need to be replaced,
contact the nearest Service Centre.
15. ACCESSORIES
STEAM
HOSE
(20, Fig. 6)
Steam hose is made up of the handle (22, Fig. 6), the sheath and the socket (21, Fig. 6).
You can plug it to the machine (13, Fig. 2) through the socket.
CONTROL
HANDLE (Fig. 4, 4.1 e 4.2)
21 Steam hose socket
20 Double pipe steam hose (steam/dry and liquid vacuum)
22 Steam/vacuum/detergent / hydrojet handle
50 Steam control
button
51 Steam enabling switch (red)
52 Vacuum enabling switch (white)
53 Detergent switch (green)
54 Hydrojet switch (light blue). The handle can be used as a vaporizer nozzle regulating the steam.
You can connect to it all the accessories.
ASSEMBLING
OF ACCESSORIES
In order to connect all the accessories to the handle and/or to the extension pipes, you can insert
one into another and rotate the locking ring towards right to fix them.
THERMOISOLATED EXTENSION PIPES
(30, Fig. 6)
You can connect all the accessories to the extension pipes, but first you have to connect them
to
the handle of the steam hose. They are useful for the cleaning of floors together with the large brush
400mm.
LARGE
BRUSH 400 mm (32, Fig. 6) and
FRAMES (32a,
32b, 32c, Fig. 6)
It is used for the cleaning (steam and vacuum) of the floors.
You have to use it together with one of the three frames:
- Double profile bristled frame
(32a,
Fig. 6): to clean delicate surfaces, like parquet.
- Double profile rubber frame (32b, Fig. 6): to clean all kind of floors.
- Double profile stiff frame (32c, Fig. 6): to clean carpets and moquettes.
In order to mount the frames on the brush you have to: shift the sliders to “Open” position, place the
desired frame, shift the sliders to “Close” position.
WINDOW
CLEANER
(37, 38, 38a, 38b, Fig. 6)
In the accessories box you can find two different kinds:
- 25 cm window
cleaner;
- 15 cm window cleaner, equipped with bristled and rubber frames.
STEAM AND VACUUM
VERTICAL
MOUTH
(35a,
Fig. 6)
The vertical mouth allows you to use steam and vacuum functions at the same time.
UNIVERSAL
MOUTH (35, Fig. 6)
This mouth can be connected to other accessories:

18
- Horizontal mouth (35b);
- Rectangular brushes (23, 24, 25, 36a, 36b, 36c).
FERRULE
WITH
FIXED EXTENSION
(19, Fig. 6)
The extension of this accessory allows you to reach the most difficult places.
ANTI-LIMESTONE PRODUCT
(26, Fig. 6)
This product helps in preventing damages caused by limestone on the internal components of the
machine. Every time you fill the water tank, dilute 10 ml of product each Liter of water.
DETERGENT
(27, Fig. 6) (only for detergent function version)
Ecologic detergent for the cleaning of floors, formula of surfactants of vegetable origin, it does
not
damage the surfaces removing grease and dirt. Ideal for all types of flooring such as ceramic,
marble, linoleum, tiles and wood floors.
Dilute half a cap for each Liter of water.
DRYING
AND POLISHING CLOTH (28, Fig. 6)
This cloth wipes the surface treated with steam and allows to dry water residual and to polish the
surface.
ADAPTOR
TOOL FOR STEAM ONLY
ACCESSORIES
(29, Fig. 6) AND LONG ALUMINIUM NOZZLE
(34, Fig. 6 only for hydrojet version)
The adaptor tool, attached to the hose, allows you to use the range of steam only accessories
(which have a different connection).
For example, if you want to use the long aluminium nozzle (34, Fig. 6) you have to connect it to the
adaptor tool mounted on the steam hose.
TRANSPARENT
MOUTH (33, Fig. 6) AND 24CM
TRANSPARENT
MOUTH (40, Fig. 6)
These
accessories are very efficacious for the cleaning of upholstered furniture such as chairs, sofas,
carpets, fabrics and car interiors.
Caution: it is very important to clean the accessories after use to remove residual of dirt.
In the bag containing the assembling items (see “Assembling instructions” paragraph) you can find
some substitutive o-rings for the accessories (13, Fig. 13).
16.
RESIDUAL
RISKS
There are some residual risks that could not be eliminated during machine
pr
oject.
These risks are the followings:
-burn danger in the bottom part of the machine when the safety valve opens due to anomaly. Do
not bring your face close to the drainage outlet of the safety valve placed in the bottom part of the
machine.
- possibility of incurring in scratches / damages with the steam hose connection. Be careful during
emptying of waste bucket routine maintenance.
-do not disconnect the power cord with wet hands. Risk of electrocution.
- risk of crushing if the machine overturns.

19
- fire/explosion danger if easily inflammable liquids are sucked. In addition, the aspiration of various
chemicals substances may result in dangerous reactions.
- risk of fire / explosion if the machine is used in potentially explosives areas.
- do not direct steam jet towards electric parts, damage or electrocution danger.
- do not direct steam jet towards parts of the body, burn danger.
17.
W
ARRANTY
The combined appliance MOD. Professional 7000 has a one year warranty from the day of pur
chase
against manufacture defect and faults of the materials. In order to be valid, the warranty needs to be
accompanied either by the sales receipt or by the seller’s stamp indicating the date of purchase. The
warranty covers the replacement or the repair free of charge of the components of the appliance.
The warranty does not cover damage caused by improper use of the appliance. In case of failure or
malfunction, contact the nearest Service Centre immediately. Any unauthorized modification to the
appliance will automatically void the warranty.
The
MANUFACTURER
declines any responsibility in case of accidents caused by any use of MOD.
Professional 7000 which is not in line with the present operating instructions, in case of direct or
indirect damage to persons, things or animals.
KEEP
THE ORIGINAL PACKAGING AND, IF
REQUIRED, RETURN
THE APPLIANCE
TO
THE
SERVICE
CENTRE IN ITS ORIGINAL PACKAGING. IN CASE THIS WAS NO LONGER
AVAILABLE,
PLEASE
CONTACT THE SERVICE CENTRE TO REQUEST ANOTHER PACKAGING (UPON PAYMENT
OF
FEE).
Table of contents
Languages:
Other Krüger Technology Cleaning Equipment manuals