manuals.online logo
Brands
  1. Home
  2. •
  3. Brands
  4. •
  5. Kramer
  6. •
  7. Controllers
  8. •
  9. Kramer FC-26 User manual

Kramer FC-26 User manual

FC-26 Quick Start
P/N:
2900- 301280QS
Rev:
3
Scan for full manual
FC-26 Quick Start Guide
This guide helps you install and use your FC-26 for the first time.
Go to www.kramerav.com/downloads/FC-26 to download the latest user manual and check if firmware
upgrades are available.
Step 1: Check what’s in the box
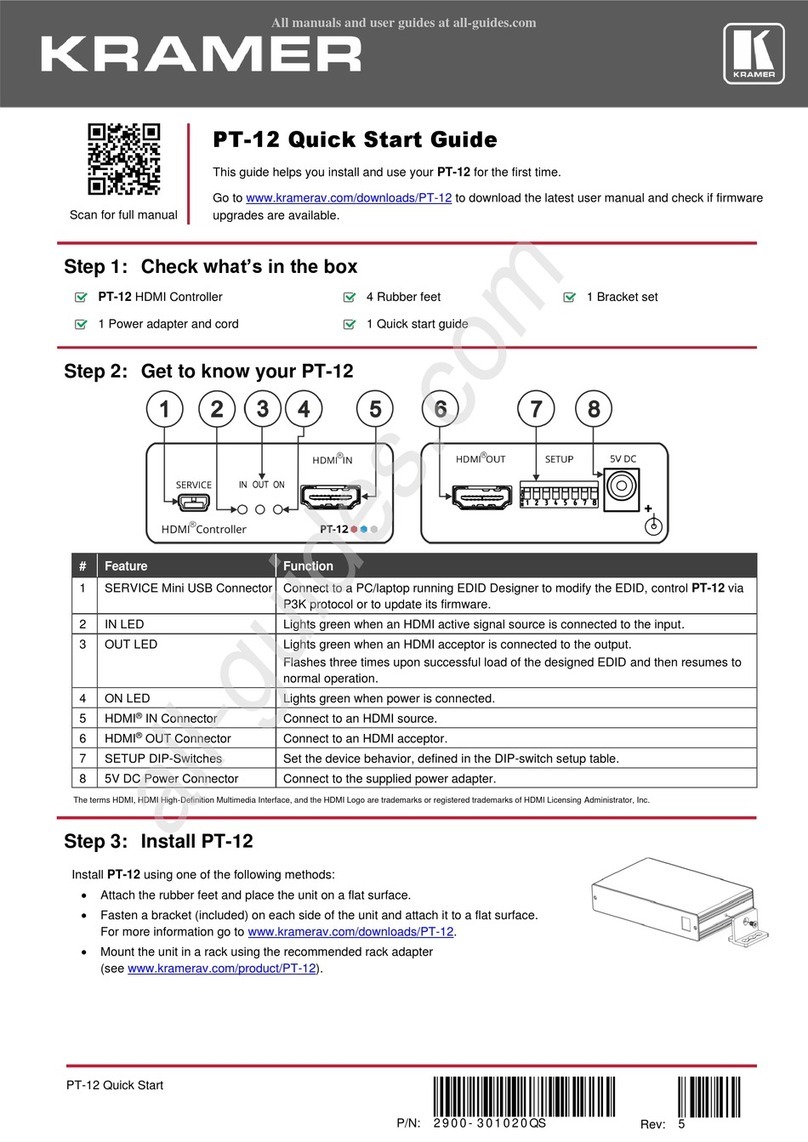
FC-26 Ethernet Controller
1 IR Cable (C-A35M/IRE-10)
1 Quick start guide
1 Power adapter (5V DC)
4 Rubber feet
Step 2: Get to know your FC-26
Front Panel
#
Feature
Function
1
F/W UPGRADE Mini USB Connector
Connect to a PC to perform a firmware upgrade
2
IR IN Sensor
Sensor for IR learning
3
ETH LEDs
CONNECT
Lights orange when the Ethernet port is connected
DATA
Flashes green when data is transferred over the Ethernet link
4
RS-232 LEDs
TX 1
Lights green when data Is transmitted on serial port 1
RX 1
Lights red when data is received on serial port 1
5
TX 2
Lights green when data Is transmitted on serial port 2
RX 2
Lights red when data is received on serial port 2
6
IR OUT 1 ~ 4 LEDs
The associated LED lights green when the relevant IR port transmits data.
When IR learning is in progress, the four IR Out LEDs light and the FC-26 is
unavailable for normal operation
7
ON LED
Lights green when the unit is on
Rear Panel
#
Feature
Function
1
RS-232 6-pin Terminal Block
1
Connect to the first RS-232 controlled device
2
Connect to the second RS-232 controlled device
2
IR OUTPUTS 1 ~ 4 3.5mm Mini Jacks
Connect to IR blasters/emitters using cables up to 80 m (260ft) long
3
ETHERNET RJ-45 Connector
Connect to a PC or other controller directly or via a LAN
4
FACTORY RESET Button
Press and hold while power-cycling the device to reset to factory default
parameters
5
5V DC Connector
Connect to the 5V DC power supply, center pin positive. Not needed when the
device is supplied power by a PoE provider
Step 3: Mount FC-26
Install FC-26 using one of the following methods:
•Attach the rubber feet and place the unit on a flat surface.
•Fasten a bracket on each side of the unit and attach it to a flat surface
(see www.kramerav.com/downloads/FC-26).
•Mount the unit in a rack using the recommended rack adapter
(see www.kramerav.com/product/FC-26).
•Ensure that the environment (e.g., maximum ambient temperature &
air flow) is compatible for the device.
•Avoid uneven mechanical loading.
•Appropriate consideration of equipment nameplate ratings should be
used for avoiding overloading of the circuits.
•Reliable earthing of rack-mounted equipment should be maintained.
Step 4: Connect inputs and outputs
Always switch OFF the power on each device before connecting it to your FC-26.
To achieve specified extension distances, use the recommended Kramer cables available at www.kramerav.com/product/FC-26.
Using third-party cables may cause damage!
Step 5: Connect power
Connect the power cord to FC-26 and plug it into the mains electricity.
Safety Instructions (See www.kramerav.com for updated safety information)
Caution:
•For products with relay terminals and GPI\O ports, please refer to the permitted rating for an external connection, located next to the terminal or in the User Manual.
•There are no operator serviceable parts inside the unit.
Warning:
•Use only the power cord that is supplied with the unit.
•Disconnect the power and unplug the unit from the wall before installing.
Step 6: Operate FC-26
The FC-26 is dispatched from the factory with the DHCP enabled and a random IP address. This means that if the device is
connected to a LAN, you must identify the IP address of the FC-26 in order to connect to it. This can be done by using
K-LAN Configurator to discover the IP address of the FC-26. This is available for download from our website at
www.kramerav.com.
To browse the FC-26 Web pages; upon taking the device out of the box, use the default host name “FC-26-xxxx”, where
xxxx are the last four digits of the serial number of the device.
To reset FC-26 to its factory default settings:
1. Turn off the power to the device.
2. Press and hold the Reset button on the front panel.
3. Turn on the power to the device while holding down the
Reset button for a few seconds.
4. Release the button.
The device is reset to the factory default settings.
If you perform a factory reset, DHCP is disabled and the
IP address of the device is set to 192.168.1.39.
To configure and operate the FC-26:
1. Using the embedded Web pages, configure the Ethernet
controller:
▪Set DHCP or assign a static IP address
▪Associate IP port(s) with serial port(s)
▪Configure the serial port parameters
2. Configure virtual port(s) on the K-Touch control device/PC.
3. Configure Ethernet connection(s) on the K-Touch control
device/PC.
4. Switch port(s) on the Ethernet Controller.

Other manuals for FC-26

1

This manual suits for next models

1

Other Kramer Controllers manuals

Kramer SL-14RC User manual

Kramer

Kramer SL-14RC User manual

Kramer RC-6 User manual

Kramer

Kramer RC-6 User manual

Kramer SL-1 User manual

Kramer

Kramer SL-1 User manual

Kramer RC-7LC User manual

Kramer

Kramer RC-7LC User manual

Kramer RC-13TC User manual

Kramer

Kramer RC-13TC User manual

Kramer RC-52N User manual

Kramer

Kramer RC-52N User manual

Kramer RC-63DLN User manual

Kramer

Kramer RC-63DLN User manual

Kramer RC-62 User manual

Kramer

Kramer RC-62 User manual

Kramer RC-6IR User manual

Kramer

Kramer RC-6IR User manual

Kramer SL-240 User manual

Kramer

Kramer SL-240 User manual

Kramer SL-12 User manual

Kramer

Kramer SL-12 User manual

Kramer RC-54DL User manual

Kramer

Kramer RC-54DL User manual

Kramer SL-280 User manual

Kramer

Kramer SL-280 User manual

Kramer FC-10ETH User manual

Kramer

Kramer FC-10ETH User manual

Kramer SL-10 User manual

Kramer

Kramer SL-10 User manual

Kramer SL-240C User manual

Kramer

Kramer SL-240C User manual

Kramer PT-12 User manual

Kramer

Kramer PT-12 User manual

Kramer KT-107-INWL User manual

Kramer

Kramer KT-107-INWL User manual

Kramer FC-28 User manual

Kramer

Kramer FC-28 User manual

Kramer RC-2C User manual

Kramer

Kramer RC-2C User manual

Kramer RC-63DLN User manual

Kramer

Kramer RC-63DLN User manual

Kramer SL-10 User manual

Kramer

Kramer SL-10 User manual

Kramer SL-1N User manual

Kramer

Kramer SL-1N User manual

Kramer K-NET RC-53D User manual

Kramer

Kramer K-NET RC-53D User manual

Popular Controllers manuals by other brands

Selmo SMART 43 manual

Selmo

Selmo SMART 43 manual

Fairchild T9000 installation instructions

Fairchild

Fairchild T9000 installation instructions

Toshiba nv Series Operating instructions (functional manual)

Toshiba

Toshiba nv Series Operating instructions (functional manual)

FunkTronic FT635 REL AC manual

FunkTronic

FunkTronic FT635 REL AC manual

Xantrex Trace C Series Installation and operation guide

Xantrex

Xantrex Trace C Series Installation and operation guide

Hugo Lahme AllFit user manual

Hugo Lahme

Hugo Lahme AllFit user manual

Datakom D-700 MK3 user manual

Datakom

Datakom D-700 MK3 user manual

Allen-Bradley FlexLogix 1794-L33 installation instructions

Allen-Bradley

Allen-Bradley FlexLogix 1794-L33 installation instructions

American DJ S-4A/DMX User instructions

American DJ

American DJ S-4A/DMX User instructions

AUMA PROFOX PF-Q80 Operation instructions

AUMA

AUMA PROFOX PF-Q80 Operation instructions

Jetter JC-360 manual

Jetter

Jetter JC-360 manual

VDC Electronics BatteryMINDer SCC515 instruction manual

VDC Electronics

VDC Electronics BatteryMINDer SCC515 instruction manual

AUMA SA 25.1-UW manual

AUMA

AUMA SA 25.1-UW manual

Compac C4000 BioBlend installation manual

Compac

Compac C4000 BioBlend installation manual

Siemens SINUMERIK 808D Programming and operating manual

Siemens

Siemens SINUMERIK 808D Programming and operating manual

Gioteck GC2PS3-21 Operational manual

Gioteck

Gioteck GC2PS3-21 Operational manual

Viconics VTR8300 Series Application guide

Viconics

Viconics VTR8300 Series Application guide

Oceanic OSX instructions

Oceanic

Oceanic OSX instructions

manuals.online logo
manuals.online logoBrands
  • About & Mission
  • Contact us
  • Privacy Policy
  • Terms and Conditions

Copyright 2025 Manuals.Online. All Rights Reserved.