Eng: Mounting & usage instructions
Mounting instructions (see Fig. 1 & 4)
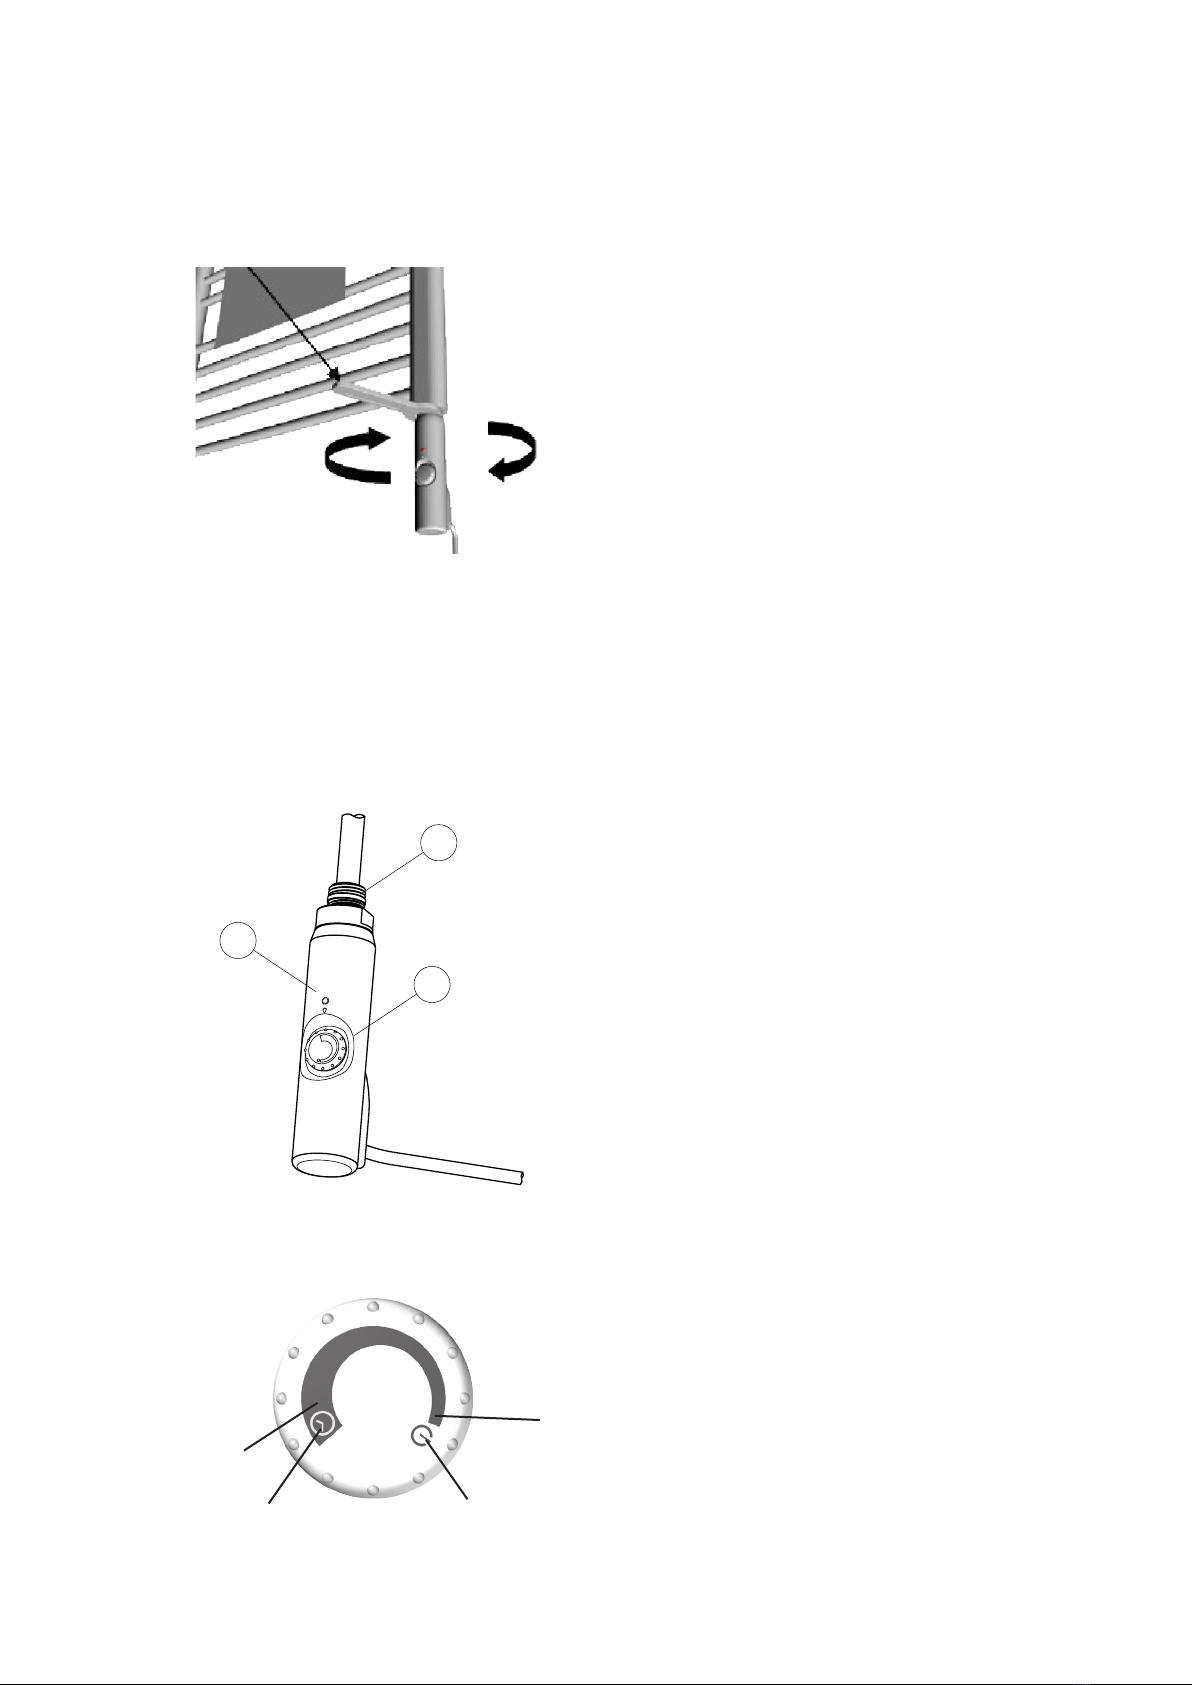
1. Mount the electric heating element into the bottom of the towel radiator. Remember to wrap the threads with hemp thread
or tape, since the silicone gasket does not neccessarily fill up the thread tolerences of the connection thread. Never install the
electric heating element vertically into the radiator. Never let the electric heating element operate without being surrounded by
fluid.
2. After the installation of the electric heating element, the towel radiator must be filled with water or a water/glycol mixture (if
there is a risk of frost). Fill water into the towel radiator until the water reaches but does not fill the uppermost horizontal tubes.
Mount the towel radiator to the wall.
3. Connect the electric heating element to an authorized connection in the wall and heat the radiator up at maximum power (see
Fig. 3) until the element switches off. Ventilate any excess air in the radiator by the safety valve (supplied with this heater, see
description) in the top. You might need to add some exstra water to the towel radiator. Remember to check that the radiator with
the mounted electric heating element is not leaking.
Operating the device (see Fig. 2 & 3)
- When the Helios is in the standby position (OFF position) the heating element and the LED light is off.
- The water temperature inside the radiator can be adjusted to a chosen temperature within the range of 20 to max. 65 degrees
celsius - consequently the towel radiator will never feel burning when touched.
- When the control knob isn’t in the OFF position, the electric heating element is activated. LED light will stay turned on (whether
the elementet actually warms or not).
- The control knob on the thermostat is turned clockwise to turn on, to adjust the temperature up and to activate the timer function.
Turn Knob counterclockwise to adjust the temperature down or to switch off.
- If you want to set / reset the temperature, turn the knob to “off “. Then turn to the desired temperature. 3 seconds after the
knob has been turned from “off “ the setting are registered, and the LED flashes slowly for a period of 5 seconds, after which the
element begins to heat up. In the 5 second interval, you may program the timer function - see below.
- The timer function makes the electric heating element operate at a user-preset temperature for 2 hours after which ther heating
element is turned off. The timer function is activated automatically at the same hour the next day. Follow the steps below to
program the timer function.
- If you want to use electric heating element after the timer has operated for 2 hours, just turn the knob to the desired temperature
setting - you must however remember to put the button back on the timer again to resume the previosly programmed setting.
Programming the timer function (See Fig. 3)
A. Turn the control knob to off.
B. Turn the control knob to the desired temperature as instructed above. LED flashes slowly for 5 seconds.
C. While the LED flashes, turn the control knob to the position of the timer function. Now the timer function will be activated with
the desired temperature, and the LED blinks slowly for 2 hours, while heating.
D. If you want to reprogram the timer function, simply follow directions from point A.
E. By setting the control knob to off, the programmed timer settings will be erased.
F. If you wish to use the heater when the timer function has stopped heating, simply turn the knob to the desired temperature
setting. REMEMBER to turn the knob back to timer function before the end of the timer cycle if you wish to continue the set
program!
Notice:
If the current fails while Helios is in timer mode, the timer repeats the 24 hour cycle from the time the current comes back. For
safety reasons the temperature setting will be set to 40oCelsius. It may be necessary to reset the timer function.
Attention!
- Helios electrical heating elements are supplied without plug and must be installed according to applicable law governing
electrical installations. We recommend to let a qualified electrician ensure proper connection.
- The electric heating element must never operate without being surrounded by fluid. Do not add oil or oil mixtures to the towel
radiator as it can dissolve the seals.
- Use a spanner for mounting the heating element (see Fig. 1). Never twist the thermostat box as it ruins the
inner sealing, which in turns voids the warranty!
- In order to avoid a hazard for very young children, this appliance should be installed so that the lowest heated rail is at least
600mm above the floor.
General and technical properties
- The cabinet of the regulating unit is made of ABS and comes in white (RAL 9016), chrome or Steel look finish. The heating body
are made of stainless steel.
- The system is approved according to the CE standards stated on page 5.
- Electric heating element is supplied for mounting vertical and upwards in the towel radiator. Alternatively, electrical heating
element may be mounted horizontally, but never vertically and downward.
- Voltage: 230-240V at 50 Hz.
- Thermostat box is IPX4 tested and approved.
Maintenance
- When cleaning, make sure that the thermostat box is off.
- Cleaning can be done with a mild detergent and a damp, soft cloth. Avoid soaking soaking or otherwise exposure to water.