Kullhaus alpha Q20L User manual

alpha Q20L
Instruction Manual
DEHUMIDIFIER
Thank you for choosing Kullhaus.
Please read the instructions before using the dehumidier and keep it for future reference

CONTENTS
Safety precautions ..................................................................................................................................3-4
Safety Regulations for Service and Repair Work.....................................................................................5-6
Product Description ....................................................................................................................................7
Control Panel Description .......................................................................................................................... 7
Technical Specications ............................................................................................................................ 8
Placement ................................................................................................................................................. 8
Operating Instructions ....................................................................................................................... 9-13
Cleaning and Maintenance .................................................................................................................14-15
Trouble Shooting ..................................................................................................................................... 15
Conditions of Warranty ............................................................................................................................ 16
Storage ................................................................................................................................................... 13
Responsible Disposal .............................................................................................................................. 13
2

3
Please read the instruction manual before using the product and then save it for future reference.
We reserve the right for any error in text or images and any necessary changes made to technical data.
• Failure to abide by this warning could result in an explosion, death, injury and property damage.
• Any person who is involved with working on or breaking into a refrigerant circuit should hold a current valid
certicate from an industry-accredited assessment authority, which authorizes their competence to handle
refrigerants safely in accordance with an industry, recognized assessment specication.
• Servicing shall only be performed as recommended by the equipment manufacturer. Maintenance and repair
requiring the assistance of other skilled personnel shall be carried out under the supervision of the person
competent in the use of ammable refrigerants.
SAFETY INSTRUCTION
Warning
• Check the voltage and make sure it meets the technical specication of the machine.
• This machine can be used by children aged from 8 years and above and persons with reduced physical,
sensory or mental capabilities or lack of experience and knowledge if they have been given supervision
or instruction concerning use of the appliance in a safe way and understand the hazards involved.
Children shall not play with the machine. Cleaning and user maintenance shall not be made by children
without supervision.
• The machine must always stand upright.
• The machine must stand upright for at least 1 hour before it is used for the rst time.
• Never sit, cover or place foreign objects on the product.
• Make sure that the air lter is clean and tted correctly before turning the machine on.
• Never use the product if the mains lead, plug or any other part is damaged or does not work properly.
• Never try to dismantle or repair the machine yourself.
• Never plug in or unplug the product with wet hands.
• Never insert foreign objects into the machine.
• Unplug the product immediately if it emits strange noises, odours or smoke.
• Make sure that no foreign objects cover or block the air inlet/outlet. Blockages can lead to res, electric
shocks or damage to the product.
• Unplug the product when it is not in use.
• Before the machine is moved, make sure it is switched off, unplugged and that the water tank is empty.
• If the supply cord is damaged, it must be replaced by the manufacturer, its service agent or similarly qualied
person in order to avoid a hazard.
• The appliance shall be installed in accordance with national wiring regulations.
• The machine is designed A-weighted sound pressure level below 70 dB.
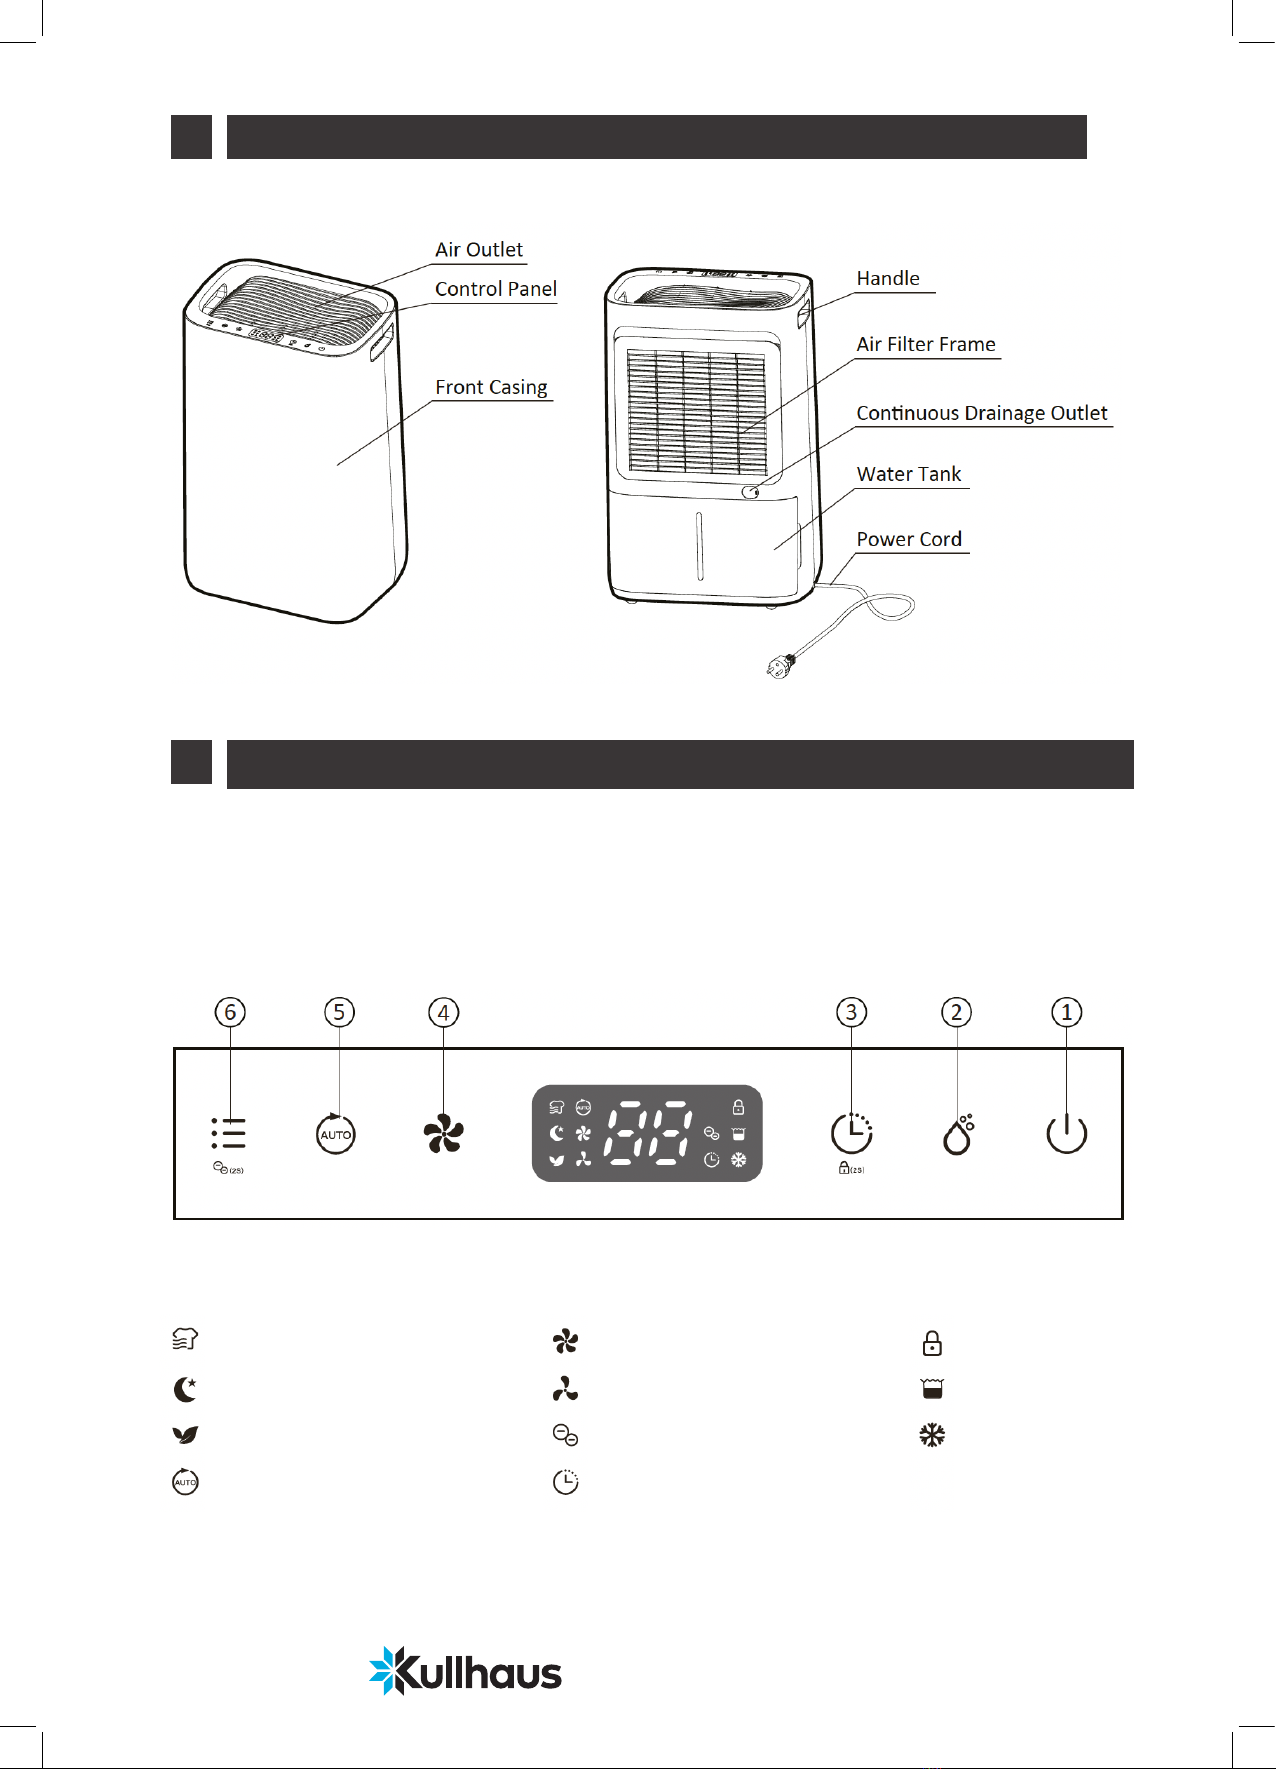
Dehumidier

4
SAFETY INSTRUCTION
Warning on Refrigerant R290
• The machine is designed only for use with R290 (propane) gas as the designated refrigerant.
• THE REFRIGERANT LOOP IS SEALED. ONLY A QUALIFIED TECHNICIAN
SHOULD ATTEMPT TO SERVICE!
• The lack of smell does not indicate a lack of escaped gas.
• No open ames, cigarettes or other possible sources of ignition should be used in the vicinity of the machine.
• Component parts are designed for propane and non-incentive and non-sparking. Component parts shall
only be replaced with identical repair parts.
THE MACHINE MAY ONLY BE INSTALLED IN A ROOM WITH A MINIMUM FLOOR
AREA OF 4m2.
R290 is a ammable gas that is heavier than air. On this basis, if the gas leaks from the unit, the concentration will be the
highest at ground level. However, the gas can be lifted (e.g. by drought, fan, etc) to higher levels. The R290(propane) used
in this unit has no odor.
Do not use the machine in a room with an open ame, other high-level heat sources (e.g. cigarettes, candles, etc.) or electrical
discharges. Install the machine in a room which can be ventilated when necessary and where gas accumulation is not possible.
If R290 (propane) is detected in the room, or a leak is suspected, do not allow unauthorized persons to search for the source of
the leak. In such cases, evacuate all people from the room, open the windows, leave the room and notify your local re depart-
ment to advise them that a propane leak has occurred. Do not allow any person to return to the room until the commanding
ofcer of the re department or a certied service engineer decides that the risk has ceased to exist.

5
SAFETY REGULATIONS FOR SERVICE AND REPAIR WORK
Repairs must only be carried out by authorized service personnel and only using genuine spare parts.
1. Checks to the Area
Prior to beginning work on systems containing ammable refrigerants, safety checks are necessary to ensure that the
risk of ignition is minimized. For repair to the refrigerating system, the following precautions shall be complied with prior to
conducting work on the system.
2. Work procedure
Work shall be undertaken under a controlled procedure so as to minimize the risk of a ammable gas or vapor being pres-
ent while the work is being performed.
3. General work Area
All maintenance staff and others working in the local area shall be instructed on the nature of work being carried out. Work
in conned spaces shall be avoided. The area around the workspace shall be sectioned off. Ensure that the conditions
within the area have been made safe by control of ammable material.
4. Checking for presence of refrigerant
The area shall be checked with an appropriate refrigerant detector prior to and during work, to ensure the technician is
aware of potentially ammable atmospheres. Ensure that the leak detection equipment being used is suitable for use with
ammable refrigerants, i.e. non-sparking, adequately sealed or intrinsically safe.
5. Presence of re extinguisher
If any hot work is to be conducted on the refrigeration equipment or any associated parts appropriate re extinguishing
equipment shall be available to hand. Have a dry powder or CO2 re extinguisher adjacent to the charging area.
6. No ignition sources
No person carrying out work in relation to a refrigeration system which involves exposing any pipe work that contains or
has contained ammable refrigerant shall use any sources of ignition in such a manner that it may lead to the risk of re
or explosion. All possible ignition sources, including cigarette smoking, should be kept sufciently far away from the site of
installation, repairing, removing and disposal, during which ammable refrigerant can possibly be released to the surround-
ing space. Prior to work taking place, the area around the equipment is to be surveyed to make sure that there are no
ammable hazards or ignition risks. “No smoking” signs shall be displayed.
7. Ventilated area
Ensure that the area is in the open or that it is adequately ventilated before breaking into the system or conducting any
hot work. A degree of ventilation shall continue during the period that the work is carried out. The ventilation should safely
disperse any released refrigerant and preferable expel it externally into the atmosphere.

6
SAFETY REGULATIONS FOR SERVICE AND REPAIR WORK
8. Checks to the refrigeration equipment
Where electrical components are being changed, they shall be t for the purpose and to the correct specication.
At all times the manufacturer’s maintenance and service guidelines shall be followed. If in doubt consult the manufacturer’s
technical department for assistance. The following checks shall be applied to installations using ammable refrigerants.
• The charge size is in accordance with the room size within which the refrigerant containing parts are installed;
• The ventilation machinery and outlets are operating adequately and are not obstructed;
• If an indirect refrigerating circuit is being used, the secondary circuit shall be checked for the presence of refrigerant;
• Marking to the equipment continues to be visible and legible. Markings and signs that are illegible shall be corrected;
• Refrigeration pipe or components are installed in a position where they are unlikely to be exposed to any substance which
may corrode refrigerant containing components, unless the components are constructed of materials which are inherently
resistant to being corroded or are suitably protected against being so corroded.
9. Checks to electrical devices
Repair and maintenance to electrical components shall include initial safety checks and component inspection procedures if a
fault exists that could compromise safety, then no electrical supply shall be connected to the circuit until it is satisfactorily dealt
with. If the fault cannot be corrected immediately but it is necessary to continue operation, an adequate temporary solution shall
be used. This shall be reported to the owner of the equipment so all parties are advised. Initial safety checks shall include:
• That capacitors are discharged: this shall be done in a safe manner to avoid possibility of sparking;
• That there no live electrical components and wiring are exposed while charging, recovering or purging the system;
• That there is continuity of earth bonding.

7
PRODUCT DESCRIPTION
CONTROL PANEL DESCRIPTION
1. Power Button
2. Manual Button
3. Timer Button/Childlock Button
4. Fan Speed Button
5. Auto Button
6. Mode Button/Ionizer Button
Sleeping Indicator Low Fan Speed Indicator Tank Full Indicator
Auto Indicator Timer Indicator
Laundry Drying Indicator High Fan Speed Indicator Childlock Indicator
Air Purifying Indicator Ionizer Indicator Defrosting Indicator

8
Check the dehumidier for any transport damage. In case of damage, you should contact the seller immediately.
• Make sure that the dehumidier is standing rmly on a at surface.
• Make sure that the mains lead is easily accessible and is not
• Damaged by sharp edges or is crushed in any way during use.
• If any part of your house suffers from severe humidity, the
dehumidier can be placed there rst and then moved to another
part of the house later.
• Ensure the dehumidier is at a safe distance at least 50cm
away from a wall or furniture.
• Never place the dehumidier next to a radiator or heating
appliance.
PLACEMENT
The above technical data are for reference only. We reserve the right to modify them without notice.
TECHNICAL SPECIFICATIONS
Model alpha Q20L
Voltage / Frequency 220-240V~ 50Hz
Dehumidifying Capacity
20L/day (30°C 80%rh)
12L/day (27°C 60%rh)
Rated Power (27°C 60%) 245 watts
Rated Current 1.73A
Air Flow
High 190m³/h
Low 160m³/h
Fan speeds 2
Noise level
High 44 dB(A)
Low 40 dB(A)
Refrigerant R290/0.06kg
Water Tank Capacity 4.5L
Operating Temperature 5°C−35°C
Net Weight 14.9 kg
Dimension (W×D×H) 378 × 273 × 580 mm

9
OPERATING INSTRUCTIONS
Note:
• Ensure the supply power is in correspondence with the value on the nameplate.
• Ensure the water tank is correctly tted before the dehumidier can be switched on.
• If the dehumidier is turned off and then turned back on again immediately, it will take approximately 3 minutes to
reach full power (compressor back to work).
• If the dehumidier switched off by a power cut, it will automatically switch back on once the power is restored.
• The dehumidier works best at normal room temperature, its efciency is reduced if the ambient temperature falls to
below 15 .
Switching On/Off the Unit
Humidity Setting Control
Timer Setting
Connect the mains lead to socket.
Press Power button once to turn on the unit. By default, it runs on Manual Dehumidifying Mode.
Press Power button once again to turn off the unit.
Press Manual button once to enter Manual Dehumidifying Mode or to select desired level of humidity
from CO-30%-35%-40%-45%-50%-55%-60%-65%-70%-75%-80%-CO.
Note: if ambient humidity lower than 30%, display shows LO.
if ambient humidity higher than 90%, display shows HI.
At ON mode, press Timer button consecutively from 1-24h to select your preferred timer duration for automatic shut off
setting. Its corresponding Timer indicator will be displayed on screen.

OPERATING INSTRUCTIONS
10
Fan Speed Option
Auto Dehumidifying Function
Press the Fan Speed button to select your preferred fan speed setting of low and high to meet the different usage
requirements.
Press the Auto button to enter into the Auto Dehumidifying Mode, the unit runs automatically accordance to the ambient
humidity detected below.
Ambient RH% detected Compressor Fan Speed Level
RH%>65% Working High Fan
55%≤RH%≤65% Working Low Fan
RH%<55% Stop Working Low Fan
KULLSAVE
The Energy Savings Smart Operation
When the target relative humidity is reached, the unit will operate only the fan in low speed for
1 minute, then will stop for 15 minutes. The fan will then run for 1 minute to check the relative
humidity.
If the relative humidity has risen above the target humidity (HS)+1%, the unit will start operat-
ing again. If the relative humidity remains below the target level, the unit will fall back to sleep
and only the fan works in low speed for about 1 minute and then stops for 15 minutes.

11
OPERATING INSTRUCTIONS
- Sleeping Mode
Press Mode button twice to select the Sleeping mode, its corresponding Sleeping indicator will be displayed on screen.
The unit works in previous mode but in low fan speed and 10 seconds later, all indicators will be off.
Note: At Sleeping Mode, press any button to wake up the unit rst then to operate as usual.
- Air Purifying Mode
Press Mode button 3 times to select the Air Purifying mode, its corresponding Air Purifying indicator and lonizer indicator
will be displayed on screen. The unit works with high fan speed without dehumidifying, ion function start working as well.
Note: Ion function can be switched off by pressing and holding the Mode button for 2 seconds.
Built in Ionizer
Press and hold Mode button for 2 seconds to activate the ion function, built-in ionizer can produces negative ions to
freshen up the air quality and to promote air purication through the elimination of air borne allergens and germs.
Note: If the fan stops working, anion function will automatically be deactivated.
Multifunction Optional
Press Mode button once to select the Laundry Drying mode, its corresponding Laundry Drying indicator will be displayed
on screen. The unit works in continuous dehumidication with high fan speed for 6 hours then switch off automatically.
- Laundry Drying Mode

OPERATING INSTRUCTIONS
Childlock Function
Automatic Shut Off
To prevent the mishandling by young children, unit is equipped with a Childlock function. Press Timer button for 2 seconds to
activate or deactivate the childlock function.
Note: After activating the childlock function, the childlock indicator will be displayed on screen.
When the water tank becomes full during normal use, the unit shuts off automatically with tank full indicator on the screen
and buzzer alarm goes off for 5 times.
Note: If water tank is removed or not placed properly, above phenomenon will appear also.
Pull water tank out Pour water away Restore the water tank
12

13
OPERATING INSTRUCTIONS
Automatic Defrost Feature
Memory Feature
Continuous Drainage Option
The unit is equipped with an automatic defrost feature. When room temperature is too low, compressor shuts off
and unit runs on high fan speed setting until the frost has disappeared, no other setting can be made for this feature.
Its corresponding indicator will be displayed on screen.
When power failure and after recovering, the unit will work with the mode prior to the shutdown.
Means the fan speed setting, humidity setting and working mode setting will be kept.
Continuous drainage option allows easy removal of collected water instead of manually emptying from the water tank
when the environment is very high humidity.
• 1. Remove the rubber plug covering the drain hose connection.
• 2. Connect a suitable drain hose (14mm inner diameter) through the drainage outlet.
Ensure that the hose is secure and tight to prevent leakage.
• 3. Always make sure the drainage hose is not blocked or obstructed to maintain a smooth ow.

14
CLEANING AND MAINTENANCE
Cleaning the dehumidier
To ensure the effectiveness of the dehumidier, it is recommended
to clean the unit at least every two weeks.
1. Turn the dehumidier off and pull out the plug before cleaning.
2. Use a soft cloth to gently wipe the outer case to remove dust.
3. Vacuum clean the air inlet and outlet grilles of the dehumidier.
4. Remove the water tank and wash it by hand using a mild detergent.
Rinse it with Clean Water.
Note: Do not spray water directly onto the unit.
Cleaning the Air Filter
1. Remove the pre-lter from the back.
2. Vacuum or wash the prelter carefully in warm water, use a mild detergent if necessary.
3. Rinse the pre-lter in clean water and let it dry before reinserting it.
4. Vacuum the H13 HEPA lter
5. Fit the lter frame back onto the unit
Note: DO NOT use the dehumidier without the Air Filter in place.
Never wash the pre-lter in the dishwasher.
Never clean theHEPA lter with water. It will be destroyed.

15
TROUBLE SHOOTING
Check the following before contacting technical support.
PROBLEM POSSIBLE CAUSE / SOLUTION
The dehumidier will not switch on
. Make sure that the mains lead is properly plugged in and that there is
power in the wall socket.
. The water tank is full or incorrectly tted.
. The set humidity level has been reached.
. Power plug or cord damaged.
The humidity is not reducing
. The dehumidier has not been used long enough.
. Make sure that the doors and windows are closed.
. The ambient temperature is too low.
. The surrounding humidity level is too low.
. The air lter frame is dirty.
. Exceed recommended room coverage area.
. The ambient humidity level is lower than the desire humidity level set.
Unusual noises
. The dehumidier is tilted or standing on an uneven surface.
. Make sure that the air lter is clean
. Loose or foreign particles inside the unit.
. Sound of owing refrigerant.
Water in tank overows
.Water tank may be damaged.
. Float for water auto-sensor is not in place.
. Internal drainage passage is blocked or obstructed.
Error code
E1 Temperature sensor error. Contact customer care center.
E2 Humidity sensor error. Contact customer care center.
Replacing H13 HEPA lter
The H13 HEPA filter must be replaced when the color changes from white to gray or every 3 to 6 months (depending on
the environment and the frequency of use). The HEPA filter should be cleaned by gently using a vacuum cleaner to suck
away dust and debris from the surface of the filter. Water should not be used as the HEPA filter will damaged permanent-
ly. The cleaning process must be done outside the room, otherwise the particles will disperse into the air. If the HEPA
filter remains black/grey and dusty after cleaning then the filter has to be replaced.
─► Using a HEPA filter is optional.
The dehumidifier can be used without the HEPA filter, which means it will simply dehumidify the air and not clean it.
HEPA replacement filters can be purchased at www.sanihellas.gr

16
CONDITIONS OF WARRANTY
There is a two-year warranty on your dehumidier from the date of purchase.
The following applies:
1. Any repairs or replacement of components during the warranty period will be not result in an extension of the warranty
period.
2. The warranty will expire if any alterations have been made, not genuine components have been tted or if the dehumidi-
er has been repaired by a third party.
3. Components subject to normal wear and tear, such as the air lters, are not covered by the warranty.
4. The warranty is only valid on presentation of the original, unaltered, and date-stamped purchase receipt.
5. The warranty is not valid for:
• Damages is caused by actions that deviate from those as described in the user’s manual or by neglect.
• Damages caused from intervention of unauthorized personnel.
• Bad or insufcient maintenance.
• Factors for which the production factory does not have any responsibility (variations in power supply beyond the speci-
cations of the unit, etc.), connection in non-grounded power supply socket etc.
• All claims for compensation, including consequential damage, will not be entertained.
6. In case of any unit’s damage you should refer to the company that sold the unit.
7. The transportation costs from and back to technical department and the probable insurance of the units are under the
customer’s choice and responsibility.
Storage
STORAGE
If the dehumidier will not be used for a long period of time, take the following steps:
1. Remove the plug from the socket and empty the tank, make the tank and the dehumidier dry completely, this
may take a couple of days.
2. Clean the air lter as described above.
3. Ensure that the dehumidier is in perfect condition for a safe use of the unit after a long period of storage.
4. Pack the device with the suitable packaging.
5. Store the dehumidier in a dust-free and out of direct sunlight location, preferably covered with a sheet of plastic.
Responsible Disposal
This symbol indicates that this product should not be disposed of with general household
waste. This applies throughout the entire EU. In order to prevent any harm to the environment
or health hazards caused by incorrect waste disposal, the product must be handed in for
recycling so that the material can be disposed of in a responsible manner. When recycling your
product, take it to your local collection facility or contact the place of purchase. They will ensure
that the product is disposed of in an environmentally sound manner.

www.kullhaus.com
SANI HELLAS
IMPORT EXPORT TECHNICAL SA
5-7 Kosti Palama Str.
143 43 Athens, Greece
Tel. (+30) 210 3236627, 3233766
Fax (+30) 210 3247709
e-mail: [email protected]
www.sanihellas.gr
SANI HELLAS IMPORT EXPORT TECHNICAL SA - distributor of Kullhaus products in Greece.
Table of contents
Other Kullhaus Dehumidifier manuals