Kullhaus Qualis 12L ion User manual

User manual
Dehumidier
Thank you for choosing this product.
Please read this instruction manual before using it.
Qualis 12L ion / Qualis 20L ion

Table of Contents
2
Safety Instructions .......................................................................................................... 1-2
Prior to Operation .............................................................................................................. 3
Continuous Drainage ......................................................................................................... 3
Operation Instructions ...................................................................................................... 4-8
Cleaning ............................................................................................................................. 9
Storage .............................................................................................................................. 10
Display Error Codes ........................................................................................................... 10
Trouble Shooting ................................................................................................................ 11
Technical Specications ..................................................................................................... 12

3
Only for domestic use
Read the user manual before any use, refer to the corresponding section in this user
manual.
Recycle unwanted materials instead of disposing of them. All appliances and
packaging should be sorted and tendered at a regional recycling centre and be
processed in an ecological manner.
The product conforms to the applicable European and other directives.

4
Safety Instructions
This appliance is intended for use in a domestic environment only. Any other use is not recommended by the manufacturer
and may cause re, electrical shocks or other person injury or property damage.
Warning
Cautions Wet hands not allowed Warning
Do not pull the
power cord in
order to unplug
the device from
the socket.
Do not put any
heavy objects on
the power cord
in order to avoid
safety hazard.
Do not attempt to
change the power
cord, contact the
authorized service
centre for repair.
The socket has
to be earthed
and appropri-
ately secured.
Do not use the
appliance in
overloaded ex-
tension cord.
Do not use the
appliance if its
socket holes
cannot rmly
hold a plug.
Do not touch the
plug with wet
hands in order
to avoid electric
shock.
Please pull out
the plug during
lightning storms.
Power Cord

5
Safety Instructions
Do not put amma-
ble and explosive
objects around the
appliance in order
to avoid re.
Do not use the
appliance in a
draughty place.
Please turn off the
power and unplug
the power cord
before moving it.
Children should
be supervised to
ensure that they
do not place stick
into the appliance.
Do not push the
appliance over or
let the appliance
suffer strong impact
in order to avoid
malfunction.
Do not put hands
on the air outlet
in order to avoid
injury or malfunc-
tion.
Do not use the
appliance in swim-
ming pool or similar
facilities in order
to avoid safety
hazard.
Place the appli-
ance on a stable,
at surface.
Do not let the old
and sick people stay
near the appliance
for a long time in
order to avoid lack of
oxygen.
Do not put any
heavy objects
on the appliance
in order to avoid
malfunction.
The appliance must
not be covered
when being used.
Please install the
air lter before
using it.
Placement
During Use

6
Product Description
Components
1. Handle
2. Air Inlet Grille
3. Water Tank
4. Drainage Outlet
5. Power Cord Bracket
6. Power Cord
7. Rear Cover
8. Casters
9. Control Panel
10. Air Outlet
11. Front Cover
Control Panel
12. Power Button
13. Timer On/Off Button
14. Manual Dehumidifying Button
15. Fan Speed Buttons/Child Lock Button
16. Auto Button
17. Laundry Drying Button
18. Sleep Button
19. Anion Button
20. Auto Indicator
21. Laundry Drying Indicator
22. Sleep Indicator
23. Anion Indicator
24. Humidity Reading
25. Timer Indicator
26. Manual Dehumidifying Indicator
27. Tank Full Indicator
28. Defrost Indicator
29. Child Lock Indicator
30. Fan Speed Indicator
Drainage
31. Drainage Outlet Door
32. Drainage Pipe

Πόση συλλογή νερού να περιμένετε και με τι κατανάλωση
7
Figure1
Figure2
Figure3

8
• Place the dehumidier in an upright position on a stable, at surface.
• Ensure the dehumidier is at a safe distance at least 50cm away from a wall or furniture.
• Supply power should be in correspondence with the value on the nameplate, power outlet needs to be grounded.
• Ensure the tank is correctly tted, if the tank is full or not in place, the tank full light comes on and the dehumidier will
stop working.
Prior to Operation
Continuous Drainage
In general, water will be collected by tank, if you want continuous drainage, please do steps as follows:(refer to gure 3)
1. Unplug the drainage outlet plug.
2. Insert the drainage pipe with 14mm inner diameter into water outlet. Please always make sure the pipe is going downhill,
is not blocked or kinked.

9
Operation Instructions
Safety Child lock Function [ Fan speed button- 2 seconds ]
Press the fan speed button for 2s to lock all buttons on the panel with a beeping sound, the same operation can unlock it.
Low Temperature Defrost Mode
When the ambient temperature is too low, dehumidier will enter into the defrost mode, the unit runs with high fan speed
without dehumidifying.
Fan speed button is invalid.
Auto Shut off with Water Tank Full Indicator
The unit will enter into the standby mode when water tank is full or the water tank is not installed properly. After emptying
the tank or install the water tank properly, the unit will go on to the previous mode.
Except for the power button, all other buttons are invalid.

10
Operation Instructions
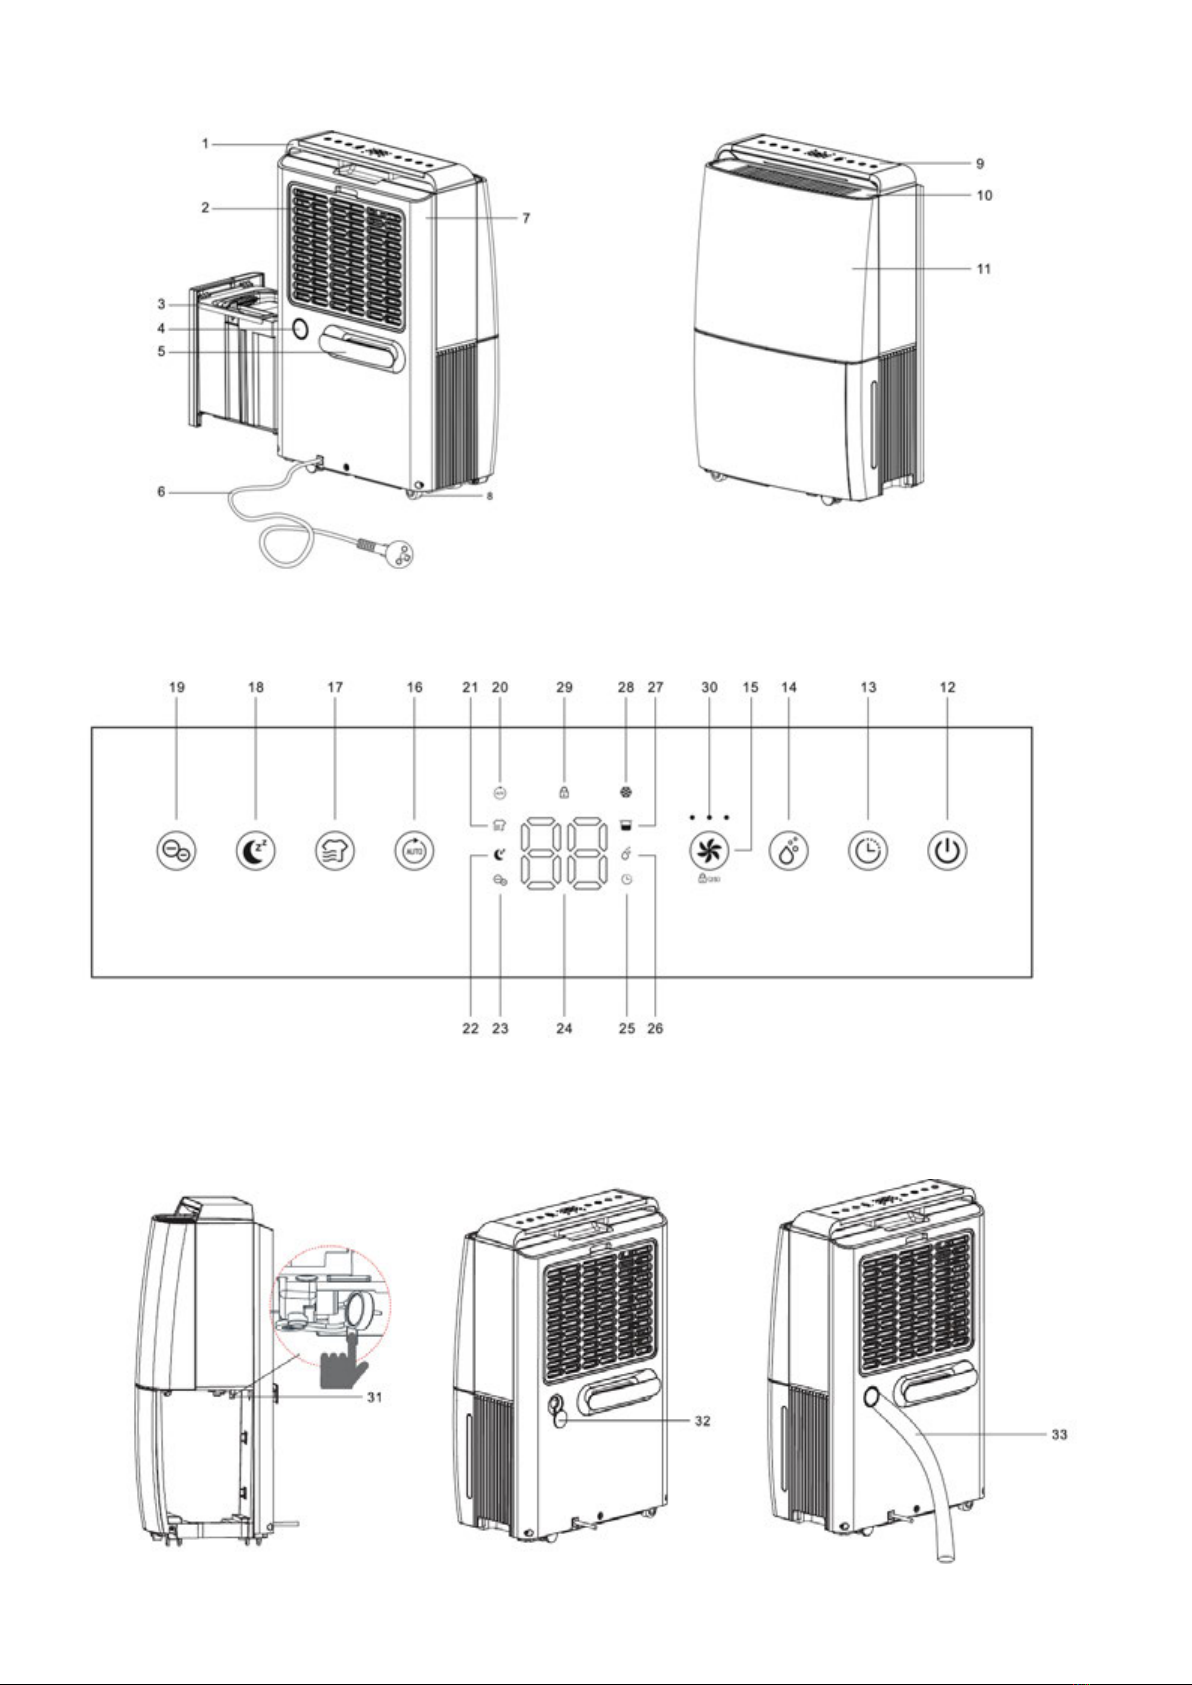
Ionizer Function [Ionizer button]
Press the ionizer button to activate the ionizer function to fresh up the air quality.
Ionizer function will be off automatically when the fan stops working.
Laundry Drying Function [ Laundry Drying button ]
Press the laundry drying button to activate the laundry drying function, the unit runs in continuous dehumidication with
high fan speed for 6 hours then switch off automatically.
Fan speed button and timer button are invalid.
Sleep Mode [Sleep button]
Press the sleep button to activate the sleep function, the unit runs with a designated humidity setting of 55% along with
the low fan speed. All indicators and tri-color light will be off 5s after the setting is completed. Touch any button to activate
the light, and to operate as usual.
At Sleep Mode, both RH% level and fan speed setting are adjustable.
With no further operation after activate the light for 30s, lights will be off again.
When the water tank is full on sleep mode, water tank full indicator will always be on.

11
Operation Instructions
Switch On / Switch Off The Unit [Power button]
Press the power button once to turn on the unit, the unit runs by default mode on manual continuous dehumidifying with
mid fan speed.
Press the power button to turn off the unit, it will stop working, fan will work for some seconds to blow out the
hot air inside the unit.
Auto Switch On / Off Timer Function [Timer button]
At working mode, press the timer button to select your preferred timer hour from 00-24-00 for automatic switch off.
At standby mode, press the timer button to select your preferred timer hour from 00-24-00 for automatic switch on.
Connect the power plug to the correct power supply; all indicators will light up and then will be off.
Desired setting will be conrmed 3s after the operation.
Tri-color light will reect the environment humidity: Red light: RH%>65%; Yellow light:
55%≤RH%≤ 65%; Green light: RH%<55%.
Auto timer on/off setting will be cancelled if press timer button for 2 times in 5 seconds.
Auto timer off setting will be cancelled if switch off the unit and switch on again.
Auto timer on setting will be cancelled if switch on the unit by manual.

12
Operation Instructions
Fan Speed Option [ Fan Speed button ]
Press the fan speed button to select your preferred fan speed setting among low, medium, and high to meet the different
usage requirements.
Fan speed button is invalid at laundry drying mode, auto mode and defrost mode.
Manual Dehumidifying Mode [Manual button]
Press the manual button to select your preferred humidity from CO-30%-35%-40%-45%-50%-55%- 60%-65%-70%-75%-
80%-CO. CO means continuous dehumidifying regardless of ambient humidity.
At manual mode, all buttons are valid.
Auto Dehumidifying Function [Auto button]
Press the auto button to activate the auto dehumidifying mode, the unit runs automatically accordance to the ambi-
ent humidity detected below.
Ionizer function will be off automatically when the fan stops working.
Ambient RH% detected Indicator Compressor Fan Speed Level
RH%>65% Red Working High
55%≤RH%≤65% Yellow Working Medium
RH%<55% Green Stop Working Low

13
Operation Instructions
Memory Function:
a. When unplugged directly or power cut, then reconnected to the power supply, the dehumidier will run with the
mode prior to the shutdown. The timer setting will be kept.
b. Press the power button to switch off the dehumidier, and then press the power button to switch it back on. The
dehumidier will run with the mode prior to the shutdown. The timer setting will be cancelled.
c. Switch off the device and unplug the power cord, then reconnect the power supply and switch on the dehumidier.
It will run as factory preset mode the rst time you received the dehumidier.

Cleaning
When used regularly , the lter may become clogged with dust and particles. Therefore the lter should be cleaned at least
every two weeks. Follow these steps:
1. Switch the device off and remove the plug from the socket before cleaning.
2. Clean the housing with soft, dry cloth. If the device is extremely dirty,
use a mild cleaning agent. Wipe the dehumidier with a slightly damp
cloth. Never spray the device with water.
3. Remove the lter, clean the lter with a vacuum cleaner or soapy
water no hotter than 40°C.
4. Rinse and dry the lter completely before installing back to the
device.

Storage
If the dehumidier will not be used for a long period of time, take the following steps:
1. Remove the plug from the socket and empty the tank, make the tank and the dehumidier dry completely, this
may take a couple of days.
2. Clean the air lter .
3. Check the dehumidier for perfect condition to ensure a safe use of it after a long period of storage.
4. Pack the device with the suitable packaging.
5. Store the dehumidier in a dust-free and out of direct sunlight location, preferably covered with a sheet of plastic.
Display Error Codes
Please contact local distributor if any of the error codes below appears.
Display Code E1 E2
Error Temperature sensor error Humidity sensor error
Display Flash every 30 seconds Flash every 30 seconds
What is happening Device still dehumidies but is in
defrost mode only.
Device still dehumidies but is in con-
tinuous dehumidifying mode only CO.

14
PROBLEM POSSIBLE CAUSE SOLUTION
The device does not work
The power is not connected Insert the plug into the wall outlet
The water tank is full Empty the tank
The tank has not been replaced correctly Replace the tank correctly
Water removal capacity is too low
Runtime is too short Be patient and wait
Ambient temperature or humidity is too low It is normal that the device does not de-
humidify in these conditions
The device works, but reduces the
relative humidity insufciently
The room is too big We recommend using a dehumidier with
a greater capacity
There is too much ventilation Reduce ventilation(e.g. close windows
and shut doors)
The air lter is clogged Clean the lter
Set humidity is higher than the ambient
humidity
Set the humidity lower than ambient
humidity
Dehumidier is blowing out warm air
The dried air is passed over heating coils
before it is blown into the room as part of
the dehumidifying process
This is normal, a dehumidier is not an air
cooler
The display is not showing the hu-
midity set point
The display shows the room relative hu-
midity not the set point
Press the up or down button once to see
the target relative humidity
Water on oor There is residual water in tank, and the
device is lurched too much by moving Be careful when move the tank
The dehumidier is noisy The air lter is blocked or the device is on
an uneven surface
Clean the lter or put the device on a at
surface
Trouble Shooting
Check the following before contacting technical support.

15
The above technical data are for reference only. We reserve the right to modify them without notice.
Technical Specifications
Model Qualis 12L ion Qualis 20L ion
Power Supply 220-240V~ 50Hz 220-240V~ 50Hz
Dehumidifying Capacity
12L/day (30°C 80%rh) 20L/day (30°C 80%rh)
6,5L/day (27°C 60%rh) 11,71L/day (27°C 60%rh)
Power Consumption 145 watts 265 watts
Air ow H: 135 | M: 125 | L: 105 m³/h H: 150 | M: 135 | L: 120 m³/h
Fan speed 3 3
Water Tank Capacity 4.0L 4.0L
Noise Level H: 43 | M: 40 | L: 37 dB(A) H: 44 | M: 42 | L: 38 dB(A)
Operating Temperature 5°C−35°C 5°C−35°C
Timer 1−24h 1−24h
Refrigerant R134a
Net Weight 12 kg 13 kg
Product Size (WxDxH) 360 x 234 x 569mm 360 x 234 x 569mm

16
Conditions of Warranty
There is a three year warranty on your dehumidier from the date of purchase.
The following applies:
• Any repairs or replacement of components during the warranty period will be not result in an extension of the warranty period.
• The warranty will expire if any alterations have been made, not genuine components have been tted or if the dehumidier
has been repaired by a third party.
• Components subject to normal wear and tear, such as the air lter, are not covered by the warranty.
• The warranty is only valid on presentation of the original, unaltered, and date-stamped purchase receipt.
• The warranty does not cover damage caused by actions that deviate from those as described in the user’s manual or by
neglect.
• All claims for compensation, including consequential damage, will not be entertained.

17
www.sanihellas.gr - www.kullhaus.gr
SANI HELLAS
IMPORT EXPORT TECHNICAL SA
5-7 Kosti Palama Str.
143 43 Athens, Greece
Tel. (+30) 210 3236627, 3233766
Fax (+30) 210 3247709
e-mail: [email protected]
SANI HELLAS IMPORT EXPORT TECHNICAL SA is the sole distributor of Kullhaus products in Greece.
For further information or service please feel free to contact us.
This manual suits for next models
1
Table of contents
Other Kullhaus Dehumidifier manuals