2003 by KYOCERA MITA CORPORATION All rights reserved. 2-28, 1-Chome, Tamatsukuri Chuo-ku, Osaka 540-8585, Japan
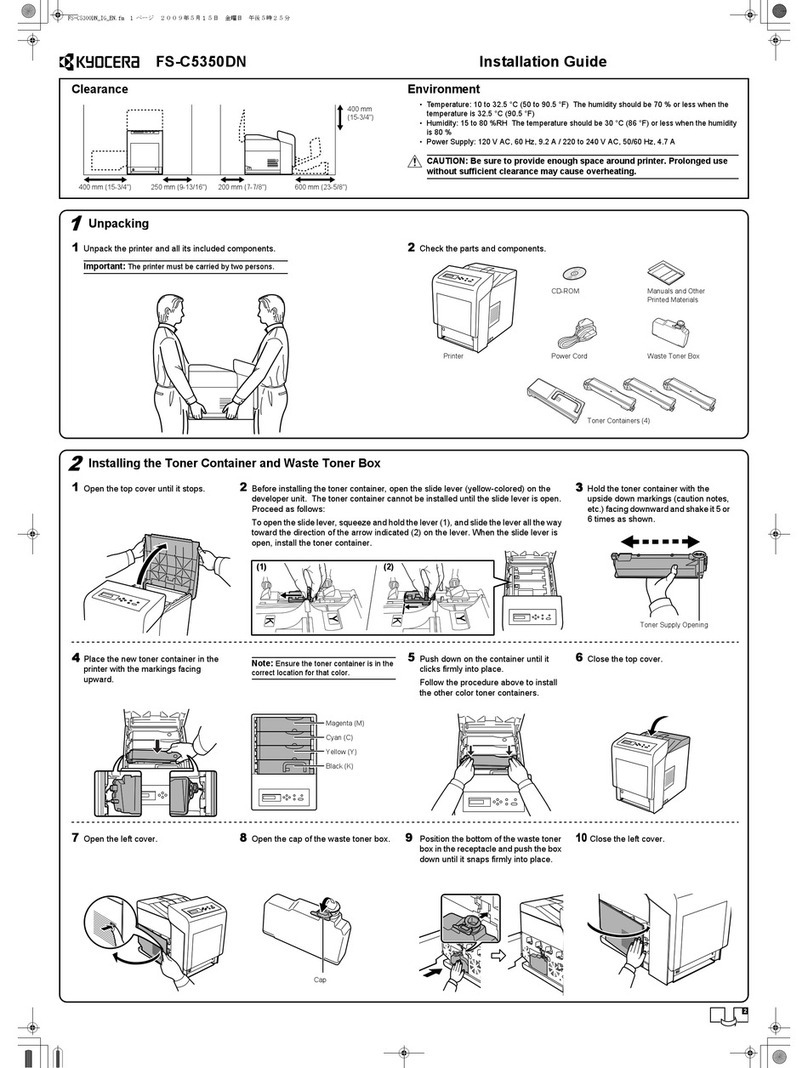
Installing the Charger Units and Toner Containers
Installing the Waste Toner Box
Fixing Unit Adjustment
Preparing the Paper Cassette, MP Tray and Quick Guide Holder
For information on how to operate the printer, see e-manual on the CD-ROM.
Printed in Japan 2003.10 2BF81020A
Connections
20 Press the toner container covers inward so
that the covers fall open toward the front.
21
Take the charger units out of their protective
bags. Match the color sticker on the charger
units to the colors on the printer and insert the
units into the printer as shown in the figure.
22 Lower the 4 printer heads.
Cyan charger unit
Magenta charger unit
Yellow charger unit
Black charg-
er unit
23 Take the toner containers out of their protec-
tive bags. Shake them in a parallel direction 4
to 5 times before installing them.
24 Insert the toner containers into the toner con-
tainer cover of the same color.
25 Close the toner container covers. 26 Close the right side transfer unit.
Yellow toner
container
Black toner
container
Cyan toner
container
Magenta toner
container
27 Check the collection holes in the waste toner
box are open.
28
Install the waste toner box as shown in the fig-
ure.
29 Close the front cover. The printer comes with 2 waste toner boxes.
It may be necessary to replace it when print-
ing, therefore keep the other one handy.
Collection
holes
30 Open the left cover of the printer. 31 While raising the green lever beneath the fix-
ing unit, pull the fixing unit out.
32
Tighten the fixing pressure adjuster screws on
both sides of the fixing unit until they turn no
more. Be careful not to overtighten the screws.
33 After returning the fixing unit back to its place,
close the left cover of the printer.
34 Pull out the paper cassette.
35 Slide the paper guide to the outside and
remove the guide stopper attached to
the tray.
36 Reinsert the paper cassette as before.
37 Open the MP tray.
38 Remove the protective paper from the
tray.
39 Fold the MP tray back up as before.
40 Connect the printer to a computer.
(A connection cable is sold separately.)
Parallel interface port
Parallel printer cable
Clips
Network interface port
Network cable
41 Connect the included power cord to the
printer and an electrical outlet.
42 Set the power switch in the ON (I) posi-
tion to turn the printer on.
Power cord
Setti.fm 2 ページ 2003年10月17日 金曜日 午後7時49分

