DE MASCHINE SCHNEIDT TOMATEN, 10 MESSER
HINWEISE
1.- Denken Sie daran, dass die Messer sehr scharf sind. Benutzen Sie die Maschine mit großer Vorsicht,
um sich nicht zu schneiden. Halten Sie ihre Finger von den Messern entfernt.
2.- Verwenden Sie immer Schutzhandschuhe wenn Sie die verschiedenen Messer austauschen.
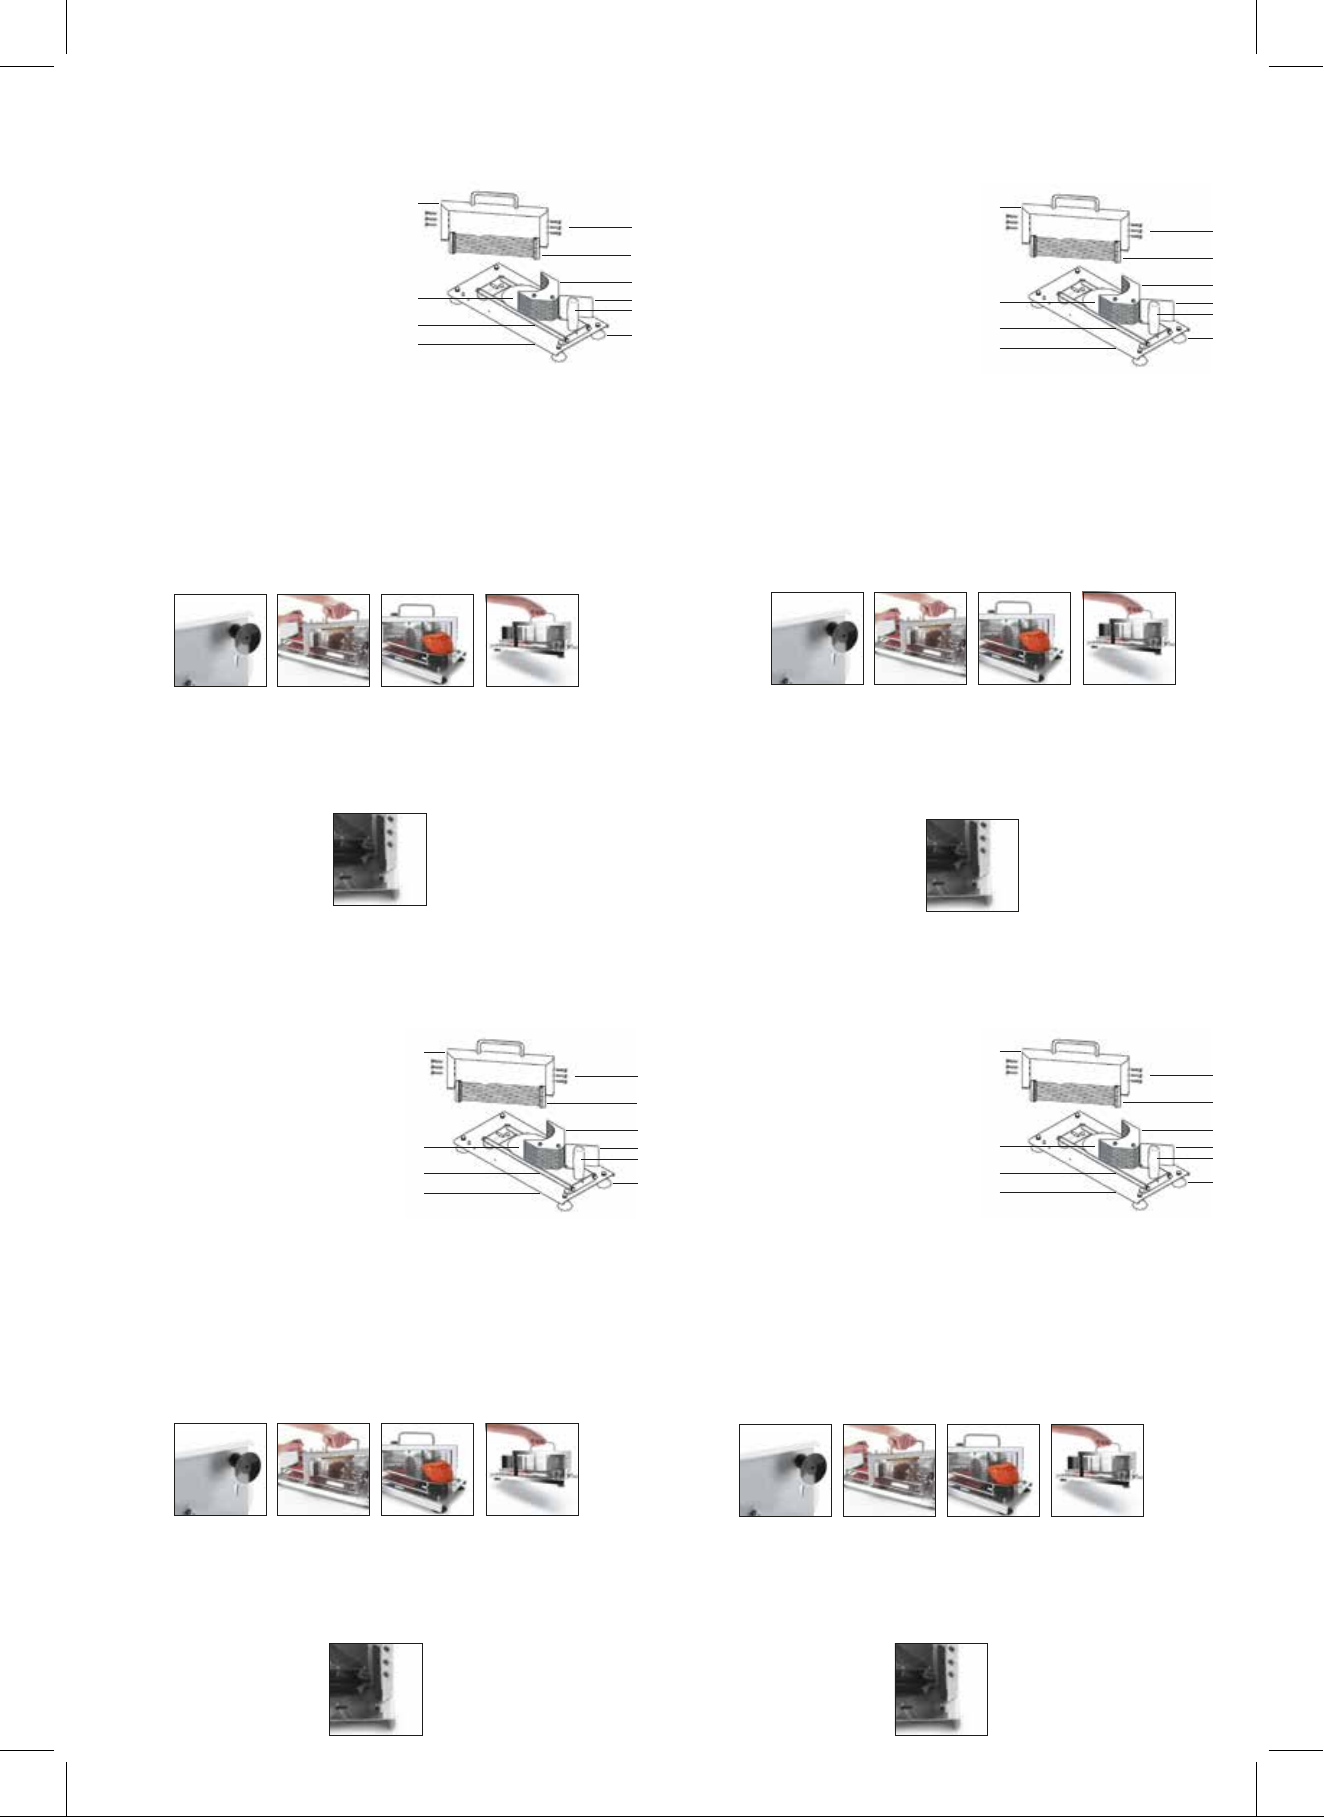
BESCHREIBUNG DER MASCHINENTEILLE
1.- Griff transport/Stütze
2.- Klingen Set
3.- Schubblock
4.- Beschützer
5.- Schubgriff
6.- Basis
7.- Greif Saugnäpfe
8.- Messer Klemmschrauben
9.- Transportbahn
10.- Lebensmittel-Fach
WICHGSTE TECHNISCHEN DATEN
Ref.: 60510
Dick geschnitten: 5,5 cm
Grössen: 10
Größe: 43,2x20,2x21 cm
Gewicht: 5,20 Kgr.
MONTAGE UND INBETRIEBNAHME
1.- Vor der ersten Inbetriebnahme reinigen Sie die Maschine, um Fettreste oder Unreinheiten, die bei der
Produktion entstanden sind, zu entfernen.
2.- Vergewissern Sie sich, dass die Saugnäpfe zur Befestigung (7) gut auf dem Tisch oder auf der gewählten
Arbeitsfläche aufsitzen.
3.- Ziehen Sie den Schiebeknauf nach hinten (5) und stellen Sie den Schiebeblock (3) auf seine Originalposition.
4.- Legen Sie die Tomate in die Lebensmittelschale (10) neben die Messer und ziehen Sie den Knauf nach
vorne, um die Tomate in Scheiben zu schneiden.
5.- Nehmen Sie die Tomate aus der Schale und legen Sie sie in einen Behälter.
ACHTUNG: Transportieren Sie die Maschine aus Sicherheitsgründen IMMER mit dem dafür vorhergesehenen
Transportgriff (1).
8
3
4
7
2
6
10
9
1
5
FR MACHINE POUR COUPER TOMATES 10 LAMES
ATTENTION
1.- Les lames sont très affilées. Utiliser la machine en faisant très attention de ne pas se couper.
Maintenir les mains éloignées des lames coupantes.
2.- Toujours utiliser des gants de protection pour changer les différentes lames.
DESCRIPTIONS DES PARTIES
1.- Anse tansport / Support
2.- Lames set
3.- Bloc poussoir
4.- Protecteur
5.- Poignée poussoir
6.- Base
7.- Préhension ventouses
8.- Vis préhension lames
9.- Piste de transport
10.- Plateau de nourriture
SPECIFICATIONS TECHNIQUES PRINCIPALES
Ref.: 60510
Cut epais: 5,5 cm
Tranches: 10
Dimensions: 43,2x20,2x21 cm
Poids: 5,20 Kgr.
INSTALLATION ET FONCTIONNEMENT
1.- Avant la première utilisation, nettoyer la machine afin d’éliminer les restes de graisses ou saletés ayant
pu se déposer lors de la fabrication.
2.- Vérifier que les ventouses de fixation (7) sont bien fixées à la table ou à la surface de travail choisie.
3.- Tirer du pommeau-poussoir vers l’arrière (5) et placer le bloc poussoir (3) sur la position d’origine.
4.- Placer la tomate sur le plateau des aliments (10) alignée par rapport aux lames et pousser le pommeau
vers l’avant afin de couper la tomate en rondelles
5.- Retirer la tomate du plateau et la déposer dans un récipient.
RAPPEL: Pour transporter l’appareil, et pour des raisons de sécurité, TOUJOURS utiliser la poignée de
transport (1) conçue à cet effet.
NETTOYAGE ET MAINTENANCE
1.- Dans le cas où le rail de transport (9) sèche et gêne le mouvement du plateau, utiliser un peu de
graisse résistante à l’eau et apte pour un usage alimentaire, pour le lubrifier.
À NOTER: Ne pas utiliser d’huiles végétales pour la lubrification.
2.- Pour nettoyer les lames, démonter les 6 vis de fixation (8) placées sur les deux extrémités et extraire la
lame. Les nettoyer à l’aide d’une brosse et de l’eau chaude. Une fois sèches, remonter l’ensemble des
lames et ranger dans un endroit sec et sans humidité.
3.- Pour prolonger la durée de vie et l’aiguisage des lames, utiliser ce produit tel que spécifié dans le
manuel d’instructions.
REINIGUNG UND WARTUNG
1.- Sollte die Transportschiene (9) zu trocken sein, und das Gleiten der Schale beeinträchtigen, schmieren
Sie sie mit in wenig wasserfestem Fett, das geeignet für die Benutzung mit Lebensmittel ist.
HINWEIS: Keine pflanzlichen Öle zum Schmieren verwenden.
2.- Zur Reinigung der Messer entfernen Sie die 6 Halterungsschrauben (8) an beiden Enden und nehmen
Sie die Messer heraus. Reinigen Sie sie mit einer Bürste und warmem Wasser. Wenn sie gut abgetrocknet
sind, setzen Sie die Messer wieder zusammen und verstauen Sie das Gerät an einem trockenen Ort.
3.- Um die Lebensdauer und die Schärfe der Messer zu verlängern, benutzen Sie dieses Produkt
entsprechend der Hinweise in dieser Gebrauchsanweisung.
EN TOMATO CUTTER MACHINE 10 BLADES
WARNINGS
1.- Remember the blades are very sharp. When using the machine be extremely careful to not cut yourself.
Keep hands away from the cutting blades.
2.- Always use protective gloves when replacing the different blades.
PARTS LIST
1.- Transportation/Support handle
2.- Blades set
3.- Pusher block
4.- Protector
5.- Pusher handle
6.- Base
7.- Gripping suckers
8.- Blade clamping screws
9.- Transportation track
10.- Food tray
SPECIFICATION
Ref.: 60510
Thick cut: 5,5 cm
Slice: 10
Sizes: 43,2x20,2x21 cm
Weight: 5,20 Kgr.
INSTALLATION AND OPERATION
1.- Prior to the first use, clean the machine to remove any remains of grease or dirt that may have been
generated during production.
2.- Ensure the suction cups (7) are firmly attached to the table or chosen working surface.
3.- Pull the pushing knob (5) backwards and place the pushing block (3) in the original position.
4.- Place the tomato on the food tray (10) aligned with the blades and pull the knob forward to cut the tomato
into slices.
5.- Remove the tomato from the tray and place it in a bowl.
REMEMBER: To safely transport the item, always use the carrying handle (1) that is designed for this purpose.
CLEANING AND MAINTENANCE
1.- If the carrying rail (9) dries up and interferes with the movement of the tray, use a small amount of water
resistant food grade lubricant to lubricate the rail.
NOTE: Do not use vegetable oils for lubrication.
2.- To clean the blades remove the 6 holding screws (8) that are installed at both ends and remove the blade.
Use a brush and hot water to clean the blades. Once the blades are dry, reinstall them and store in a
location that is dry and free of humidity.
3.- In order to extend the service life and preserve the sharpness of the blades, use this product as specified in
this instructions booklet.
PT MÁQUINA CORTADOR TOMATES 10 LÂMINAS
ADVERTÊNCIAS
1.- Lembre que as lâminas estão muito afiadas. Utilize a máquina com muito cuidado de não se cortar.
Mantenha as mãos afastadas das lâminas de corte.
2.- Utilize sempre luvas de proteção para trocar as distintas lâminas.
DESCRIPCIÓN DE LAS PARTES
1.- Asa de transporte / Apoyo
2.- Conjunto de cuchillas
3.- Bloque empujador
4.- Protector
5.- Pomo empujador
6.- Base
7.- Ventosas de sujección
8.- Tornillos sujección cuchilla
9.- Rail de transporte
10.- Bandeja alimentos
PRINCIPALES ESPECIFICACIONES TÉCNICAS
Ref.: 60510
Espesor corte: 5,5 cm
Rodajas: 10
Dimensiones: 43,2x20,2x21 cm
Peso: 5,20 Kgr.
INSTALACION Y FUNCIONAMIENTO
1.- Antes del primer uso, limpie la máquina para eliminar los restos de grasas o suciedades que se hayan
podido generar durante la producción.
2.- Asegúrese de que las ventosas de sujeción (7) estén bien sujetas a la mesa o superficie de trabajo escogido.
3.- Tire del pomo empujador hacia atrás (5) y coloque el bloque empujador (3) en la posición de origen.
4.- Coloque el tomate en la bandeja de alimentos (10) alineado con las cuchillas y tire del pomo hacia adelante
para laminar el tomate en rodajas.
5.- Retire el tomate de la bandeja y deposítelo en un recipiente.
RECUERDE: Para transportar el artículo, por motivos de seguridad, utilice SIEMPRE el asa de
trasporte (1) diseñado para ello.
LIMPIEZA Y MANTENIMIENTO
1.- En caso de que el raíl de transporte (9) se seque y entorpezca el movimiento de la bandeja, emplee un poco
de grasa a prueba de agua y válida para uso alimenticio, para lubricarlo.
NOTA: No utilice aceites vegetales para la lubricación.
2.- Para limpiar las cuchillas, desmonte los 6 tornillos de sujeción (8) colocados en los dos extremos y extraiga la
cuchilla. Límpielas con un cepillo y agua caliente. Una vez secas, monte el conjunto de las cuchillas
nuevamente y almacénelo en un lugar seco y libre de humedad.
3.- Para alargar la vida útil y afilado de las cuchillas, use este producto tal y como se especifica en este libro de
instrucciones.
8
3
4
7
2
6
10
9
1
5
8
3
4
7
2
6
10
9
1
5
8
3
4
7
2
6
10
9
1
5


