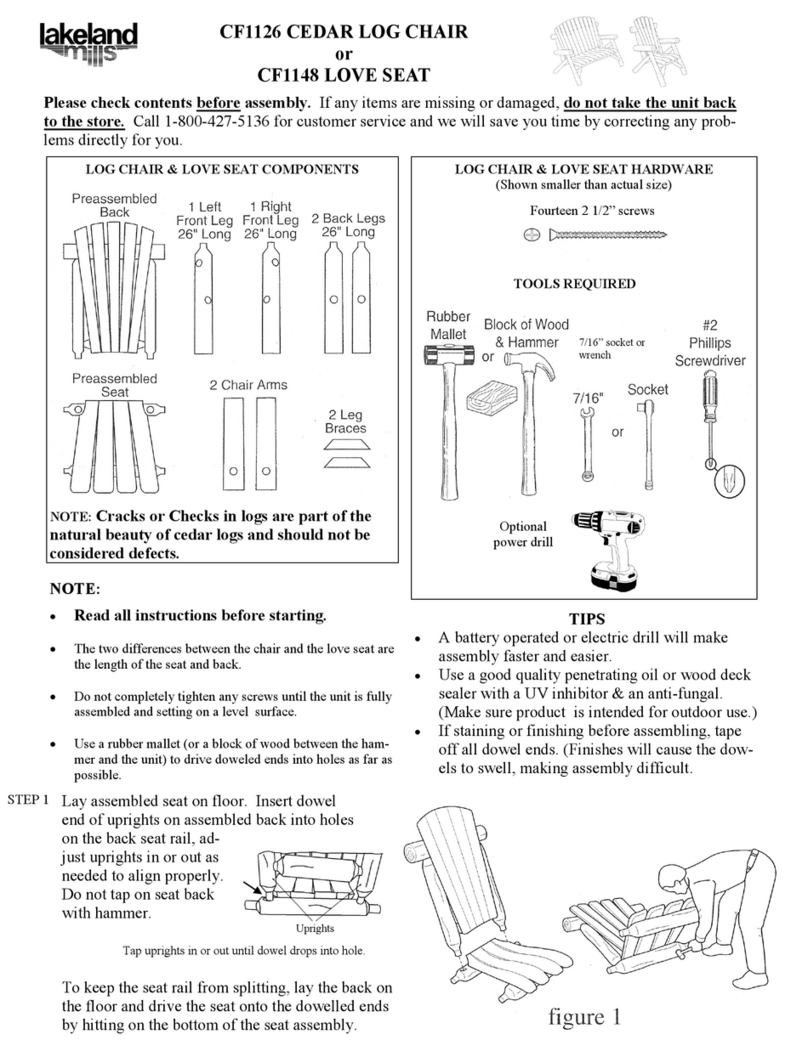
Lay assembled seat on a clean flat surface. Making sure the large
holes in the uprights of the assembled back are facing inward.
Insert the doweled end of the uprights of one of the assembled
seat backs into the holes on the back seat rail. (Adjust uprights in
or out as needed to align properly. See figure below). DO NOT
tap on seat back with hammer. To keep the SEAT RAIL from
splitting, lay the back on the ground and drive the seat on by hit-
ting on the bottom of the seat assembly. As shown in figure 2b.
Insert table supports into the holes on the front seat rail of the
assembled seat. Insert the doweled end of the rear table support
into the hole in the upright of the assembled back. Align the hole
in the upright of the remaining assembled back with the doweled
end of the rear table support and assemble as you did the first
assembled back. Align holes in the
table top with the doweled ends of
STEP 2
As shown in figure 3, insert 12” arm support into hole in arm,
then into hole in the top of the seat end. Drive the dowels in as
far as possible.
Fasten arm to frame from the back by tightening the preinstalled
lag screw into the pilot hole in the arm with a 7/16” wrench.
Repeat the process for the other arm.
STEP 3
Figure 2a
Figure 2b
Figure 4
Figure 3
Screw placement
Secure all dowel joints that you have assembled in place with
screws perpendicular to the doweled end as shown in figure 4.
Put barrel nut into side drilled hole in end of swing
bar. Position barrel nut with screwdriver and screw
in 5” eyebolt with 3/8” washer as shown in figure at
right. TIGHTEN DOWN SECURELY! Repeat
process for other swing bar.
Pre-measure and mark the arms for swing bars. Mark from the back of the
arms, 15” with pencil, as illustrated in figure 5. Fasten swing bars to side of
unit as shown. (This gives a suggested pitch of the seat. You may change the
pitch by altering the location of the lag screw in the arm.) With hammer tap a
5” lag screw through the bottom hole in swing bar and into pilot hole on seat
end. Tap a 5” lag screw through the upper hole in the swing bar and into the
arm about 1/2” deep at the place marked in pencil on the arm. Tighten down
lag screws.
STEP 4
STEP 5
STEP 6
Factory: 1 Lakeland Place, Edmore MI 48829, Phone: 800-427-5136, Fax: (989) 427-5824
www.lakelandmills.com
If you have hardware left over after completing your unit it most likely has
been assembled incorrectly and may not be safe to use. Please call customer
service at 1-800-427-5136, for assistance.
Check all nuts and bolts for tightness before and during each usage season.
Figure 5
Tap uprights in or out until dowel drops
into hole.
Uprights
Lakeland Mills recommends:
WeatherSeal Premium Oil-Based Exterior Wood Stain & Sealant
www.ContinentalProd.com
Look for videos on:
https://www.youtube.com/watch?v=LwdC2RBzv2U


