097-FIS19A_BLUE_SMART_EDC_MONO 8
IT-EN
Con questa procedura si può riportare la centrale ai parametri di default.
NOTA: verranno eliminati eventuali trasmettitori programmati
This procedure let you take the control unit back to factory settings.
NOTE: even stored transmitters will be deleted
PROCEDURA / PROCEDURE:
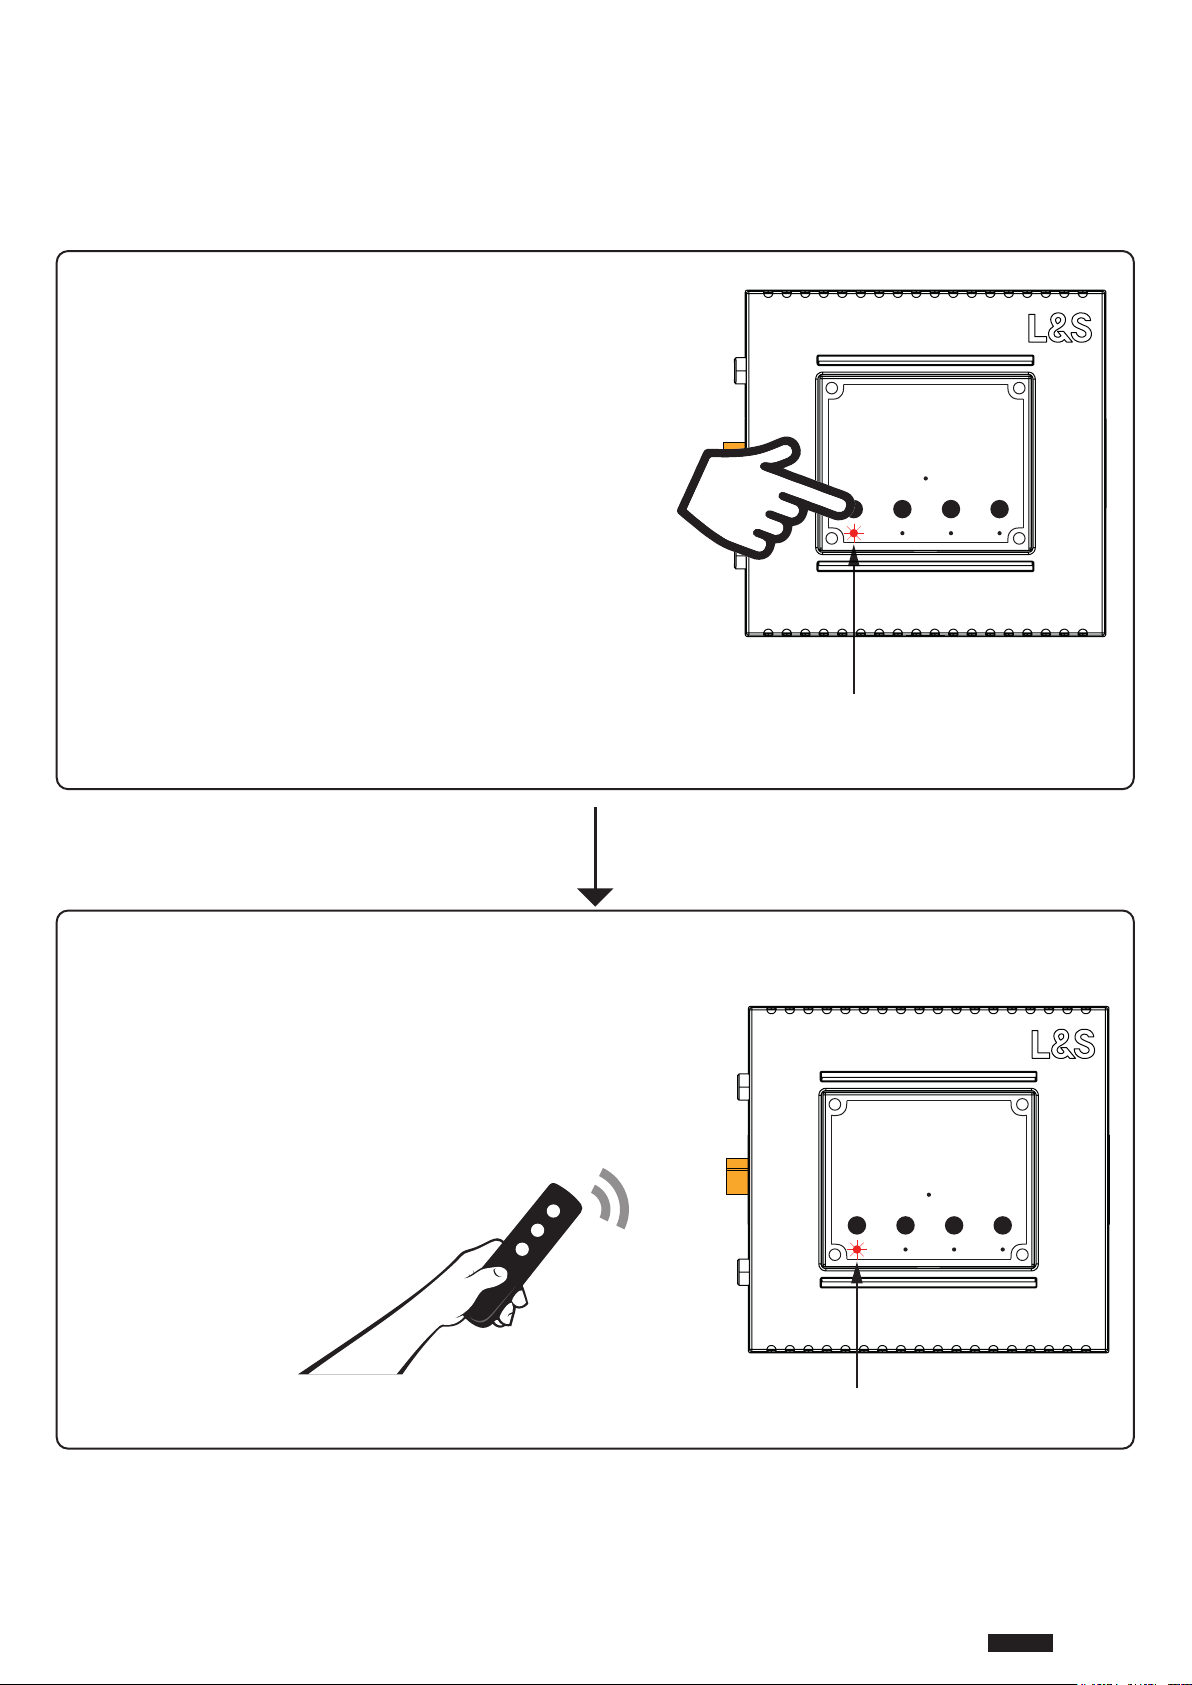
RESET DELLA CENTRALE
RESET DELLA CENTRALE
PASSO 1 / STEP 1
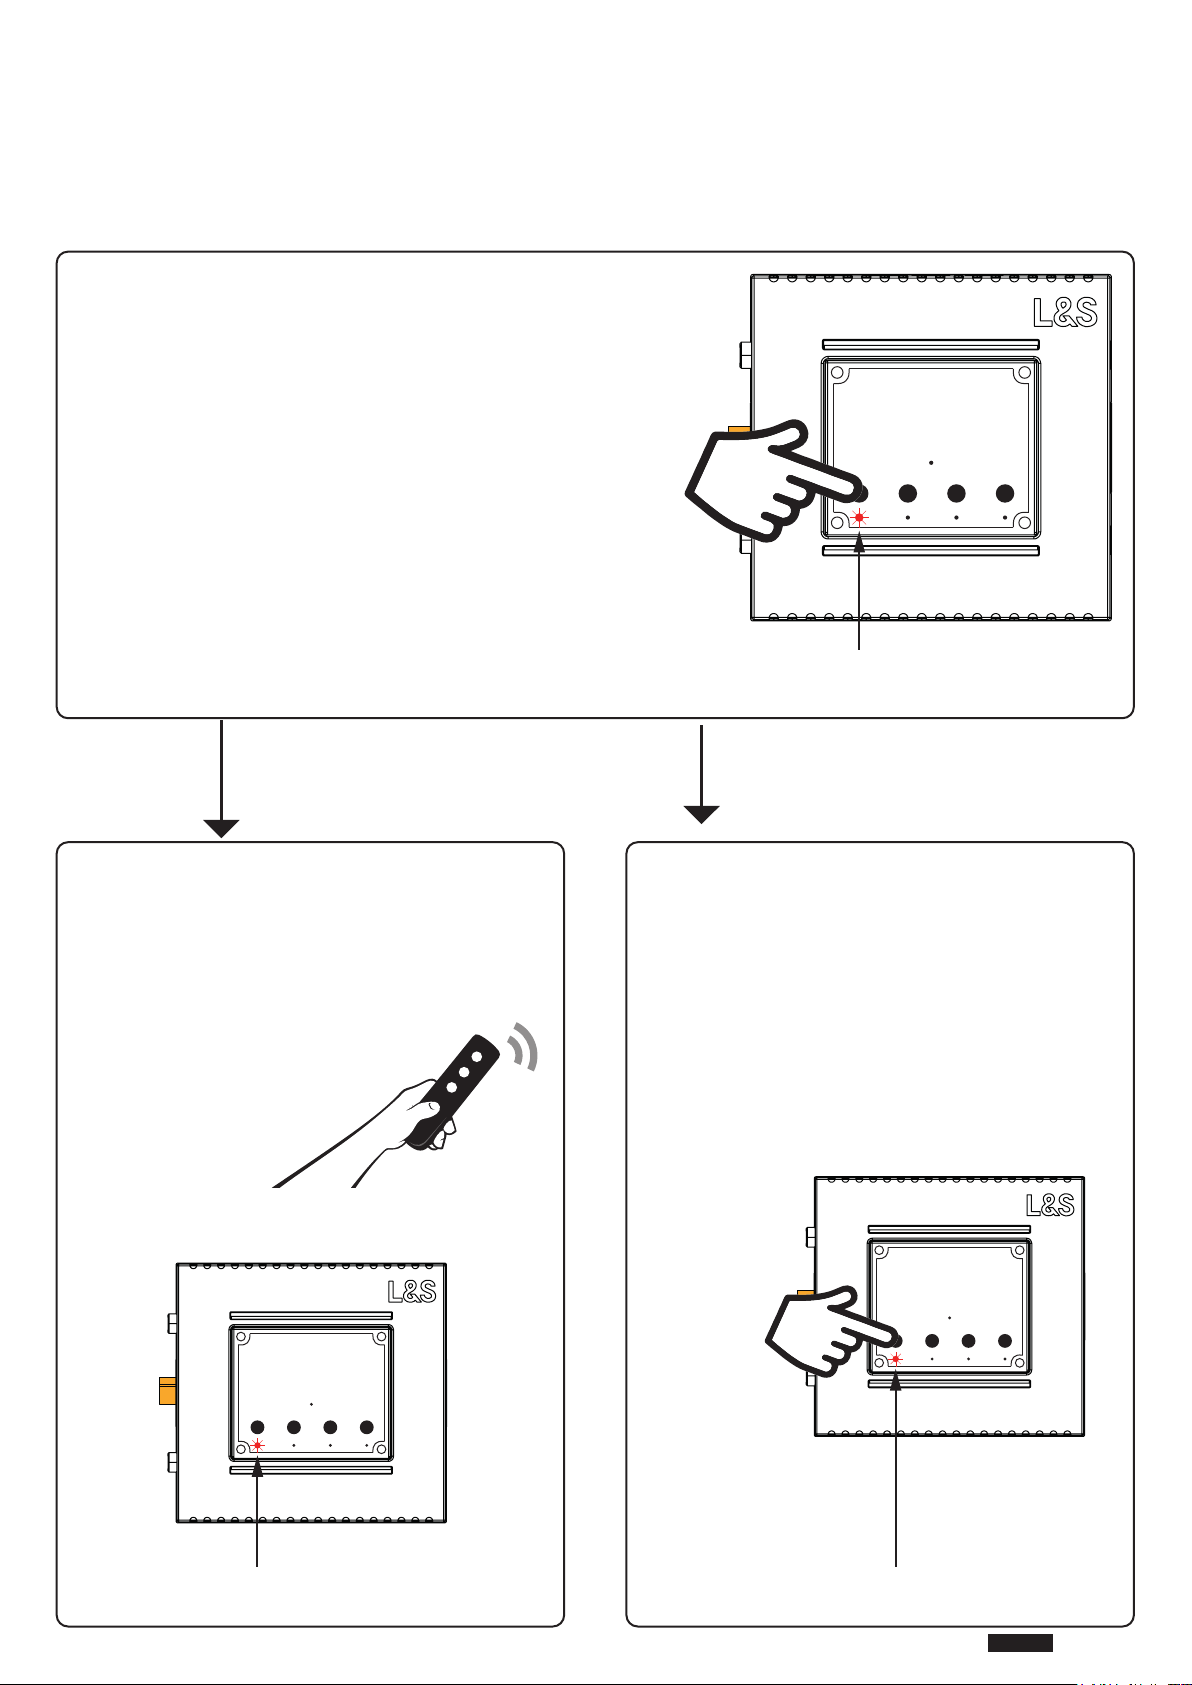
Mantenere premuto il tasto 1 (circa 5 secondi) fino a
che il led non comincia a lampeggiare.
Hold the receiver button down (about 5 seconds.) until
the LED begins to flash.
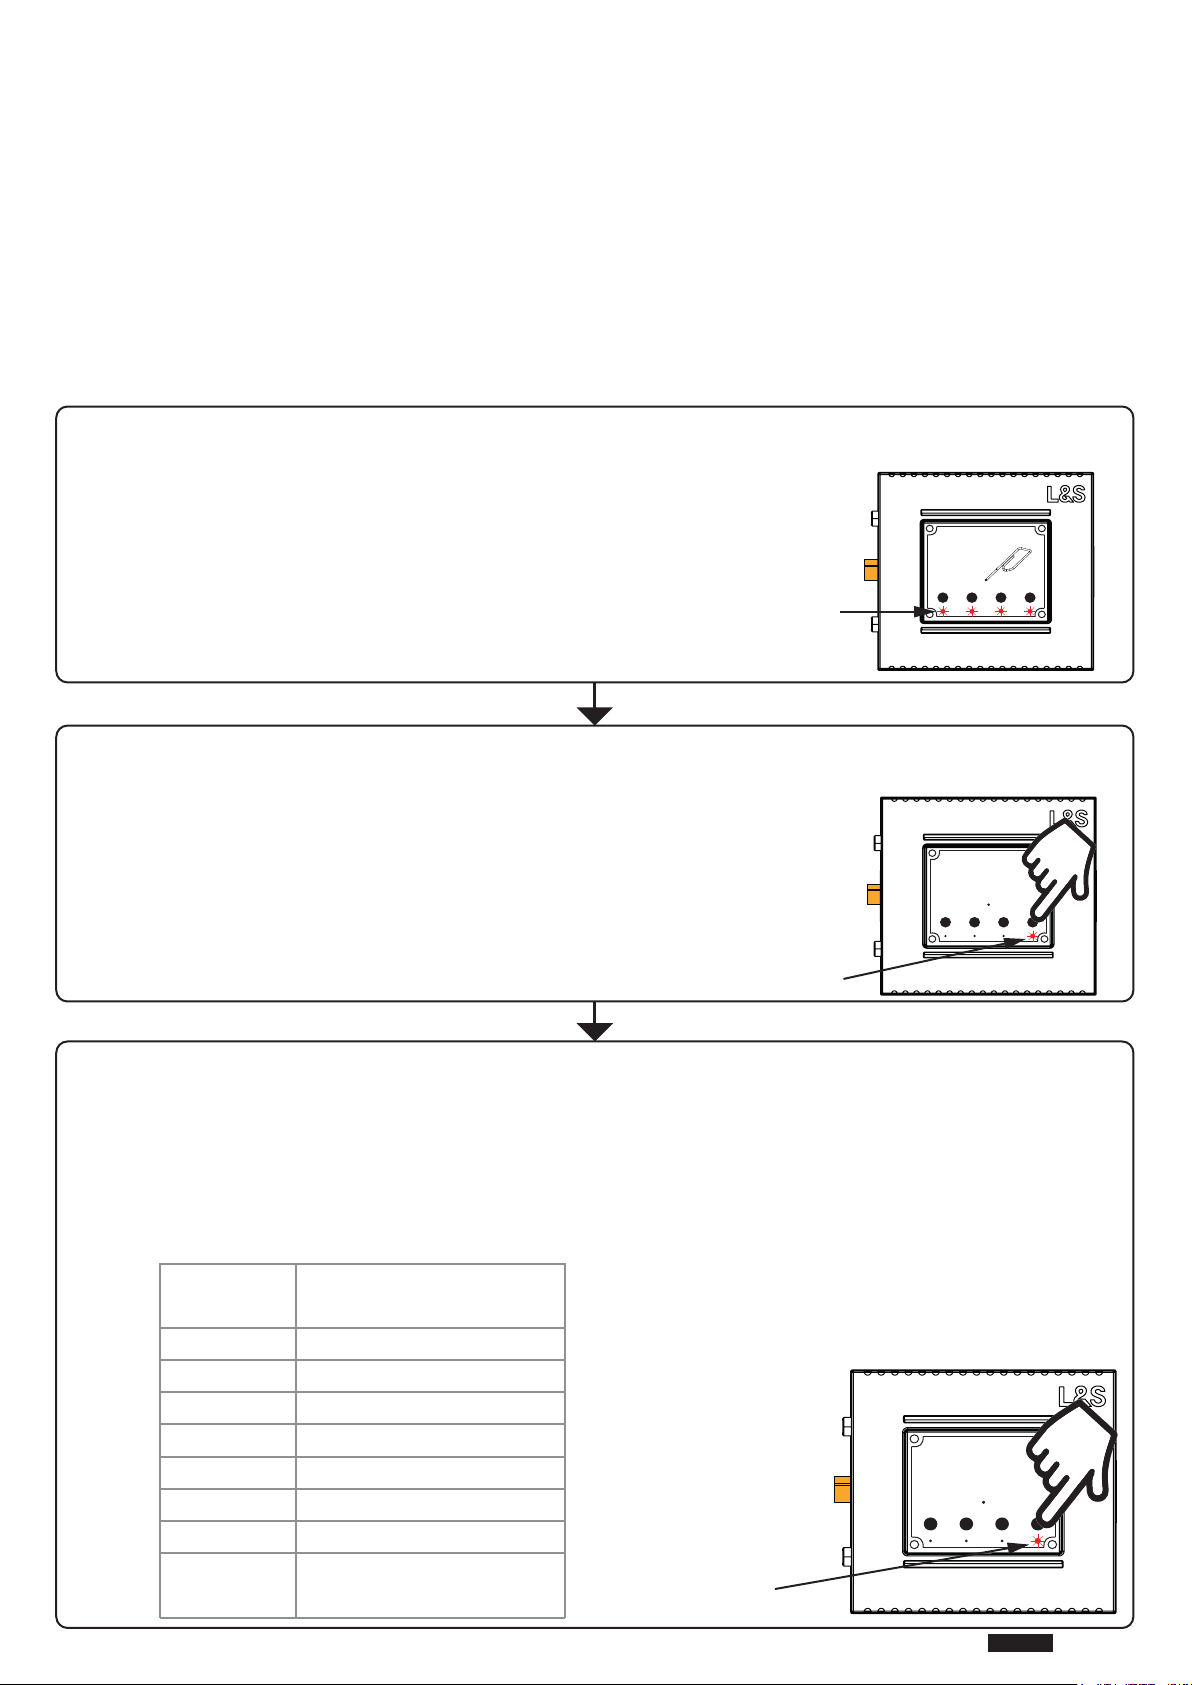
PASSO 2 / STEP 2
Entro 10 secondi, fare una pressione
breve del tasto “nascosto”.
Il led 1 fa dei lampeggi veloci e si spegne.
Within 10 seconds, make a short press of
“hidden” button.
The LED 1 flashes quickly and turns off.
FARE UNA PRESSIONE LUNGA
(circa 5 secondi)
PROLONGED PRESS
(about 5 seconds)
IL LED LAMPEGGIA
VELOCE
THE LED
FLASH QUICLY
FARE UNA
PRESSIONE BREVE
MAKE A SHORT PRESS
IL LED LAMPEGGIA
LED FLASHES
1
A
23 4
1
A
23 4
IMPORTANTE
Conservare queste istruzioni. Le istruzioni
devono essere seguite in maniera
scrupolosa durante l’installazione e l’uso.
AVVERTENZE
L’apparecchio NON DEVE essere
manomesso in alcun modo, le uniche
operazioni ammesse sono quelle indicate
dall’istruzioni d’uso.
NOTA: UTILIZZARE ESCLUSIVAMENTE
ALIMENTATORI IN CLASSE 2. (per USA e
CANADA)
Gli alimentatori elettronici che L&S utilizza
sono Plug&Play. Ogni altra connessione
alla linea principale (alimentatori diversi da
quelli forniti da L&S, alimentatori L&S
modificati) va verificata con un elettricista
qualificato.
L&S non risponde degli eventuali danni alle
persone, agli animali domestici e alle cose
causati da operazioni effettuate in modo
non conforme alle norme vigenti sul
collegamento elettrico.
LEGENDA SIMBOLI (per EUROPA)
Apparecchio in classe III.
L’alimentazione
dell’apparecchio deve essere in
bassissima tensione di
sicurezza. Utilizzare
esclusivamente alimentatori
garantiti SELV. (rif. Norma EN
61347-2-13).
DEMOLIZIONE E
SMALTIMENTO
DELL’APPARECCHIO DI
ILLUMINAZIONE
L’apparecchio va considerato
come AEE (apparecchiatura
elettrica ed elettronica) e come
tale deve essere smaltita.
Il simbolo sottoriportato i dica che
l’apparecchiatura a fine vita è da
considerarsi RAEE (rifiuto di
apparecchiatura elettrica ed elettronica).
Come tale l’apparecchio non può essere
smaltito come rifiuto urbano misto ma deve
essere conferito agli appositi centri di
raccolta allestiti dalle amministrazioni o dai
produttori che provvederanno alla raccolta
separata dei RAEE.
MANUTENZIONE
Il prodotto non contiene parti riparabili
dall’utente. In caso di guasti,far sostituire
l’intera unità.
Rivolgersi al produttore
WARNING
Save these instructions.The instructions for
use must be scrupulously complied with
during installation and use.
WARNINGS
The device MUST NOT be tampered with
in any way what so ever; no operations
other than those indicated in the
instructions for use are allowed.
NOTE: USE ONLY WITH CLASS 2
POWER UNIT. (for USA and CANADA)
L&S drivers are Plug and Play. All other
connections to the primary line voltage (via
drivers which are NOT supplied by L&S or
those which have been modified) must be
verified with a qualified electrician.
L&S cannot be held liable for any injury to
persons or pets or damage to property due
to work that is not in conformity with
current regulations regarding electrical
connection.
KEY TO SYMBOLS (for EUROPE)
Appliance in class III. The
power appliance must be very
low voltage security. Use only
power supplies guaranteed
SELV. (Standard Ref. EN
61347-2-13).
DEMOLITION AND DISPOSAL
OF THE LIGHTING
APPLIANCE
The appliance should be
considered as EEE (electrical
and electronic equipment) and
must be disposed of as such.
The symbol shown below indicates that at
the end of its life the equipment is to be
considered WEEE (waste electrical and
electronic equipment).
As such the appliance may not be
disposed of as mixed municipal waste, but
must be taken to the special collection
centres set up by the local au¬thorities or
by the manufacturers, who will arrange for
the separate collection of WEEE.
MAINTENANCE
The product does not contain any parts
that should be repaired by the user. In the
event of a defect, replace the entire
assembly.
Contact the manufacturer.
WICHTIG
Diese Anweisungen Aufbewahren. Die
Montageanweisungen müssen
gewissenhaft befolgt werden während der
Installierung und der Verwendung.
HINWEISE
Das Gerät DARF IN KEINER WEISE
verändert werden, die einzig zulässigen
Vorgänge sind in der Gebrauchsanleitung
beschrieben.
HINWEIS: VERWENDEN SIE HUR
NETZGERÄTE IN KLASSE 2. (für USA
und KANADA)
Die elektronischen Netzgeräte, die L&S
verwendet, arbeiten mit Plug&Play. Jeder
andere Anschluss an die Hauptleitung
(Netzgeräte, die sich von den von L&S
gelieferten unterscheiden, veränderte
Netzgeräte von L&S) muss durch einen
Fachelektriker geprüft werden.
L&S haftet nicht für Personen-, Tier- und
Sachschäden, die durch Arbeiten befugten
Personals aber unter Nichtbeachtung der
geltenden.
ZEICHENERKLÄRUNG (für EUROPA)
Gerät der Klasse III. Die
Speisung des Geräts muss
durch
Niedervolt-Sicherheitsspannung
erfolgen. Ausschließlich
Netzgeräte verwenden, die
SELV. (Ref.-Norm EN
61347-2-13).
ENTSORGUNG UND
VERSCHROTTUNG DES
BELEUCHTUNGSGERÄTS
Das Gerät wird als EEG
(elektrische und elektronische
Geräte) angesehen und muss
dementsprechend entsorgt
werden.
Das nachstehend gezeigte Symbol
bedeutet, dass das unbrauchbar
gewordene Gerät als EAG (elektrische und
elektronische Altgeräte) anzusehen ist.
Als solches kann das Gerät nicht als
gemischter Siedlungsmüll entsorgt werden,
sondern muss einer von Stadt- und
Gemeindeverwaltungen eingerichteten
Sammelstelle oder dem Hersteller
übergeben werden, die eine getrennte
Entsorgung der EAG veranlassen.
INSTANDHALTUNG
Das Produkt enthält keine vom Benutzer zu
reparierenden Teile. Bei einem Defekt die
komplette Baugruppe austauschen lassen.
Den Hersteller kontaktieren.
IMPORTANTE
Conservar estas instrucciones. Debe seguir
escrupulosamente las instrucciones de uso
durante la instalación y el uso.
ADVERTENCIAS
El aparato NO DEBE ser manipulado de
ningún modo; las únicas operaciones
admitidas son las que se indican en las
instrucciones de uso.
ATENCIÓN: UTILIZAR SÓLO CON
UNIDAD DE POTENCIA DE SEGUNDA
CLASE. (para EUROPA y CANADÁ)
Las unidades de suministro eléctrico que
utiliza L&S son Plug&Play. Cualquier otro
tipo de conexión a la línea principal
(dispositivos diferentes a los que L&S
suministra o dispositivos L&S modificados)
debe verificarse con un electricista
calificado.
L&S no se responsabiliza de los posibles
daños a personas, animales o cosas
provocados por operaciones realizadas de
manera no conforme a las normas vigentes
sobre la conexión eléctrica.
LEYENDA DE SÍMBOLOS (para EUROPA)
Aparato de clase III. La
alimentación del aparato debe
ser a muy baja tensión de
seguridad. Utilizar
exclusivamente unidades de
suministro garantizadas de
categoría SELV. (ref. Norma EN
61347-2-13).
DEMOLICIÓN Y ELIMINACIÓN
DEL APARATO DE
ILUMINACIÓN
El aparato debe considerarse
AEE (aparato eléctrico y
electrónico) y eliminarse como
tal.
El símbolo de abajo indica que, al final de
su vida útil, el aparato debe considerarse
RAEE (residuo de aparato eléctrico y
electrónico).
Como tal, el aparato no puede ser
eliminado como residuo urbano, sino que
se debe entregar a centros de recogida
habilitados por las administraciones o por
los fabricantes, que se encargarán de la
recogida selectiva de los RAEE.
MANTENIMIENTO
El producto no contiene piezas que
puedanser reparadas por el usuario. En
caso de defecto se ha de sustituir el módulo
completo.
Ponerse en contacto con el fabricante.
MPORTANT
Conserver ces instructions. Ces consignes
d’utilisation doivent être scrupuleusement
respectées au cours de l’installation et de
l’utilisation.
AVERTISSEMENTS
L'appareil NE DOIT être altéré en aucune
manière, les seules opérations admises sont
celles indiquées dans le mode d'emploi.
NOTE : N’UTILISER QU’AVEC UN BLOC
D’ALIMENTATION DE CLASSE 2. (Pour les
USA et le CANADA)
Les alimentateurs électroniques utilisés par
L&S sont de type Plug&Play. Toute autre
connexion à la ligne principale
(alimentateurs non fournis par L&S,
alimentateurs L&S modifiés) doit faire l'objet
d'une vérification par un électricien qualifié.
L&S ne répondra pas des éventuels
dommages sur les personnes, les animaux
domestiques et les biens, provoqués par
des opérations effectuées de manière non
conforme aux normes en vigueur en matière
de branchement électrique.
LÉGENDE DES SYMBOLES (pour
l’EUROPE)
Appareil de classe III.
L'alimentation de l'appareil doit
être à très basse tension de
sécurité. Utiliser exclusivement
les alimentateurs garantis SELV.
(réf. Norme EN 61347-2-13).
DÉMOLITION ET ÉLIMINATION
DE L'APPAREIL D'ÉCLAIRAGE
L'appareil doit être considéré
comme un EEE (équipement
électrique et électronique) et doit
être éliminé comme tel.
Le symbole ci-dessous indique que
l'appareil, à la fin de sa vie, doit être
considéré comme un DEEE (déchet
d'équipement électrique et électronique).
Comme tel, l'appareil ne peut être éliminé
comme déchet urbain mixte, mais doit être
remis aux centres de collecte prévus à cet
effet par les administrations ou par les
fabricants qui procèderont à la collecte
séparée des DEEE.
ENTRETIEN
Le produit ne contient aucune pièce à
réparer par lutilisateur. En cas de défaut,
faire remplacer le module complet.
Contacter lefabricant.
IT EN DE SPFR