Launch EST100 User manual

Owner’s Manual
EST100 - Battery charger and stabilizer

INSTRUCTION
It is of utmost importance that before using your charger, you read this manual and follow
the safety and operating instructions exactly. Keep the battery and charger protected.
CAUTION!
CAUTION!
Combustible gas will be produced when charging, fire is strictly prohibited at the operating site .
ATTENTION!
CAUTION!
This machine can only charge the rechargeable battery, one-time battery charging is strictly
prohibited. Battery specifications have to be matched otherwise it may bring damage to the battery
and charger even explosion. If battery acid splash skin, eye or clothing, wash immediately with
soap and water. Seeking for medical attention if necessary.
WARNING!
WARNING!
Usage of charger:
1. When the battery and charger are connected, try to make full use of the clip length and keep
the charger and battery as far apart as possible.
2. Do not place the charger directly on the battery.
3. Keep ventilation.
There are WARNING labels printed on the top of machine. Please strictly control the working
environment to meet the requirements when using the machine. Otherwise, it may damage the
charger or other devices which connected to charger, more seriously may endanger personal safety.
It’s best to use our accessories, Do not repair the machine by yourself. Please make contact with
our professions if replacement required. Before using, Please ensure that the appearance of the
machine is complete, there is no obvious bump, so as to avoid internal short circuit caused by
bumps and other issues.
Power supply voltage as well as wire size should in strict accordance with the charger nameplate.
Positive and negative of charge clip can not be reversed, to keep the charger clean. All cables
should be placed neatly. After using, Not only to turn off the machine switch, but also to unplug
the socket for insurance purposes. Do not open the cover with electricity charged for
maintenance, please contact our professional before open it.
Keep the machine from children when it running. Pay attention to earthing and avoid electric
shock. Please keep watched when the machine working, so as to avoid problems. Pay attention
to ventilation.
4. The power supply and charging clip are connected correctly.
AA-Equipment Support
1e Tussendijk 17, 5705 CG Helmond (NL)
+31 (0) 492 525 717

6. It takes a long time to fully charge the battery. Please be patient.
7. Batteries with short-circuit internal unit can not be charged.
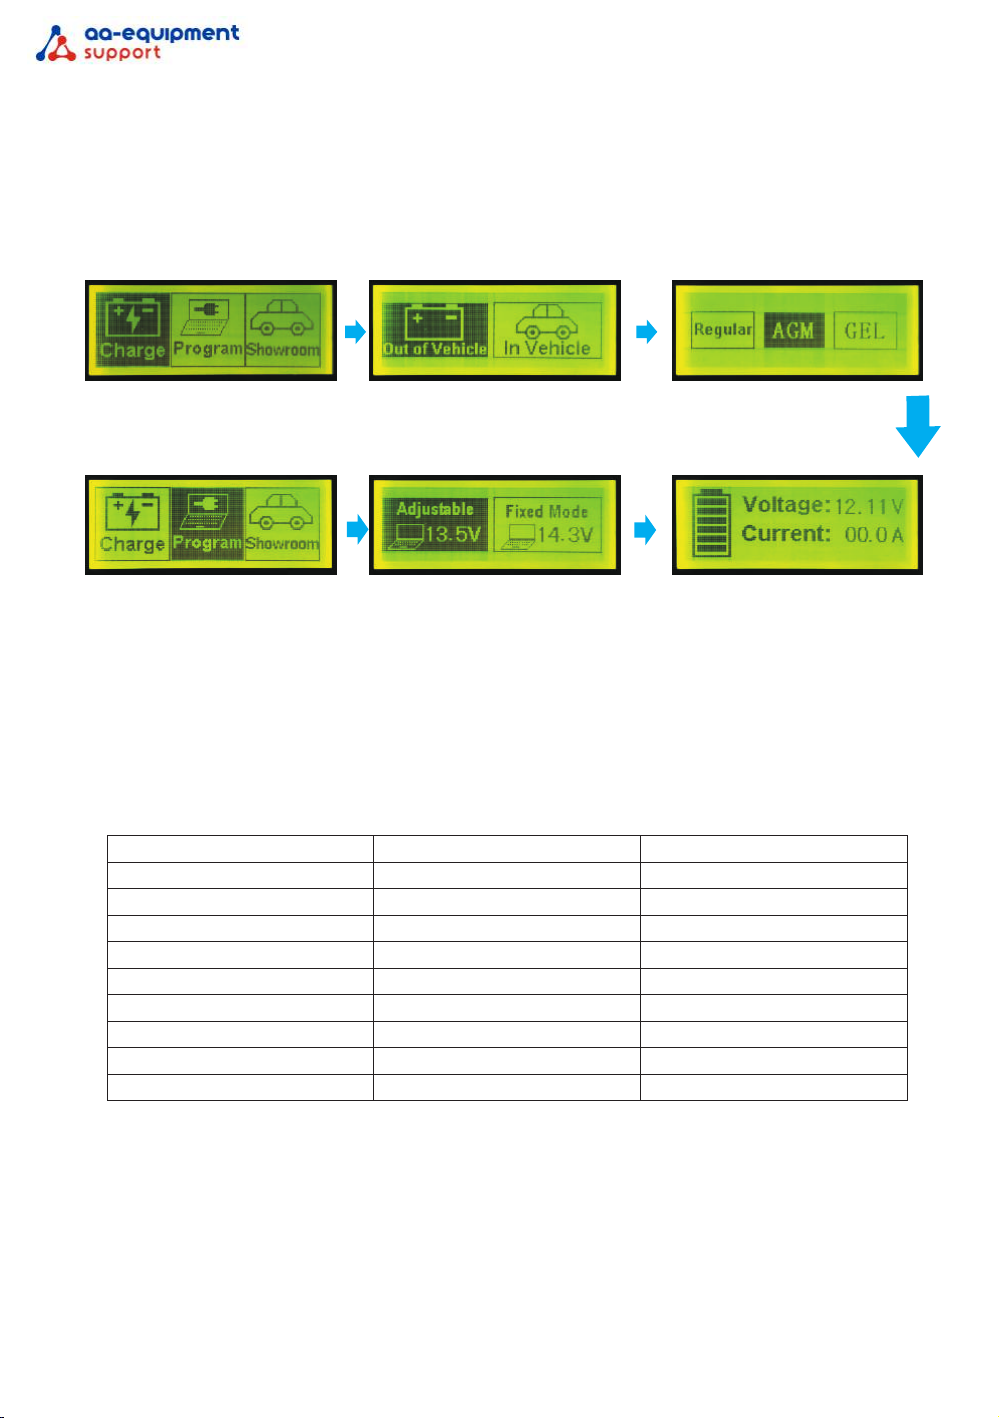
Different working modes:
5. During the normal charging process, to stop charging, please press the Enter / Stop key first,
then unplug the charging clip. Avoid disconnecting the power outlet directly.
Charging mode: The regular mode for battery under normal condition. The long-time-placed or
severe leakage of battery may need to force to start and repair. When charging mode is selected,
you need to select whether the battery inside the car or outside the car, and the machine will make
a slightly different treatment depending on the selection. Then you should choose the type of
battery to make a different charging voltage and current. Make the right choice, allowing to protect
charger effectively and work efficiently.
Programming mode: To provide a stable voltage source for the car in need of system programming
or decoding. You need to full-charged the battery, to avoid the voltage instability caused by
charging. This machine can adjust the programming voltage according to need, voltage range of
12-16V can be directly selected, please operate properly. A stable voltage source allows for better
system programming and decoding.
Exhibit mode: Prevent from battery power shortage of the car due to long-term placement, could
not be used in a crucial time and cause serious leakage. When choosing this mode, According to
need, continue to charge the battery in small current to ensure that the battery has been in full
power state.
Dispose remainder:
Suggesting that the clip is in poor contact. If it still shows the clip in poor contact when the charge
clamp is normally connected and the battery voltage is above 5V, remove the battery clip, clean
the electrode and reconnect. If it doesn’t work, please press the enter key for a while to force start c
harging. If there is no current for a long time, please contact our after-sales personnel.
Suggesting that temperature is too high. If in that case, please remove the charging clip, no need to
turn off the machine, place it for a while, it will cancel the alarm automatically and return to
interface when the temperature is normal. If it shows excessively high temperature when you just
started the machine, do not use and contact our After-sales service.
Suggesting that the current is too high. This situation due to serious battery loss or weighting the
battery when it is charging. If the loss is too serious, in this case, adjust the voltage to 12V to make
charging. Switch to normal charging when the current is lower than 8A.
If you are prompted that the battery is reversed, unplug the battery clip, make sure the charging clip
is properly connected.
If it shows battery is damaged, please replace it.
If it shows battery is full-charged and easily to consume, it means a damaged battery, please replace it.
Before turning on the power, make sure that the voltage is normal , the socket is in the right size
and the battery is intact. For the different functions required, operate the machine correctly and
select the appropriate operating mode:
Hidden repair mode: This mode will indicate whether the battery should be repaired according to
judgment from charger, please select the mode manually and follow instruction when repair needed.
AA-Equipment Support
1e Tussendijk 17, 5705 CG Helmond (NL)
+31 (0) 492 525 717

Operation panel is as follows:
1.
2
Right / Left
Up / Down
Switch
Monitor
Over Charge Protection
Over Heat Protection
Low Voltage Protection
Short Circuit Protection
Revert Polarity Protection
.
3.
4.
5.
6.
7.
8.
9.
Over heat protection: It will automatically stop charging when the machine is over heat.
The internal fan works.
Low Voltage Protection: When the input voltage is lower than required, the machine will not
work.
Short circuit protection: Battery is damaged. The machine will not work when Internal part short
circuit.
Revert Polarity Protection: The LCD displays when the battery clip is reversed.
ON/OFF: If the charging clamp is in bad contact, press the key to enter the forced start mode.
Use left and right keys to switch options, up and down keys to the previous step and the next step.
Press the start stop button to start and halt.
Overcharge protection: In the charging process, the machine will constantly detect the
battery state to prevent damage from overcharging.
When adjust the programming voltage, you need to select the adjustable mode, then press right
and down buttons at the same time, after you hear the warning tone, you can use the up and down
keys to set voltage. After setting, press the right and down keys again to logout, then press ON
to start.
1
2
3
4
9876 5
English switching:
STOPKEY+RIGHTKEY+LEFTKEY!
AA-Equipment Support
1e Tussendijk 17, 5705 CG Helmond (NL)
+31 (0) 492 525 717

Operation procedure:
The machine will automatically adjust the charging voltage and current during charging process.
Specification data
Item
Input Voltage
Rate
Input Power
MAX
Charging Voltage
Programming mode
MAH
Demension
Weight
Unit
V
Hz
W
RM S
v
PG V A
Ah
cm
Kg
Choose programming mode Programming mode 1 or 2 is
available for option.
Indicate the present status
of voltage and current
Choose the position mode,on vechicle
or outside vechicle
Choose the type of rechargeable
battery,Ordinary,AGM or GEL
Choose charge m ode
2~16V/2~100A
220 - 2 40V
50/60
1200W
100 A
12
10~1 2 0 0
43×35×1 4
8.5
Note: This charger should not be used as a substitute for battery, If it is
necessary to replace battery, a spare barttery must be connected
EST-100
AA-Equipment Support
1e Tussendijk 17, 5705 CG Helmond (NL)
+31 (0) 492 525 717
Table of contents
Other Launch Batteries Charger manuals