LawnMaster CLBL6015ACE User manual
Instruction Manual
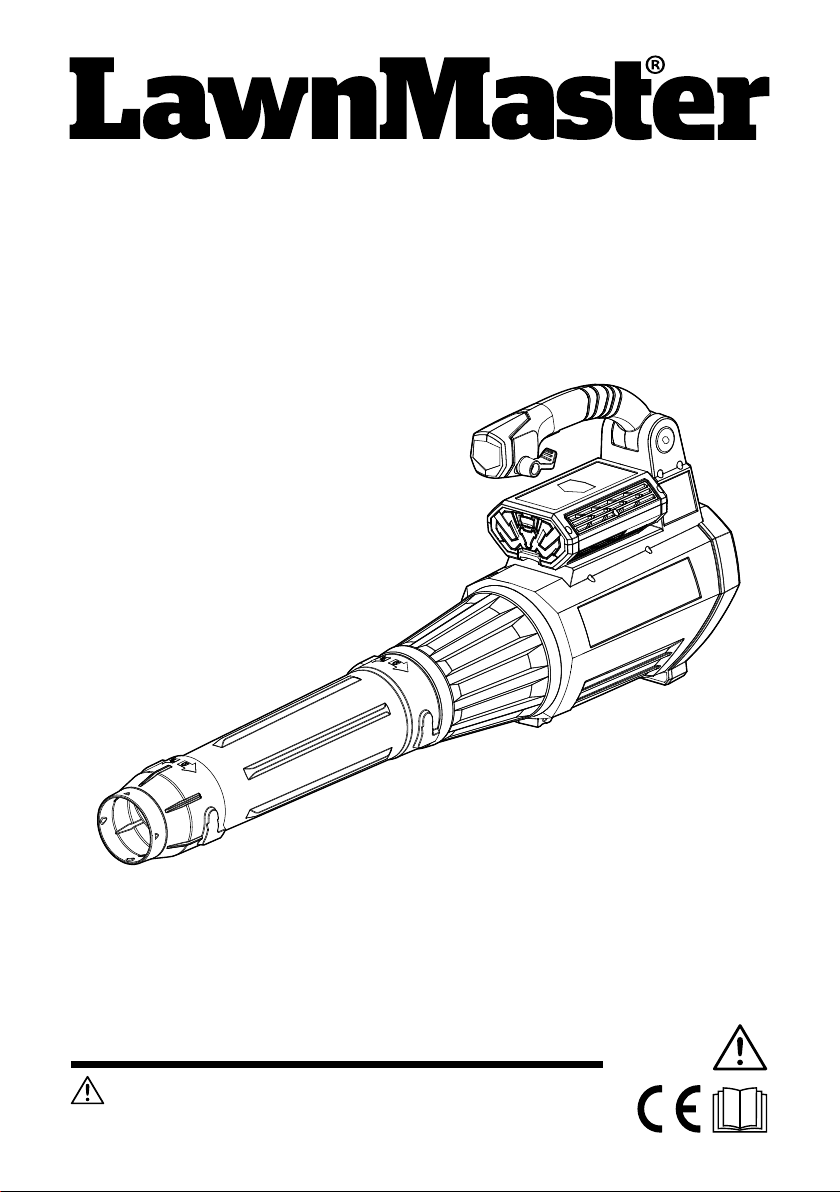
60V Max* Lithium-Ion Cordless Brushed Blower CLBL6015ACE
Read all safety instructions carefully before assembling and operating
this machine. Ensure the machine has been assembled correctly and safely. Keep the
instructions safe and pass them on to any subsequent user so that the information is always
available.
WARNING:
Original Instructions


97
1
3
4
65
2
8

4
TABLE OF CONTENTS
Section Page
Symbols
Safety Information
In the Box
Assembly
Operation
Maintenance
Troubleshooting
Specications
Recycling and Disposal
5-6
7-13
13
14
15-17
18
19
20
21
5
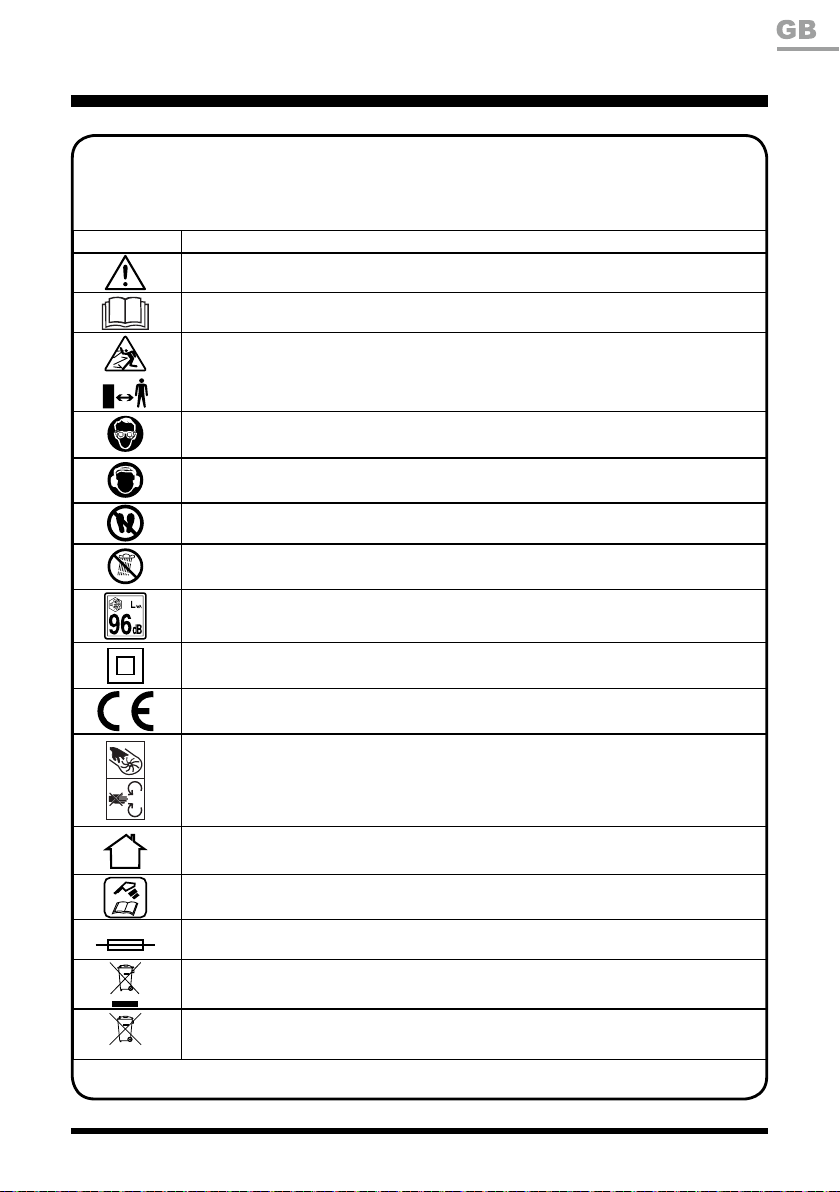
SYMBOL DESIGNATION/EXPLANATION
Caution
Read instruction manual.
Keep bystanders away.
Wear eye protection.
Wear hearing protection.
Do not use as a step.
Do not expose to rain.
Noise level specication Lwa in dB(A).
Protection Class II.
The product complies with the applicable European directives and an evaluation
method of conformity for these directives was followed.
Keep hands away.
Only recharge battery packs with the supplied charger indoors.
Disconnect the battery pack before any repair or maintenance.
Fuse.
Do not dispose of electrical equipment in domestic waste.
Batteries contain Li-ion, waste batteries should be sorted for ecofriendly disposal.
Do not dispose of waste batteries as unsorted municipal waste.
SYMBOLS
The following warning symbols appear throughout this manual and indicate the
appropriate safety measures you should take when operating and maintaining the
appliance.
T/3.15A
Li-ion

6
SYMBOLS
SYMBOL DESIGNATION/EXPLANATION
Do not dispose of battery packs in rivers or immerse in water.
Do not dispose of battery packs in re.
Do not subject the battery to direct sunlight over long periods and do not leave it
on or near a heat source (max. 60°C).
Recycle electrical waste products in an environmentally safe way where facilities
exist.
To avoid serious personal injury, do not attempt to use this product until you read thoroughly and
understand completely the instruction manual.
If you do not understand the warnings and instructions in the instruction manual, do not use this
product.
WARNING

7
SAFETY INFORMATION
READ CAREFULLY BEFORE USE. KEEP FOR FUTURE
REFERENCE.
WARNING
Training
■ Read the instructions carefully. Be familiar with the controls
and the correct use of the machine.
■ Never allow children, persons with reduced physical,
sensory or mental capabilities or lack of experience and
knowledge or people unfamiliar with these instructions to
use the machine, local regulations may restrict the age of
the operator.
■ Keep in mind, that the operator or user is responsible for
accidents or hazards occurring to other people or their
property.
■ Do not allow the machine to be used as a toy. Close
attention is necessary when used by or near children.
■ Do not handle battery or blower with wet hands.
■ Do not expose the blower to rain.
Preparation
■ While operating the machine always wear substantial
footwear and long trousers. Do not operate the machine
when barefoot or wearing open sandals. Avoid wearing
clothing that is loose tting or that has hanging cords or
ties.
■ Operate the machine in a recommended position and only
on a rm, level surface.
■ Do not operate the machine on a paved or gravel surface

8
SAFETY INFORMATION
where ejected material could cause injury.
■ Before using, always visually inspect to see, that the
fasteners are secure, the housing is undamaged and
that guards and screens are in place. Replace worn or
damaged components in sets to preserve balance. Replace
damaged or unreadable labels.
■ Never operate the machine while people, especially
children, or pets are nearby.
■ Do not leave the Blower working unattended .
■ To prevent dust irritation the wearing of a face mask is
recommended.
Operation
■ Keep your face and body away from the air intake opening.
■ Wear eye and hearing protection.
■ Do not allow hands or any other part of the body or clothing
near any moving part.
■ Keep proper balance and footing at all times. Do not
overreach.
■ If the machine should start making any unusual noise or
vibration, immediately allow the machine to stop. Remove
the battery pack and take the following steps before
restarting and operating the machine:
i) inspect for damage;
ii) replace or repair any damaged parts;
iii) check for and tighten any loose parts.
■ Keep the battery pack clean of debris and other
accumulations to prevent damage to the battery pack or
possible re.
■ Stop the machine, and remove the battery pack from the

9
SAFETY INFORMATION
blower. Make sure that all moving parts have come to a
complete stop
- whenever you leave the machine,
- before checking, cleaning or working on the machine.
■ Handle the unit with care. Clean the ventilation slots
regularly; follow the maintenance instructions.
■ Do not overload your device. Work only within the indicated
range of performance. Do not use your device for purposes
for which it has not been designed.
■ Do not attempt to repair the Blower yourself unless you are
qualied to do so.
■ Turn off all controls before removing battery.
Maintenance and storage
■ When the machine is stopped for servicing, inspection,
or storage, or to change an accessory, Stop the machine,
and remove the battery pack from the blower and make
sure that all moving parts are come to a complete stop.
Allow the machine to cool before making any inspections,
adjustments, etc. Maintain the machine with care and keep
it clean.
■ Store the machine in a dry place out of the reach of
children.
■ Always allow the machine to cool before storing.
■ Replace worn or damaged parts for safety. Only use
replacement parts and accessories supplied and
recommended by the manufacturer. Using third-party parts
will immediately invalidate the guarantee.
■ Store the blower, the charger and the battery at a
temperature between 0°C and 25°C.

10
SAFETY INFORMATION
Battery Safety Information
■ Recharge only with the charger specied by the
manufacturer. A charger that is suitable for one type of
battery pack may create a risk of re when used with
another battery pack. Incorrect use may result in electric
shock, overheating or leakage of corrosive liquid from the
battery.
■ Do not place appliances or their batteries near re or heat
sources. Continuous intense sunlight, re or other heat
sources may cause an increased danger of explosion.
■ Do not crush, drop or damage the battery pack. Do not
use a battery pack or charger that has been dropped or
received a sharp blow. A damaged battery is subject to
explosion. Properly dispose of a dropped or damaged
battery immediately.
■ Batteries can explode in the presence of a source of
ignition, such as a pilot light.
■ To reduce the risk of serious personal injury, never use
any cordless product in the presence of an open ame.
An exploded battery can propel debris and chemicals. If
exposed, ush with water immediately.
■ Do not charge battery in a damp or wet location. Following
this rule will reduce the risk of electric shock.
■ For best results, your battery tool should be charged in a
location where the temperature is more than 4°C but less
than 40°C.
■ Under extreme usage or temperature conditions, battery
leakage may occur. If liquid comes in contact with your
skin, wash immediately with soap and water. If liquid gets
into your eyes, ush them with clean water for at least 10

11
SAFETY INFORMATION
minutes, then seek immediate medical attention.
■ When the battery pack is not in use, keep it away from
other metal objects like: paper clips, coins, keys, nails,
screws, or other small metal objects that can make a
connection from one terminal to another. Shorting the
battery terminals together may cause sparks, burns, or a
re.
■ Do not open up the battery and avoid mechanical damage
to the battery. Risk of short circuit and fumes may be
emitted. Ensure fresh air and seek medical assistance in
the event of discomfort.
■ Always remove battery pack before storing the device.
When battery becomes fully charged, unplug the charger
from the power supply and remove the battery pack from
the charger.
■ Keep battery pack dry, clean, and free from oil and grease.
Always use a dry cloth when cleaning. Never use brake
uids, gasoline, petroleum-based products, or any solvents
to clean battery pack.
Charger Safety Information
■ Ensure the battery pack is charged indoors only, in a dry,
cool and well ventilated environment.
■ Do not use non-rechargeable batteries!
■ Do not operate the charger with a damaged cord or plug,
which could cause shorting and electric shock. If damaged,
immediately discontinue use. Replace the charger with the
identical unit as listed in the Product Specications in this
manual. If the power cord for this equipment is damaged, it
must be replaced by the manufacturer, a customer service

12
SAFETY INFORMATION
agent of the same or a fully qualied personal in order to
prevent hazards.
■ The plug of the charger must match the outlet. Never
modify the plug in any way. Unmodied plugs and matching
outlets will reduce the risk of electric shock.
■ Allow a hot battery to cool before charging.
■ Before each use, check the charger, cable and plug. Do
not use a defective charger and do not disassemble the
charger. Incorrect reassembly may result in the risk of re,
electric shock or electrocution.
■ Protect the charger against moisture and wet conditions.
There is a danger of electric shock.
■ Operate the charger only with the appropriate original
batteries. Charging other batteries may result in injuries
and risk of re.
■ Keep the cord away from heat, oil, sharp edges or moving
parts. Damaged or entangled cords increase the risk of
electric shock.
■ Do not use a charger that has been dropped or received a
sharp blow.
■ The voltage indicated on the charger rating plate must
correspond to the voltage of the power source.
■ Never touch the mains plug with wet hands.
Double Insulation
Double insulation is a concept in safety in electric power tools.
All exposed metal parts are isolated from the internal metal
motor components with protecting insulation.

13
SAFETY INFORMATION
Intended Use
This product is intended for private domestic use only, not for
any commercial trade use.
It must not be used for any purposes other than those
described. Any use of the machine that deviates from its
intended use and is not included in these instructions is
considered unauthorised use and relieves the manufacturer
from his or her legal liability.
IN THE BOX
1. Handle
2. Trigger Switch
3. Cruise Control lever
4. Blower Tube
5. Debris Scraper
6. Concentrator Nozzle
7. Instruction Manual
8. Battery Pack
9. Battery Charger

14
ASSEMBLY
Assembly Preparation
■ Carefully remove all contents from the product packaging.
■ Ensure you have all the accessories and tool(s) needed for assembly and operation. This also
includes suitable personal protective equipment.
Blower Assembly (See Fig. 1)
■ Insert the widest end of the blower tube onto the mounting clips located on the blower motor
unit.
■ Align the locking mechanism and turn clockwise to secure into place. The blower tube can only
be attached one way.
■ Insert the concentrator nozzle into the blower tube and turn clockwise to lock into place.
Installing/Removing the Battery Pack (See Fig. 2)
IMPORTANT! Before using the blower, read all safety precautions and follow the instructions in
the Battery Pack and Charger section. If storing for a prolonged period of time, remove the battery.
■ Replace the battery pack or the charger immediately if the battery case or charger cord is
damaged.
■ Verify that the switch is in the OFF position before inserting or removing the battery pack.
■ Verify that the battery pack is removed and the switch is in the OFF position before inspecting,
adjusting, or performing maintenance on any part of the blower.
■ Read, understand, and follow the instructions contained in the section entitled Battery Pack
Operation and Charger Operation.
To Install the Battery Pack (Fig. 2)
■ Align the support rails located on the battery chamber with the guide rails on the battery pack.
■ Slide the battery pack fully towards the handle until the latch locks into place. Ensure it is
secured.
To Remove the Battery Pack (Fig. 2)
Press the release button on the battery pack and remove it from the product in the reverse action
to installing.
NOTE: The battery pack ts onto the blower snugly in order to prevent accidental dislodging.
Follow these instructions in order to avoid injury and to reduce the risk of electric shock or re:
WARNING

15
OPERATION
LEDs on battery
(Continuous lighting)
Battery Capacity
Green 50%~100%
Orange 25%~ 50%
Red 0-25% (Recharge required)
Power Indicators
Battery Pack Operation
■ Battery Charging
• Use only with 60V Lawnmaster® 60LFC03 battery charger. The battery charger supplied is
specically designed for the lithium-ion battery used in this garden appliance and may cause
risk of re if used with a non-compatible battery pack.
• Check the power voltage! Battery chargers operate on 220-240V AC.
• Ensure the battery is charged between 4°C and 40°C. This ensures an optimum battery
service life.
• Protect the battery from heat, from continuous exposure to sun and keep away from radiation
or other heat sources. Do not leave the battery in the blower in direct sunlight over long
periods.
• The battery is supplied partially charged. To ensure full capacity of the battery, charge the
battery before using your appliance for the rst time. The lithium-ion battery can be charged
at any time without reducing its service life. Interrupting the charging procedure does not
affect the battery.
■ Battery LED Panel
The battery is equipped with a charge-level indicator panel which indicates its current charge
condition. Press and release the charge indicator button on the battery to actuate the charge level
indicator. The charge level can be checked either when the battery is attached on the machine or
removed from the machine.
Charger Operation (See Fig. 3)
If any part of the charger is missing or damaged, do not operate it! Replace the charger with a new
one. Failure to pay attention to this warning could result in possible serious injury.
Check the voltage! The voltage must comply with the information on the rating label.
WARNING

16
OPERATION
■ Align the two guide rails on the side of the battery pack with the support rails on the side of the
charger. Slide the battery pack down until it locks into place (Fig. 3).
■ Connect the charger to the power supply.
■ After the battery is charged and the fan on the charger has stopped operating, it is suggested
that the charger be disconnected from the power supply.
■ Press the release button on the battery pack and remove it from the charger.
NOTE: It is normal for the battery pack and the charger to become warm during charging process.
■ Charger LEDs
• Charging: a ashing green LED on the charger indicates that the battery is charging
normally.
• Charged: continuous green LED on the charger indicates that the battery is ready for use.
Wait until the cooling fan stops, remove the battery pack from the charger and disconnect the
charger from the power supply.
• Charging paused: a ashing red LED light on the charger indicates that charging is
paused.
- Red LED light ashing slowly: charging paused (battery temperature is not within the
charging temperature range – charging will automatically resume once temperature within
range).
- Red LED light ashing quickly: the charger and/or the battery pack not communicating
(unplug the charger from the power outlet and remove the battery from the charger. Wait for
more than 1 minute, and then reinsert the mains plug of the charger into the power outlet. If
charging does not continue call the aftersales helpline).
After continuous or repeated charging cycles without interruption, the charger may warm up.
This is normal and does not indicate a technical defect of the battery charger.
The indicator lights on the charger show the charger status:
Starting / Stopping the Blower (See Fig. 4)
■ To switch on, ensure the battery is fully inserted.
■ For manual operation, gently pull the trigger switch towards the handle. You can adjust the
power level by increasing or decreasing the pressure applied to the trigger switch.
■ For automatic cruise control operation rotate the cruise control lever to adjust the power level.
SYMBOL
Red, flashing Charging Paused
INDICATOR LIGHT
Charging
Green, flashing
Green, continuous Fully charged
17
OPERATION
Always wear eye protection with side shields marked to comply with ANSI Z87.1, along with
hearing protection. Failure to do so could result possible serious injury.
WARNING
The cruise control function allows consistent power without having to apply pressure to the
trigger switch.
■ To turn off the blower, release the trigger switch and/or make sure the cruise control lever is in
the upward position.
NOTE: Using the blower on max power level will decrease the battery run time. For extended use,
adjust the pressure applied onto the trigger switch.
Using the Blower (See Fig. 5)
■ Once operational, direct airow towards the subject you wish to clean.
■ Your blower is designed to blow and clean all types of surfaces. From removing debris, leaves
and grass clippings into piles or clearing driveways, garages and patios.
Low Power
Max Power Low Power
Max Power

18
MAINTENANCE
When servicing, use only recommended replacement parts. Use of any other parts may create a
hazard or cause product damage.
To avoid serious personal injury, always remove the battery pack from the tool when cleaning or
performing any maintenance.
WARNING
WARNING
General Maintenance
■ Keep all safety devices, air vents and the motor housing free of dirt and dust. Avoid using
solvents when cleaning plastic parts. Most plastics are susceptible to damage from various
types of commercial solvents and may be damaged by their use. Use clean, dry cloths to
remove dirt, dust, oil, grease, etc.
■ Remove any buildup of grass and leaves on or around the motor cover. Wipe the blower clean
with a dry cloth occasionally. Do not use water as this may damage any electrical components.
Battery and Charger Maintenance
■ Keep the battery and charger clean and clear of debris. Do not allow foreign material into the
recessed cavity or on the contacts. Wipe with a dry cloth. Do not use solvents, water, or place in
wet conditions.
■ Always unplug the charger when there is no battery pack in it.
■ Check that the charger and battery contacts have not been shorted by debris or foreign material.
Always store away from metal objects which could create a connection with the terminals.
■ Always remove the battery when storing the blower and keep in a cool dry place out of direct
sunlight.
■ Store the battery only within a temperature range between 0°C and 25°C and do not subject or
store the battery pack to direct sunlight.
■ It is recommended to store the lithium-ion battery pack in a 30%-50% charged condition.
■ It is recommended to fully charge the lithium-ion battery pack after every six months of storage.

19
TROUBLESHOOTING
PROBLEM POSSIBLE CAUSE SOLUTION
Unit will not start when trigger
switch is depressed.
The battery is not secure.
To secure the battery pack,
Make sure the latches on the
bottom of the battery pack snap
into place.
The battery is defective. Replace with a new, charged
battery.
The battery is not charged.
Charge the battery pack
according to the instructions in
the Instruction manual.
Defective trigger mechanism. If within warranty period, call
customer service.
Unit will not blow. The tube is blocked. Remove battery and clear
debris from in and around tube.
No charging procedure
possible.
The battery contacts are
contaminated.
Clean the battery contacts (e.g.
by inserting and removing the
battery several times) or replace
the battery.
Socket outlet, fuse, mains cable
or battery charger are defective.
Check the mains voltage and
fuse, if necessary have the
battery charger checked by an
authorised customer service
station.
The battery has a fault. Contact the After Sales
Helpline.
The red and green LED is
ashing alternatively on the
charger.
The battery is in a low voltage
status and needs re-activate.
The battery is undergoing an
additional 30 minute recovery
charge. Please maintain the
normal charging procedure. And
once complete and fully charged,
the LED will change to green
continuous.
ONLY PERFORM THE STEPS DESCRIBED WITHIN THESE INSTRUCTIONS!
REMOVE THE BATTERY PACK BEFORE TROUBLESHOOTING.
WARNING
WARNING

20
SPECIFICATIONS
60V Cordless Brushed Blower
CHARGER
BATTERY
Type
Insulation Protection
Motor
Voltage
Max air volume
Max air speed
Sound Pressure Level (LPA)
Sound Power Level (LWA) Guaranteed
Sound Power Level (LWA) Measured
Vibration (ah)
Weight (Without 2.0Ah Battery)
Model No.
Charger Input
Charger Output
Charging Period (Battery Fully Discharged)
Weight of Charger
Insulation Protection of Charger
Model No.
Rated Voltage of Battery
Capacity of Battery
Battery Type
Weight of Battery
*Maximum initial battery workload voltage (measured without a workload) is 60 volts.
Nominal voltage is 54 volts.
Cordless, Battery-powered
Brushed motor
60V MAX*
208L/s
178km/h
74dB(A) K=3dB
96dB(A)
90.4dB(A) K=3dB
≤2.5m/s2 K=1.5m/s2
3.1kg
60LFC03
220-240V~50/60Hz 1.76A
60V 4.0A
40min (For 60LB2030)
1.12kg
60LB2030
60V MAX*
2.0Ah
Lithium-Ion
1.03kg
Table of contents
Other LawnMaster Blower manuals

LawnMaster
LawnMaster NPTBL26A User manual

LawnMaster
LawnMaster BL705 User manual

LawnMaster
LawnMaster BV1210E 1201 User manual

LawnMaster
LawnMaster CLBL2406-1 User manual

LawnMaster
LawnMaster LMEB260 Installation manual

LawnMaster
LawnMaster NPTBL31AB User manual

LawnMaster
LawnMaster CLBL6015A User manual

LawnMaster
LawnMaster NPTBL31AB User manual

LawnMaster
LawnMaster CLBL6015A User manual

LawnMaster
LawnMaster CLBL4016A User manual


