LD ZM-6 User manual

Professional 19” Rack Mixer
ZM-6
USER MANUAL
USER MANUALUSER MANUAL
USER MANUAL
Thank you for buying an LD Systems audio product. Please read these
operating instructions carefully before you use the product for the first
time and keep them handy for future reference.
Content
Safety notices …...………………………. 1
Rear panel.………..………………............3
Main features .....……….…………………….1
Connections (setup)….…………………………..4
Precautions…………………………………….2
Specifications ……………….....…………………5
Front panel ………..….………………………….2

ZM-6 PROFESSIONAL 19” RACK MIXER USER MANUAL PAGE 1/5 V-
This symbol warns of the presence of uninsulated “dangerous voltages” inside the device that may
be capable of causing an electrical shock.
This symbol identifies important operating and maintenance ( servicing) instructions.
1.) Caution: To avoid the risk of electrical shock, do not remove the cover. No user serviceable parts inside.
2.) To prevent fire or shock hazard, do not expose the unit to rain or moisture. Do not place metal objects or
spill liquid inside the unit; electrical shock or malfunction may result.
3.) To avoid overheating, always ensure sufficient ventilation and never cover up the ventilation slits . Make
certain to keep the device away from other sources of heat. Avoid dusty and humid environments.
4.) The power cord of the unit should be unplugged from the outlet when left unused for long periods of time.
5.) Do not attempt to repair the unit by yourself. Service or repairs should be carried out only by qualified
personnel.
2.
..
.Main features
The ZM-6 is a user friendly mixer specially designed for professional installations. With full versatility, the 19”
rack mixer is perfect for discotheques, clubs, theatres, etc.
The rack mixer features:
Six lines, one phono, three microphone inputs
Mic 1 is equipped with auto-ducking, sensitivity adjustment, delay time, EQ, and gain control
Balanced mic inputs on front and rear panels
Simple on/off switches on front panel
Dual zone assign for all inputs
Two zone outputs with gain, pan, EQ, and stereo/mono adjustment
Both zones have unbalanced and balanced outputs with master gain reduction
Headphone output with volume control
Power adapter with 3-way multipole connector
DC 24 V control power input; emergency audio input and control.
1. Safety instructions

ZM-6 PROFESSIONAL 19” RACK MIXER USER MANUAL PAGE 2/5 V-
3.
..
.Precautions
1) All operating and other instructions should be followed before this product is connected and used.
2) Make sure the mains power of the unit is turned off before installation.
3) Make sure all the connectors are well connected in their indicated positions firmly. Use appropriate
cables throughout your system; quality cable makes a big difference in audio fidelity.
4) Never attempt to make any adjustments or repairs other than those described in this manual.
5) Always start with volume controls/ master controls on minimum.
6) Try to move gain controls slowly. Rapid adjustments could damage speakers.
7) If the mixer does not work properly, stop and disconnect it immediately. Do not attempt to repair it by
yourself, contact your dealer for service.
4.
..
.Front panel
1) Input gain knobs (for six lines) – Control individual source levels.
2) Channel select (On/off) switch – Selects/Deselects the respective channel.
3) Zone assign – Determines which zone the audio is directed to. The A+B position sends channel audio to
both zones.
4) Mic 1 gain control – Controls the input gain for the Neutrik combo connector on the front panel.
5) Mic1 EQ controls – Adjusts the treble, middle, bass frequencies respectively of the mic 1 input.
6) Neutrik combo connector – Allows connection of either a 1/4” jack or an XLR plug.
7) Zone knob – Controls the output level.
8) Mono/ Stereo – Sets the mode for the output sound.
9) Pan – Controls the mix of stereo audio available from the channel. Moved to the left only the left
speakers will be heard, or to the right for the right speakers.
10) Zone EQ: Adjusts the treble, middle, and bass frequencies respectively of the zone audio.
11) Stereo level indicator – Indicates the level of sound output. Proper attention to the output level is
necessary in order to obtain the punchiest possible sound without audible distortion.
12) Headphone gain control – Adjusts headphone volume.
13) Headphone Output 6,3 Jack Socket – for plugging in your headphones.
14) Power indicator (green LED): Lights up to indicate that the mixer is switched on.
15) Emergency input indicator (red LED): Indicator for24 V DC power and activation of the emergency audio
input (emergency announcements).

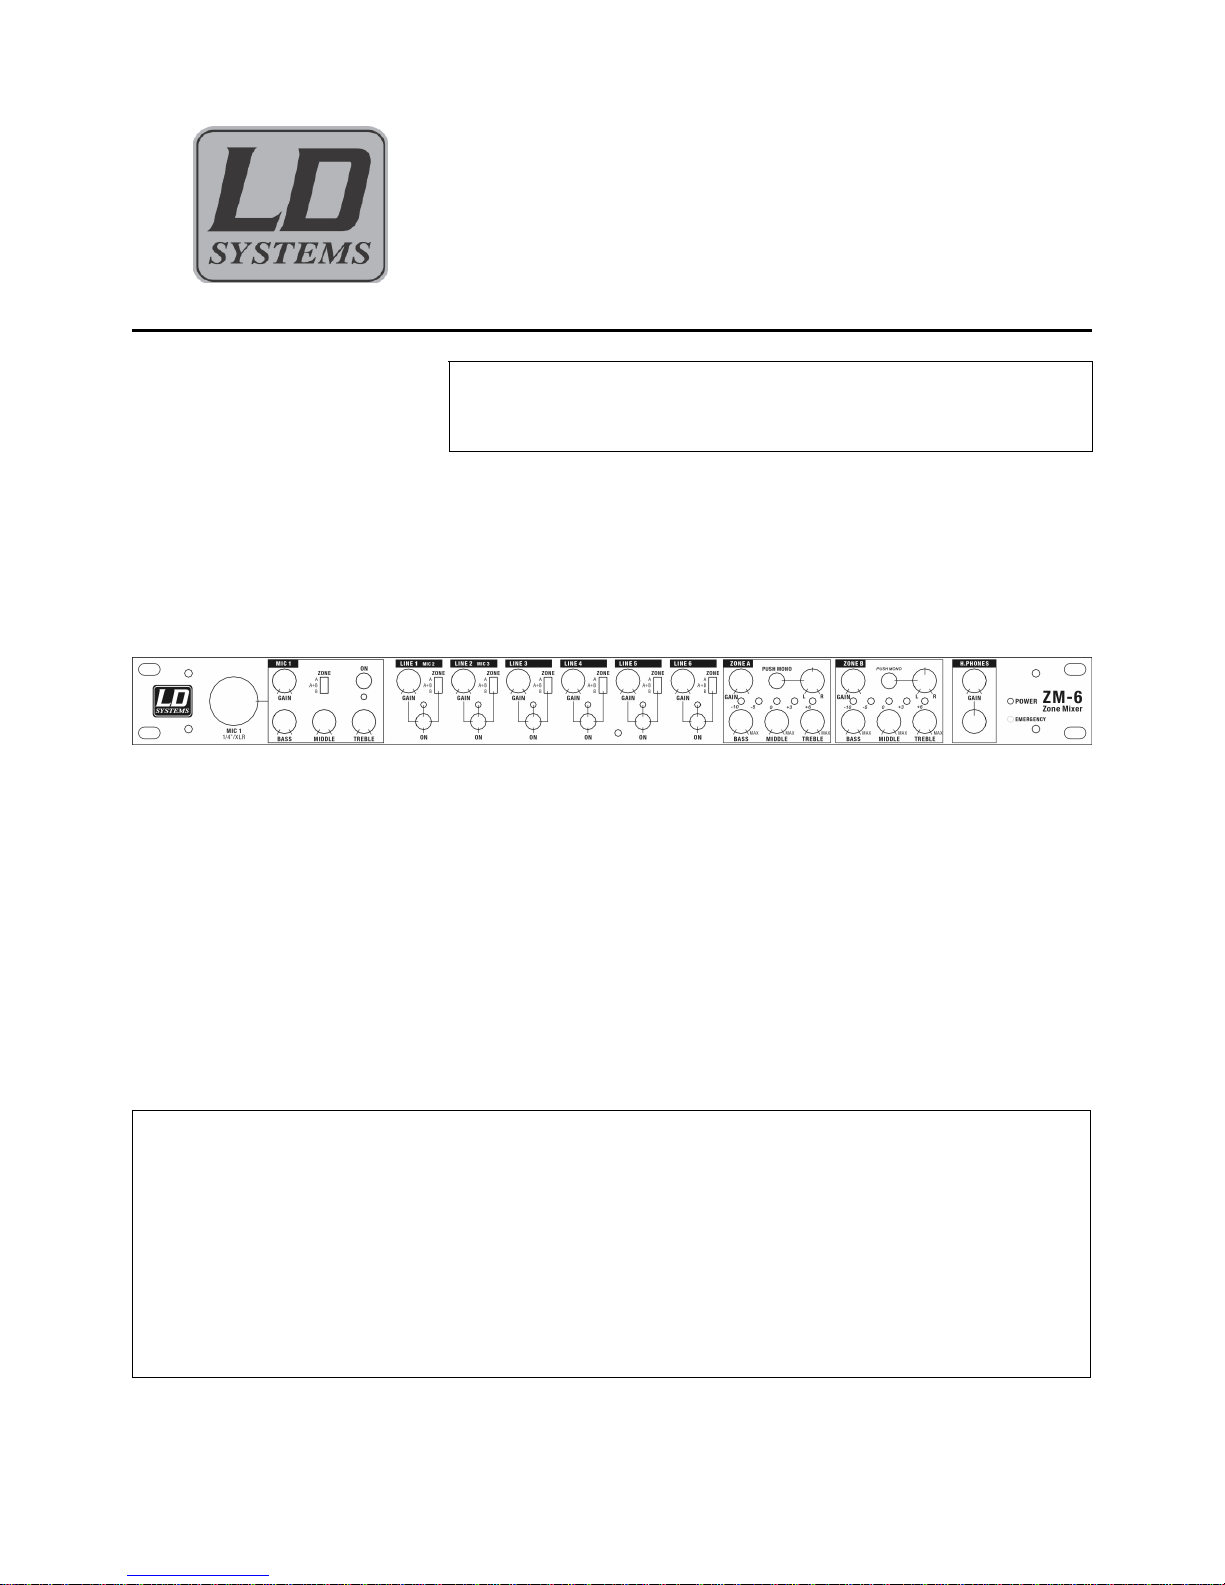
ZM-6 PROFESSIONAL 19” RACK MIXER USER MANUAL PAGE 3/5 V-
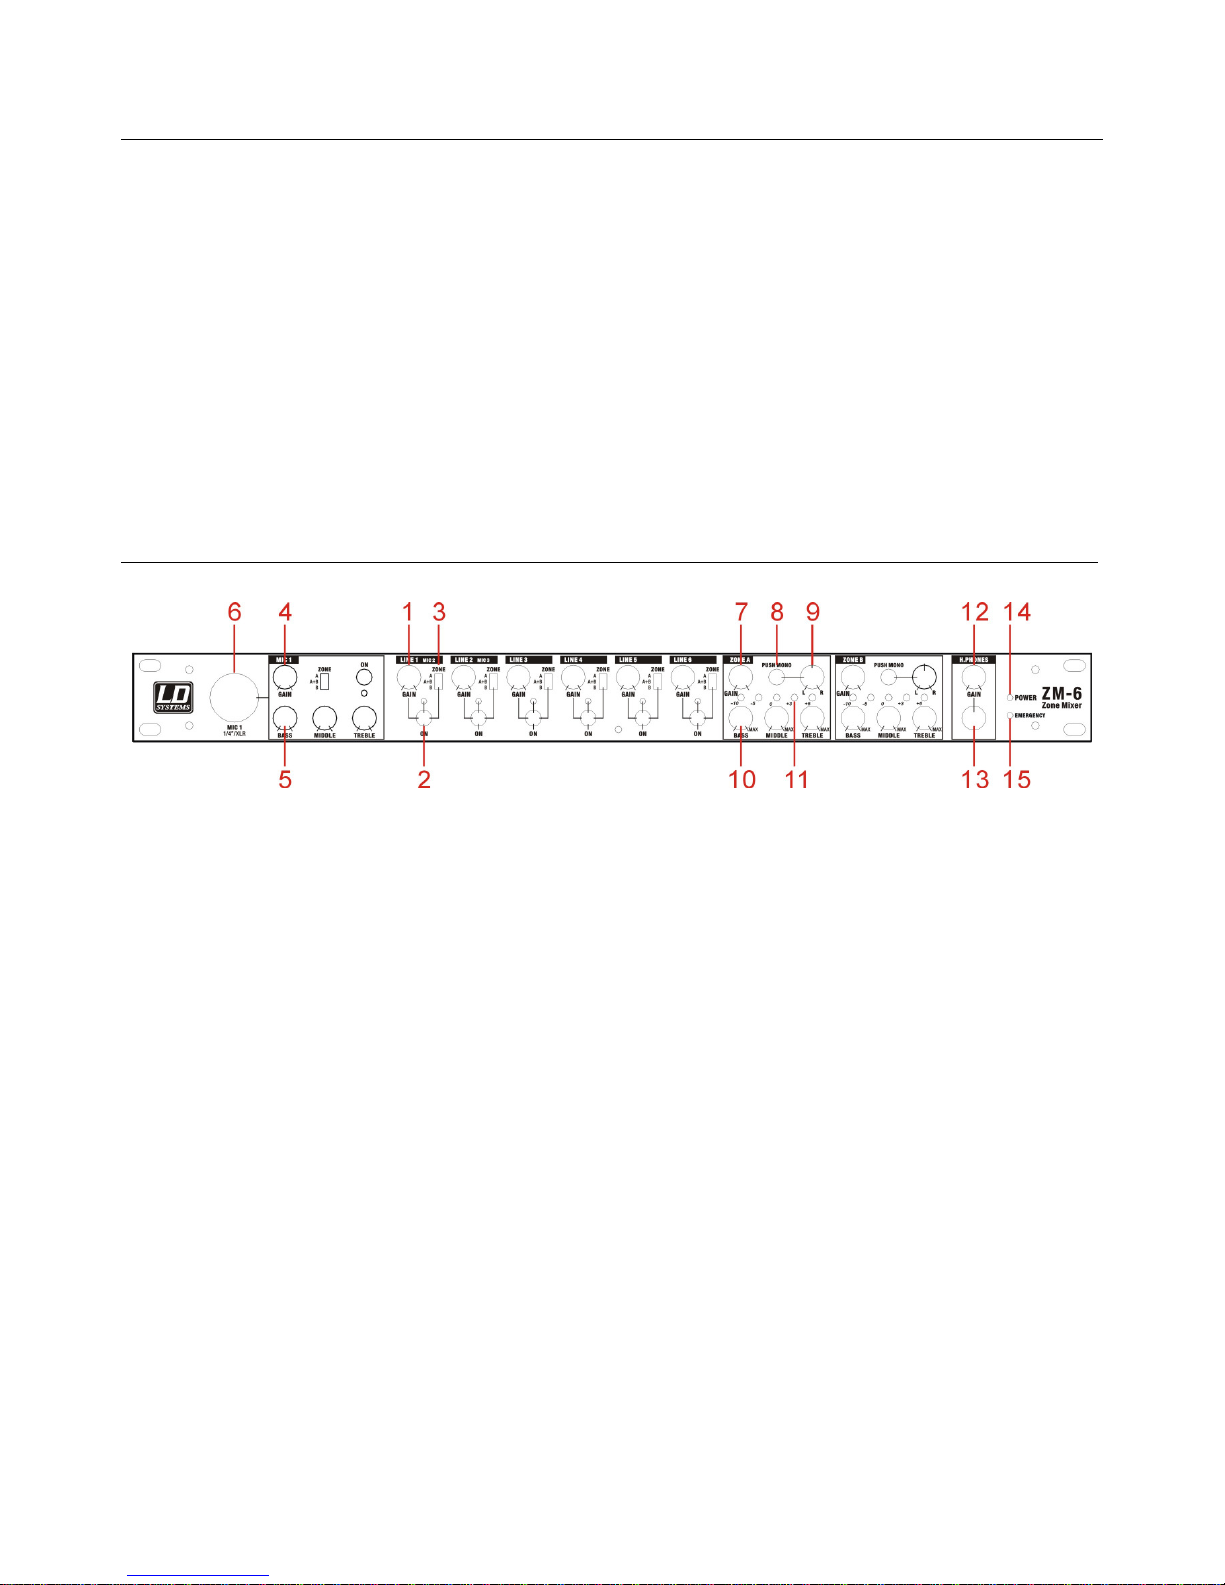
5.
..
.Rear panel
1) Power switch – Switches the unit on.
2) Power supply input DV +/- 15V – For connecting the power adapter.
3) Balanced Zone B outputs – 1/4” stereo balanced TRS 1/4” connectors controlled by the Zone B knob.
4) Balanced Zone A outputs – Balanced stereo XLR connectors controlled by the Zone A knob.
5) Master gain reduction – For setting the optimal output level of the balanced outputs (0.245 V to 2.5 V to
match the optimal inputs of amplifiers and other devices).
6) Unbalanced Zone Outputs – Output controlled by the Zone knobs.
7) Emergency audio inputs – Inputs for emergency signal. Connection via unbalanced phone plugs (-10 dB
adjustable audio level). This circuit is activated by the 24 VDC power supply; override function; all other
audio input sources will be muted and the audio signal source that is connected to the emergency audio
inputs will be routed to all zone outputs.
8) Unbalanced line inputs – To connect stereo audio from HiFi VCRs, cassette and reel to reel tape decks,
DAT machines, CD players, laser discs, tuners, or other mixing consoles. Note: a.) Plug mono audio
sources into both Left and Right inputs using a “ Y “ cable connector. b.) Line 3
9) Emergency trim – The knob adjusts the level of emergency audio input. When the 24 VDC control circuit
is activated by an external device the red LED light illuminates and all zone outputs are replaced by the
emergency audio input.
10) Ground connection – Use these connections with your grounding cable to avoid signal hum.
11) Neutrik combo connector – Allows connection of either a 1/4” jack or an XLR jack for balanced line or mic
inputs depending on switch position.
12) Mic/ Line switch – Toggles between balanced line input or microphone signal for the associated XLR
combo inputs. When microphone is not used, always set the switch to line position.
13) Stereo/Mono switch – Permits the user to adjust the signal input for stereo or mono input accordingly.
14) Auto-talkover control (“auto-ducking”) – Automatically reduces the level of all signals when the mic
connected to “Mic 1” is spoken into. Switch positions: off, -12 dB, and –40 dB ( complete reduction ).
15) Talkover sensitivity trim control – Determines the point at which auto-talkover activates. The higher the
sensitivity, the faster auto-talkover is activated even one speaks into the microphone quietly.
16) Delay time trim control – Determines the rate at which the music, etc., returns to normal (preset) volume
after the microphone has been used (0.5~ 4 seconds).
17) Ground lift switch-activates or deactivates the ground lift function.
18) Power adapter jack – Permits connection of a 24 VDC power adapter.

ZM-6 PROFESSIONAL 19” RACK MIXER USER MANUAL PAGE 4/5 V-
6.
..
.Connections ( setup)
))
)
The ZM-6 Rack Mixer is suitable for a wide variety of applications; the diagram below is just one example of a
setup configuration. Make sure all knobs are at “ zero “ and all devices are off. First, connect all input sources;
next, connect the stereo outputs to the power amplifiers and/or recording equipment (for example, tape
decks). Plug your mixer into AC power. Now you are ready to switch everything on.
Important: Always switch on your audio input sources such as turntables or CD players first, then your mixer,
and finally amplifiers. When turning off, always reverse this operation by turning off amplifiers, then your mixer,
and then input devices.
Note:Incorrect connections will result in malfunctions. Make sure that all connections have been made
correctly before operation.

ZM-6 PROFESSIONAL 19” RACK MIXER USER MANUAL PAGE 5/5 V-
7.
..
.Specifications
10kohms input impedance
Line
140mV rms sensitivity ( for 1.4V balanced output )
10kohms input impedance unbalanced
Mic 1 1.5mV rms sensitivity ( for 1.4V balanced output);
60mV rms max input
10kohms input impedance
Inputs
Mic2/ Mic3 1.5mV rms sensitivity ( for 1.4V balanced output);
80mV rms max input
Line 9V rms max
Headphone 0.5 watts into 47 ohms
Outputs
Distortion Less than 0.01%
Line > 92dB
Mic1 > 80dB
Mic2/Mic3 > 75dB
S/N ratio (vs. max output )
Phono > 75dB
Line 20 ~ 22kHz +/- 0.5dB
Frequency Response
Mics 20 ~ 20kHz +/-1.5dB
Bass +/- 20 dB
Equalizations
(Mic1/Zone A/ Zone B)
Middle +/- 15 dB; Treble +/- 14 dB
Power supply
AC 31V ~ 350mA
Panic override
24 VDC
Dimension(
((
(W×D×H)
))
)
483 (W) x 200 (D) x 44( H) mm
Net weight
2.2 kgs
ZM-6
Professional 19” Rack Mixer
Specifications subject to change without prior notice.
Table of contents
Other LD Music Mixer manuals