Leader LD-TF3.0 User manual

LD-TF3.0
FIVE-STAGE DISPENSER
User Manual V1.0
2023.03
Please read this book carefully and keep it properly before using this product
If you have any questions, please contact the sales personne

1
Cautions
Try not to plug and unplug the OSDK cable with power, otherwise it may cause
damage to the OSDK interface, and the damage phenomenon is that the device
cannot be controlled (under the premise of normal use before).
Once damaged, you need to return to the factory to repair the OSDK interface of
the drone, please pay attention to the order when operating, and both ends of the
OSDK cable should be plugged in before the drone is powered on.

2
Catalogue
Cautions...............................................................................................................................................1
Introduction...................................................................................................................................... 3
LD-TF3.0 .........................................................................................................................................3
Part Name .....................................................................................................................................3
Installation......................................................................................................................................... 4
Preparations.................................................................................................................................4
Mount installation ..................................................................................................................... 4
Remote control APP installation...........................................................................................6
Control and Operation............................................................................................................ 18
Mount item operation ........................................................................................................... 18
Remote control operation ....................................................................................................19
Signal mode switching operation ......................................................................................20
SPEC.....................................................................................................................................................21

3
Introduction
LD-TF3.0
This product is based on DJI OSDK development of five-stage UAV airdrop device,
its advantage is: OSDK communication control does not occupy the gimbal
interface, customers do not need to purchase dual gimbal kit can use. The main
body of the equipment adopts a large number of carbon fiber and aviation
aluminum materials, CNC process processing, anodizing and laser engraving and
other surface treatments, waterproof and rustproof, using TYPE-C interface and
UAV OSDK interface anti-misplug design connection, manual buttons are set in
front of the module to control the opening and closing of the projector claw, which
can quickly complete the mounting task.With the quick release carrier frame
produced by our company, a variety of equipment can be quickly disassembled and
quickly changed, the focus is on the position under the center of gravity of the
drone, to ensure the safety and stability of the drone flight to the greatest extent,
such as equipped with H20 series cameras and this launcher, which can not only
observe the target in high definition and convenience, but also can be divided into
multiple times to achieve accurate delivery, safety and stability.
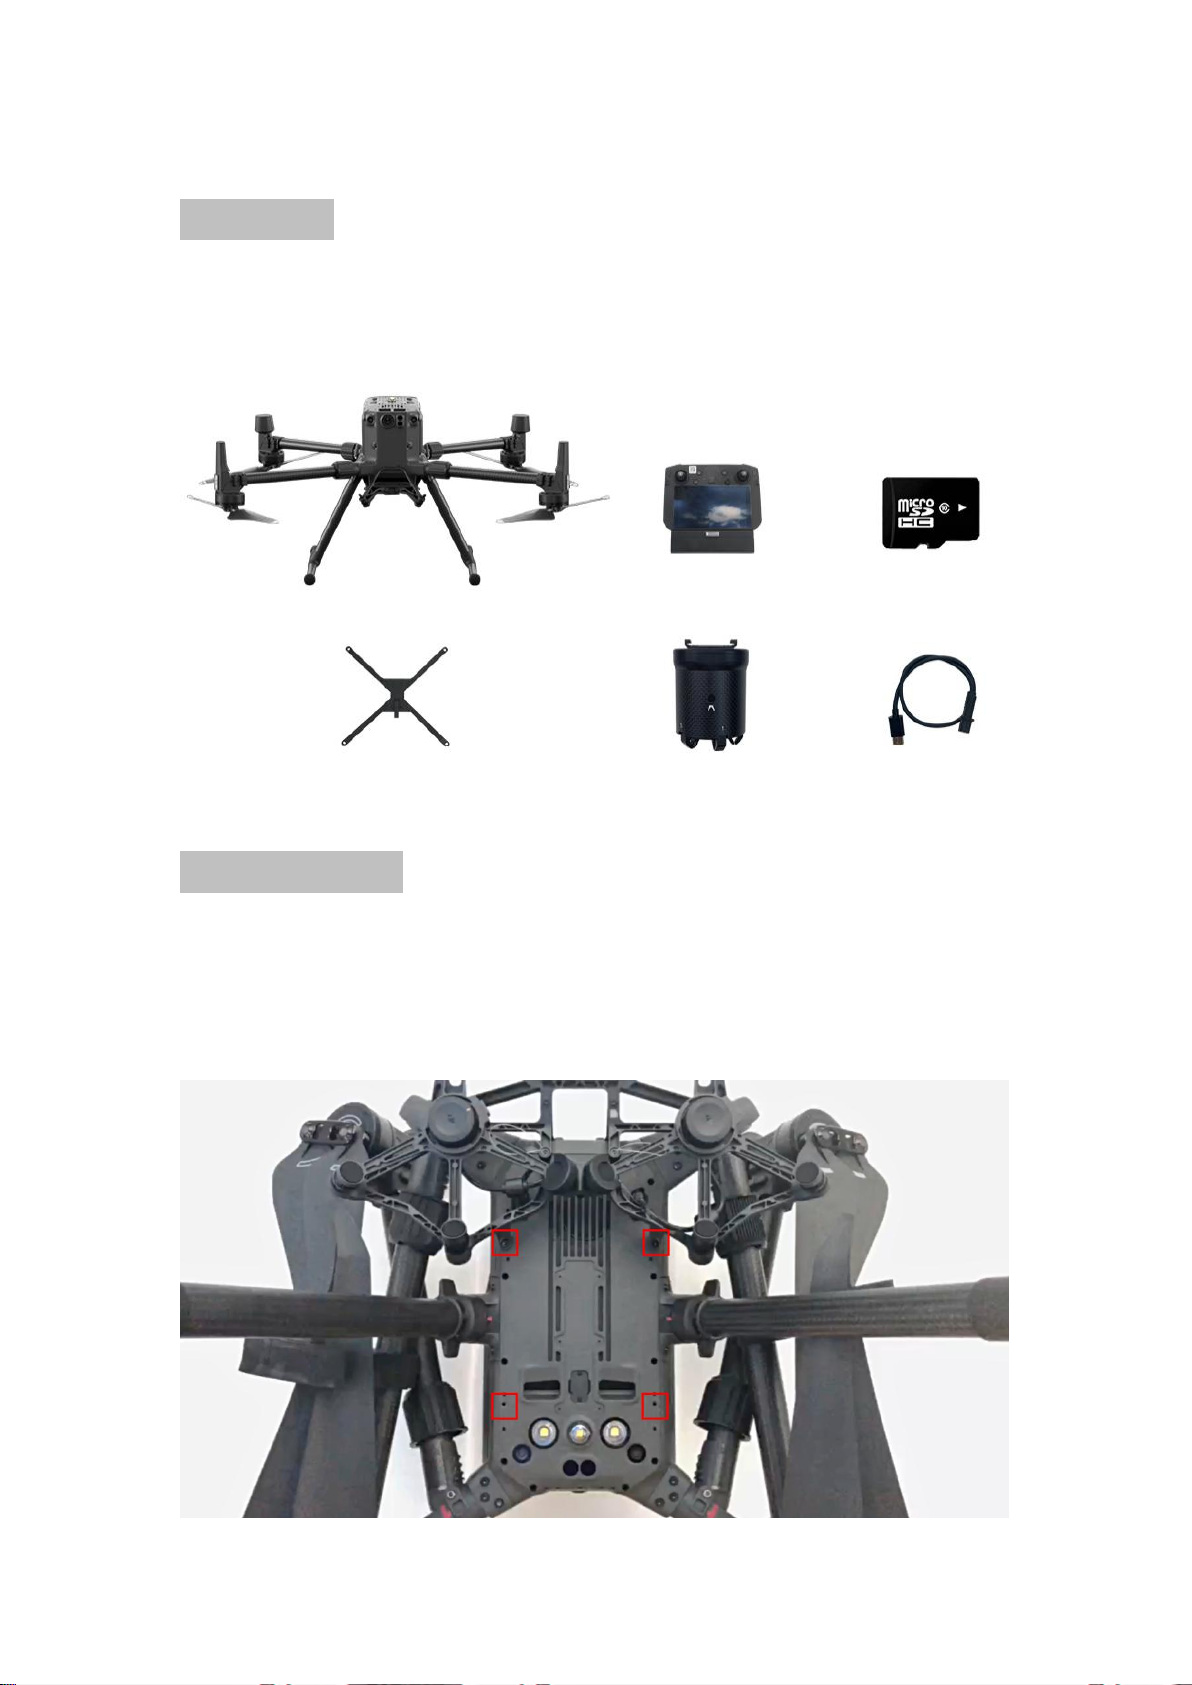
Part Name
1. Quick release hanger
2. PWM interface
3. Signal selection dial
4. Drop the claw
5. OSDK interface
6. Upgrade the interface
7. Physical keys

4
Installation
Preparations
The following items need to be prepared before installation and use:
M300RTK drone, remote control, TF card with APP installation package, quick
release mount, five-stage dropper, OSDK special cable.
Mount installation
After the preparation is done, first install the quick release pylons under the drone,
first remove the two fixing screws of the gimbal pylon, install the quick release
pylons to the same hole, and use the attached screws and tools to install the four
fixing screws.

5
Install the five-segment injector to the quick-release pylon, align and push in, and
after hearing the click, it means that it is locked, and the injector can be shaken to
confirm whether the installation is secure.

6
Insert the fuselage end of the special cable into the OSDK interface on the top of
the drone, pay attention to the direction requirements, plug the single slot, face the
outside of the drone, insert it to ensure the end and firm, and then insert the other
end of the connection line into the OSDK interface of the five-segment injector,
regardless of forward and reverse. Note: The OSDK interface is not hot-swappable
to prevent damage to the interface!
Remote control APP installation
Insert the TF card with the APP installation package into the TF card slot of the
remote control, pay attention to the installation direction, and press in place.

7
Turn on the power of the remote control, the power of the drone, connect the
remote control to a reliable WIFI or mobile phone hotspot after starting. Then click
the menu icon in the lower right corner
Click File Management

8
Click on SD card
Find and click on Lide.apk

9
Click Next
Click to install

10
Wait for the installation to complete
The application installation is complete, click Open

11
The permission interface will pop up, and click Allow for all
After waiting for the button to turn blue, click the GO button to log in (Note: If you
have not registered successfully for a long time, press the back button to return to
the application interface, and you can complete the registration after entering the
APP again)

12
Pop-up prompt: Please open the floating window permission, click "Lide" APP, and
enter the APP opening window
Turn on switches that allow appearance on other apps

13
When prompting "Floating window permission has been opened", press the back
button and click "GO" again to log in
Click DJI pilot2 to enter the app

14
Enter the flight interface
Skip pre-flight inspection

15
Enter the camera interface
Press the back button to return to the application interface and enter the Lide app
again

16
Click "GO" to log in
The floating window will automatically appear in the application interface, click DJI
pilot2 again to enter the app

17
Skip the flight interface and pre-flight inspection and enter the camera interface
(the floating window can be dragged according to personal operating habits)

18
Control and Operation
Mount item operation
After the installation of the APP and equipment to complete the connection with
the drone and power on, the five-stage projector will automatically enter the initial
position.
Then tap the physical button on the five-stage dropper, press the physical button
each time, open a casting claw, when opened, move the rope of the item to be
placed within the locking range of the casting claw, press it five times in turn, and
after mounting five drop items, you can take off.

19
Remote control operation
By observing the vertical view of the camera to the ground, when flying above the
mission target, tap the SW1 icon in the floating window to start the delivery, when
the button is blue, it is the drop state, and when gray, it is the reset state.
When blue: delivery status
When gray: reset state
After returning to the take-off point, you can use the physical buttons to mount the
new drop item, or you can use the SW1 icon on the APP interface to control the
opening of the drop claw.
Table of contents
Other Leader Dispenser manuals