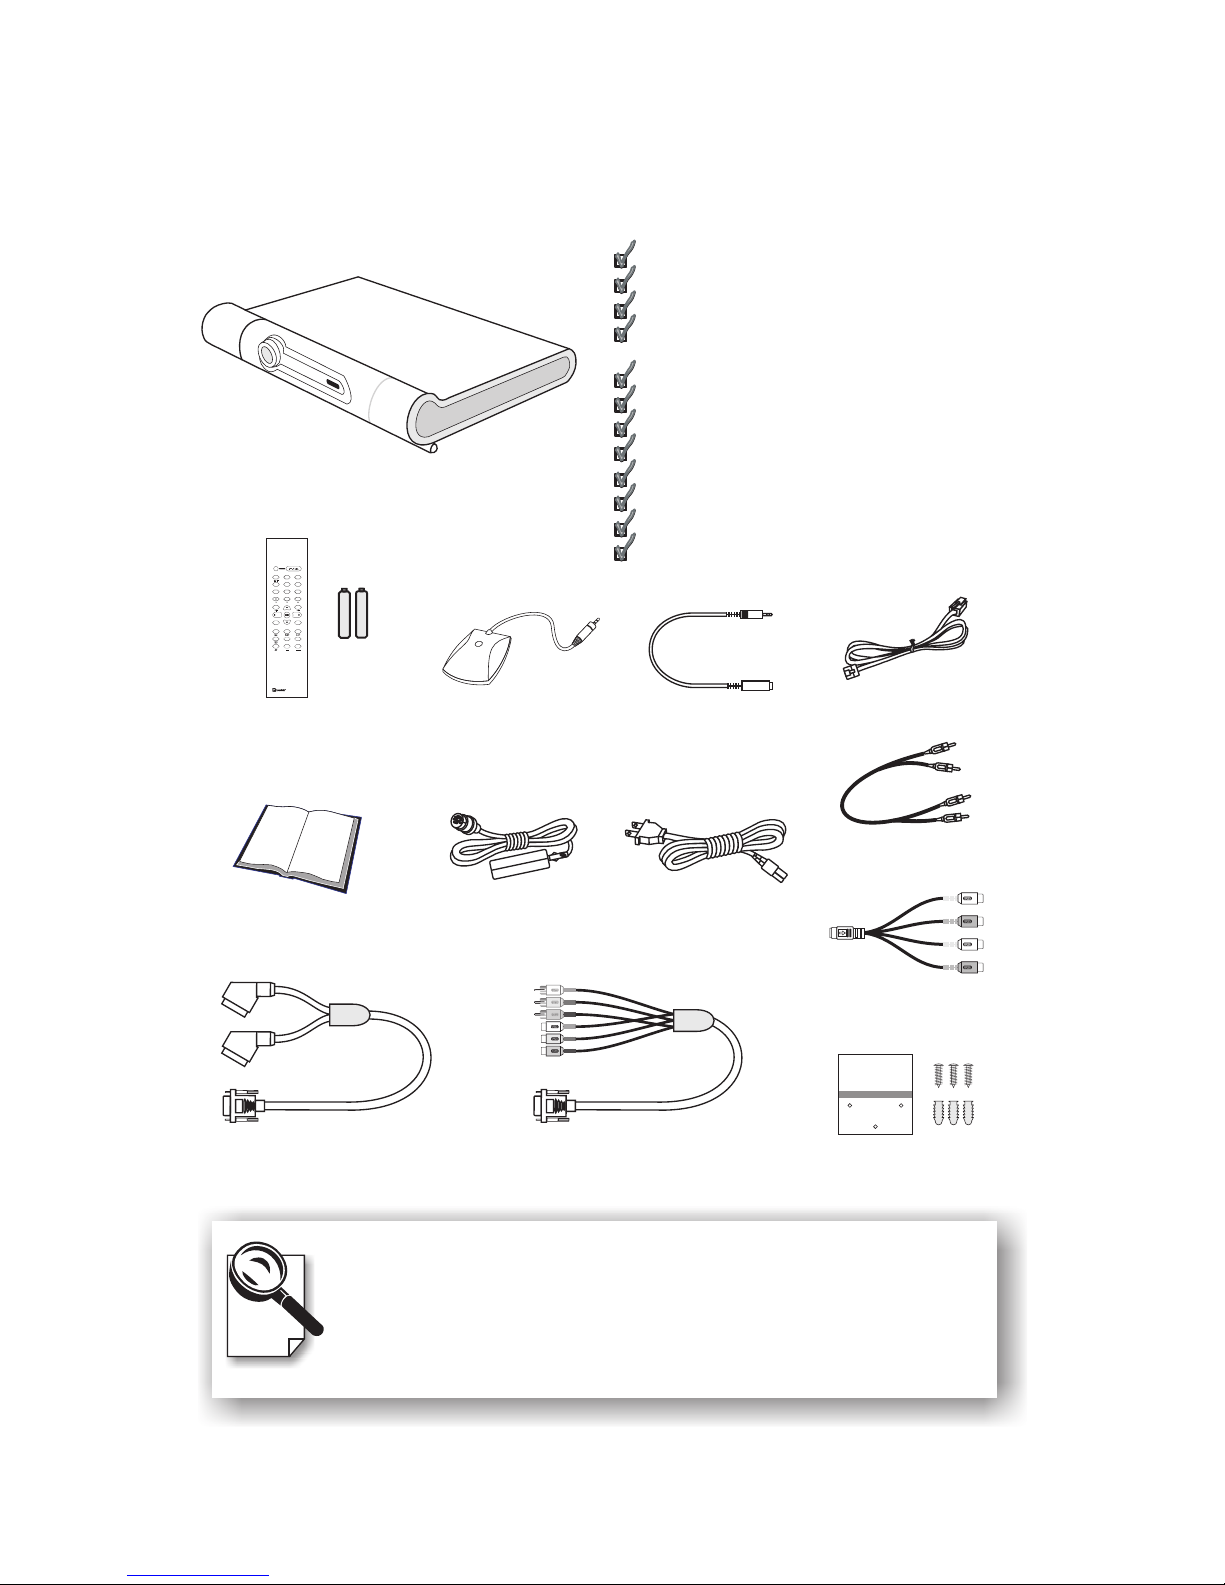
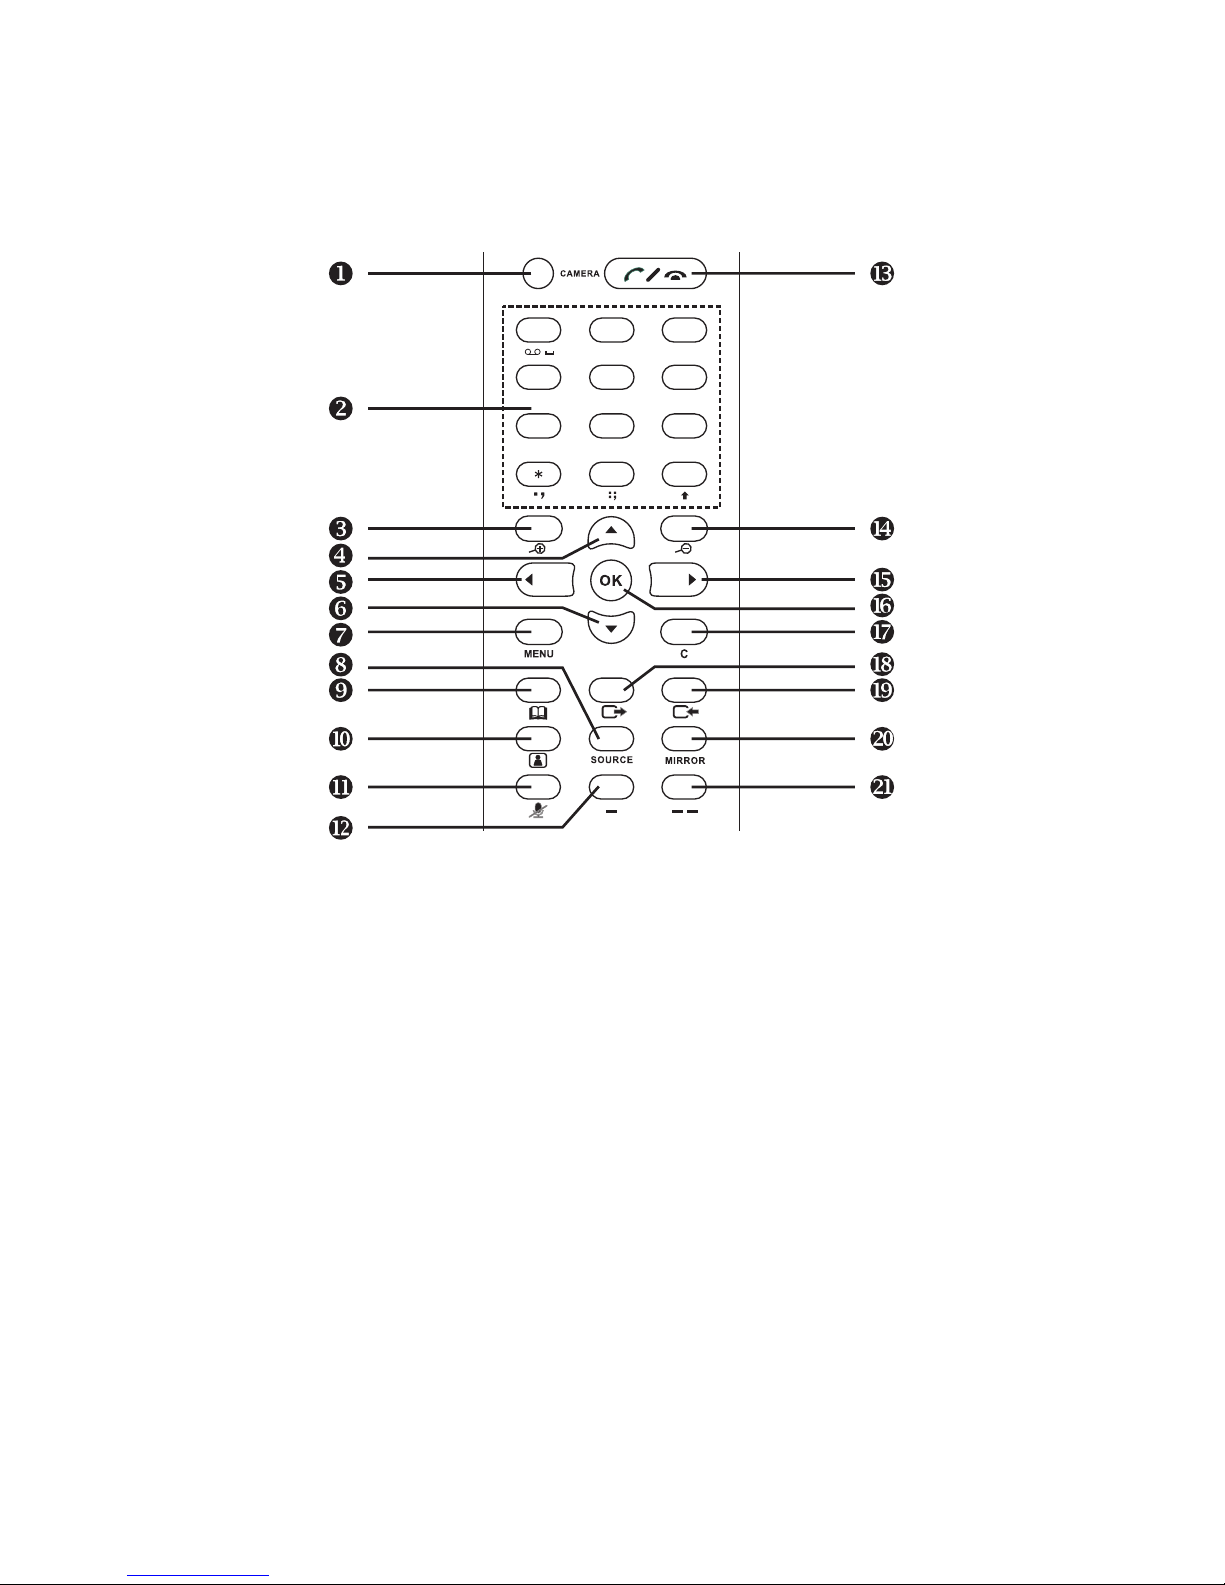
Leadtek BVP 8759 User manual

BVP 8759
User's Manual

BVP 8759 User's Manual
Version A
January 2005 P/N: W0500977
International Headquarters
18th Fl., 166, Chien-Yi Rd., Chung Ho, Taipei Hsien, Taiwan (235)
Phone: +886 (0)2 8226 5800 Fax: +886 (0)2 8226 5801
United States Headquarters
Europe Headquarters
46732 Lakeview Blvd., Fremont, CA 94538, U.S.A.
Phone: +1 510 490 8076 Fax: +1 510 490 7759
http://www.leadtek.com
Phone: + Fax: +
http://www.leadtek.nl
Antennestraat 16 1322 AB, Almere, The Netherlands
31 (0)36 536 5578 31 (0)36 536 2215
Copyright 2005 Leadtek Research Inc. All rights reserved.
No part of this document may be copied or reproduced in any form or by any means without the prior written
consent of Leadtek Research Inc.
Leadtek makes no warranties with respect to this documentation and disclaims any implied warranties of
merchantability, quality, or fitness for any particular purpose. The information in this document is subject to
change without notice. Leatek reserves the right to make revisions to this publication without obligation to notify
any person or entity of any such changes.
Trademarks or brand names mentioned herein are trademarks or registered trademarks of their respective owners.

Table of Contents
1 Getting Started ..................................................... 1
3 Getting to Know Your BVP 8759 ......................... 3
4 Installation ............................................................ 8
2 What's In The Package ........................................ 2
5 System Setup ...................................................... 11
Front view ....................................................................... 3
Installing the unit ............................................................ 8
Rear view ........................................................................ 4
Using remote control ...................................................... 5
ADSL/Constant ADSL/Single, Public, & Fixed IP ...... 12
ADSL/Constant ADSL/Multiple, Public, & Fixed IP ... 15
When the IP is used exclusively by BVP 8759 ........................... 12
When the IP is shared with other devices (with a DHCP
server connected) ....................................................................... 13
When the IP is shared with other devices (without a DHCP
server connected) ....................................................................... 14
When BVP 8759 uses one of the IPs (with a DHCP server
connected) .................................................................................. 15
When BVP 8759 uses one of the IPs (without a DHCP
server connected) ....................................................................... 16
When one of the IPs is shared with other devices (with
a DHCP server connected) ........................................................ 17
When one of the IPs is shared with other devices (without
a DHCP server connected) ........................................................ 18

Table of Contents
ADSL/Timing ADSL .................................................... 19
Cable ............................................................................. 22
LAN/No Firewall or NAT ............................................. 25
LAN/NAT ..................................................................... 27
LAN/Firewall with Packet Filter .................................. 29
LAN/Firewall with NAT & Packet Filter ...................... 31
Before making a video call ........................................... 33
Making a video call ...................................................... 34
Icon explanations ......................................................... 35
When the ADSL is used exclusively by BVP 8759 ..................... 19
When the ADSL is shared with other devices (with a DHCP
server connected) ....................................................................... 20
When the ADSL is shared with other devices (without a
DHCP server connected) ........................................................... 21
When the IP is used exclusively by BVP 8759 ........................... 22
When the IP is shared with other devices (with a DHCP
server connected) ....................................................................... 23
When the IP is shared with other devices (without a DHCP
server connected) ....................................................................... 24
With a DHCP server connected ................................................. 25
Without a DHCP server connected ............................................ 26
With a DHCP server connected ................................................. 27
Without a DHCP server connected ............................................ 28
With a DHCP server connected ................................................. 29
Without a DHCP server connected ............................................ 30
With a DHCP server connected ................................................. 31
Without a DHCP server connected ............................................ 32
6 Making a Call ...................................................... 33

Table of Contents
7 Using OSD Menus .............................................. 37
8 OSD Menu Tree .................................................. 58
9 Trouble Shooting ............................................... 59
10 Tech Support ..................................................... 60
11 Limited Warranty ............................................... 61
12 FCC Statement ................................................... 62
Password Checking ....................................................... 37
Configuration ................................................................ 38
Password ....................................................................... 49
Phonebook .................................................................... 50
Copyright Information .................................................. 56
Restore Factory Settings ............................................... 57
System Setup .................................................................. 38
Service Setup .................................................................. 42
Bandwidth Setup ............................................................. 47
Remote Update ............................................................... 48
Add ................................................................................. 50
Search ............................................................................. 51
In Box ............................................................................. 54
Out Box ........................................................................... 55
Network Setup ................................................................. 38
Server Setup ..................................................................... 39
Terminal Setup ................................................................. 40
NTP Setup ........................................................................ 41
Call Service Setup ........................................................... 42
Auto Answer Setup .......................................................... 44
Advanced Setup ............................................................... 45
Option .............................................................................. 46

Overview
Feature highlights:
The BVP 8759 is designed to avoid complicated installation. And with the
buttons on the remote control, you are able to access the user-friendly on
screen display menu (OSD), easily control the functions and make
adjustments.
The has a built-in high quality CCD camera. Images are
transmitted through the Internet at up to 24 frames per second (fps)
. While making a video call, you can enjoy the brilliant real-time
color images of yourself, your correspondents or both. If you do not want
your image to display on the caller or receiver's screen. The 's
private mode can do just that.
The is fully compliant with SIP (Session Initiation Protocol)
international standards for video communication. It can be used with any
video phone that are compatible with this standard.
Broadband IP address videophone
Connect the other videophone by simply entering the phone number
Friendly and easy operation through remote control
Phonebook dialing function
1 A/V input for additional video/audio input
Up to 24 frames per second video display (@ CIF resolution)
Video selectable and picture image up to VHS quality
Echo-cancellation and no delay high quality audio
1 serial port for PTZ camera control
2 USB 1.1 connectors provide USB application extension
BVP 8759
(@ CIF
resolution)
BVP 8759
BVP 8759
Built-in high quality CCD camera
1Getting Started
1

Audio/Video Cable
Power Adapter
Ethernet Cable
Power Cord
User's Manual
BVP 8759
Please unpack the product package with caution; inspect
the items closely. If you find any damaged item, please
contact your local distributor immediately. Also, please keep
the box and packing material for future use in the event of
future shipments.
BVP 8759 x1
Remote Control with Batteries x1
User's Manual x1
D-Sub26-2SCART Cablex1or
D-Sub26-3RCA x 2 Cable x 1
Microphone x 1
Microphone Extension Cable x 1
Power Adapter x1
Power Cord x1
Ethernet Cable (RJ-45) x1
Audio/Video Cable x1
MiniDIN-RCA x 4 Cable x 1
Mounting Plate & Screws x 1
Remote Control
with Batteries
2What's In The Package
BVP 8759 User's Manual 2
4
1
7
GHI
PQRS
2
5
8
0
JKL
TUV
ABC
3
6
9
#
MNO
WXYZ
DEF
MENU C
MIRRORSOURCE
MiniDIN-RCA x 4
Cable
Microphone Microphone
Extension
Cable
Mounting Plate
& Screws
D-Sub26-SCART x 2
Cable
D-Sub26-3RCA x 2
Cable
or

3Getting to Know Your BVP 8759
3
Front view
CCD Camera:
The input source of
local video image. This
is a mini built-in CCD
camera.
Turning Knob:
BVP 8759 features a
turning knob that you
can use to adjust the
angle and position the
camera faces. Remote Control
Signal Receiver:
Receives the infrared
signal from the remote
control. When using
the remote control,
please aim at this
receiver.
Power Indicator:
The LED lights green
when the unit is
powered on.
Message Indicator:
The LED lights red
when a message comes.
Built-in Microphone:
This is the built-in
microphone to which
you can input sound.
Ringer Indicator:
When there is an
incoming call, the ring
will light up.
Video Indicator:
The LED lights
yellow when the unit
is in a video call.

BVP 8759 User's Manual 4
Rear view
WAN
Ethernet
connector
Power Switch
For turning
on/off the power
A/V AUX
Audio and Video for
TV and VCR
DC IN
Connect to the
DC output of
power adapter
Microphone
Connector
Connect to an
external
microphone
(optional).
Phone
Connect to
a telephone
USB Connectors
Connect to other
USB devices
COM
Connect to an
external PTZ
camera
A/V
Audio and Video
input/output connector

4
1
7
GHI
PQRS
2
5
8
0
JKL
TUV
ABC
3
6
9
#
MNO
WXYZ
DEF
5
Using remote control
1. Camera
2. Number keys
3. PTZ Camera zoom in
4. Navigation key
5. Navigation key
6. Navigation key
7. Menu
8. Source
9. Phonebook
10. Video key (privacy, view)
11. Mute
12. Soft key 1 (reserved)
13. On-hook / Off-hook
14. PTZ Camera zoom out
15. Navigation key
16. Ok
17. Cancel
18. Outbox
19. Inbox
20. Mirror
21. Soft key 2 (reserved)

BVP 8759 User's Manual 6
Used with OSD menus; to move
the cursor left or to go back to
the previous menu. During a
video call, used to reduce the
incoming video bit rate.
Used with OSD menus; to move
the cursor right or to enter the sub
menu. During a video call, used to
raise the incoming video bit rate.
Used with OSD menus; to move the
cursor up. During a call, to turn the
volume of the speakerphone up.
Used with OSD menus;
to move the cursor down.
During a call, to turn the
volume of the
speakerphone down.
Cursor Panel
Hot Keys
Using remote control (cont.'d)
Mute:
During a video call, this button
is used to mute the audio so that
you will not be heard by the
other party on the phone.
Video Key (Privacy, View):
Privacy:
View:
Stop sending your image to the
other side so that you will not be
seen by the person you talk to.
To select how local and remote
video is displayed on the screen.
The options are: Remote, PIP
upper-left, PIP lower-left, PIP
upper- right, PIP lower-right,
Local. And it switches in that
sequence.
OK: Used with OSD menus; to
enter the sub menu, or to confirm
the selection. During a call,
related to the "Call Waiting"
option (see page 42).
IN-BOX:
To bring out the menu that
contains the numbers of the 10
last received calls.
OUT-BOX:
To bring out the menu that
contains the numbers of the 10
last dialed calls.
Phonebook:
To bring out the phonebook
menu. See page 50.
MENU:
To bring out the OSD menu.
Cancel:
To cancel a selection, or to
function as Backspace when you
input letters or numbers.
Source:
Select between the built-in and
the external A/V source.
Mirror:
To toggle mirror video on/off.
Camera:
To switch between STB and
external PTZ camera.

Inputting numbers
Pressing any key on the numeric keypad can input the
correspondent number.
For example, pressing will generate the number"8".
Numeric Keypad
Numeric Keypad
Inputting letters
Every button on the numeric keypad has characters printed on
it, in addition to the numbers. Number keys from"2"to"9"
have English letters below them, so they can be used to input English letters.
When inputting data, pressing a key consecutively will generate the letters on it.
For example, has the number"7"onitandtheletters " PQRS " below it.
Pressing this key once will generate the number"7".
Pressing this key twice consecutively will generate the letter"P".
Pressing this key three times will generate the letter"Q",four times the letter
" R ", and five times the letter"S".
And it will cycle in such order.
Inputting punctuation marks
The keypad provides four punctuation marks:
" " " " " : " and " ".
., ;
" ": Press twice consecutively;
" ": Press three times consecutively.
" : ": Press twice consecutively.
" ": Press three times consecutively.
.
,
;
Inputting special characters
The keypad also provides three special characters: " " " " and " ".#
" ": Press twice consecutively; " ": Press once.
" ": Press once.
#
Using remote control (cont.'d)
Switching between upper
case and lower case letters
Press once to switch
between upper and lower case
letters when inputting data.
Speed Dial
When the button is
pressed, pressing can
enable speed dial.
4
1
7
GHI
PQRS
2
5
8
0
JKL
TUV
ABC
3
6
9
#
MNO
WXYZ
DEF
8
TUV
7
PQRS
#
0
0
1
#
#
7

4Installation
Step 1 Pick a good spot
Prolonging the lifespan
Avoid storing or operating BVP 8759 in abnormal conditions.
High temperatures or excessive humidity could cause the unit to
malfunction and shorten its useful lifespan.
Stability
Place your BVP 8759 on top of a counter, desk, or table with the
CCD camera opening in front.
Or you can install BVP 8759 on the wall by fixing the included
mounting plate to the wall with screws and sliding the slot on the
back of BVP 8759 onto the mounting plate.
Lighting condition
Make sure the lighting is sufficient and does not shine directly
into camera lenses.
View of camera
Avoid using BVP 8759 in a room with brightly painted walls or
flamboyant wallpaper. Soft and evenly painted background
provides the best results.
Installing the unit
BVP 8759 User's Manual 8
Step 2 Connect the Ethernet cable
Plug one end of the Ethernet cable in the jack marked " " on
BVP 8759. Plug the other end of the Ethernet cable in the RJ-45
jack of the Internet device (hub, router, or ATU-R).
Connect the
Ethernet cable
to the Internet
device.

Installing the unit (cont'd)
Step 3 Plug in for power
Connect the power cord between the wall outlet and the power
adapter. Plug the free end of the power adapter into the power
connector (DC IN) on BVP 8759.
Connect the power adapter.
Connect the power cord
and plug in.
9
Notes for removing the power cord
The connector on the power adapter has a mechanism which, when
connected to the videophone, will be locked to the power connector. To
remove the power cord from the videophone, follow the steps below:
1. Grab the connector and slide
it outward to loosen the lock.
2. Gently pull the connector until
the cord is fully disconnected.
Note: Do not force the connector or pull the cord abruptly,
or the power adapter may be damaged.

VCRCCD Camera
Television
BVP 8759 User's Manual 10
Installing the unit (cont'd)
External Microphone (Optional)
Video/Audio
Output
Video/Audio
Input
(Optional)
Television
VCR TV
or

5System Setup
The System Setup section gives instructions on how to set up your BVP 8759
system under some mostly used interconnection types. There is a condition bar on
each page (as shown in the figure), indicating what type of connection the setup
guide on that page is for. Look for the type of connection you use with your BVP
8759 to find the setup instructions you need.
Connection LAN Type Firewall NAT Packet Filter
Without DHCP server connected
Internet
System Setup (Cont'd)
Condition Bar
11

Connection ADSL Type Constant ADSL IP Single, Public, & Fixed
When the IP is used exclusively by BVP 8759
Internet
ATU-R
BVP 8759
Note : IP address, Subnet Mask and Gateway are assigned by your ISP, each consisted of 4 sets
of numbers with dots in between them. Check with your ISP for the information.
System Setup (Cont'd)
Connect Type: STATIC
IP address: see note
Subnet Mask: see note
Gateway: see note
PPPoE Username( )
PPPoE Password( )
BVP 8759 System Setup
(see p. 37)
Phonebook
Configuration
Password
Bandwidth Setup
Remote Update
System Setup
Server Setup
Network Setup
Terminal Setup
NTP Setup
Service Setup
BVP 8759 User's Manual 12

Connection ADSL Type Constant ADSL IP Single, Public, & Fixed
When the IP is shared with other devices (with a DHCP server
connected)
Internet
ATU-R
Router General PC 1, 2, ...n DHCP Server
Note : IP, Subnet Mask and Gateway are assigned by your DHCP server.
This router has to be able to provide the NAT service
and the following static routes should be set: TCP port
1720-1730 and 7000-7009 and UDP port 8050-8058.
Or you can put BVP 8759 into DMZ if your router
supports this function.
The DHCP Server
must be able to
support dynamic-
fixed IP allocation.
System Setup (Cont'd)
BVP 8759
BVP 8759 System Setup
(see p. 37)
Phonebook
Configuration
Password
Bandwidth Setup
Remote Update
System Setup
Server Setup
Network Setup
Terminal Setup
NTP Setup
Service Setup
Connect Type: DHCP
IP address: see note
Subnet Mask: see note
Gateway: see note
PPPoE Username( )
PPPoE Password( )
13

Connection ADSL Type Constant ADSL IP Single, Public, & Fixed
When the IP is shared with other devices (without a DHCP server
connected)
Note : You can assign your own IP, Subnet Mask and Gateway within your private segment. If
the segment is 172.16.0.0-172.16.0.255, your settings should be:
one chosen from the range between 172.16.0.1 to 172.16.0.254
255.255.255.0
one chosen from the range between 172.16.0.1 to 172.16.0.254, usually
172.16.0.254, and can't be the same as your IP address.
IP :
Subnet mask :
Gateway :
Internet
ATU-R
Router General PC 1, 2, ...n
This router has to be able to provide the NAT service and the following static routes
should be set: TCP port 1720-1730 and 7000-7009 and UDP port 8050-8058. Or
you can put BVP 8759 into DMZ if your router supports this function.
System Setup (Cont'd)
BVP 8759
BVP 8759 System Setup
(see p. 37)
Phonebook
Configuration
Password
Bandwidth Setup
Remote Update
System Setup
Server Setup
Network Setup
Terminal Setup
NTP Setup
Service Setup
Connect Type: STATIC
IP address: see note
Subnet Mask: see note
Gateway: see note
PPPoE Username( )
PPPoE Password( )
BVP 8759 User's Manual 14

Connection ADSL Type Constant ADSL IP Multiple, Public, & Fixed
When BVP 8759 uses one of the IPs (with a DHCP server connected)
Note : IP, Subnet Mask and Gateway are assigned by your DHCP server.
Internet
ATU-R
General PC 1, 2, ...n DHCP Server
Hub
System Setup (Cont'd)
BVP 8759
BVP 8759 System Setup
(see p. 37)
Phonebook
Configuration
Password
Bandwidth Setup
Remote Update
System Setup
Server Setup
Network Setup
Terminal Setup
NTP Setup
Service Setup
Connect Type: DHCP
IP address: see note
Subnet Mask: see note
Gateway: see note
PPPoE Username( )
PPPoE Password( )
15
Other manuals for BVP 8759
1
Table of contents
Other Leadtek Conference System manuals
Popular Conference System manuals by other brands

TANDBERG
TANDBERG 3000 MXP Profile Installation

Heathkit
Heathkit GD-125 Assembly and operation

Beyerdynamic
Beyerdynamic MCS 20 operating instructions

Polycom
Polycom VIEWSTATION EX Api guide

Tobii Dynavox
Tobii Dynavox I-12+ ETR user manual

Alcatel-Lucent Enterprise
Alcatel-Lucent Enterprise 8378 DECT IP-xBS Getting started