manuals.online logo
Brands
  1. Home
  2. •
  3. Brands
  4. •
  5. Lechuza
  6. •
  7. Lawn And Garden Equipment
  8. •
  9. Lechuza CASCADINO User manual

Lechuza CASCADINO User manual

www.lechuza.com
US GB A CHD
- Bewahren Sie diese Anleitung auf. Diese Anleitung liefert wichtige
Sicherheitshinweise für die Montage des LECHUZA Pflanzturms
(Erweiterungsset für CASCADA/CASCADINO 2-er Turm Art.-Nr.
14997). Lesen Sie diese Anleitung sorgfältig, bevor Sie mit der Mon-
tage des Pflanzturms beginnen.
- Verwenden Sie für die Montage nur Originalteile von LECHUZA
(Schrauben, Sockel, Rohre, CASCADA und CASCADINO Pflanzgefäße).
- Der Aufstellort muss eben/waagerecht, belastbar und windgeschützt sein.
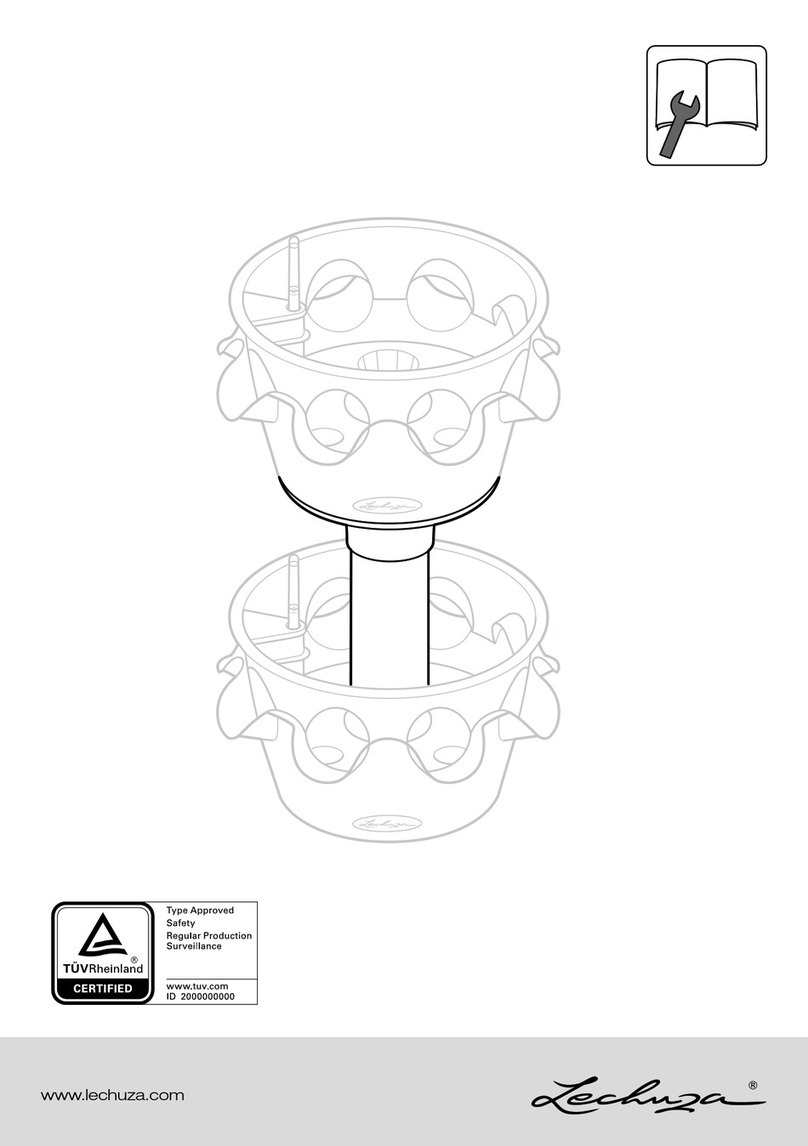
- Setzen Sie nicht mehr als 2 Pflanzgefäße übereinander. Es muss
sichergestellt sein, dass die Verbindungsrohre korrekt und vollständig
aufgesteckt sind. Überprüfen Sie deshalb die Turmhöhe:
2-er Turm 66 cm (siehe Abbildung).
- Befestigen Sie die Pflanzgefäße mit den beigelegten Schrauben und
überprüfen Sie regelmäßig den festen Sitz der Schrauben. Ziehen Sie
diese mit einem Schraubendreher fest an. Ein einfaches Aufsetzen
reicht nicht aus! Verwenden Sie zur Montage keinen Akkuschrauber.
- Bepflanzen Sie den LECHUZA Pflanzturm von unten nach oben, um
den Schwerpunkt niedrig zu halten. Befüllen Sie die Pflanzgefäße
gleichmäßig, um den Pflanzturm im Gleichgewicht zu halten. Beachten
Sie für das oberste Gefäß, dass die maximale Pflanzenhöhe 30 cm
nicht überschreitet und verwenden Sie kein Rankgitter.
- Der Pflanzturm ist kein Kinderspielzeug! Stellen Sie sicher, dass
der Pflanzturm von Kindern nicht als Spielzeug (z.B. zum Klettern)
benutzt wird.
- Leeren Sie vor dem Umsetzen des Pflanzturms die Pflanzgefäße
(von oben nach unten).
- Keep these instructions. These instructions provide important safety
information for assembling the LECHUZA plant tower (expansion
set for CASCADA/CASCADINO 2-pc tower item no. 14997). Read
these instructions carefully before you start to assemble the plant
tower.
- Use only genuine parts from LECHUZA for the assembly (screws,
pedestal, tubes, CASCADA and CASCADINO planters).
- The tower must be placed on a sturdy, level surface that is sheltered
from wind.
- Put no more than 2 planters on top of each other. Make sure that
the connecting tubes are correctly and completely inserted into
each other. Check the height of the tower to do this:
2-pc tower: 26 in | 66 cm (see figure).
- Attach the planters with the supplied screws and check regularly to
ensure that the screws are tight. Tighten the screws with a screwdriver.
Simply setting them on top of each other is not enough! Do not use
a cordless screwdriver for assembly.
- Plant the LECHUZA plant tower from bottom to top to keep a
low center of gravity. Fill the planters evenly so the plant tower is
balanced. Please note: The planting in the top planter should not be
higher than 11.8 in | 30 cm; do not use a trellis.
- The plant tower is not a toy! Do not allow children to play with the
plant tower (e.g. for climbing).
- Empty the plant tower (from top to bottom) before moving it.
I CH NL B
- Conservare queste istruzioni. Le presenti istruzioni forniscono importanti
indicazioni di sicurezza per il montaggio della torre portavasi LECHUZA
(set aggiuntivo per torre da 2 CASCADA/CASCADINO codice art.
14997). Leggere con attenzione le istruzioni prima di iniziare il montaggio
della torre portavasi.
- Per il montaggio utilizzare solo pezzi di ricambio originali LECHUZA
(viti, basamento, tubi, vasi CASCADA e CASCADINO).
- Il luogo di installazione deve essere piano/orizzontale, sollecitabile e
protetto dal vento.
- Non disporre più di 2 vasi uno sopra l’altro. Si deve assicurare
che i tubi di collegamento siano applicati correttamente e innestati
completamente. Verificare quindi l’altezza della torre:
torre da 2: 66 cm (vedere figura).
- Fissare il vaso con le viti in dotazione e verificare regolarmente la tenuta
salda delle viti. Stringerle saldamente con un cacciavite. Non è
sufficiente una semplice applicazione! Per il montaggio non utilizzare
un cacciavite a batteria.
- Piantare la torre portavasi LECHUZA dal basso verso l’alto per
mantenere basso il baricentro. Riempire i vasi in modo uniforme al
fine di mantenere la torre portavasi in equilibrio. Prestare attenzione
per il vaso più alto di non superare l’altezza massima di 30 cm e non
utilizzare alcun graticcio.
- La torre portavasi non è un gioco! Assicurarsi che la torre portavasi
non venga usata dai bambini come gioco (ad es. per arrampicarsi).
- Svuotare i vasi prima del ricollocazione della torre portavasi (dall’alto
verso il basso).
- Bewaar deze gebruiksaanwijzing. Deze handleiding biedt belangrijke
veiligheidsaanwijzingen voor de montage van de LECHUZA-plantentoren
(uitbreidingsset voor CASCADA/CASCADINO dubbele toren art.-nr.
14997). Lees deze handleiding zorgvuldig door voordat u met de
montage van de plantentoren begint.
- Gebruik voor de montage alleen originele onderdelen van LECHUZA
(schroeven, sokkel, buizen, CASCADA en CASCADINO planten-
potten).
- De plaats van opstelling moet vlak/waterpas, belastbaar en tegen
de wind beschermd zijn.
- Plaats niet meer dan 2 plantenpotten boven elkaar. Er moet worden
gegarandeerd dat de verbindingsbuizen correct en volledig ingebracht
zijn. Controleer daarom de torenhoogte:
2e toren 66 cm (zie afbeelding).
- Bevestig de plantenpot met de meegeleverde schroeven en
controleer regelmatig of de schroeven vast zitten. Draai ze met een
schroevendraaier goed vast. Eenvoudige plaatsing is niet voldoende!
Gebruik voor de montage geen accuschroefmachine.
- Beplant de LECHUZA-plantentoren van onder naar boven om het
zwaartepunt laag te houden. Vul de plantenpot gelijkmatig om de
plantentoren in evenwicht te houden. Let er voor de bovenste pot
op dat de maximale beplantingshoogte de 30 cm niet overschrijdt
en gebruik geen klimrooster.
- De plantentoren is geen kinderspeelgoed! Verzeker u ervan dat de
plantentoren niet door kinderen als speelgoed (bijv. om te klimmen)
wordt gebruikt.
- Leeg voor het verplaatsen van de plantentoren (van boven naar onder).
F B CH E
- Conservez cette notice. Cette notice contient des consignes de
sécurité importantes pour le montage de la tour à plantes LECHUZA
(kit d’extension pour tour à 2 niveaux CASCADA/CASCADINO
art. nº 14997). Lisez-la attentivement avant de commencer à
monter la tour à plantes.
- Pour le montage, utilisez exclusivement des pièces d’origine
LECHUZA (vis, socle, tiges, pots CASCADA et CASCADINO).
- Le lieu d’installation doit être plan/horizontal, résistant et à l’abri
du vent.
- Veillez à ne pas empiler plus de 2 pots les uns sur les autres.
Assurez-vous que les tubes de raccordement sont entièrement et
correctement fixés. Vérifiez la hauteur de la tour :
tour à 2 niveaux 66 cm (cf. illustration).
- Fixez les pots avec les vis fournies et vérifiez régulièrement que les
vis sont bien serrées. Serrez-les avec un tournevis. Il ne suffit pas
de poser les pots les uns sur les autres ! N’utilisez pas de visseuse
sans fil pour le montage.
- Effectuez les plantations dans la tour à plantes LECHUZA de bas en
haut afin maintenir le centre de gravité en bas. Remplissez les pots
de manière uniforme afin de garder la tour à plantes en équilibre.
Pour le pot supérieur, assurez-vous que la hauteur de la plantation ne
dépasse pas 30 cm max. et n’utilisez pas de treillis.
- La tour à plantes n’est pas un jouet ! Assurez-vous que les enfants
ne jouent pas avec la tour à plantes (p. ex. en grimpant dessus).
- Avant de déplacer la tour à plantes, videz les pots (de haut en bas).
- Conserve estas instrucciones. Estas instrucciones ofrecen instrucciones
de seguridad importantes para el montaje de las torres LECHUZA
(set complementario para CASCADA/CASCADINO torre 2 pisos
núm. art. 14997). Lea estas instrucciones cuidadosamente antes de
empezar el montaje de la torre.
- Para el montaje utilice sólo piezas originales LECHUZA (tornillos,
pedestal, tubos, macetas CASCADA y CASCADINO).
- Colocar en un lugar plano/horizontal, resistente y protegido del viento.
- No coloque más de 2 macetas una encima de la otra. Se tiene
que asegurar que los tubos de conexión estén correctamente y
totalmente fijados. Compruebe la altura de la torre:
torre 2 pisos 66 cm (vea imagen).
- Fije la maceta con los tornillos incluidos y compruebe regularmente
que estén bien apretados. Apriételos con un destornillador. ¡No es
suficiente colocarlos flojos! Para el montaje no utilice ningún destornillador
con batería.
- Plante las torres LECHUZA desde abajo hacia arriba para mantener
bajo el centro de gravedad. Llene las macetas uniformemente para
mantener el equilibrio de la torre. Tenga en cuenta para la maceta
superior que la altura máxima de la planta no supere los 30 cm, y
no utilice ningún enrejado.
- ¡La torre no es ningún juguete! Asegúrese de que los niños no
utilicen la torre como juguete (p. ej. para trepar).
- Antes de trasladarla, vacíe la torre de macetas (de arriba hacia abajo).
P PL
- Guardar estas instruções. Estas instruções fornecem avisos de se-
gurança importantes para a montagem da torre de plantas LECHUZA
(conjunto expansão para torre dupla CASCADA/CASCADINO,
ref. 14997). Ler atentamente estas instruções antes de iniciar a
montagem da torre de plantas.
- Para a montagem em varandas utilizar exclusivamente peças
originais da LECHUZA (parafusos, base, tubos, vasos CASCADA e
CASCADINO).
- O local de montagem deve ser plano, resistente e protegido do vento.
- Não montar mais de 2 vasos. Deve ser assegurado que os tubos de
ligação estão correta e completamente montados. Verificar a altura
da torre: torre dupla 66 cm (ver figura).
- Fixar os vasos com os parafusos fornecidos e verificar regularmente
a fixação dos parafusos. Apertar os parafusos com uma chave de
parafusos. Não basta enroscá-los! Não utilizar uma aparafusadora a
bateria.
- Plantar a torre de plantas LECHUZA de baixo para cima, de modo a
manter o centro de gravidade baixo. Encher os vasos uniformemente,
de modo a manter a torre de plantas equilibrada. Ter em atenção que
o vaso do topo não tenha uma planta com uma altura superioir a 30
cm e não utilizar uma treliça.
- A torre de plantas não é um brinquedo para crianças! Assegurar que
a torre de plantas não seja utilizada por crianças como brinquedo
(p. ex. para escalar).
- Esvaziar os vasos antes de mudar a posição da torre de plantas
(de cima para baixo).
- Zachować niniejszą instrukcję obsługi. Niniejsza instrukcja zawiera
ważne informacje dotyczące bezpieczeństwa podczas montażu
systemu pojemników kaskadowych LECHUZA (akcesoria do kolumny
2-elementowej CASCADA/CASCADINO nr art. 14997). Zaleca się
uważne przeczytanie instrukcji przed przystąpieniem do montażu
systemu.
- Do montażu stosować wyłącznie oryginalne części LECHUZA (śruby,
podstawka, rury, pojemniki CASCADA i CASCADINO).
- Kolumnę należy ustawić na równym/poziomym, stabilnym podłożu,
w miejscu osłoniętym od wiatru.
- System kaskadowy może składać się maksymalnie z 2 pojemników.
Rury łączące elementy muszą muszą być prawidłowo i całkowicie
zmontowane ze sobą. W związku z tym należy sprawdzić wysokość
kolumny: kolumna 2-elementowa 66 cm (patrz rysunek).
- Zamocować pojemniki na rośliny za pomocą załączonych śrub i
regularnie sprawdzać, czy są dobrze dokręcone. Dokręcić śruby
wkrętakiem. Nie wolno montować pojemników bez przykręcania! Do
montażu nie używać wkrętaka akumulatorowego.
- Pojemniki systemu kaskadowego LECHUZA obsadzać od dołu do
góry, tak aby środek ciężkości znajdował się nisko. Wypełnić pojemniki
równomiernie, aby zapewnić stabilność systemu kaskadowego.
Maksymalna wysokość roślin w najwyższym pojemniku nie może
przekraczać 30 cm i nie należy używać w nim drabinki do roślin.
-System pojemników kaskadowych nie jest zabawką! Nie dopuścić do
tego, aby system był używany do zabawy przez dzieci (np. do wspinania)
- Opróżnić pojemniki systemu kaskadowego przed zmianą aranżacji
(począwszy od góry).
66 cm
!
!
Indoor
Outdoor
Item no: 14997
© 2016 geobra Brandstätter Stiftung & Co. KG, Brandstätterstraße 2–10, 90513 Zirndorf / Germany
30811304 / 03.16 / ACS / Printed in Germany
1
23
4

This manual suits for next models

1

Other Lechuza Lawn And Garden Equipment manuals

Lechuza BOLA 23 Installation guide

Lechuza

Lechuza BOLA 23 Installation guide

Lechuza CUBE 40 User manual

Lechuza

Lechuza CUBE 40 User manual

Lechuza Canto LED 30 User manual

Lechuza

Lechuza Canto LED 30 User manual

Lechuza CASCADA User manual

Lechuza

Lechuza CASCADA User manual

Lechuza PURO 50 User manual

Lechuza

Lechuza PURO 50 User manual

Lechuza CARARO User manual

Lechuza

Lechuza CARARO User manual

Lechuza CASCADINO User manual

Lechuza

Lechuza CASCADINO User manual

Lechuza CARARO User manual

Lechuza

Lechuza CARARO User manual

Lechuza Green Wall Home Kit User manual

Lechuza

Lechuza Green Wall Home Kit User manual

Lechuza BALCONERA 50 User manual

Lechuza

Lechuza BALCONERA 50 User manual

Lechuza RONDO User manual

Lechuza

Lechuza RONDO User manual

Lechuza NIDO User manual

Lechuza

Lechuza NIDO User manual

Popular Lawn And Garden Equipment manuals by other brands

FLORABEST FLV 1200 A1 translation of original operation manual

FLORABEST

FLORABEST FLV 1200 A1 translation of original operation manual

Pioneer Athletics BRITE STRIPER 1600PS Instruction manual and parts listing and parts listing

Pioneer Athletics

Pioneer Athletics BRITE STRIPER 1600PS Instruction manual and parts listing and parts listing

Everbloom S333618W installation guide

Everbloom

Everbloom S333618W installation guide

Simplicity 1690821 Operator's manual

Simplicity

Simplicity 1690821 Operator's manual

ThermaCell Backpacker user manual

ThermaCell

ThermaCell Backpacker user manual

AeroGarden Farm 12 Assembly guide

AeroGarden

AeroGarden Farm 12 Assembly guide

Toro Bullseye QuickGroom 710 Operator's manual

Toro

Toro Bullseye QuickGroom 710 Operator's manual

Sase SC12E user manual

Sase

Sase SC12E user manual

Aquatec Aquapro instruction manual

Aquatec

Aquatec Aquapro instruction manual

SCM SC 10 manual

SCM

SCM SC 10 manual

vita Keyhole 3x5 instruction manual

vita

vita Keyhole 3x5 instruction manual

Husqvarna FT900 owner's manual

Husqvarna

Husqvarna FT900 owner's manual

Ryobi R36PPS114 manual

Ryobi

Ryobi R36PPS114 manual

Holman dial ezy 4 instruction manual

Holman

Holman dial ezy 4 instruction manual

Craftsman 842.242560 owner's manual

Craftsman

Craftsman 842.242560 owner's manual

Westfalia 828672 Assembly instruction

Westfalia

Westfalia 828672 Assembly instruction

Rewatec Modena 200 Installation & assembly instructions

Rewatec

Rewatec Modena 200 Installation & assembly instructions

DANDELION FLOURISH DBDTAB1 user guide

DANDELION

DANDELION FLOURISH DBDTAB1 user guide

manuals.online logo
manuals.online logoBrands
  • About & Mission
  • Contact us
  • Privacy Policy
  • Terms and Conditions

Copyright 2025 Manuals.Online. All Rights Reserved.