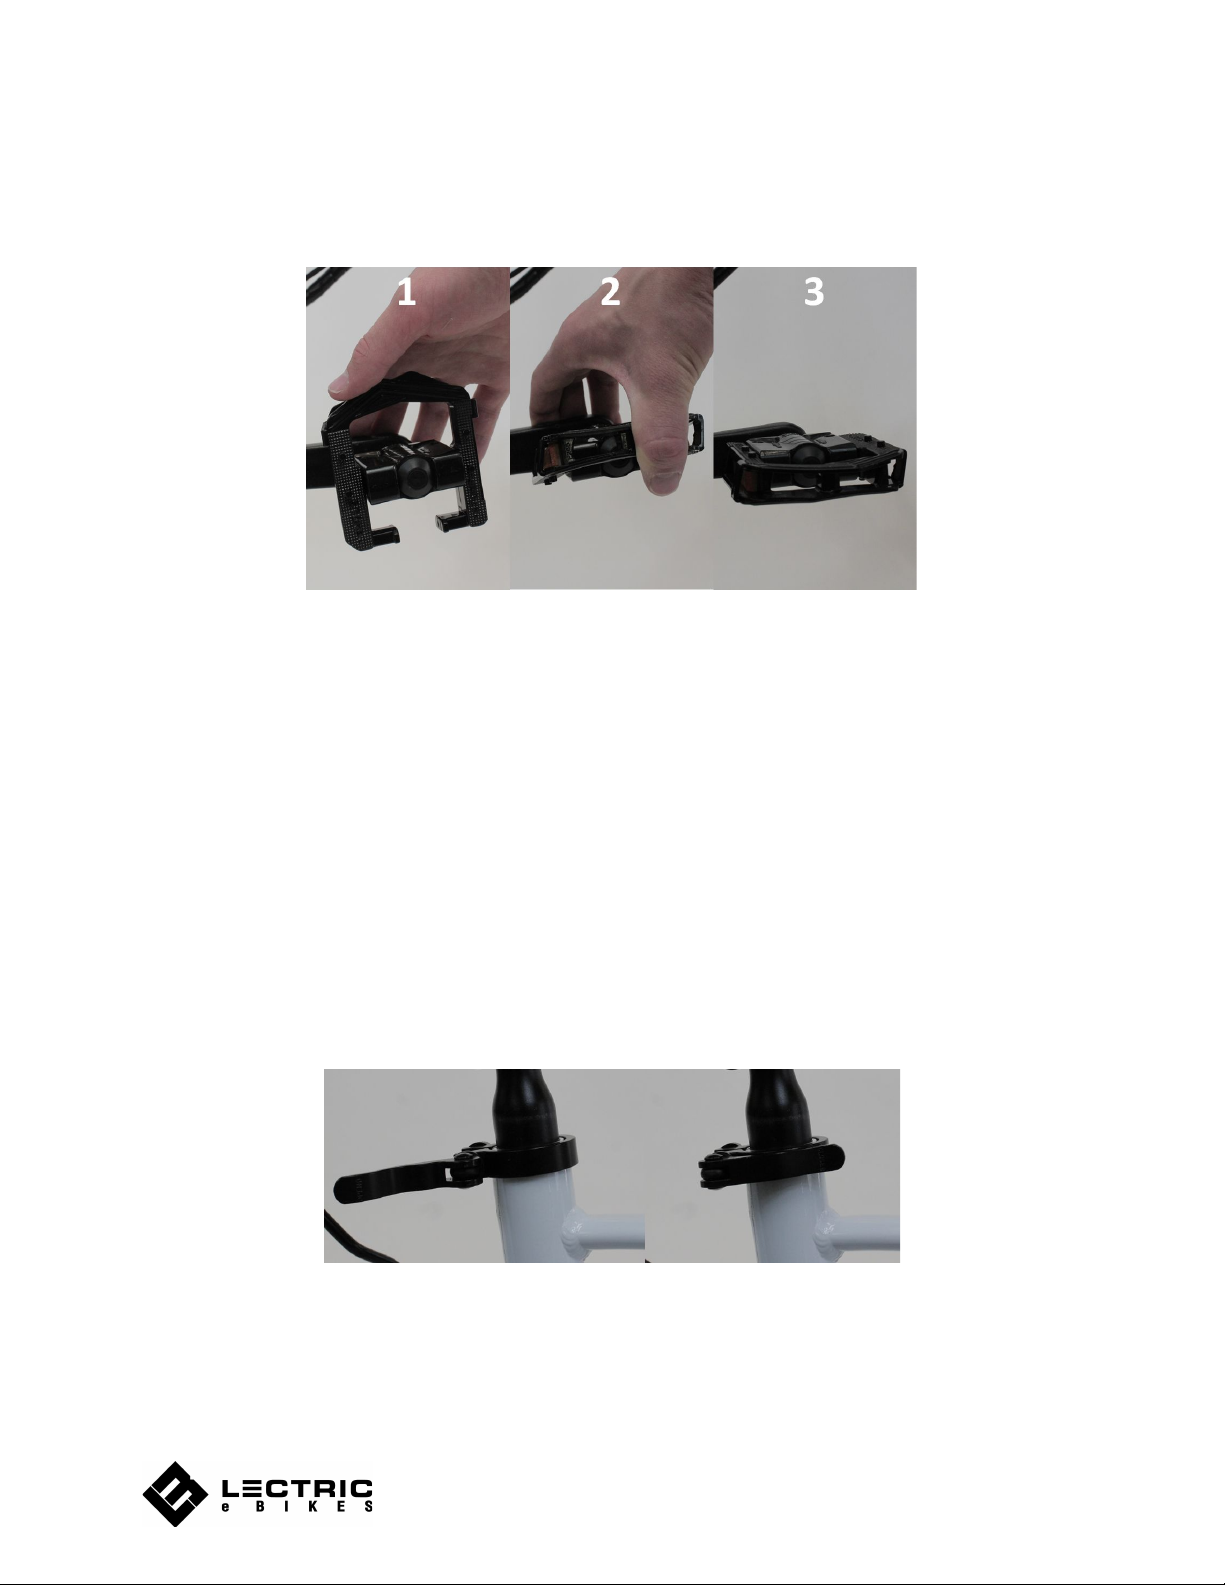
Lectric XP User manual

Lectric XP
Owner’s Manual
2019
V 1.1
www.lectricebikes.com

Table of Contents
Table of Contents 2
Warning 4
Unboxing 5
Getting Started 5
Folding and Unfolding the Bike 5
Preparing to Ride 7
Recommended Torque Values 8
Battery 9
Operating your battery 9
Keeping Your Battery Healthy 10
Charging Your Battery 11
Battery Safety 11
Operating your new eBike 12
Cockpit Tour 13
Cockpit Instruments 13
Display Control Pad 14
Your First Ride 15
Front and Rear Lights 16
Operating Safety 16
7 Speed Gear System 17
Mechanical Disc Brakes 17
LCD Display Functions 19
Display Readouts 19
Operating the LCD Display 20
Display Settings 20
Changing the Top Speed 22
Battery Capacity Display 23
Kickstand 23
Tips When Riding To Increase Range 23
Maintaining Your Bike 24
Safety 25
Warranty 26
2

Thank you for your purchase of a Lectric eBike.
We appreciate your business and we hope you thoroughly enjoy riding your new eBike.
If you need any assistance please do not hesitate to reach out to us.
Contact Information
Email: [email protected]
Website: lectricebikes.com
Phone: (602)-715-0907
3

Warning
Read this entire manual before assembling or using your new electric bike. Do not
modify, disassemble, or replace the original electrical components on your bike. Doing
so will invalidate your warranty and could put you in danger. Riding any kind of bike
comes along with some risks which can’t be predicted or avoided. Taking proper care of
bike components can lower the risk of sudden failure of components but can not prevent
it. These sudden failures could cause serious harm, injury, or death to the rider. If you
notice abnormalities in any component on the bike, please take it to a licensed mechanic
to be repaired or replaced immediately. Lectric eBikes LLC assumes no liability for harm,
injury, or death of the rider.
This manual is not intended as a detailed service or repair manual. Seek assistance from
your local bike shop mechanic at a reputable bike shop with all the proper certifications
and qualifications.
The Lectric XP can stand up to most rain showers without sustaining damage. However,
the bike and its mechanical and electrical components are not waterproof. We do not
recommend storing or using the bike is wet conditions if it is not absolutely necessary.
The warranty for the Lectric XP does not cover water damage.
For technical assistance or warranty claims contact Lectric eBikes at (602)-715-0907 or email at
contact@lectricebikes.com.
4

Unboxing
Getting Started
Congratulations on your purchase of a brand new Lectric XP eBike! Your bike comes in the box
100% assembled. The instructions that follow are intended to serve as a guide in unboxing and
getting familiar with your new bike. The bike may require adjustments upon being received and
unboxed, as shipping can sometimes be bumpy. We recommend seeking professional help
from a licensed bicycle mechanic who can then help with future maintenance and repair.
What’s in the box:
1. Lectric XP eBike
2. Lectric XP eBike charger
3. 2 Battery keys
4. Assembly tools
5. Manufacturer manuals
Before riding your bike, remove everything from the box and make sure everything listed above
is present. If anything is missing or damaged contact Lectric eBikes immediately for assistance.
For video instructions on how to unfold your bike visit our youtube page: Lectric eBikes.
Folding and Unfolding the Bike
The Lectric XP comes to you fully assembled so all you have to do is ensure everything is
properly secured, unfold the bike, and then you can get riding! The Lectric XP folds in the center
of the frame as well as at the handlebars.
Handlebars
1. To unfold the bike, start with the handlebar clasp.
2. Pull the handlebars to their upright position and push the clasp down firmly.
3. Once the safety clasp is locked, move the safety pin sideways so it is inserted into the
clasp locking it in place.
5

Frame
1. To unfold the bike frame grab the handlebar stem and rear end of the bike while
standing near where the battery is exposed. Lift the bike slightly off the ground and
swing the bike to its closed position.
2. Push down on the clasp firmly until it locks into position.
3. To unlock the bike frame slide the switch to the right as shown below, then pull the latch
open.
6

Pedals
1. To unfold the pedals push down slightly and move the pedal outwards.
2. Continue pushing down while lowering it into its unfolded position.
3. Ensure you hear the pedal lock into place once in the unfolded position.
Preparing to Ride
●Ensure all components are properly secured before riding otherwise serious harm
or death could occur. This includes but is not limited to: pedals, handlebars,
handlebar clamp, cranks, seat, and seatpost clamp.
● Make sure you can’t twist the seat or stem out of alignment by hand.
● Check to see if your saddle is positioned at the proper height. Sit on the saddle facing
forward and place the ball of your foot on the pedal at its lowest point. Your leg should
be mostly straight at this point with a slight bend at the knee. You should be able to
pedal the bike without overextending your leg when the pedal is at its lowest point. Your
legs may be overextended where it causes your hips to move side to side which means
the seat must be lowered.
● To adjust your seat up or down, unlatch the seatpost clamp. Move the seat to the
desired height and close the seatpost clamp. The open and closed positions of the
seatpost clamp are shown below (open position on left, closed position on right).
● If you need to adjust the angle of your seat, loosen the nuts on both sides of the seat,
move the seat to the desired angle, then tighten the nuts. The nut’s location is shown
below.
7

● Ensure all cables and connectors at the front of the bike are securely connected or
certain components may not work including the front light, the motor inhibitor switches,
LCD display, and throttle. The motor inhibitor switches shut the motor off as soon as the
rider hits the brakes. If these switches are not operational it will take longer to slow
down which in some riding situations could cause injury or death to the rider.
Recommended Torque Values
It is recommended that fasteners be tightened to the manufacturer's specification found below:
Part
Required Torque (N*m)
Hub
35-44
Reflector
4-5
Disc mounting bolts
6-8
Brake Lever
2-3
Rear Derailleur
8-10
Seatpost
15-17
Saddle
18-19
Pedals
35
Bottom Bracket Parts
38-44
Headset Parts
30-34
Stem
5-6
Handlebars
4
8

Battery
Operating your battery
Your bike comes with a 48V 10.4Ah lithium ion battery with LG cells. Key operating features of
the battery can be found below:
1. Your bike’s battery comes with a set of keys that are used to turn it ON/OFF as well keep
it LOCKED/UNLOCKED to the frame. Each battery has a unique set of keys.
2. The battery has 3 positions: UNLOCKED, OFF, and ON. These positions are shown and
marked below.
3. When your battery is in the UNLOCKED position, you will be able to remove it from the
frame and the power will not be active.
9

4. When turning your battery from the UNLOCKED to the OFF position you must PUSH the
keys in firmly. In the OFF position the battery will be locked to the frame, but the power
will not be active.
5. To turn the power from the OFF to the ON position you must turn the key clockwise. In
the ON position the battery will be locked to the frame, and the power will be active. You
will not be able to remove the keys from the battery in this position. The keys must be
turned to this position for your bike to work.
Keeping Your Battery Healthy
● If you know you won’t be using the battery for more than a few days keep it charged at
about 75% capacity. The battery will degrade less over time at this charge level than at
higher charge levels.
● Periodically check your batteries charge level about once per month and charge back up
to 75% if necessary.
● If you want to increase the number of cycles your battery will last for charge your battery
to 100% a few hours before you plan to ride it. For example if you ride the bike one day
and the charge level falls to 50% but you plan to use the bike again in a few days, wait
until the night before you plan to use it again to charge it up to 100%. When the battery
is not in use this is healthier for the individual cells in the long term.
10

Charging Your Battery
Locate the charge port on the side of the battery. You can charge the battery from this port while
the battery is on or off the bike.
The battery on the Lectric XP comes with almost a full charge. You should plug your battery
in when you first receive it to ensure it is fully charged prior to your first ride.
● The battery can be charged while attached or detached from the bike.
● You can remove the battery by inserting the key into the lock on the underbelly of the
frame. Push the key in firmly and turn counterclockwise (if looking at the bike from
below) to unlock. Remove the key from the battery and slide the battery out of the frame
until it is free.
● To lock the battery, insert the key into the lock on the underbelly of the frame. Turn the
key clockwise (if looking at the bike from below).
● Do not charge the battery with chargers other than the charger provided by Lectric
eBikes.
● Only charge the battery indoors in dry spaces which are not excessively hot or cold
(Within 10°F of room temperature).
● Ensure there is no dirt or debris near when using the charger.
● The charger will automatically stop charging once the battery reaches its full capacity.
● The light on the charger will be red when the battery is charging and will turn green when
charging has finished.
● Avoid leaving the charger plugged in when the battery is fully charged.
● Do not charge the battery if you notice the battery is damaged, excessively hot, leaking,
smells, or is discolored.
● Charging the battery should take approximately 4-6 hours if battery is mostly empty.
● Store the battery indoors in a dry space, away from heat or flame sources and out of
direct sunlight.
Battery Safety
● Do not submerge the battery in liquid of any kind.
● Do not touch the terminals at the back of the battery.
● Turn off the battery when not in use and before removing from the bike.
● The battery should not be excessively difficult to attach or remove from the battery
mount. Do not force the battery to avoid the risk of damage or personal injury.
● Battery charging times may increase with battery age and usage.
● Only grab the charger by the plug and not the cable when plugging and unplugging from
the wall.
● If the battery has trouble charging discontinue charging and contact Lectric eBikes
immediately.
11

Lithium Ion batteries can be dangerous. Take care when using and charging your battery.
Failure to follow the above guidelines could result in damage to property and/or serious
injury.
Operating your new eBike
Make sure you read this entire manual before turning on and operating your eBike.
Now that your eBike is unfolded it is almost time to start riding. The Lectric XP eBike is equipped
with pedal assist, a twist throttle, and can also be used as a regular bike. To use electric assist,
the battery must be charged, inserted into the frame, and the key must be in the battery and
turned to the ON position.
12

Cockpit Tour
Before learning about how to operate your new eBike, it is important you know where all of the
important controls are located. Below are photos showing where key controls and features are
on your eBike.
Cockpit Instruments
Location
Component
1
Display control pad
2
Bell
3
LCD Display
4
Shimano gear shifter
5
Half twist throttle
13

Display Control Pad
Location
Component
1
Up button
2
Down button
3
Mode button
14

Your First Ride
To use your electric bike:
1. Ensure your battery is fully charged before your first ride.
2. If the battery is not already inside the bike, slide it inside of the frame and lock it in
position. Make sure the battery is all the way inside the bike. Once the battery is secured
inside, insert the key into the battery via the port on the underbelly of the frame near the
seatpost. The location of the key port is shown below.
3. Push the key in firmly and turn the key clockwise to lock the battery to the bike and turn it
to the ON position. You will not be able to remove the keys from the battery in this
position.
Note:
● Make sure to push the key in firmly to be able to turn the key to the ON
position.
● The key has to be inside the battery and turned to the ON position in order
to operate the bike. In this position you will not be able to remove the key
from the bike. See the BATTERY section of this manual for further
information.
● Before transporting the bike on a bike rack remove the battery from the bike.
15

4. Hold down the mode button on the button pad located on the left handlebar until the
display comes on.
5. Select a level of pedal assist using the up and down arrows on the button pad. Pedal
assist level 1 is the lowest level of assist and pedal assist level 5 is the highest level of
pedal assist. Level zero will provide no assistance.
6. The right handlebar features a half twist throttle. To operate the throttle, ensure the
pedal assist level is set above 0, then twist the throttle back slowly according to how
much speed and acceleration you want to achieve. The farther you twist the throttle from
its resting position, the more power propels the bike forward. When the bike is at a
complete stop, turn the display off. This will ensure that the motor will not activate until
the display is turned back on and the rider is ready to go. (Note: Exercise extreme
caution using the twist throttle. When at a complete stop with the bike turned on,
be careful not to twist the throttle unknowingly or the bike could throw you off
balance and cause serious harm, injury, or death.)
7. To turn on the headlight and taillight, press and hold the up arrow on the button pad. The
battery must be inside the bike when it is in its unfolded position in order for the
headlight to work.
8. DO NOT HOLD DOWN THE DOWN ARROW ON THE DISPLAY CONTROL PAD
WHILE THE BIKE IS POWERED ON. THIS WILL TRIGGER UPHILL WALK MODE
WHICH IS ONLY INTENDED FOR USE WHEN DISMOUNTED FROM THE BIKE,
WALKING UP EXTREMELY STEEP GRADES. ENGAGING UPHILL WALK MODE ON
FLAT GROUND MAY CAUSE INJURY/DAMAGE TO THE BIKE/RIDER.
Front and Rear Lights
The Lectric XP comes with fully integrated front and rear lights. Please use these lights when
riding at night or in low visibility situations. To turn the lights on hold the up button on the display
control pad until the lights turn on. To turn the lights off repeat.
Operating Safety
Before riding the bike for the first time ensure that you have read and understood this
manual. Make sure you understand how to turn on activate the pedal assist and throttle. When
first riding the bike take care to start slowly in a low level of pedal assist. Take your first ride in a
safe area away from cars, other bikers, pedestrians, or other potentially dangerous obstacles.
Only move up pedal assist levels when you feel comfortable and you have ample experience
riding the bike. The higher pedal assist levels will accelerate you to higher speeds more quickly.
Take care when riding the bike at any speed. Failure to adhere to warnings and guidelines in
this manual can lead to serious harm, injury, or death. Damage sustained by the bike from
failing to follow instructions, guidelines, and warnings in this manual is not covered under
warranty.
16

7 Speed Gear System
The Lectric XP comes with a 7 speed Shimano freewheel (Note: the freewheel is the cluster of
sprockets on the rear wheel of the bike). This allows the rider to maintain a comfortable level of
effort and pedaling speed throughout different terrains. For instance, while pedaling in lowest
gear (the largest sprocket), it will be easier to pedal up hills. In the highest gear (the smallest
sprocket), the rider will be able to reach higher speeds on flat or downhill terrain. 1st gear is the
lowest gear of this drivetrain while 7th gear is the highest gear. Use the thumb shifter on the
right handlebar to shift gears up or down. To shift up press the lower button. To shift down push
the lever on the top of the shifter. A photo of the shifter can be seen in the photo below.
Do not change gears too quickly as doing so could cause the chain to fall off and the
rider to lose control, which could result in serious injury. If the chain falls off, turn the
bike off before fixing the chain. If you do not and the motor turns on you could sustain
serious injury.
Mechanical Disc Brakes
The Lectric XP is equipped with mechanical disc brakes to ensure that you can stop quickly
even at high speeds. The brakes are engaged by squeezing the brake levers towards the
handlebars. This pulls the brake cable which closes the brake caliper. The brake caliper then
makes contact with the brake rotor which is attached to the bike wheels. The more you squeeze
the brake lever the more force will be applied and thus the faster the bike will slow down. The
left brake lever activates the brake on the front wheel and the right brake lever activates the
brake on the rear wheel. The right brake lever should always be applied before and while the
front brake is also being applied. If only the front brake is applied while slowing or stopping
17

quickly, the rider may be ejected over the front handlebars. This could result in serious
harm, injury, or death. To avoid this always apply even pressure to both brakes when
slowing down or stopping.
Before riding, ensure the brake lever does not touch the handlebars when fully applied. If it
does, screw or unscrew the barrel adjuster to increase tension in the brake cable. If this does
not fix the problem, take the bike to an experienced bicycle mechanic for further adjustment.
Note: Disc brake rotors will become hot during use and will stay hot for a short period
after use. This is due to the high amount of friction between the brake pad and the rotor.
Ensure you do not touch the disc rotor right after use.
Contact Lectric eBikes if you have ANY questions regarding the operation of your Lectric
eBike.
18

LCD Display Functions
Display Readouts
Location
Description
1
Pedal assist (PAS) Level Indicator
2
Odometer, Trip A, Trip B, Voltage, Current,
TM readouts
3
Battery level indicator bar
4
Speedometer in MPH or KM/H
5
Light On/Off Indicator
6
Mile and kilometer indicators
19

Operating the LCD Display
Turning the bike ON/OFF
Hold the mode button until the display turns
on
Increase Pedal Assist Level
Press up arrow button
Decrease Pedal Assist Level
Press down arrow button
Turn ON/OFF front/rear lights
Hold the up arrow button for 3 seconds until
lights turn on, repeat to turn off
Toggle Odometer, Trip A, Trip B, Voltage,
Current, Trip timer (TM)
Press and let go of the mode button
When the bike has not been used for 10 consecutive minutes the display will automatically shut
down.The pedal assist and throttle features will no longer work when the display is turned off.
Display Settings
To change display settings hold the up and down arrows simultaneously to enter into the
advanced settings menu. In this menu clicking the mode button will toggle between each
numbered setting. To adjust the value of each setting click the up and down arrows accordingly.
Setting
Function
Default
Explanation
P01
Brightness
1
Backlight display
brightness. The
darkest level is 1, the
brightest level is 3.
P02
Distance Units
1
Distance Units. 0: KM;
1: MILE.
P04
Sleep
10
LCD Display sleep
timer. With the default
setting, the display will
turn off after it has not
been used for 10
minutes.
P08
Speed Limit
32
Speed limit. Range is
0-100.
The input data here
represents the
20
Table of contents
Other Lectric Scooter manuals