LED Technologies VR1000 User manual

VR1000 8w Quad Colour RGBW User Manual
Specifications
Input Voltage: 100 –240v AC 50-60Hz
Power Consumption: 65w
Weight: 5.2kg
Dimensions: 1000mm x 75mm x 80mm (plus Brackets)
Beam Angle: 40deg
LED’s: 12 x 8w Quad-Colour
DMX Connections: 3 pin male / female flying leads with IP65 rated connectors
Mains Link: 4 pin male / female flying leads with IP65 rated connectors
Infra –Red Remote Control Sensor
Features
Infra Red Remote Control (Using optional VRIR remote Transmitter)
Compatible with LED Technologies Optional RGBW Easy Controller
Stand Alone / Master Slave
DMX 512 Controllable (4, 5, 6 & 7 x Channels)
410Hz LED Driver Chips for Flicker Free Operation when using Video Equipment
Power & DMX Link
IP65: Rated for Outdoor Use
Mains and DMX Linkable
Low Power Consumption
Rubberised easy wrap cable
(Optional Data & Power link leads are available in various lengths).
Introduction
Thank you for choosing the VR1000 8w Quad-Colour RGBW Lighting Baton.
Prior to use, please read all the instructions carefully paying particular attention
to the installation of this product.
By following the suggestions found in this user manual you can look forward to
long and reliable service of your new product.
Unpacking, Inspection and Installation
Please check that the following items are included in your packaging. If anything
is missing please contact your dealer.
VR1000 8w Quad-Colour RGBW Baton • Power cord with 13A mains plug
Carefully remove all packaging materials from the box, ensuring that all foam
padding is discarded responsibly.
This unit can be mounted and operated at any angle; however we would
recommend using a suitable safety chain if the unit is to be installed above head
height. As little or no heat is generated by the unit it can safely be installed
behind marquee linings and drapes.

Set Up
Connect your VR1000 8w Quad-Colour Baton to a suitable mains supply using
the special power lead (Included). Up to 8 x Units can be linked together using
the IP64 rated mains link leads.
Data and Mains Links in various lengths are available as an optional extra.
Operation
The VR Range of outdoor lighting requires a VRIR Infra-Red Remote control
transmitter to set up the units.
The units can then be controlled using the VR Remote control, DMX, or the
RGBW Easy Controller.
Infra-Red Operation
Note: The Infra-Red sensor is located towards the end of the LED baton. It is
clearly marked “IrDA”. When operating the baton by remote control, point the I/R
transmitter towards this area of the LED Matrix.
VRIR Instructions
Connect the unit to a suitable mains power supply.
If required, the units may be linked together using a suitable 3 PIN DMX lead.
Point the VRIR controller at the IR lens on the front of the baton.
1. Press BLACK OUT to switch the units on or off.
2. Press PROGRAM to cycle through the four program modes:
Program Mode 1: Auto Run
Program Mode 2: Static Colour Selection, Colour Chase & Colour Fade
Once the required program mode is selected, the each program can be modified
to give control over the colours.
Auto Run Mode: The run speed can be adjusted by pressing SPEED followed
by +or –or alternatively press SPEED then a number between 00 & 14, where
this value represents the speed of the program, 00 (slowest) & 14 (fastest).
This enables instant control of the run speed of the program.

Colour Select Mode: In this mode each of the 15 pre-mixed colours plus two
Colour Chase and two Colour Fade Programs can be selected. After entering
this mode, press +or –to scan through the mixed colours and programs or
simply press a number between 00 (Blackout) & 15 to select the pre-mixed
colours or 16 / 17 for colour chase programs or 18 / 19 for colour fade programs.
Program Listing
Program
Description
00
Blackout
01
Red
02
Green
03
Blue
04
White
05
Red + Green
06
Red + Blue
07
Red + White
08
Green + Blue
09
Green + White
10
Blue + White
11
Red + Green + Blue
12
Red + Green + White
13
Red + Blue + White
14
Green + Blue + White
15
Red + Green + Blue + White
16
Color Chase Program 1
17
Color Chase Program 2
18
Color Fade Program 1
19
Color Fade Program 2
Note: The above programme’s can be modified once selected as follows.
To Add a Strobe effect: Press the Fbutton to select the flash mode. To control
the strobe speed you can either press the SP Button then the +& -buttons or
simply press SP followed by a number between 00 & 15 to increase or decrease
the strobe flash rate.
To control the speed of the Chase or Fade programs you can either press the SP
Button then the +& -buttons or simply press SP followed by a number between
00 & 14 to increase or decrease the run speed of the program.
The SA button is not a function of the VR1000 8w Quad-Colour RGBW Baton.
The SL button selects SLAVE mode (see section on Master / Slave Modes).
The R, G, B &W buttons are used in conjunction with the +& -buttons to control
the intensity of individual colours. (See section on Custom Colour Mixing)
The Abutton is not a function of the VR1000 8w Quad-Colour RGBW Baton.
The D& Sbuttons are used in conjunction with the numbered 0to 9buttons to
set the units DMX Mode and DMX Address, (see section on DMX Mode).

Master / Slave Mode
Multiple units can be linked together using the data and mains flying leads at
each end of the baton.
The first unit in the chain will be the Master Unit; all the other units are Slaves.
We recommend setting the units to slave mode BEFORE connecting the DMX
(Data) leads.
So, daisy chain up to EIGHT units together with the power link leads only. Do
not connect the DMX (Data) link together at this time.
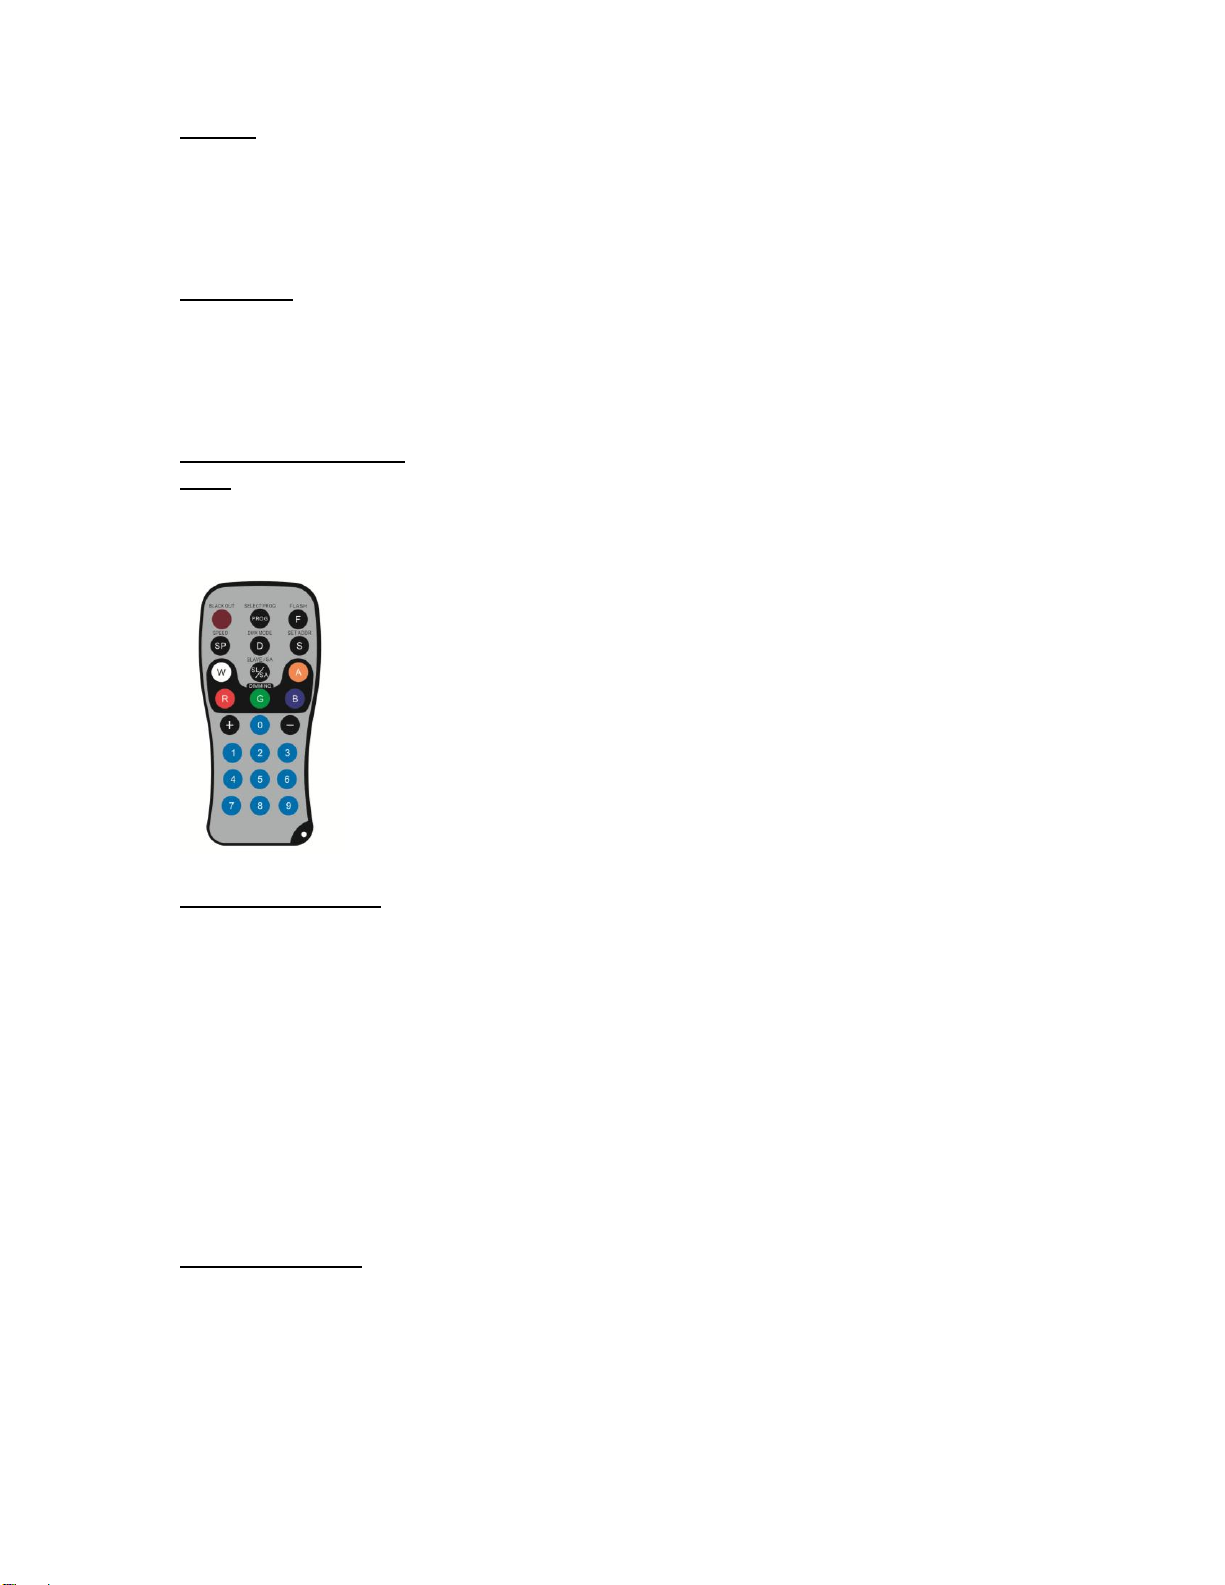
Once connected together with mains, switch on the power and set each unit to
slave mode by pointing the remote control at the IR sensor and press S. All the
LED’s will go out. Once set, switch off the power and the Data leads can then be
connected together.
Note: There is no real restriction on the number of units that can be linked with
DMX although we recommend connecting a terminator plug on the last unit.
Once all the units are connected together, re-apply the mains power and then all
the units can be controlled together by selecting the required colour or program
on the first unit in the chain (Master Unit). Take care not to point the remote
control at any of the other units when selecting colours etc. otherwise you may
inadvertently select two master units in the chin causing other slave units to
flicker.
Simple Colour Mixing
To access the more accurate colour mixing capabilities of the unit, press PROG
until the Static Colour selection mode is selected. Press any of the Red, Green,
Blue or White Buttons on the VRIR. All the LED’s should then illuminate.
Accurate colour mixing of the Quad-Colour LED’s can then be performed using a
combination of the R, G, B & Wbuttons with the +& -buttons.
Example: To reduce the intensity of the RED LED’s, press any of the R, G, B or
Wbuttons, (all LED’s on). Press the Red Button then hold down the -button until
the level of colour is achieved.
Note: Once the colour is reduced to its lowest level, if you continue to hold down
the –button the maximum level of colour will be selected. This is a handy way of
knowing the maximum / minimum level has been selected.
The same applies for the Green, Blue and White content.
Colour Mix Memory: If a colour has been mixed previously then when the R, G,
B& Wbutton is pressed that pre-mixed colour will be displayed even if the power
has been removed from the unit, so if all the LED’s do not come on to full
brightness you will need to select each colour then the +button to restore all the
LED’s to full brightness.
Tip: When selecting a colour look at the area that the light shines onto and not
directly at the LED’s.

DMX Mode
Pressing Dputs the unit into DMX mode.
Note: Refer to example below to set the DMX address.
Setting the DMX MODE using the VRIR
The VR1000 8w Quad-Colour Baton has four DMX modes: 4, 5, 6 & 7 Channel
Modes. The DMX Protocol tables at the end of this manual will detail the various
options available in each mode.
IMPORTANT:
You must set the DMX MODE before setting the DMX Addresses.
To set the DMX mode, press the Dbutton followed by the + &- buttons to scroll
through the four DMX Modes.
The LED’s change colour and Flash each time Dis pressed to indicate the DMX
mode that has been selected.
RED Flashes indicates DMX Mode 1: 4 x Channel Operation.
GREEN Flashes indicates DMX Mode 2: 5 x Channel Operation
BLUE Flashes indicates DMX Mode 3: 6 x Channel Operation
WHITE Flashes indicates DMX Mode 4: 7 x Channel Operation
Setting the DMX ADDRESS using the VRIR
(Example to set the DMX address to 001)
1. Press the Sbutton; all the LED’s will flash then light Red, indicating that the
unit is ready to except the DMX address.
2. Press the 0button; the LED’s will light Green, indicating that the number 0 in
the 001 address is set.
3. Press the 0button, the LED’s will light Blue, indicating that the number 0 in the
001 address is set.
4. Press the 1button, all the LED’s on the unit will flash and then go out,
indicating that the final number in the 001 address has been set.
The unit is then ready to except a DMX signal corresponding to the address 001.
Note: If you then want to operate the unit in the IR Mode, simply use the remote
control as detailed above, the baton will come out of DMX Mode and operate as
normal.
Press the Dbutton to return the unit to the last DMX Address set. When pressed
all the LED’s will flash then go out indicating it is in DMX Mode.
LED Technologies RGBW Easy Controller
As detailed above, set the DMX Mode to four channel mode then set the units to
either Slave Mode or DMX Address 001.
Connect the unit to the RGBW Easy Controller using the DMX lead supplied with
the controller. Refer to the instructions on the use of the RGBW Easy Controller
for detailed operation.

DMX Mode
The unit can be set to DMX mode (as above) which will enable accurate control
over all functions and colour mixing using a compatible DMX Controller.
Note: It is important to set the DMX mode BEFORE setting the DMX Addresses.
Refer to the instructions to set the DMX Mode and Address required.
DMX Mode 1
DMX Protocols (4 x Channel Mode)
Channel
DMX Value
Function
1
000 –255
Red
2
000 –255
Green
3
000 –255
Blue
4
000 –255
White
DMX Mode 2
DMX Protocols (5 x Channel Mode)
Channel
DMX Value
Function
1
000 –255
Red
2
000 –255
Green
3
000 –255
Blue
4
000 –255
White
5
000 –255
Master Dimming
DMX Mode 3
DMX Protocols (6 x Channel Mode)
Channel
DMX Value
Function
1
000 - 255
Red
2
000 - 255
Green
3
000 - 255
Blue
4
000 - 255
White
5
000 - 255
Master Dimming
6
000 - 015
016 - 255
No Function
Strobe Function

DMX Mode 4
DMX Protocols (7 x Channel Mode)
Channel
DMX Value
Function
1
000 - 255
Red
2
000 - 255
Green
3
000 - 255
Blue
4
000 - 255
White
5
000 - 255
Master Dimming
6
000 - 015
No Function
6
016 - 255
Strobe Function
6
016 –255
Program Speed Adjustment when
Colour Chase or Colour Fade
Program is Selected as Below
7
000 - 012
013 - 025
026 - 037
038 - 050
051 - 063
064 - 076
077 - 089
090 - 101
102 - 114
115 - 127
128 - 140
141 - 153
154 - 165
166 - 178
179 - 191
192 - 204
205 - 217
218 - 229
230 - 242
243 - 255
No Function
Red
Green
Blue
White
Red & Green
Red & Blue
Red & White
Green & Blue
Green & White
Blue & White
Red & Green & Blue
Red & Green & White
Red & Blue & White
Green & Blue & White
Red & Green & Blue & White
Colour Chase Program 1
Colour Chase Program 2
Colour Fade Program 1
Colour Fade Program 2
Table of contents
Other LED Technologies Lighting Equipment manuals
Popular Lighting Equipment manuals by other brands

Alkalite
Alkalite octostrip TP-60II user manual

Vistosi
Vistosi LUCCIOLA PT M-P manual

Lumoon Group
Lumoon Group Lumoon 75.000 lm user manual

Signtex
Signtex MoonLite LED MAE-AC Series Installation instructions and owner's manual

Tungsram
Tungsram D2 Install Instruction Guide

SONARAY
SONARAY ST-5150 installation guide