manuals.online logo
Brands
  1. Home
  2. •
  3. Brands
  4. •
  5. LEF LIGHTING
  6. •
  7. Dimmer
  8. •
  9. LEF LIGHTING SR-2303AC-4CHDIN User manual

LEF LIGHTING SR-2303AC-4CHDIN User manual

SR-2303AC-4CHDIN
www.leflighting.it
MADE IN P.R.C.
USER GUIDE
Universal dimmer controlled by push-button or DALI signal
LEF LIGHTING S.R.L. | www.leflighting.it
Viale L.Ariosto 478 - 50019 Sesto Fiorentino (FI) - ITALY | Tel +39 055 421 77 27 - Fax +39 055 425 44 92
IP20 ta
MAX 75°C
AC
230V
800
WATT AEE Identification nr.IT18040000010321
PRODUCT TO BE DISPOSED
DIFFERENTLY FROM URBAN WASTE
CODICE
CODE
Comando
Command
RESISTIVO
RESISTIVE
Lampade ad
incandescenza
o alogene
Incandescent
or halogen lamps
230Vac
1x800W
INDUTTIVO
INDUCTIVE
Trasformatore
lamellare
e toroidale
Laminated
and toroidal
transformer
230/12Vac
-
Peso
Weight
(g)
Alimentatore
elettronico con
lampade ad
incandescenza
o alogene
Electronic driver
with incandescent
or halogen lamps
230/12Vac
1x400W
Alimentatore
elettronico con
lampade LED
dimmerabili
Electronic driver
with dimmable
LED lamps
230/12Vac
1x400W
Alimentatore
elettronico
dimmerabile con
uscita in CC/CV
per LED
Dimmable
electronic driver
with CC/CV
output for LED
1x400W
Lampade
LED
dimmerabili
Dimmable
LED lamps
230Vac
Strip
LED
dimmerabili
Dimmable
Strip LED
230Vac
1x800W
2x600W - 2x300W 2x300W 2x300W 2x300W 2x600W 2x600W
3x500W - 3x250W 3x250W 3x250W 3x250W 3x500W 3x500W
4x400W - 4x200W 4x200W 4x200W 4x200W 4x400W 4x400W
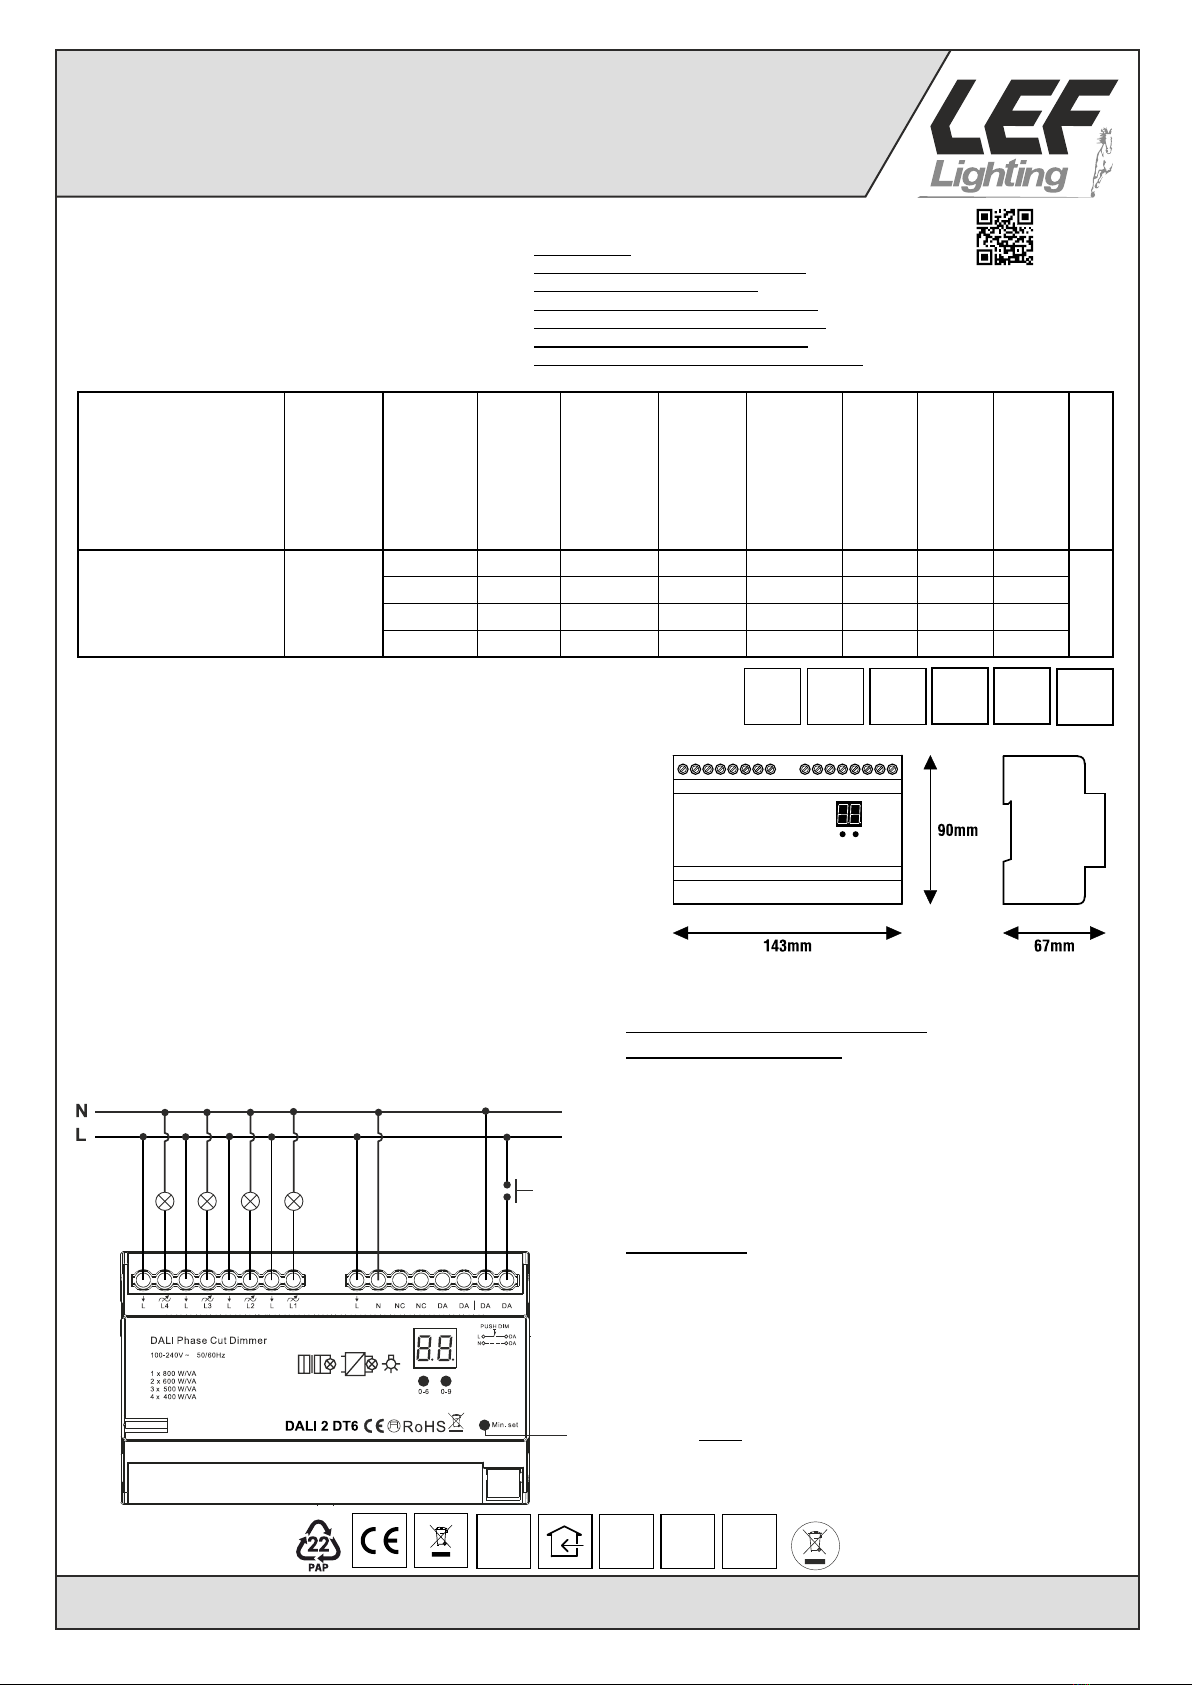
PUSH |DALI
SR-2303AC-4CHDIN 500
Moduli
LED
dimmerabili
Dimmable
LED modules
Seoul
ACRICH
230Vac
1x400W 1x800W
Miniminum set
button,to set
minimum
dimming level
PUSH
230Vac
PUSH-BUTTON mode (PUSH 230Vac)
DIM
PUSH
230Vac
OUT
IGBT DISPLAY
SET THE MINIMUM DIMMING
BRIGHTNESS POINT
The factory adjustment range is 1% ~ 100%, but some
types of loads may flicker when dimmed to 1%, so the
minimum brightness can be set higher than 1% .
The minimum brightness level can be reset as follows:
Adjust the load of L1 to the desired brightness, then press
and hold the “Min. Set ” button until the load on L1
flashes, at this point the minimum is set to this brightness.
Factory reset: bring the L1 load to 100%, then press and
hold the “Min. Set ” button until the load of L1 flashes.
DALI
2
DALI
DT6
N.B.
In PUSH-BUTTON mode all the outputs work
simultaneously.
DIM
DALI
Technical Features
Input voltage range 110-240Vac
Input frequency 50÷60Hz
4-channel dimmer with Phase-cut output (IGBT)
Dimming control through:
- push-button (PUSH 230Vac)
- DALI signal
With manual DALI channel addressing function
(via push-buttons and display)
DALI consumption 2mA
Manageable power (see table)
Minimum brightness calibration by PUSH-BUTTON.
Short circuit protection (SCP)
Operating ambient temperature Ta -20°C ÷ +50°C
Max case temperature on Tc 75°C
General Characteristics
DIN rail plastic case (8 modules)
Device not for indipendent mounting
Electric class protection II
Protection degree IP20
Reference Standards
EN 62386-101
EN 62386-102
EN 62386-207
ATTENTION:
The installation of the product must be
followed by qualified personnel.
If the product is used for purposes other
than the original ones or if it is connected
incorrectly, LEF Lighting S.R.L. will not
accept any responsibility for damages caused.
[AA] Rev. v1.10 17/10/2022
SR-2303AC-4CHDIN
LEF LIGHTING S.R.L. | www.leflighting.it
Viale L.Ariosto 478 - 50019 Sesto Fiorentino (FI) - ITALY | Tel +39 055 421 77 27 - Fax +39 055 425 44 92
USER GUIDE
DALI mode
Buttons for manual setting
of DALI addres
Push-button 1 Push-button 2
MANUAL ASSIGNMENT OF THE DALI ADDRESS VIA BUTTONS
- Press and hold one of the two buttons "0-6" and "0-9" until the numeric display flashes, then
release the button.
- Press once on one of the two buttons “0-6” and “0-9” to select a digit, press again to modify
the digit to the desired value. Press the first button "0-6" to set the "tens" position and press the
second button “0-9” to set the position of the "units". DALI address can be set from “00” to “63”.
- Press and hold any of the two buttons until the numeric display stops flashing for
confirm the settings.
N.B .: The DALI address can be manually assigned from “00” to “63” and “FF”. To set the “FF” value arrive
to channel “63” and then press the “0-9” button once.
Setting the “FF” address will restore the dimmer to the factory settings.
ASSIGNMENT OF THE DALI ADDRESS VIA DALI MASTER
The DALI address can be automatically assigned by the DALI MASTER controller. Follow the instructions in the DALI
MASTER manual.
N.B. The digital display shows the “AU” symbol when the DALI MASTER is assigning the addresses.
[AA] Rev. v1.10 17/10/2022
SET DALI ADDRESS QUANTITY (SEE TABLE)
- Press and hold both buttons "0-6" and "0-9" until the numeric display flashes,
then release the button.
- Press the first button "0-6" to select "1A", "2A", "3A" or "4A" which means 1/2/3/4 DALI addresses.
- Then press and hold one of the two buttons until the display stops flashing to confirm the setting.
For example, when we set the DALI address to 00:
- When selecting 1A, the load of all 4 channels will have the same address 00 and will be controlled
at the same time.
- When 2A is selected, channels L1 and L3 will have the same address 00, outputs L2 and L4 will have the same
address 01.
- When you select 3A, channel L1 will have the address 00, channel L2 will have the address 01, channels L3 and L4
will have the address 02.
- When 4A is selected, channel L1 will be address 00, channel L2 will be address 01, channel L3 will be
address 02, channel L4 will be address 03.
N.B.: The channels with the same address will be controlled at the same time, the channels with different addresses
will be controlled separately.
Wiring diagrams

Popular Dimmer manuals by other brands

Crestron infiNET CLW-DIMS1RF manual

Crestron

Crestron infiNET CLW-DIMS1RF manual

Plejd CTR-01 installation guide

Plejd

Plejd CTR-01 installation guide

Everflourish EMD201 instruction manual

Everflourish

Everflourish EMD201 instruction manual

X10 WS4777 Set up and operating instructions

X10

X10 WS4777 Set up and operating instructions

ZooZ ZEN31 user manual

ZooZ

ZooZ ZEN31 user manual

INSTEON LampLinc 2457D2 owner's manual

INSTEON

INSTEON LampLinc 2457D2 owner's manual

INSTEON SwitchLinc 2476DH user guide

INSTEON

INSTEON SwitchLinc 2476DH user guide

Gira push-button/2-way low voltage operating instructions

Gira

Gira push-button/2-way low voltage operating instructions

Trust START-LINE ACD-200 user manual

Trust

Trust START-LINE ACD-200 user manual

SkyLink LS-318 user manual

SkyLink

SkyLink LS-318 user manual

DIMON TECHNOLOGY Walldim103E1 quick start guide

DIMON TECHNOLOGY

DIMON TECHNOLOGY Walldim103E1 quick start guide

IOT-LIGHT 2AMDI511IPVRDS user manual

IOT-LIGHT

IOT-LIGHT 2AMDI511IPVRDS user manual

TIS RLY-6CH-0-10V installation manual

TIS

TIS RLY-6CH-0-10V installation manual

Jands HP6 Technical manual

Jands

Jands HP6 Technical manual

Leviton Topaz 24 Installation & maintenance guide

Leviton

Leviton Topaz 24 Installation & maintenance guide

AMX PLL-3WAY Specifications

AMX

AMX PLL-3WAY Specifications

Maestro MAELV-600, MSCELV-600M user guide

Maestro

Maestro MAELV-600, MSCELV-600M user guide

FABAS LUCE SMART LUCE 3572-00-006 Assembly instructions

FABAS LUCE

FABAS LUCE SMART LUCE 3572-00-006 Assembly instructions

manuals.online logo
manuals.online logoBrands
  • About & Mission
  • Contact us
  • Privacy Policy
  • Terms and Conditions

Copyright 2025 Manuals.Online. All Rights Reserved.