LEGO MINDSTORMS Education EV3 MicroPython User manual

Getting started with
LEGO®
MINDSTORMS®
Education EV3
MicroPython
Version 2.0.0

i
LEGO, the LEGO logo and MINDSTORMS are trademarks of the LEGO Group.
©2019-2020 The LEGO Group.
TABLE OF CONTENTS
1
Installation
......................................................................................................................................................................................................................
2
2
Creating and Running Programs.............................................................................................................................................
8

1
Getting started with LEGO®MINDSTORMS®Education EV3 MicroPython Version 2.0.0
This guide provides instructions on how to start writing MicroPython programs for your LEGO®MINDSTORMS®EV3
robot. The guide will outline a two step process:
• Installation: Where you will prepare your computer and your EV3 Brick by collecting and installing the
required tools. In addition, you will learn how to turn the EV3 Brick on and off and to navigate the EV3 screen
menus.
• Creating and running programs: Where you will learn how to create a program and download it to the
EV3Brick. You will also learn how to start that program from your computer or from the EV3 Brick.
After you have run your first MicroPython program, you will be ready to try out other example programs and
then start writing your own programs in MicroPython.
LEGO, the LEGO logo and MINDSTORMS are trademarks of the LEGO Group.
©2019-2020 The LEGO Group.

2
CHAPTER
ONE
INSTALLATION
This section will guide you through the steps required to download and install the necessary software you
will need to start programming.
1.1 What do you need?
To get started, you will need:
• A Windows 10 or Mac OS computer
• Internet access and administrator access
This is required during the installation only. You will not need special access to write and run
programs after installation.
• A microSD card
You will need a card with a minimum capacity of 4GB and a maximum capacity of 32GB.
Thistype of microSD card is also known as microSDHC. A Performance Class A1 microSD card
is recommended.
• A microSD card slot or card reader in your computer
If your computer does not have a (micro) SD card slot, you can use an external USB (micro)
SDcard reader.
• A mini-USB cable, like the one included with your EV3 set
The typical configuration of this equipment is summarised in Figure 1.1.
LEGO, the LEGO logo and MINDSTORMS are trademarks of the LEGO Group.
©2019 The LEGO Group.

3
Getting started with LEGO®MINDSTORMS®Education EV3 MicroPython Version 2.0.0
1.2 Preparing your computer
You will write your MicroPython programs using Visual Studio Code. Follow the steps below to download,
install, and configure this application:
1. Download Visual Studio Code.
2. Follow the on-screen instructions to install the application.
3. Launch Visual Studio Code.
4. Open the extensions tab.
5. Install the EV3 MicroPython extension as shown in Figure 1.2.
Figure 1.1: Setup overview
Mini-USB cable
EV3 Brick
MicroSD card with
EV3 MicroPython image Computer with
Visual Studio Code
LEGO, the LEGO logo and MINDSTORMS are trademarks of the LEGO Group.
©2019-2020 The LEGO Group.

4
Getting started with LEGO®MINDSTORMS®Education EV3 MicroPython Version 2.0.0
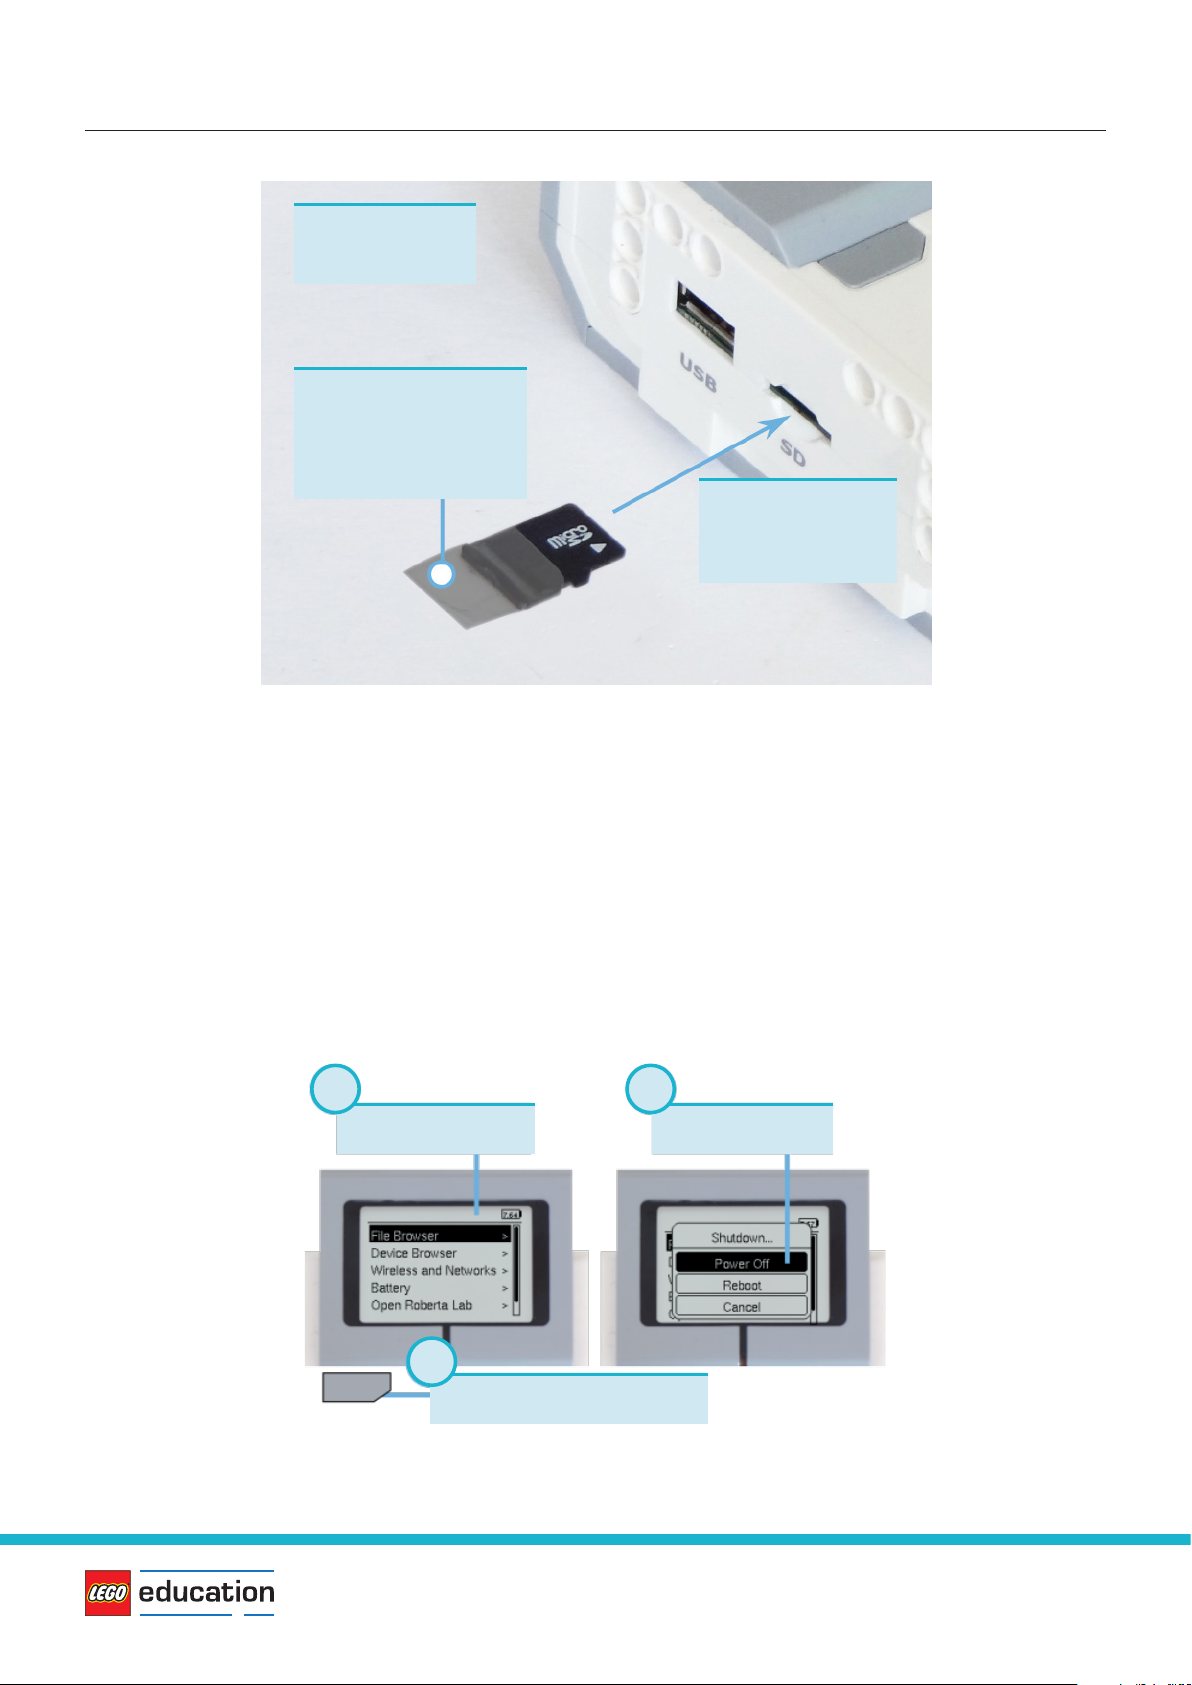
1.3 Preparing the microSD card
To run MicroPython programs on your EV3 Brick, you will need to install the MicroPython operating system on
your microSD card.
If the microSD card contains files which you want to keep, make sure you have created a backup of the
contents first. See’Managing files on the EV3 Brick’ to backup your previous MicroPython programs if
necessary.
This process erases everything on your microSD card, including any previous MicroPython programs on it.
To install the MicroPython operating system on your microSD card:
1. Download the EV3 MicroPython microSD card image and save it in a convenient location. This file is
approximately 360 MB. You do not need to unzip the file.
2. Download and install a microSD card flashing tool such as Etcher.
3. Insert the microSD card into your computer or card reader.
4. Launch the flashing tool and follow the steps on your screen to install the file you have just
downloaded. If you use Etcher, you can follow the instructions below, as shown in Figure 1.3.
a. Select the EV3 MicroPython microSD card image file you have just downloaded.
b. Select your microSD card. Make sure that the device and size correspond to your microSD card.
c. Start the flashing process. This may take several minutes. Do not remove the card until the
`flashing’ process is complete.
Figure 1.2: Installing the extension from the Visual Studio Code marketplace
Search
Open extensions tab
Install
2
1
3
LEGO, the LEGO logo and MINDSTORMS are trademarks of the LEGO Group.
©2019-2020 The LEGO Group.

5
Getting started with LEGO®MINDSTORMS®Education EV3 MicroPython Version 2.0.0
1.4 Updating the microSD card
To update the microSD card, download a new image file using the link above and then flash it to the microSD
card as described above. Be sure to back up any MicroPython programs you want to save.
You do not need to erase the contents of the microSD card first. This is done automatically when you flash the
new image file.
1.5 Using the EV3 Brick
Make sure the EV3 Brick is turned off. Insert the microSD card you prepared into the microSD card slot on the
EV3 Brick, as shown in Figure 1.4.
Figure 1.3: Using Etcher to flash the EV3 MicroPython microSD card image
Select image Select drive Flash!
abc
LEGO, the LEGO logo and MINDSTORMS are trademarks of the LEGO Group.
©2019-2020 The LEGO Group.

6
Getting started with LEGO®MINDSTORMS®Education EV3 MicroPython Version 2.0.0
1.5.1 Turning the EV3 Brick on and off
Turn on the EV3 Brick by pressing the dark grey centre button.
The booting process may take several minutes. While booting, the EV3 Brick Status Light will turn orange and
blinks intermittently. There will be text on the EV3 Display. The EV3 Brick is ready for use when the Status Light
turns green.
To turn the EV3 Brick off, open the shutdown menu with the back button, and then select Power Off using the
centre button, as shown in Figure 1.5.
Figure 1.4: Inserting the flashed microSD card into the EV3 Brick
Figure 1.5: Turning the EV3 Brick off
First, turn off
the EV3 Brick
Add a piece of
tape for easy
removal of
the card. Place the card
in the SD slot,
text side up
Main menu
Press back button
Power Off
1
2
3
LEGO, the LEGO logo and MINDSTORMS are trademarks of the LEGO Group.
©2019-2020 The LEGO Group.

7
Getting started with LEGO®MINDSTORMS®Education EV3 MicroPython Version 2.0.0
1.5.2 Viewing motor and sensor values
When you are not running a program, you can view the motor and sensor values using the device browser,
asshown in Figure 1.6.
1.5.3 Going back to the original firmware
You can go back to the LEGO®firmware and your LEGO programs at any time. To do so:
1. Turn the EV3 Brick off as shown above.
2. Wait for the Display and brick Status Light to turn off.
3. Remove the microSD card.
4. Turn the EV3 on.
Figure 1.6: Viewing motor and sensor values
Open devices Choose device type Watch values
123
LEGO, the LEGO logo and MINDSTORMS are trademarks of the LEGO Group.
©2019-2020 The LEGO Group.

8
CREATING AND RUNNING PROGRAMS
CHAPTER
TWO
Now that you have set up your computer and EV3 Brick, you are ready to start writing programs.
To make it easier to create and manage your programs, this chapter will outline how MicroPython projects and
programs are organised.
Programs are organised into project folders, as shown in Figure 2.1. A project folder is a directory on your
computer that contains the main program (main.py) and other optional scripts or files. The project folder and
its contents will be copied to the EV3 Brick, where the main program will be run.
This section outlines how to create a project and how to transfer it to the EV3 Brick.
Figure 2.1: A project contains a program called main.py and optional resources like sounds or MicroPython modules.
2.1 Creating a new project
To create a new project, open the EV3 MicroPython tab and click create a new project, as shown in Figure 2.2.
Enter a project name in the text field that appears and press Enter. When prompted, choose a location for this
program and confirm by clicking choose folder.
LEGO, the LEGO logo and MINDSTORMS are trademarks of the LEGO Group.
©2019 The LEGO Group.

9
Getting started with LEGO®MINDSTORMS®Education EV3 MicroPython Version 2.0.0
When you create a new project, it already includes a file called main.py. To see its contents and to modify it, open it from
the file browser as shown in Figure 2.3. This is where you will write your programs.
If you are new to MicroPython programming, we recommend that you keep the existing code in place and add your code
to it.
Figure 2.3: Opening the default main.py program.
2.2 Opening an existing project
To open a project you have previously created, click File and click Open Folder, as shown in Figure 2.4.
Next,navigate to your previously created project folder and click OK. You can also open a recently created
project using the Open Recent menu option.
Figure 2.2: Creating a new project. This example is called getting_started, but you can choose any name.
Create new project
Open EV3 MicroPython tab
Open main.py
Write your program
Choose a project name and press enter
Choose a location for your
project in the pop-up window
2
1
1
2
3
4
LEGO, the LEGO logo and MINDSTORMS are trademarks of the LEGO Group.
©2019-2020 The LEGO Group.

10
Getting started with LEGO®MINDSTORMS®Education EV3 MicroPython Version 2.0.0
Figure 2.4: Opening a previously created project.
2.3 Connecting to the EV3 Brick with Visual Studio Code
To transfer your code to the EV3 Brick, you will need to connect the EV3 Brick to your computer with the mini-
USB cable and configure the connection with Visual Studio Code. To do so:
• Turn the EV3 Brick on
• Connect the EV3 Brick to your computer with the mini-USB cable
• Configure the USB connection as shown in Figure 2.5.
File
Open a previously
created project
Open a recently
used project
1
2
LEGO, the LEGO logo and MINDSTORMS are trademarks of the LEGO Group.
©2019-2020 The LEGO Group.

11
Getting started with LEGO®MINDSTORMS®Education EV3 MicroPython Version 2.0.0
Figure 2.5: Configuring the USB connection between the computer and the EV3 Brick.
2.4 Downloading and running a program
You can press the F5 key to run the program. Alternatively, you can start it manually by going to the debug tab
and clicking the green start arrow, as shown in Figure 2.6.
When the program starts, a pop-up toolbar will allow you to stop the program if necessary. You can also stop
the program at any time using the back button on the EV3 Brick.
If your program produces any output with the print command, this is shown in the output window.
Open file tab Select your EV3 Brick
Connect your EV3 with the USB cable
Open device browser
Search for your EV3 Brick
15
2
3
4
LEGO, the LEGO logo and MINDSTORMS are trademarks of the LEGO Group.
©2019-2020 The LEGO Group.

12
Getting started with LEGO®MINDSTORMS®Education EV3 MicroPython Version 2.0.0
Figure 2.6: Running a program.
2.5 Expanding the example program
Now that you have run the basic code template, you can expand the program to make a motor move.
First,attach a Large Motor to Port B on the EV3 Brick, as shown in Figure 2.7.
Debug (or press F5)
Stop
Output
Download and run
1
4
3
2
LEGO, the LEGO logo and MINDSTORMS are trademarks of the LEGO Group.
©2019-2020 The LEGO Group.

13
Getting started with LEGO®MINDSTORMS®Education EV3 MicroPython Version 2.0.0
Figure 2.7: The EV3 Brick with a Large Motor attached to port B.
Next, edit main.py to make it look like this:
This program will make your robot beep, rotate the motor, and beep again with a higher pitched tone.
Runthe program to make sure that it works as expected.
Port B
Large Motor
LEGO, the LEGO logo and MINDSTORMS are trademarks of the LEGO Group.
©2019-2020 The LEGO Group.
#!/usr/bin/env pybricks-micropython
from
pybricks.hubs
import
EV3Brick
from pybricks.ev3devices
import
Motor
from pybricks.parameters
import
Port
# Initialize the EV3 brick.
ev3 = EV3Brick()
# Initialize a motor at port B.
test_motor = Motor(Port.B)
# Play a sound.
ev3.speaker.beep()
# Run the motor up to 500 degrees per second. To a target angle of 90 degrees.
test_motor.run_target(500,
90)
# Play another beep sound.
ev3.speaker.beep(1000,
500)

14
Getting started with LEGO®MINDSTORMS®Education EV3 MicroPython Version 2.0.0
2.6 Managing files on the EV3 Brick
After you have downloaded a project to the EV3 Brick, you can run, delete, or back up programs stored on it
using the device browser as shown in Figure 2.8.
2.7 Running a program without a computer
You can run previously downloaded programs directly from the EV3 Brick.
To do so, find the program using the file browser on the EV3 Display and press the centre button key to start
the program as shown in Figure 2.9.
Figure 2.8: Using the EV3 device browser to manage files on your EV3 Brick.
Project on your computer
Project on the EV3 Brick
Delete file from the EV3 Brick
Upload file back to your computer
Right click
LEGO, the LEGO logo and MINDSTORMS are trademarks of the LEGO Group.
©2019-2020 The LEGO Group.

15
Getting started with LEGO®MINDSTORMS®Education EV3 MicroPython Version 2.0.0
Figure 2.9: Starting a program using the buttons on the EV3 Brick.
Open file browser Open project folder Run your program
Go to previous folder
1 2 3
4
LEGO, the LEGO logo and MINDSTORMS are trademarks of the LEGO Group.
©2019-2020 The LEGO Group.
Table of contents
Other LEGO Educational Equipment manuals
Popular Educational Equipment manuals by other brands

Tobii Dynavox
Tobii Dynavox TD I-110 user manual

pitsco
pitsco Smart Buddies 45895 quick start guide

LeapFrog
LeapFrog ClickStart user manual

fischertechnik
fischertechnik STEM Coding Pro Assembly instruction

adafruit learning system
adafruit learning system Cupcade the Raspberry Pi Micro Arcade... manual

Enabling Devices
Enabling Devices Spinning Light Show user guide