LEGO Mindstorms EV3 User manual

LEGOeducation.com/MINDSTORMS
COMPUTER SCIENCE SCIENCE TECHNOLOGY ENGINEERING MATH
USER
GUIDE

LEGOeducation.com
TABLE OF CONTENTS
2
LEGOtheLEGOlogoMINDSTORMSandtheMINDSTORMSlogoaretrademarksofthe/
sontdesmarquesdecommercede/sonmarcasregistradasdeLEGOGroup©TheLEGOGroup
INTRODUCTION
+Welcome ...................................................
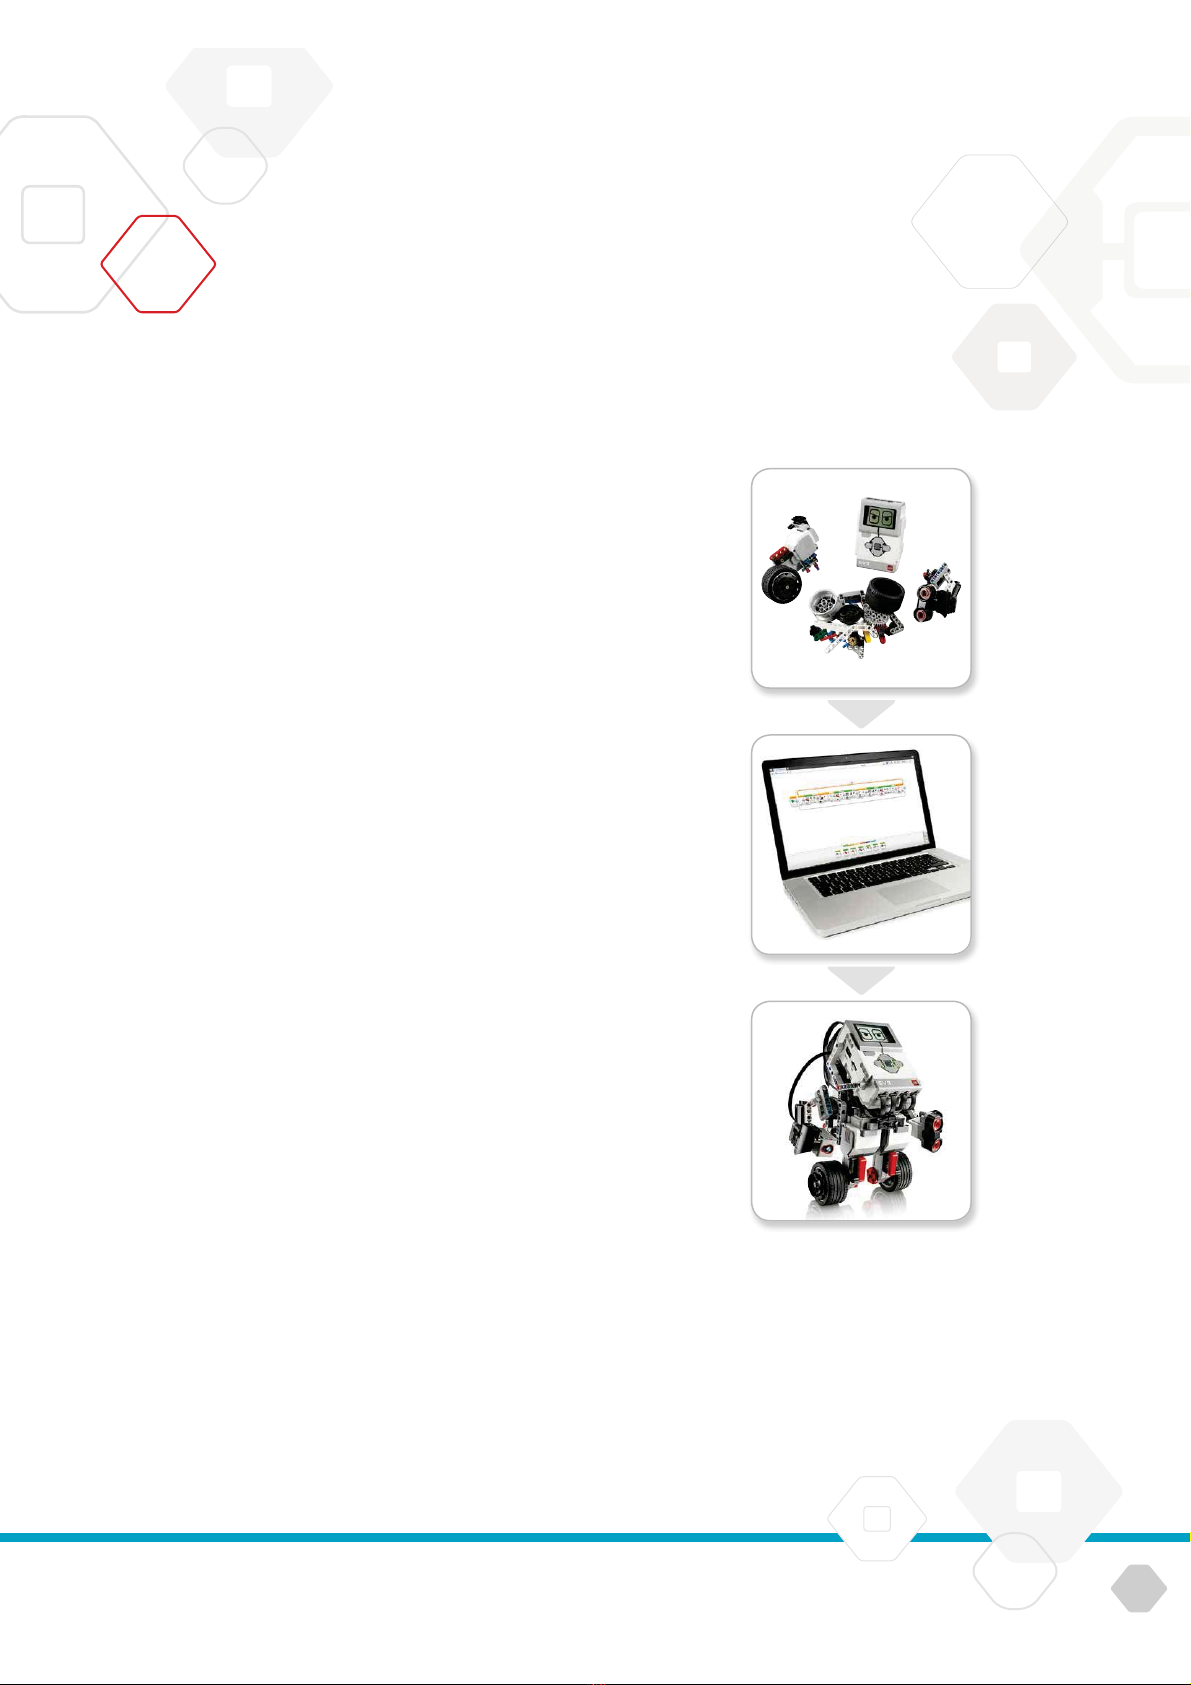
EV3 TECHNOLOGY
+Overview ...................................................
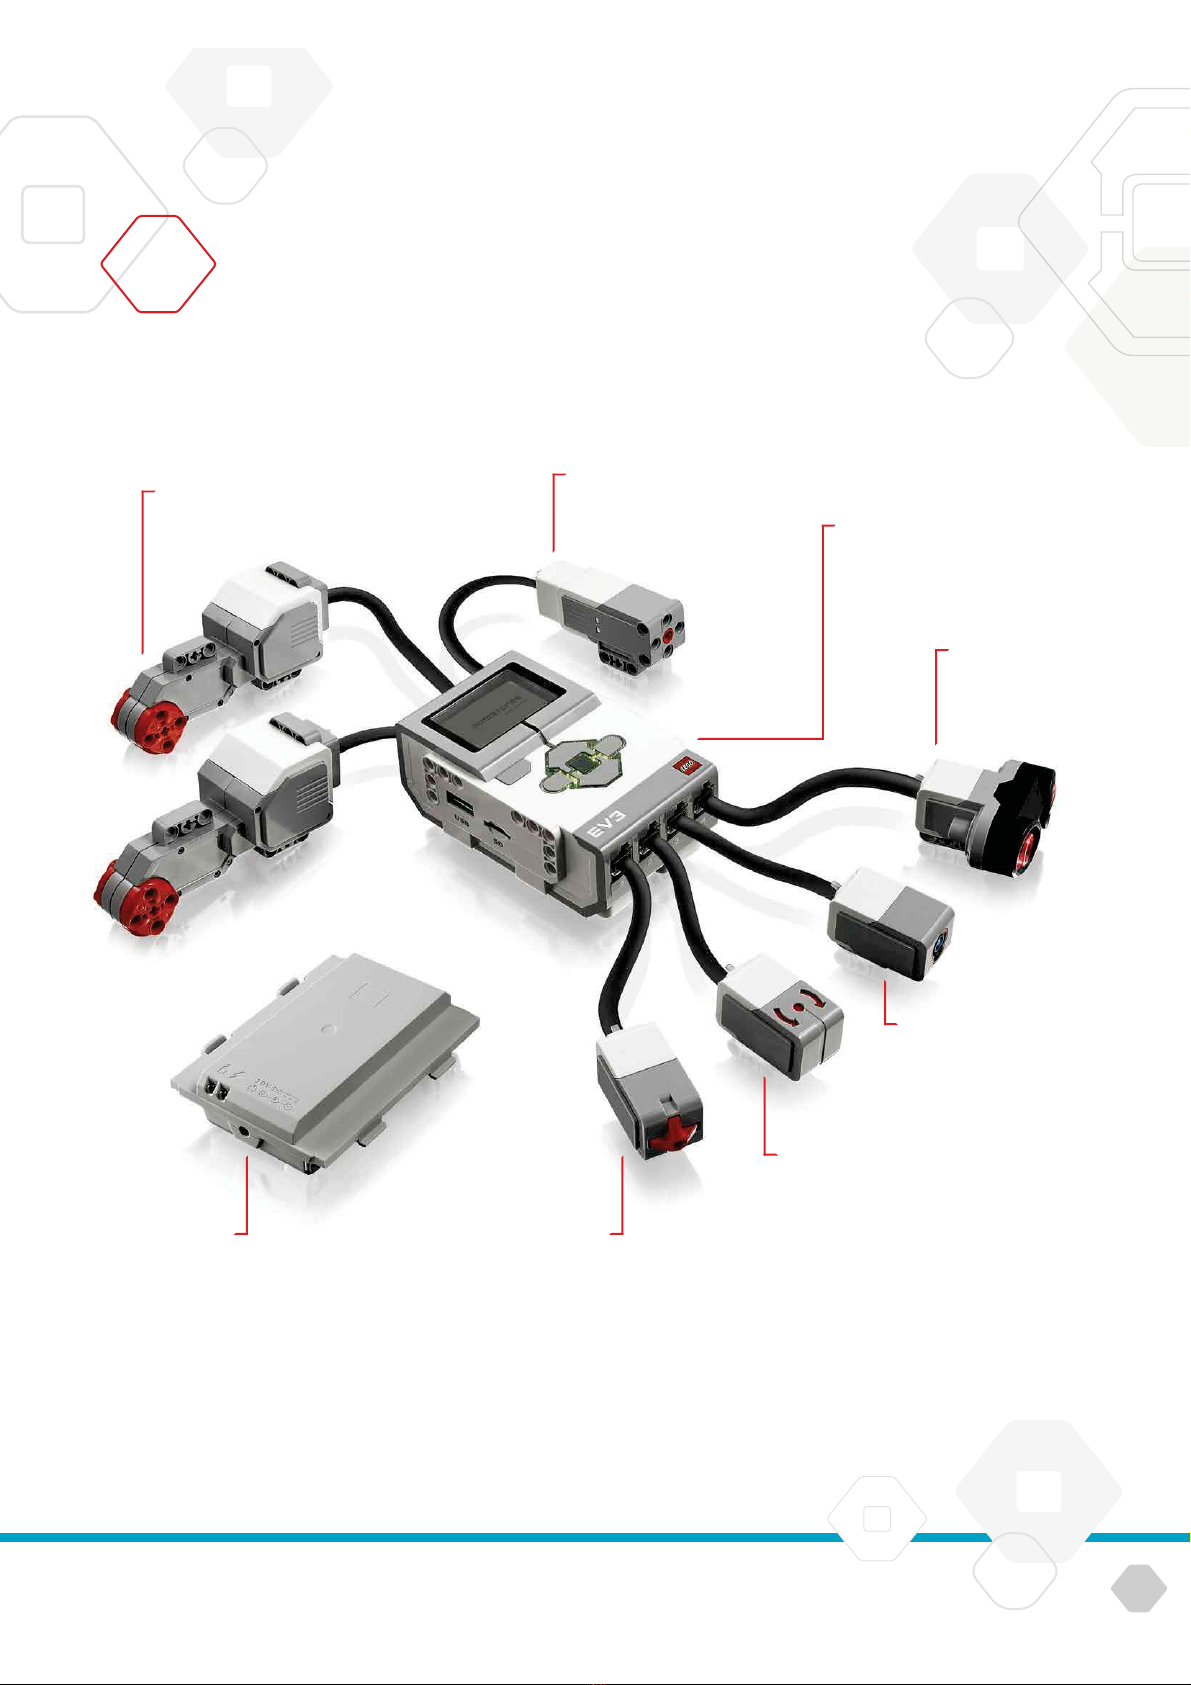
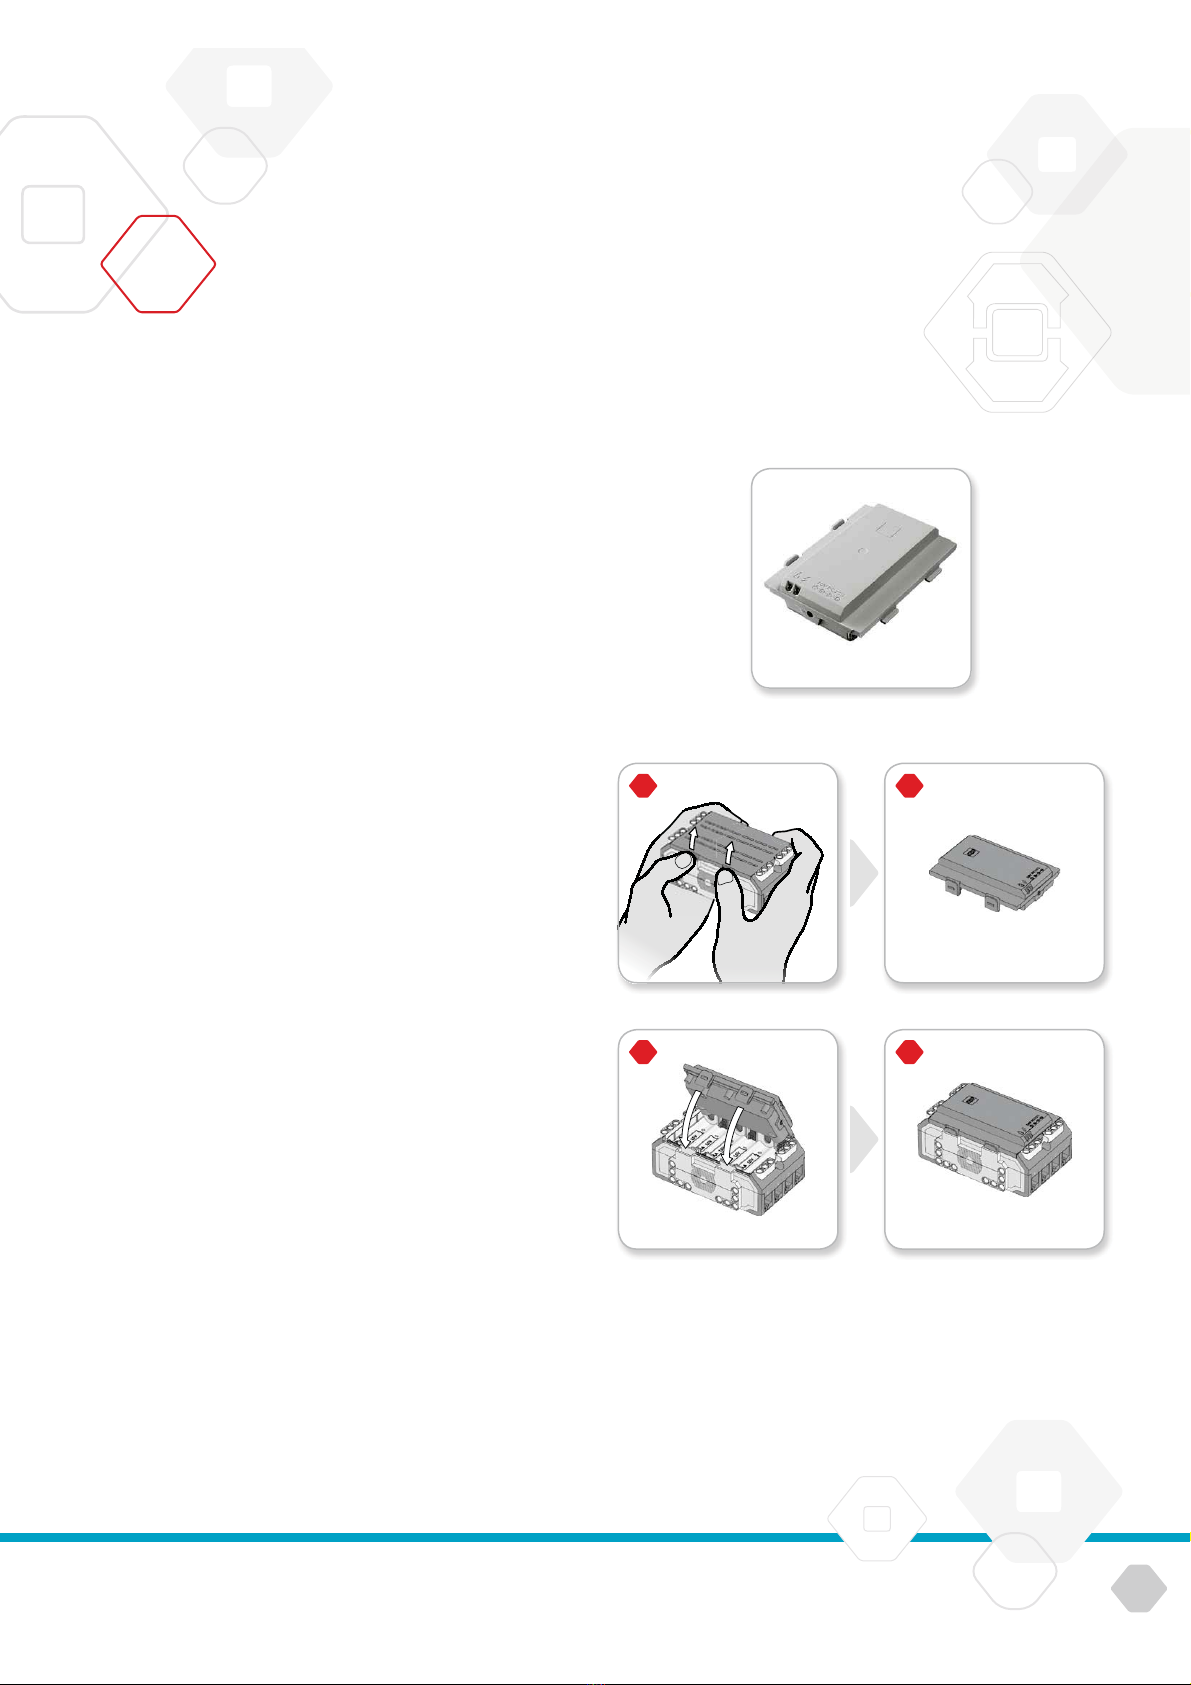
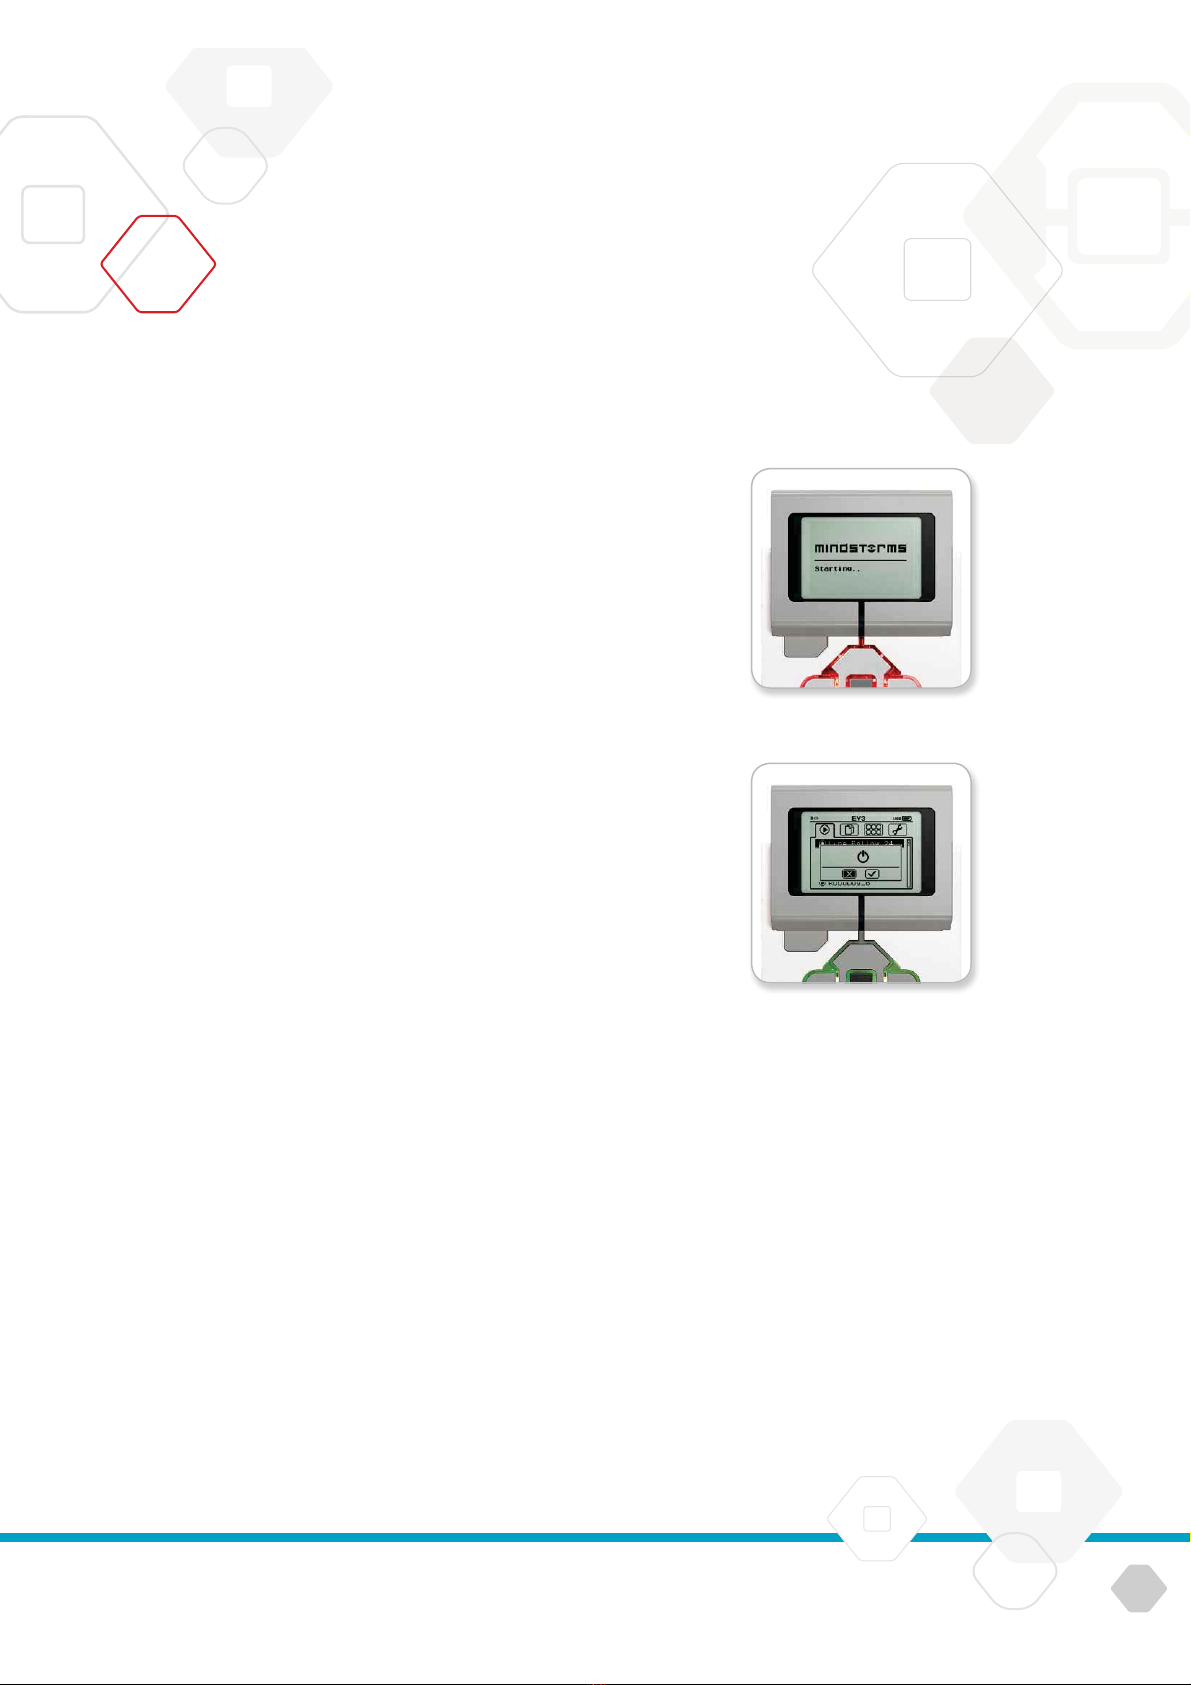
+EV3 Brick ...................................................
Overview ...................................................
Installing Batteries .........................................
Turning On the EV3 Brick ...................................
+EV3 Motors .................................................
Large Motor ................................................
Medium Motor ..............................................
+EV3 Sensors ...............................................
Color Sensor ...............................................
Gyro Sensor ................................................
Touch Sensor ...............................................
Ultrasonic Sensor ..........................................
Infrared Sensor .............................................
Remote Infrared Beacon ...................................
Temperature Sensor ........................................
+Connecting the EV3 Technology ...........................
Connecting Sensors and Motors ...........................
Connecting the EV3 Brick to Your Computer ...............
+EV3 Brick Interface ........................................
Run Recent .................................................
File Navigation .............................................
Brick Apps . . . . . . . . . . . . . . . . . . . . . . . . . . . . . . . . . . . . . . . . . . . . . . . . . .
Settings ....................................................
EV3 SOFTWARE
+Minimum System Requirements ...........................
+Installing the Software .....................................
+Lobby ......................................................
+Project Properties and Structure ..........................
+Robot Educator ............................................
+Programming ..............................................
+Data Logging ...............................................
+Hardware Page ............................................
+Content Editor ..............................................
+Tools ........................................................
TROUBLESHOOTING
+EV3 Software Help .........................................
+Software Updates ..........................................
+Firmware Update ..........................................
+Resetting the EV3 Brick ....................................
USEFUL INFORMATION
+Sound File List .............................................
+Image File List .............................................
+Brick Program App—Assets List ...........................
+Element List ................................................

LEGOeducation.com 3
LEGOtheLEGOlogoMINDSTORMSandtheMINDSTORMSlogoaretrademarksofthe/
sontdesmarquesdecommercede/sonmarcasregistradasdeLEGOGroup©TheLEGOGroup
INTRODUCTION
LEARNING POWERED BY LEGO®MINDSTORMS®EDUCATION
Since the beginning of this century, LEGO
®
MINDSTORMS
®
Education
has led the way in STEM (Science, Technology, Engineering, and Math)
Education, inspiring users to engage in fun, hands-on learning. The
combination of LEGO building systems with the LEGO MINDSTORMS
Education EV3 technology is now offering even more ways to learn
about robotics and teach the principles of programming, physical
science, and mathematics.
The heart of LEGO MINDSTORMS Education is the EV3 Brick, the
programmable intelligent brick that controls motors and sensors,
as well as providing wireless communication. Choose what motors
and sensors you wish to use and build your robot just like you want
it to be.
Enter the LEGO MINDSTORMS Education EV3 Software to find
everything you need. The EV3 Software Lobby gives you easy
access to content, programming, data logging, digital workbooks
and more. You can for example choose to follow the Robot Educator
and you’ll be able to create, program, and run a robot before you
know it. The intuitive icon-based programming is full of challenging
possibilities and the data logging environment provides a powerful
tool for scientific inquiry and experiments.
LEGO Education offers a growing number of EV3-based curriculum
packages developed by experienced educators. We are committed
to responsive customer support, professional development, and
continuing education for teachers using MINDSTORMS robotics in
their classrooms.
Want to work like real scientists and engineers? Enter the LEGO
Education-supported FIRST
®
LEGO League and World Robot
Olympiad—and gain invaluable knowledge, life skills, and increased
self-confidence!
We hope you enjoy the journey!
Welcome

LEGOeducation.com 4
LEGOtheLEGOlogoMINDSTORMSandtheMINDSTORMSlogoaretrademarksofthe/
sontdesmarquesdecommercede/sonmarcasregistradasdeLEGOGroup©TheLEGOGroup
EV3 TECHNOLOGY
Overview
Color Sensor
+Recognizes seven different
colors and measures light
intensity.
Gyro Sensor
+Measures how fast and how far
your robot is turning.
Touch Sensor
+Recognizes three
conditions—touched,
bumped, and released.
Rechargeable Battery
+Economical, environmentally
friendly, and convenient power
source for your robot.
Large Motor
+Lets you program precise and
powerful robotic action.
Medium Motor
+Maintains precision, while
trading some power for
compact size and faster
response.
Ultrasonic Sensor
+Uses reflected sound
waves to measure
distance between
thesensor and any
objects in its path.
EV3 Brick
+Serves as the control center
and power station for your
robot.

LEGOeducation.com 5
LEGOtheLEGOlogoMINDSTORMSandtheMINDSTORMSlogoaretrademarksofthe/
sontdesmarquesdecommercede/sonmarcasregistradasdeLEGOGroup©TheLEGOGroup
EV3 TECHNOLOGY
EV3 Brick
Overview
The Display shows you what is going on inside the EV3 Brick and
enables you to use the Brick Interface. It also allows you to add
text and numerical or graphic responses into your programming or
experiments. For example, you might want to program the Display
to show a happy face (or a sad face) for a comparison response or
to display a number that is the result of a mathematical calculation
(learn more about using the Display Block in the EV3 Software Help).
The Brick Buttons allow you to navigate inside the EV3 Brick
Interface. They can also be used as programmable activators. For
example, you might program a robot to raise its arms if the Up button
is pressed or to lower them if the Down button is pressed (for more
information, see Using the Brick Buttons in the EV3 Software Help).
Wireless Connection Status icons
(from the left)
Bluetooth enabled but not
connected or visible to other
Bluetooth devices
Bluetooth enabled and visible
to other Bluetooth devices
Bluetooth enabled and your
EV3 Brick is connected to
another Bluetooth device
Bluetooth enabled and visible
and your EV3 Brick is connected
to another Bluetooth device
Wi-Fi enabled but not connected
to a network
Wi-Fi enabled and connected
to anetwork
Battery level
USB connection established
to another device
Brick Buttons
Back
This button is used to reverse
actions, to abort arunning
program, and to shut down
theEV3 Brick.
Center
Pressing the Center button says
“OK” to various questions—to shut
down, to select desired settings,
or to select blocks in theBrick
Program App. You would, for
example, press this button to
select a checkbox.
Left, Right, Up, Down
These four buttons are used to
navigate through the contents of
theEV3 Brick.
Brick Name

LEGOeducation.com 6
LEGOtheLEGOlogoMINDSTORMSandtheMINDSTORMSlogoaretrademarksofthe/
sontdesmarquesdecommercede/sonmarcasregistradasdeLEGOGroup©TheLEGOGroup
EV3 TECHNOLOGY
The Brick Status Light that surrounds the Brick Buttons tells you
thecurrent status of the EV3 Brick. It can be green, orange, or red
and can pulse. Brick Status Light codes are the following:
+Red = Startup, Updating, Shutdown
+Red pulsing = Busy
+Orange = Alert, Ready
+Orange pulsing = Alert, Running
+Green = Ready
+Green pulsing = Running Program
You can also program the Brick Status Light to show different colors
and to pulse when different conditions are met (learn more about
using the Brick Status Light Block in the EV3 Software Help).
EV3 Brick
TECHNICAL
SPECIFICATIONS
FOR THE EV3 BRICK
+Operating System—LINUX
+300 MHz ARM9 controller
+Flash Memory—16 MB
+RAM—64 MB
+Brick Screen Resolution—178x128/Black & White
+USB 2.0 Communication to Host PC—Up to 480 Mbit/sec
+USB 1.1 Host communication—Up to 12 Mbit/sec
+Micro SD card—Supports SDHC,
Version 2.0, Max 32 GB
+Motor and Sensor Ports
+Connectors—RJ12
+Support Auto ID
+Power—6 AA batteries/
rechargeable
Brick Status Light – Red Brick Status Light – Orange Brick Status Light – Green

LEGOeducation.com 7
LEGOtheLEGOlogoMINDSTORMSandtheMINDSTORMSlogoaretrademarksofthe/
sontdesmarquesdecommercede/sonmarcasregistradasdeLEGOGroup©TheLEGOGroup
EV3 TECHNOLOGY
Input Ports
Input Ports 1, 2, 3, and 4 are
used to connect sensors to
theEV3 Brick.
PCPort
The Mini-USB PCPort, located
next to the D port, is used
to connect the EV3 Brick to
acomputer.
Output Ports
Output Ports A, B, C, and D
are used to connect motors to
theEV3 Brick.
Speaker
All sounds from theEV3 Brick
come through this speaker—
including any sound effects used
in programming your robots.
When thequality of thesound
is important to you, try to leave
thespeaker uncovered while
designing your robot.
Check out thecool sound files
that can be programmed within
theEV3 Software (learn more
about using theSound Block in
theEV3 Software Help).
SD Card Port
The SD Card Port increases
theavailable memory for your EV3
Brick with an SD card (maximum
32 GB—not included).
USB Host Port
The USB Host Port can be used
to add a USB Wi-Fi dongle for
connecting to a wireless network,
or to connect up to four EV3
Bricks together (daisy chain).
EV3 Brick

+
7.4V Rechargeable
-
LEGOeducation.com 8
LEGOtheLEGOlogoMINDSTORMSandtheMINDSTORMSlogoaretrademarksofthe/
sontdesmarquesdecommercede/sonmarcasregistradasdeLEGOGroup©TheLEGOGroup
EV3 TECHNOLOGY
Installing Batteries
With LEGO®MINDSTORMS®Education EV3, you have the choice of
using normal AA batteries or the EV3 Rechargeable Battery pack
included in the LEGO MINDSTORMS Education EV3 Core Set.
If you experiment with both, you will find that each option has
characteristics to consider when constructing your robots. For
instance, six AA batteries weigh more than theRechargeable Battery,
and the EV3 Brick with the Rechargeable Battery installed is slightly
larger than the EV3 Brick with six AA batteries.
The EV3 Rechargeable Battery is a convenient and economical
alternative to using AA batteries. It can be recharged while inbuilt in
a model, saving you the trouble of disassembling and reassembling
a robot to replace batteries.
To install the Rechargeable Battery on the EV3 Brick, remove
thebattery cover on the back of the EV3 Brick by pressing thetwo
plastic tabs on the side. If there are batteries in the EV3 Brick,
remove them. Insert the Rechargeable Battery in the slots that held
the battery cover in place and snap the battery in place.The battery
cover is not used.
If it is your first use of the battery—or if the battery is completely
drained, let the battery and the EV3 Brick charge together for
minimum twenty minutes.
Using the enclosed power adaptor cord, connect the Rechargeable
Battery to a wall outlet. Make sure to keep the transformer cord and
battery where they will not be tripped over or get wet.
When you plug the uncharged battery into a wall socket, a red
indicator light will be lit. When charging is complete, the red light
will go out and the green light will be illuminated. The recharging
process will generally take three to four hours. If you use the EV3
Brick while the battery is charging, it will take longer. Before you start
to use the Rechargeable Battery for the first time, it is recommended
that it is fully charged.
EV3 Brick
EV3 Rechargeable Battery

AA, 1.5V x 6
LEGOeducation.com 9
LEGOtheLEGOlogoMINDSTORMSandtheMINDSTORMSlogoaretrademarksofthe/
sontdesmarquesdecommercede/sonmarcasregistradasdeLEGOGroup©TheLEGOGroup
EV3 TECHNOLOGY
EV3 Brick
The EV3 Brick requires six AA/LR6 batteries if the EV3 Rechargeable
Battery is not used. Alkaline or rechargeable Lithium Ion AA batteries
are recommended. The AA batteries option is a good choice when
a little more weight is desirable in your robot.
To install the AA batteries, remove the battery cover on the back of
the EV3 Brick by pressing the two plastic tabs on the side. After you
have inserted the six AA batteries, attach the battery cover again.
SOME IMPORTANT INFORMATION ABOUT BATTERIES:
+Never use different kinds of batteries together
(including mixing old and new).
+Remove batteries from the EV3 Brick when not in use.
+Never use damaged batteries.
+Use the correct battery charger under the supervision of
anadult.
+Never attempt to recharge batteries that are not rechargeable.
Note: If your batteries are weak, theBrick Status Light may stay red
after you press theStart button, while theDisplay continues to say
“Starting.”
POWER-SAVING PRACTICES
+Remove batteries between use.
Remember to keep each set of batteries in its own storage
container so they can be used together.
+Reduce Volume.
+Adjust Sleep Setting.
+Turn off Bluetooth and Wi-Fi when not in use.
+Avoid unnecessary wear on the motors.
Low Battery Power Indicator

LEGOeducation.com 10
LEGOtheLEGOlogoMINDSTORMSandtheMINDSTORMSlogoaretrademarksofthe/
sontdesmarquesdecommercede/sonmarcasregistradasdeLEGOGroup©TheLEGOGroup
EV3 TECHNOLOGY
Turning On the EV3 Brick
To turn on the EV3 Brick, press the Center button. After you press the
button, the Brick Status Light will turn red and the Starting screen
will be displayed.
When the light changes to green, your EV3 Brick is ready.
To turn the EV3 Brick off, press the Back button until you see theShut
Down screen.
The Abort X will already be selected. Use the Right button to select
the Accept check mark, then press the Center button for OK. Your
EV3 Brick is now turned off. If you press OK while the X is selected,
you will return to the Run Recent screen.
EV3 Brick
Starting screen
Shut Down screen

LEGOeducation.com 11
LEGOtheLEGOlogoMINDSTORMSandtheMINDSTORMSlogoaretrademarksofthe/
sontdesmarquesdecommercede/sonmarcasregistradasdeLEGOGroup©TheLEGOGroup
EV3 TECHNOLOGY
EV3 Motors
Large Motor
The Large Motor is a powerful “smart” motor. It has a built-in Rotation
Sensor with 1-degree resolution for precise control. The Large Motor
is optimized to be the driving base on your robots.
By using the Move Steering or Move Tank programming block
in theEV3 Software, the Large Motors will coordinate the action
simultaneously.
Medium Motor
The Medium Motor also includes a built-in Rotation Sensor (with
1-degree resolution), but it is smaller and lighter than the Large
Motor. That means it is able to respond more quickly than the Large
Motor.
The Medium Motor can be programmed to turn on or off, control its
power level, or to run for a specified amount of time or rotations.
COMPARE THE TWO MOTORS:
+The Large Motor runs at 160–170 rpm, with a running torque of
20 Ncm and a stall torque of 40 Ncm (slower, but stronger).
+The Medium Motor runs at 240–250 rpm, with a running torque
of 8 Ncm and astall torque of 12 Ncm (faster, but less powerful).
+Both motors are Auto ID supported.
For more information on using the Rotation Sensor in your
programming, see Using the Motor Rotation Sensor in the EV3
Software Help.
Large Motor
Medium Motor

LEGOeducation.com 12
LEGOtheLEGOlogoMINDSTORMSandtheMINDSTORMSlogoaretrademarksofthe/
sontdesmarquesdecommercede/sonmarcasregistradasdeLEGOGroup©TheLEGOGroup
EV3 TECHNOLOGY
Color Sensor
The Color Sensor is a digital sensor that can detect the color
or intensity of light that enters the small window on the face of
thesensor. This sensor can be used in three different modes: Color
Mode, Reflected Light Intensity Mode, and Ambient Light Intensity
Mode.
In Color Mode, the Color Sensor recognizes seven colors—black,
blue, green, yellow, red, white, and brown—plus No Color. This
ability to differentiate between colors means your robot might be
programmed to sort colored balls or blocks, speak the names of
colors as they are detected, or stop action when it sees red.
In Reflected Light Intensity Mode, the Color Sensor measures
theintensity of light reflected back from a red light–emitting lamp.
The sensor uses a scale of 0 (very dark) to 100 (very light). This
means your robot might be programmed to move around on a white
surface until a black line is detected, or to interpret a color-coded
identification card.
In Ambient Light Intensity Mode, the Color Sensor measures
thestrength of light that enters the window from its environment,
such as sunlight or the beam of a flashlight.The sensor uses a scale
of 0 (very dark) to 100 (very light). This means your robot might be
programmed to set off an alarm when the sun rises in the morning,
or stop action if the lights go out.
The sample rate of the Color Sensor is 1 kHz/sec.
For the best accuracy, when in Color Mode or Reflected Light
Intensity Mode, the sensor must be held at a right angle, close
to—but not touching—the surface it is examining.
For more information, see Using the Color Sensor in the EV3
Software Help.
EV3 Sensors
Color Mode
Reflected Light Intensity Mode
Ambient Light Intensity Mode
Color Sensor

90...º -90...º
LEGOeducation.com 13
LEGOtheLEGOlogoMINDSTORMSandtheMINDSTORMSlogoaretrademarksofthe/
sontdesmarquesdecommercede/sonmarcasregistradasdeLEGOGroup©TheLEGOGroup
EV3 TECHNOLOGY
Gyro Sensor
The Gyro Sensor is a digital sensor that detects rotational motion
on a single axis. If you rotate the Gyro Sensor in the direction
of thearrows on the case of the sensor, the sensor can detect
therate of rotation in degrees per second. (The sensor can measure
amaximum rate of spin of 440 degrees per second.) You can then
use the rotation rate to detect, for example, when a part of your
robot is turning, or when your robot is falling over.
In addition, the Gyro Sensor keeps track of the total rotation angle
in degrees. You can use this rotation angle to detect, for example,
how far your robot has turned. This feature means you are able to
program turns (on the axis the Gyro Sensor is measuring) with an
accuracy of +/- 3 degrees for a 90-degree turn.
Note: The sensor must be completely motionless while being plugged
into theEV3 Brick. If the Gyro Sensor is attached to arobot, the robot
should be held motionless in its starting position as theGyro Sensor
is plugged into theEV3 Brick.
CONNECTING THE GYRO SENSOR
On the EV3 Brick, go to the Brick App screen (third tab) and use
theCenter button to select Port View.
Using a flat black Connector Cable, connect the Gyro Sensor to
theEV3 Brick on Port 2. Make sure to hold the sensor very still while
you do this. On the EV3 Brick display, the Port View app should show
a“0”reading in the second small bottom window from the left, which
is the window representing input values from Port 2.
Still without moving the sensor, observe the display for a few
seconds. It should continue to display “0” for Port 2 with the Gyro
Sensor. In case the Gyro Sensor readings do not constantly display
“0” during the connection process, unplug the sensor and repeat
the procedure.
When the screen consistently displays “0” for a few seconds,
experiment with rotating the sensor and observe how the angle
reading changes. Remember, the Gyro Sensor measures the angle
of change on only one axis.
For more information, see Using the Gyro Sensor in the EV3 Software
Help.
EV3 Sensors
Gyro Sensor
Brick App screen
Port View with Gyro Sensor
Single axis rotation

LEGOeducation.com 14
LEGOtheLEGOlogoMINDSTORMSandtheMINDSTORMSlogoaretrademarksofthe/
sontdesmarquesdecommercede/sonmarcasregistradasdeLEGOGroup©TheLEGOGroup
EV3 TECHNOLOGY
Touch Sensor
The Touch Sensor is an analog sensor that can detect when
thesensor’s red button has been pressed and when it is released.
That means the Touch Sensor can be programmed to action using
three conditions—pressed, released, or bumped (both pressed and
released).
Using input from the Touch Sensor, a robot can be programmed
to see the world as a blind person might, reaching a hand out and
responding when it touches something (pressed).
You might build a robot with a Touch Sensor pressed against
thesurface beneath it. You might then program the robot to respond
(Stop!) when your robot is about to drive off the edge of a table (when
the sensor is released).
A fighting robot might be programmed to keep pushing forward
against its challenger until the challenger retreats. That pair of
actions—pressed, then released—would constitute bumped.
For more information, see Using the Touch Sensor in the EV3
Software Help.
EV3 Sensors
Touch Sensor
Released
Bumped
Pressed

250cm / 99inch
250cm / 99 inch
LEGOeducation.com 15
LEGOtheLEGOlogoMINDSTORMSandtheMINDSTORMSlogoaretrademarksofthe/
sontdesmarquesdecommercede/sonmarcasregistradasdeLEGOGroup©TheLEGOGroup
EV3 TECHNOLOGY
Ultrasonic Sensor
The Ultrasonic Sensor is a digital sensor that can measure
thedistance to an object in front of it. It does this by sending out
high-frequency sound waves and measuring how long it takes
thesound to reflect back to the sensor. The sound frequency is too
high for you to hear.
Distance to an object can be measured in either inches or
centimeters.This allows you to program your robot to stop a certain
distance from a wall.
When using centimeter units, the detectable distance is between 3
and 250 centimeters (with an accuracy of +/- 1 centimeters). When
using inch units, the measurable distance is between 1 and 99 inches
(with an accuracy of +/- 0.394 inches). A value of 255 centimeters
or 100 inches means the sensor is not able to detect any object in
front of it.
A steady light around the sensor eyes tells you that the sensor is in
Measure Mode. A blinking light tells you that it is in Presence Mode.
In Presence Mode, this sensor can detect another Ultrasonic Sensor
operating nearby. When listening for presence, the sensor detects
sound signals but does not send them.
The Ultrasonic Sensor can help your robots avoid furniture,
track a moving target, detect an intruder in your room, or “ping”
with increasing volume or frequency as an object gets closer to
thesensor.
For more information, see Using the Ultrasonic Sensor in the EV3
Software Help.
EV3 Sensors
Ultrasonic Sensor
Detectable distance
NOTE:
Since the Ultrasonic
Sensor depends on reflection
of thesound waves it may be in-
effective at detecting surfaces that
are textured or objects that are
rounded. It is also possible for
an object to be too small for
theUltrasonic Sensor
to detect it.

70cm / 27inch
200cm / 79inch
70cm / 27inch
200cm / 79inch
LEGOeducation.com 16
LEGOtheLEGOlogoMINDSTORMSandtheMINDSTORMSlogoaretrademarksofthe/
sontdesmarquesdecommercede/sonmarcasregistradasdeLEGOGroup©TheLEGOGroup
EV3 TECHNOLOGY
Infrared Sensor and Remote Infrared Beacon
The Infrared Sensor is a digital sensor that can detect infrared light
reflected from solid objects. It can also detect infrared light signals
sent from the Remote Infrared Beacon.
The Infrared Sensor can be used in three different modes: Proximity
Mode, Beacon Mode, and Remote Mode.
PROXIMITY MODE
In Proximity Mode, the Infrared Sensor uses the light waves reflected
back from an object to estimate the distance between the sensor
and that object. It reports the distance using values between 0 (very
close) to 100 (far away), not as a specific number of centimeters or
inches.The sensor can detect objects up to 70 cm away, depending
on the size and shape of the object.
For more information, see Using the Infrared Sensor Proximity Mode
in the EV3 Help files.
BEACON MODE
Choose one of the Remote Infrared Beacon’s four channels from
the red Channel Selector. The Infrared Sensor will detect a beacon
signal matching the channel that you specify in your program up
to a distance of approximately 200 cm in the direction it is facing.
Once detected, the sensor can estimate the general direction
(heading) of and the distance (proximity) to the beacon. With this
information, you can program a robot to play hide-and-seek, using
the Remote Infrared Beacon as the target of its search.Theheading
will be a value of between -25 and 25, with 0 indicating that
thebeacon is directly in front of the Infrared Sensor. The proximity
will be values between 0 and 100.
For more information, see Using the Infrared Sensor Beacon Mode
in the EV3 Help files.
EV3 Sensors
Proximity Mode
Beacon Mode
Infrared Sensor

LEGOeducation.com 17
LEGOtheLEGOlogoMINDSTORMSandtheMINDSTORMSlogoaretrademarksofthe/
sontdesmarquesdecommercede/sonmarcasregistradasdeLEGOGroup©TheLEGOGroup
EV3 TECHNOLOGY
The Remote Infrared Beacon is a separate device that can be
handheld or built into another LEGO
®
model. It requires two AAA
alkaline batteries. To turn the Remote Infrared Beacon on, press
the big Beacon Mode button on the top of the device. A green LED
Indicator will turn on, indicating the device is active and transmitting
continuously. Another press on the Beacon Mode button will turn
it off (after one hour of inactivity, the beacon will automatically turn
itself off).
REMOTE MODE
You can also use the Remote Infrared Beacon as a remote control
for your robot. When in Remote Mode, the Infrared Sensor can detect
which button (or combination of buttons) on the beacon is pressed.
There are a total of eleven possible button combinations:
= No button (and Beacon Mode is off)
= Button 1
= Button 2
= Button 3
= Button 4
= Both Button 1 and Button 3
= Both Button 1 and Button 4
= Both Button 2 and Button 3
= Both Button 2 and Button 4
= Beacon Mode is on
= Both Button 1 and Button 2
= Both Button 3 and Button 4
For more information, see Using the Infrared Sensor Remote Mode
in the EV3 Help files.
EV3 Sensors
NOTE:
The Infrared Sensor and
Remote Infrared Beacon are not
part of theLEGO®MINDSTORMS®
Education EV3 Core Set
but can be acquired as
accessories.
Remote Mode
Remote Infrared
Beacon

LEGOeducation.com 18
LEGOtheLEGOlogoMINDSTORMSandtheMINDSTORMSlogoaretrademarksofthe/
sontdesmarquesdecommercede/sonmarcasregistradasdeLEGOGroup©TheLEGOGroup
EV3 TECHNOLOGY
NOTE:
The Temperature
Sensor is not part of
theLEGO®MINDSTORMS®
Education EV3 Core Set
but can be acquired
as accessory.
Temperature Sensor
The Temperature Sensor is a digital sensor that
measures thetemperature at the tip of its metal
probe.The sensor measures in Celsius (-20°C to 120°C)
and Fahrenheit (-4°F to 248°F) with anaccuracy of 0.1°C.
TheTemperature Sensor is most commonly used to collect data for
heat-related data logging projects. With a 50 cm–long Connector
Cable and a 6.4 cm metal probe, the sensor makes it easy to
measure hot liquids away from the EV3 Brick and other electronics.
For more information, see Using the Temperature Sensor in theEV3
Software Help.
EV3 Sensors
Temperature
Sensor

LEGOeducation.com 19
LEGOtheLEGOlogoMINDSTORMSandtheMINDSTORMSlogoaretrademarksofthe/
sontdesmarquesdecommercede/sonmarcasregistradasdeLEGOGroup©TheLEGOGroup
EV3 TECHNOLOGY
Connecting Sensors and Motors
In order to function, motors and sensors must be connected to
theEV3 Brick.
Using the flat black Connector Cables, link sensors to the EV3 Brick
using Input ports 1, 2, 3, and 4.
If you create programs while the EV3 Brick is not connected to your
computer, the software will assign sensors to default ports. Those
default port assignments are:
+Port 1: Touch Sensor
+Port 2: Gyro Sensor/Temperature Sensor
+Port 3: Color Sensor
+Port 4: Ultrasonic Sensor/Infrared Sensor
If the EV3 Brick is connected to your computer while you program,
the software will automatically identify which port is being used for
each sensor or motor.
Using the flat black Connector Cables, link motors to the EV3 Brick
using Output ports A, B, C, and D.
As with the sensors, if the EV3 Brick is not connected when you are
writing a program, each motor will be assigned to a default port.
Default port assignments are:
+Port A: Medium Motor
+Port B & C: Two Large Motors
+Port D: Large Motor
If the EV3 Brick is connected to the computer when you are
programming, the software will automatically assign the correct
port in your programs.
Connecting the EV3 Technology
Connecting Sensors
Connecting Motors
NOTE:
The software
cannot distinguish
between two or more
identical sensors
or motors.

LEGOeducation.com 20
LEGOtheLEGOlogoMINDSTORMSandtheMINDSTORMSlogoaretrademarksofthe/
sontdesmarquesdecommercede/sonmarcasregistradasdeLEGOGroup©TheLEGOGroup
EV3 TECHNOLOGY
Connecting the EV3 Brick toYourComputer
Connect the EV3 Brick to your computer by USB Cable or wirelessly
using either Bluetooth or Wi-Fi.
USB CABLE
Using the USB Cable, plug the Mini-USB end into the EV3 Brick’s PC
port (located next to Port D). Plug the USB end into your computer.
USB Cable connection
Connecting the EV3 Technology
Other manuals for Mindstorms EV3
3
Table of contents
Other LEGO Educational Equipment manuals
Popular Educational Equipment manuals by other brands

GeoSafari
GeoSafari Light Adventure EI-5283 quick start guide

TruCorp
TruCorp AirSim Advance user manual

Aircatglobal
Aircatglobal VirtualFly YOKO user manual

Learning Resources
Learning Resources gloPane quick start guide

Abra
Abra Theremin Player Kit quick start guide

Learning Resources
Learning Resources Code & Go Robot Mouse LER 2831 Activity guide