manuals.online logo
Brands
  1. Home
  2. •
  3. Brands
  4. •
  5. Lejonklou
  6. •
  7. Amplifier
  8. •
  9. Lejonklou Slipsik 5 User manual

Lejonklou Slipsik 5 User manual

This manual suits for next models

1

Other Lejonklou Amplifier manuals

Lejonklou Gaio 2 User manual

Lejonklou

Lejonklou Gaio 2 User manual

Lejonklou KINKI3 User manual

Lejonklou

Lejonklou KINKI3 User manual

Lejonklou GIELLA User manual

Lejonklou

Lejonklou GIELLA User manual

Lejonklou Sagatun User manual

Lejonklou

Lejonklou Sagatun User manual

Lejonklou KINKI3 User manual

Lejonklou

Lejonklou KINKI3 User manual

Lejonklou Tundra Mono 2 User manual

Lejonklou

Lejonklou Tundra Mono 2 User manual

Lejonklou Entity User manual

Lejonklou

Lejonklou Entity User manual

Lejonklou Tundra Mono Series User manual

Lejonklou

Lejonklou Tundra Mono Series User manual

Lejonklou Sagatun Mono 1.0 User manual

Lejonklou

Lejonklou Sagatun Mono 1.0 User manual

Lejonklou KINKI3 User manual

Lejonklou

Lejonklou KINKI3 User manual

Lejonklou Slipsik 7 User manual

Lejonklou

Lejonklou Slipsik 7 User manual

Lejonklou Gaio User manual

Lejonklou

Lejonklou Gaio User manual

Lejonklou Boazu 1.1 User manual

Lejonklou

Lejonklou Boazu 1.1 User manual

Lejonklou Sagatun Mono 1.4 User manual

Lejonklou

Lejonklou Sagatun Mono 1.4 User manual

Lejonklou Tundra 1.1 User manual

Lejonklou

Lejonklou Tundra 1.1 User manual

Lejonklou Superkikkin User manual

Lejonklou

Lejonklou Superkikkin User manual

Lejonklou Tundra Mono User manual

Lejonklou

Lejonklou Tundra Mono User manual

Popular Amplifier manuals by other brands

Magnat Audio EDITION FOUR Owner's manual/warranty document

Magnat Audio

Magnat Audio EDITION FOUR Owner's manual/warranty document

Inter-m PA-2000A Operation manual

Inter-m

Inter-m PA-2000A Operation manual

Yamaha TX6n owner's manual

Yamaha

Yamaha TX6n owner's manual

Peavey TNT 150 user guide

Peavey

Peavey TNT 150 user guide

Bosch LBB 1903/10 Installation and user instructions

Bosch

Bosch LBB 1903/10 Installation and user instructions

Avocent Emerge DA1200D Installer/user guide

Avocent

Avocent Emerge DA1200D Installer/user guide

Redgum RGi35 operating instructions

Redgum

Redgum RGi35 operating instructions

Cambridge Audio AXA25 user manual

Cambridge Audio

Cambridge Audio AXA25 user manual

Alpine MRP-M200 owner's manual

Alpine

Alpine MRP-M200 owner's manual

Technical Pro H1502UrBT user manual

Technical Pro

Technical Pro H1502UrBT user manual

FMS EMGZ307 operating manual

FMS

FMS EMGZ307 operating manual

Racal Instruments 5601 user manual

Racal Instruments

Racal Instruments 5601 user manual

Valcom V-1094A Technical specifications

Valcom

Valcom V-1094A Technical specifications

Cambridge Audio 851D user manual

Cambridge Audio

Cambridge Audio 851D user manual

QSC 3800 Specifications

QSC

QSC 3800 Specifications

NAD C300 owner's manual

NAD

NAD C300 owner's manual

Rotel RMB-1077 owner's manual

Rotel

Rotel RMB-1077 owner's manual

Peavey Monitor 300 Series operating guide

Peavey

Peavey Monitor 300 Series operating guide

manuals.online logo
manuals.online logoBrands
  • About & Mission
  • Contact us
  • Privacy Policy
  • Terms and Conditions

Copyright 2025 Manuals.Online. All Rights Reserved.

Technical specifications for Slipsik 5.1
Dimensions (WxHxD) 103x59x180 mm
Weight 950 g
Mains voltage 115 V~ 60 Hz
F se (inside the case) T1A
Inp t impedance 47 kΩ/68 pF
Gain at 1 kHz 41 dB (112 times)
O tp t impedance/Rec. load 300 Ω/>3 kΩ
Power cons mption Less than 5 W
Warning
Lethal voltages inside, do not open! No ser serviceable parts
inside. Refer servicing to q alified personnel. To red ce the risk
of fire or electric shock, do not expose this appliance to rain or
moist re. If the power cord needs replacing, please contact
Lejonklo or yo r retailer. Never se an appliance with a
damaged power cord, as there is risk of lethal shock.
The power cord is internally colo red as follows: Live=Black,
Ne tral=White, Gro nd=Green.
This appliance m st be earthed.
CE Declaration of conformity:
This appliance follows the directives 73/23/EEC (LVD) and
89/336/EEC (EMC) by conforming to the following standards:
EN60065:2002 (Safety)
EN55013:2001 (Emissions)
EN55020:2002 (Imm nity)
Contact information
Firma Fredrik Lejonklo
Vänortsgatan 57
752 64 Uppsala
Sweden
Website: www.lejonklo .com
Email: info@lejonklo .com
Tel: +4670 558 0549
Thank you for buying Lejonklou Slipsik 5!
Please read this man al caref lly before connecting yo r Slipsik.
Connections
Slipsik is a moving magnet phono preamplifier b ilt in d al
mono. This means that each side (left and right) handles one
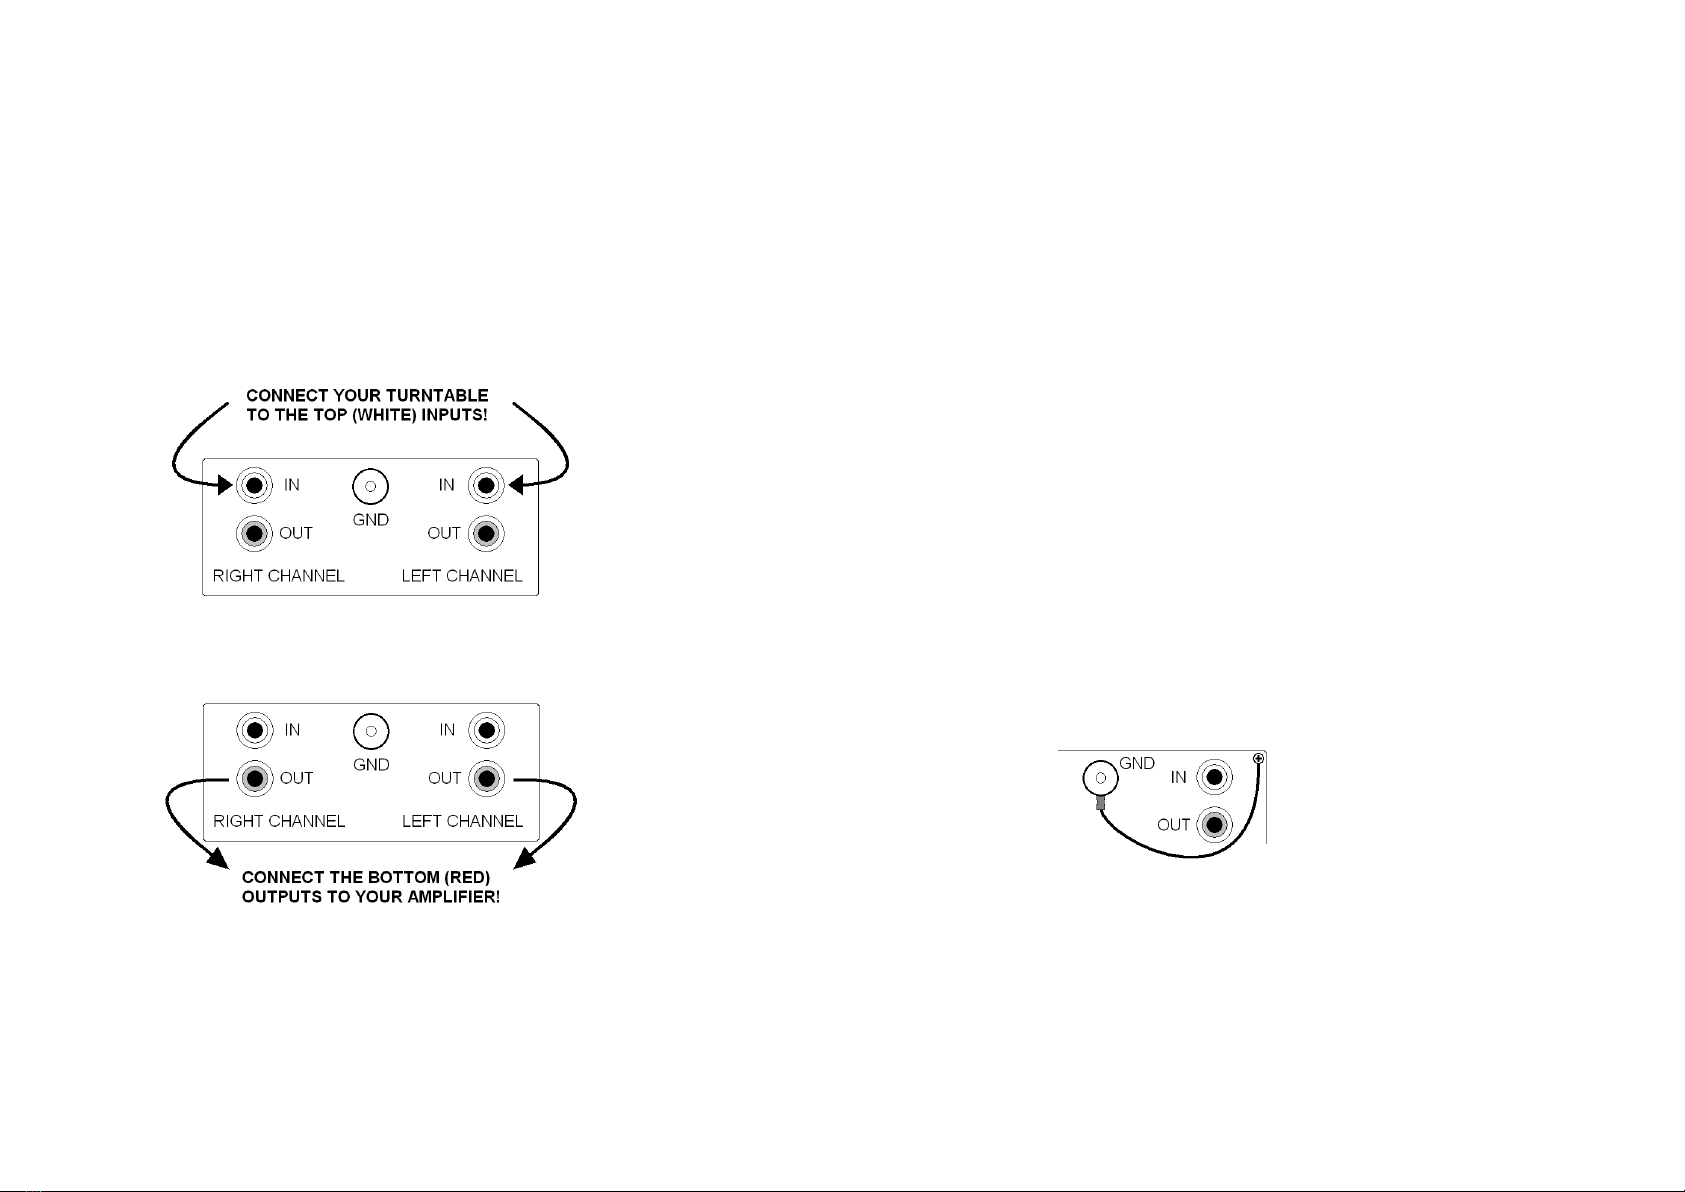
channel only. Start by connecting yo r t rntable to the top
(white) phono sockets as shown below.
Now connect a good pair of interconnects from the o tp ts (red)
to a pair of line level inp ts on yo r amplifier, as shown below.
Please note that the colo rs white and red do not correspond to
left and right! These connectors are chosen for best so nd q ality
and their man fact rer has ref sed to prod ce them in black.
If yo r t rntable has a gro nd lead, connect it to the large gro nd
screw. Last of all, connect the power cord. On E ropean models,
make s re that the li e phase of yo r power socket is on the same
side as the x in the name Volex printed on the pin side of the
power cord pl g. This will res lt in a weaker electrical field aro nd
the power s pply inside Slipsik, which improves the so nd.
Slipsik has a very low power cons mption and is designed to be
operating contin ally. We strongly recommend, however, that yo
disconnect yo r Slipsik from the mains d ring th nderstorms and
when left n sed for longer periods of time.
Extra ground lead
The optimal sit ation for yo r system is that all components are
gro nded thro gh their power cords, to a single common point.
Slipsik ses a floating signal gro nd design, which in most
sit ations res lts in the highest possible so nd q ality.
In some systems, however, when Slipsik is properly gro nded and
the amplifier is not, a h m problem can res lt. The sol tion is to
connect the s pplied gro nd cable, between a rear corner screw
and the gro nd screw, as shown in the ill stration below.
If you don’t ha e a hum problem, don’t fit this cable.
We hope you will enjoy your Slipsik 5!
If yo enco nter any problems with it, please contact yo r retailer
or Lejonklo directly. Email and telephone information can be
fo nd on the last page of this man al.