LENCO MES-205 User manual

OWNER’S MANUAL
Mobile Video System
• Digital Audio Out-Coaxial
• 7” TFT LCD Monitor
• Multi-subtitle Languages Function
• Multi-audio Languages Function
• Multi-angle Function
• Parental Control
• Remote Control
MES205

Pack ...............................................................................................................3
DVD Features ................................................................................................4
Safety Information ........................................................................................5
Disc Notes .....................................................................................................6
Installation .....................................................................................................7
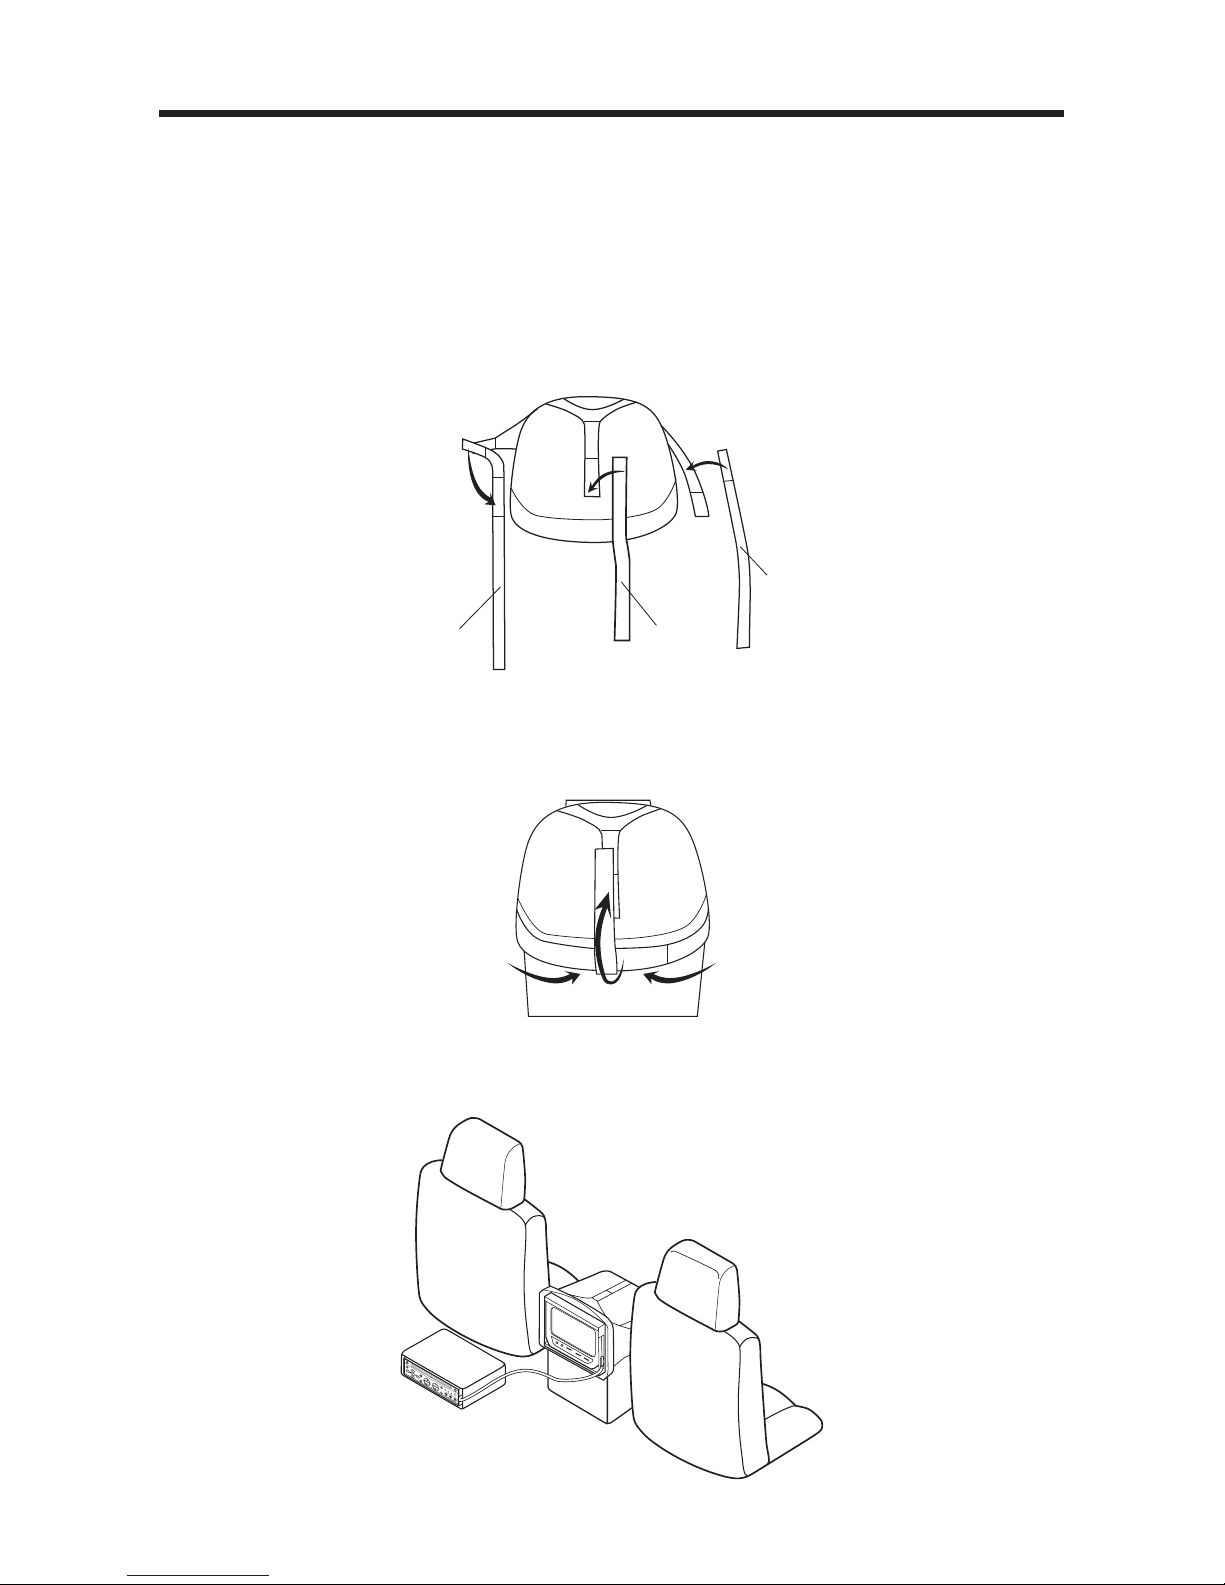
Install the Monitor and DVD Unit to the Mounting Bag .......................................7
Install the Mounting Bag With the Monitor and DVD Unit ...................................8
Method A ..........................................................................................................8
Method B ..........................................................................................................8
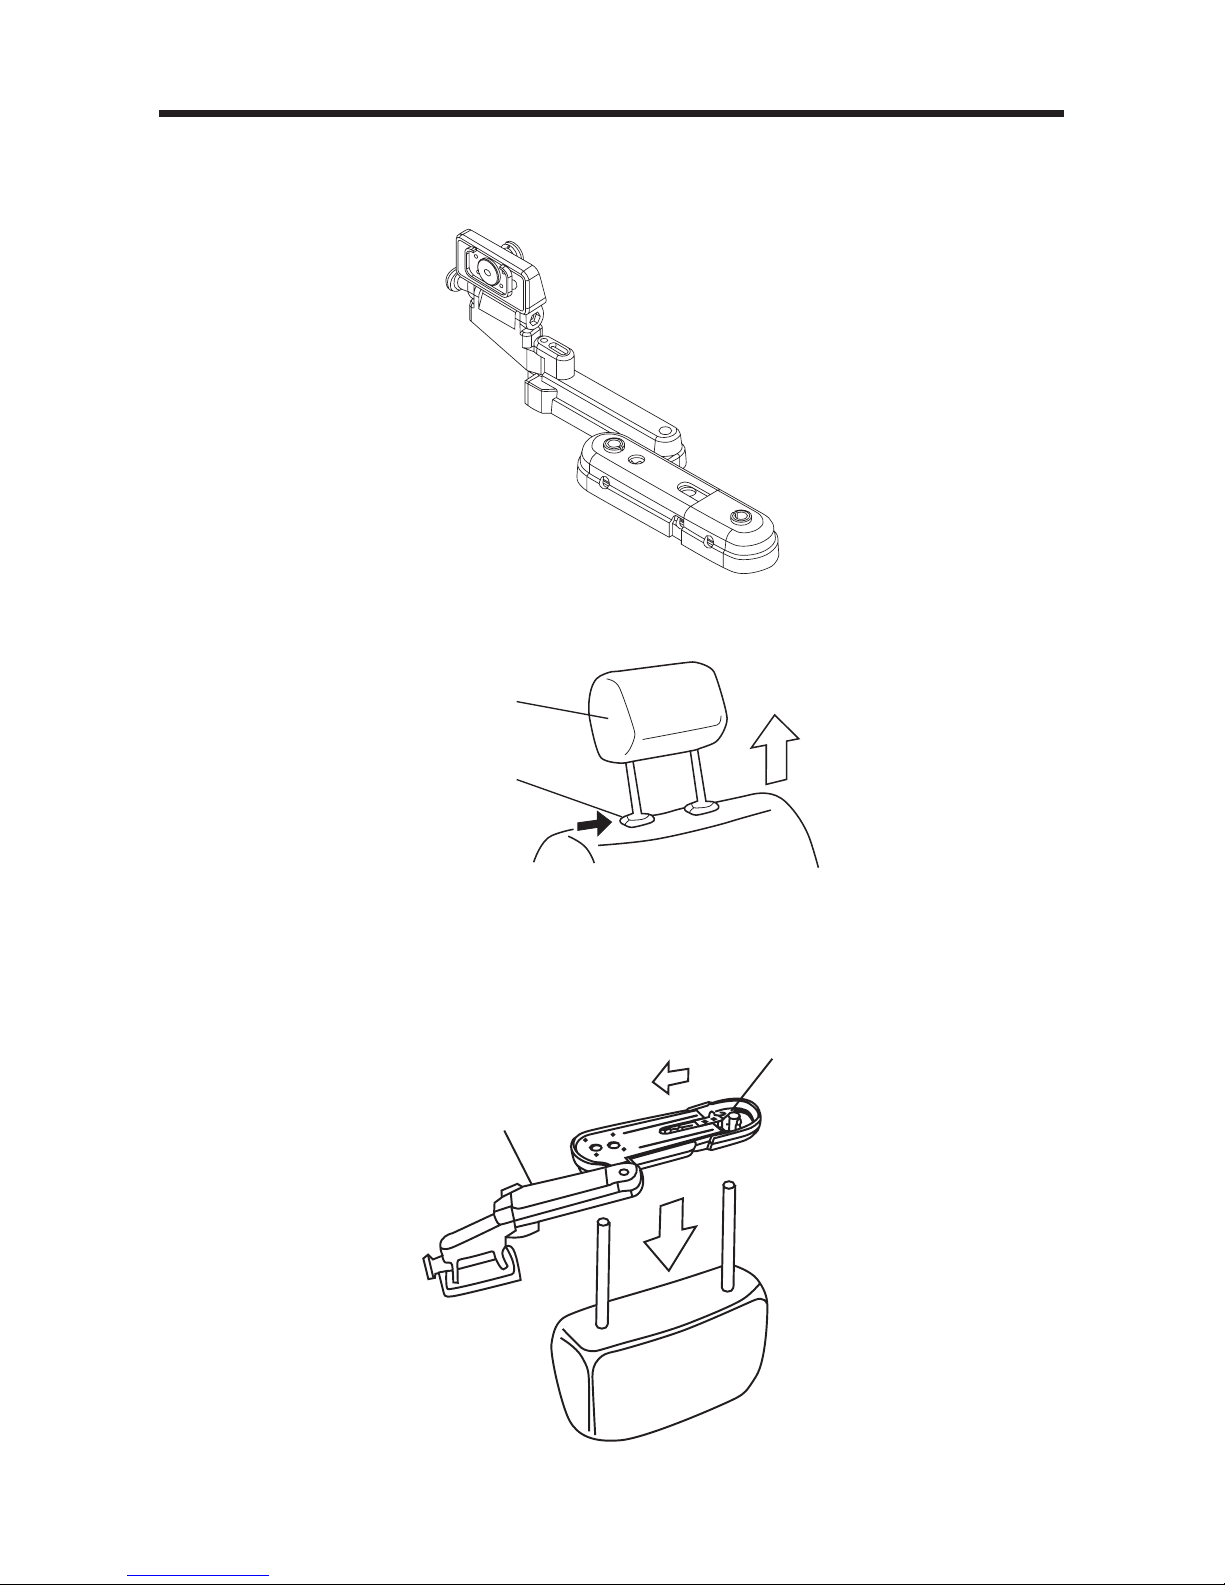
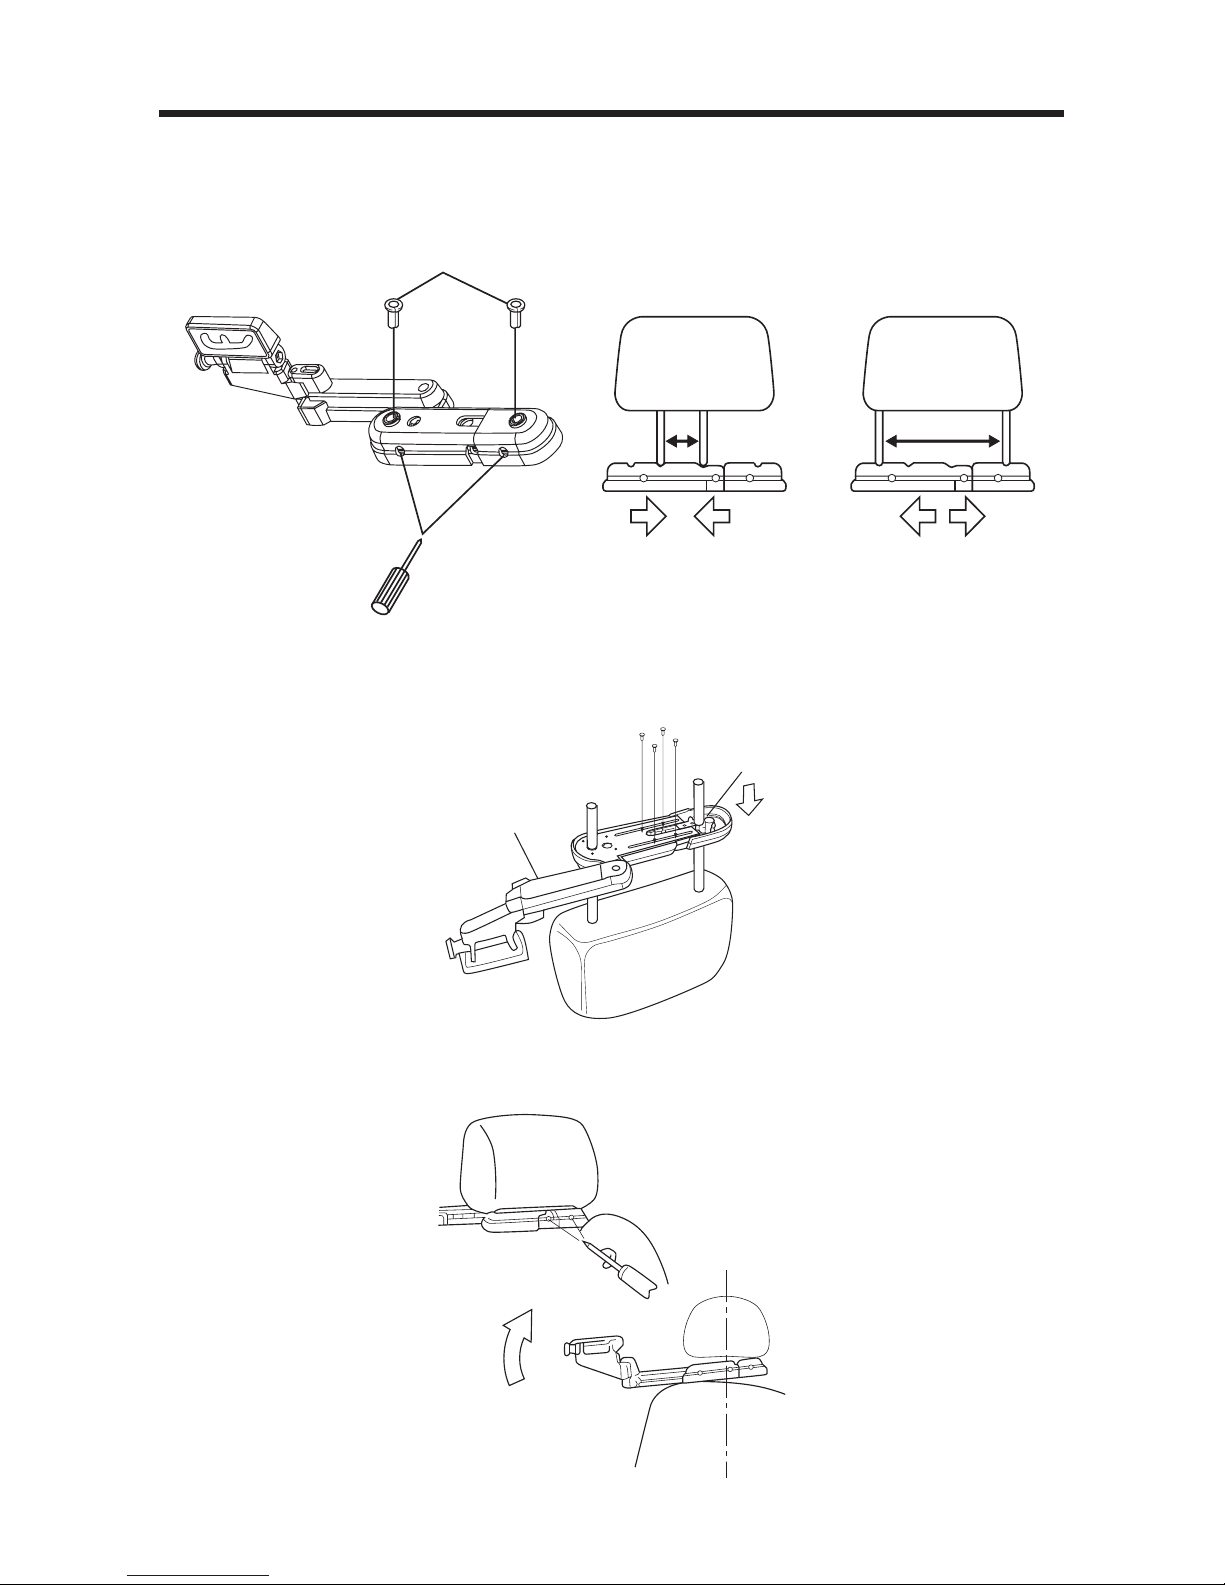
Install the headrest bracket with the monitor .......................................................9
Install TV Display On the Bracket ..............................................................11
Adjust the Angle of the Display ............................................................................11
Electrical Connection .................................................................................12
DVD Player...................................................................................................14
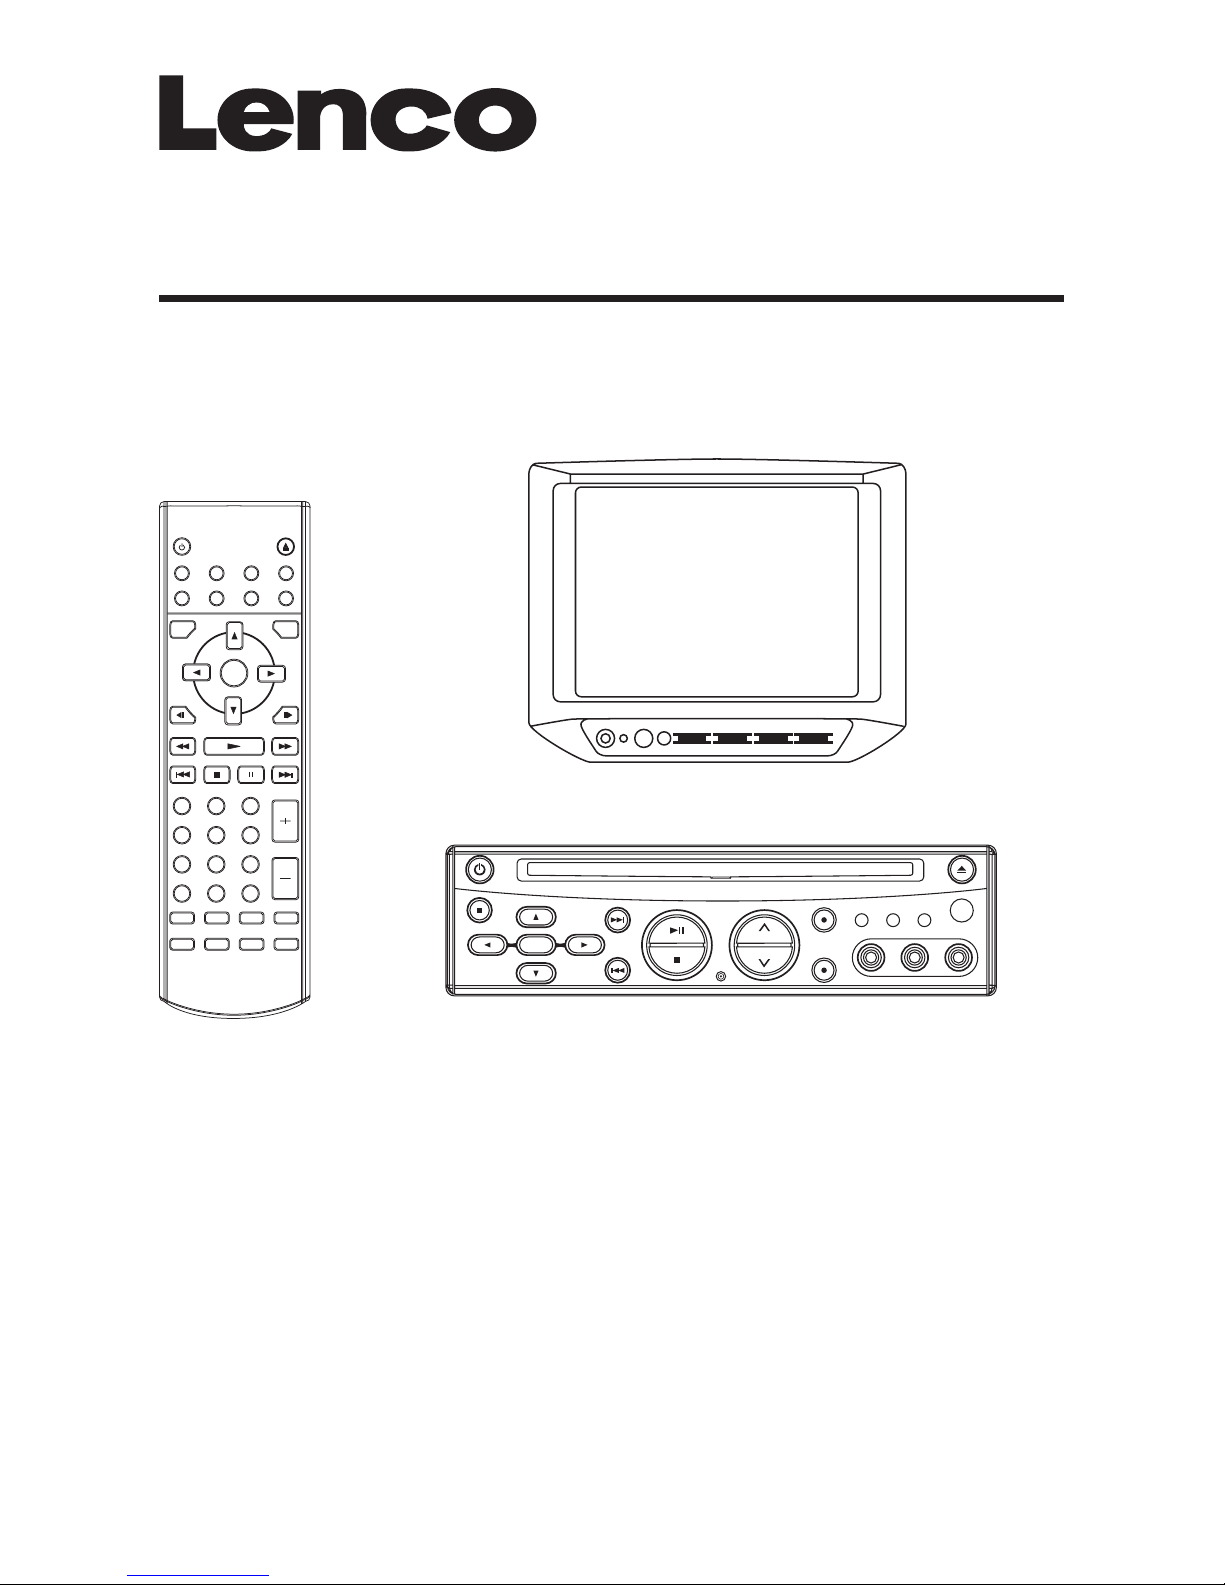
Remote Control...........................................................................................17
Location and Function of Keys ...........................................................................17
Preparing the Remote Control ............................................................................19
Loading a DVD/CD Disc ......................................................................................19
Ejecting a Disc .....................................................................................................19
Basic Operation ..........................................................................................19
On-Screen Display Function ...............................................................................21
Multi-audio Language Function .........................................................................22
Menu Function .....................................................................................................23
Title Menu Function (For DVD only) ....................................................................23
Multi-subtitle Language Function (For DVD only) ..............................................23
Multi-angle Function (For DVD only) ..................................................................23
MP3 Disc Play ......................................................................................................23
Setup ............................................................................................................24
Initial Setup ..........................................................................................................24
General Setup ......................................................................................................24
Speaker Setup .....................................................................................................26
Audio Setup .........................................................................................................26
Preferences Setup ...............................................................................................27
Defaults Table ......................................................................................................29
Trouble Shoting .......................................................................................... 30
Specifications..............................................................................................31
Monitor.........................................................................................................32
Control & Function Keys ......................................................................................33
AC/DC Adaptor .........................................................................................................35
GB-2
CONTENTS

PACK
GB-3
Examine the contents of the box that you DV player was packed in. There should be
the following:
• DVD Player
• 7” TFT LCD Monitor
• Remote Control with 2 AAA Batteries
• Mounting Bag with 3 additional straps
• 2 Sets of Earphones
• Cigarette Lighter Plug
• 9 - Pin AV Lead for Connection to DVD AV output
• Remote Wire for Controlling DVD via Monitor's Remote Sensor
• Digital Audio Out Cable
• Mounting Bracket for headrest mounting
• AC/DC Adaptor for home use
• Instruction Book
• Warranty Card

GB-4
Compatible with PAL DVD (Video CD)
and NTSC DVD (Video CD)
This player can play discs recorded in
either PAL or NTSC format.
• A single LSI chip now integrates all
major DVD playback circuit functions
including MPEG2 decoder, video D/A
converter, and audio decoders.
• L/R stereo analog audio outputs for
connection to existing head unit aux
inputs. Video output is composite
video.
• Supplied remote handles
multi-function software (multi-language
audio-track/subtitle, multi-angle, multi-
story, etc.), plus all basic functions.
USE THIS PRODUCT SAFELY
When Driving
Keep the volume level low enough to be
aware of road and traffic conditions.
When Car Washing
Do not expose the product to water or
excessive moisture. This could cause
electrical shorts, fire or other damage.
When Parked
Parking in direct sunlight can produce
very high temperatures inside your
vehicle. Give the interior a chance to
cool down before starting playback.
Use the Proper Power Supply
This product is designed to operate with
a 12 volt DC, negative ground battery
system (the regular system in a North
American car).
Protect the Disc Mechanism
Avoid inserting any foreign objects into
the slot of this player.
Failure to observe this may cause
malfunction due to the precise
mechanism of this unit.
Use Authorized Service Centres
Do not attempt to disassemble or adjust
this precision product. Please refer to
the Service Centre list included with this
product for service assistance.
For Installation
The unit should be installed in a
horizontal position with the front end up
at a convenient angle, but not more than
30°.
DVD FEATURES

GB-5
CAUTION:
MOBILE DVD PLAYER IS A CLASS I
LASER PRODUCT. HOWEVER THIS
MOBILE DVD PLAYER USES A
VISIBLE/INVISIBLE LASER BEAM
WHICH COULD CAUSE HAZARDOUS
RADIATION EXPOSURE IF DIRECTED.
BE SURE TO OPERATE THE MOBILE
DVD PLAYER CORRECTLY AS
INSTRUCTED.
USE OF CONTROLS OR
ADJUSTMENTS OR PERFORMANCE OF
PROCEDURES OTHER THAN THOSE
SPECIFIED HEREIN MAY RESULT IN
HAZARDOUS RADIATION EXPOSURE.
DO NOT OPEN COVERS AND - DO NOT
REPAIR YOURSELF. REFER SERVICING
TO QUALIFIED PERSONNEL.
WARNING:
• TO REDUCE THE RISK OF FIRE OR
ELECTRIC SHOCK, DO NOT EXPOSE
THIS EQUIPMENT TO RAIN OR
MOISTURE.
• TO REDUCE THE RISK OF FIRE OR
ELECTRIC SHOCK, AND ANNOYING
INTERFERENCE, USE ONLY THE
RECOMMENDED ACCESSORIES.
• THIS DEVICE IS INTENDED FOR
CONTINUOUS OPERATION.
This product incorporates copyright
protection technology that is protected
by method claims of certain U.S. patents
and other intellectual property rights
owned by Macrovision Corporation and
other rights owners. Use of this
copyright protection technology must be
authorized by Macrovision Corporation,
and is intended for home and other
limited viewing uses only unless
otherwise authorized by Macrovision
Corporation. Reverse engineering or
disassembly is prohibited.
SAFETY INFORMATION
Region Management Information
Region Management Information:
This Mobile DVD Player is designed and
manufactured to respond to the Region
Management Information that is recorded
on a DVD disc. If the Region number
described on the DVD disc does not
correspond to the Region number of this
Mobile DVD Player, this Mobile DVD
Player cannot play this disc.

DISC NOTES
GB-6
Disc formats supported by this player
DVD
12 cm disc
(Single-sided disc only)
Video CD
12 cm disc
CD
12 cm disc
MP3
12 cm disc
Discs which cannot be played with this
player
• DVD-ROM
• DVD-R/DVD-RAM
• CDV
• CD-G
Handling and Cleaning
• Dirt, dust, scratches and warping disc
will cause misoperation.
• Do not place stickers or make
scratches on discs.
• Do not warp discs.
• A disc should always be kept in its
case when not in use to prevent from
damaging.
• Do not place discs in the following
places:
1. Direct sunlight
2. Dirty, dusty and damp areas
3. Near car heaters
4. On the seats or dashboard
Disc Cleaning
Use a dry soft cloth to wipe the surface.
If the disc is quite dirty, use a soft cloth
slightly moistured with isopropyl (rubbing)
alcohol. Never use solvents such as
benzine, thinner or conventional record
cleaners as they may mar the surface of
the disc.
Note:
A disc may become somewhat scratched
(although not enough to make it
unusable) depending on your handle it
and conditions in the usage environment.
V
I
D
E
O
Note these scratches are not an
indication of any problem with the player.
Preparing New Discs with Rough
Spots
A new disc may have rough edges on its
inside and outside edges. If a disc with
rough edges is used, the proper setting
will not be performed and the player will
not play the disc. Therefore, remove the
rough edges in advance by using a ball
point pen or pencil as shown below. To
remove the rough edges, press the side
of the pen or pencil against the inside
and outside edges of the disc.
Rough spots
on inside edge
Ball point pen
or pencil
Rough spots on
outside edge
Label side up
Do not touch
the underside
of the disc
Do not bend
Wipe the disc from center
toward the outside edge

INSTALL THE MONITOR AND DVD UNIT TO THE MOUNTING BAG
1. The monitor is placed on the upper side of the mounting bag.
The DVD unit is placed on the underside of the mounting bag. See Fig.1.
2. As shown in Fig.2, the monitor is well installed in the bag.
INSTALL THE MOUNTING BAG WITH THE MONITOR AND DVD UNIT
METHOD A
1. You can separate the bag and place the monitor and DVD unit individually. Place
the monitor on the headrest and locate the DVD under the seat. The monitor is
fixed by using the straps on the bag as shown in Fig.3.
2. Regular set-up allows only one viewer: By slightly tilting the display to the right,
when mounted behind driver, both rear passengers can view.
INSTALLATION
Fig. 2
GB-7
Fig. 1
Fig. 3

METHOD B
1. Separate the bag and place DVD unit under the seat.
2. The monitor can be positioned between seats. By using “strap extenders”, the
monitor can be mounted on the console between the front seats. Convenient
for differentiation, the three “strap extenders” have been marked 1#, 2#, 3#.
As shown in Fig.4, stick the 1#, 2# and 3# strap extenders to the proper position
of the mounting bag according to the direction of the arrows.
3. Let the right and left straps go around the side of the console with the top
strap coming straight back over the console to meet the right and left. Then
the monitor is mounted on the console between the front seats as shown in
Fig.5 below.
4. Last locate the DVD under the seat.
INSTALLATION
Fig. 4
Strap#1
Strap#2 Strap#3
Fig. 5
GB-8
Fig. 6

INSTALLATION
INSTALL THE HEADREST BRACKET WITH THE MONITOR
Plastic Bracket
1. Press the switch under the headrest of the car seat and pull out the headrest.
2. Assemble the Screen Mounting Bracket (2) to Screen Mounting Bracket (1) and
Rotate combined bracket, then place them on the poles of the removed headrest
to select proper hold position to install the base.
Headrest
Switch
(1)
(2)
GB-9

INSTALLATION
3. Remove the Bracket from headrest and loosen the two screws by using the
screwdriver, then place the two plastic tubes (3) on the holes that you just selected,
then adjust them to proper position as shown in diagram below.
4. Install the base on the poles of the headrest and adjust to proper position, then
use four screws (ø3x10 (4) to fix the base 1 and base 2.
5. Install the headrest with the base and rotate the Mounting Bracket to the car seat
in proper position, then use the screwdriver to fasten the two screws to fix the
base.
(3) Plastic tube
GB-10
(1)
(2)
(4) Screw

INSTALL THE SCREEN ON THE BRACKET
Insert the position plate on the screen unit into the clip screw plate and screw on the
clip screw to fix the screen unit to the Mounting Bracket.
ADJUST THE ANGLE OF THE DISPLAY
1. Loose the clip screw on the side of the rotate bracket, then adjust the Mounting
Bracket to the angle of the display to your need and screw on the clip screw to fix the
Mounting Bracket.
2. In order to adjust swing arm, you must first loosen as indicated by diagram with
appropriate screwdriver.
Adjusted by force will damage the Screen Mounting Bracket.
Position plate
Rotate Bracket
(6) Clip screw
(5) Position Clip-screw
Clip screw
GB-11

GB-12
ELECTRICAL CONNECTION
CAUTION:
1. Put the 9-pin mini din plug (1) into the 9-pin mini din socket (2) at the side of the
display.
2. The yellow terminal is connected to the VIDEO out socket of DVD unit and
the black terminal is connected to the AUDIO L/R out socket. The other black
terminal is connected to the DC 12V OUT of DVD unit.
3. When you want to control the DVD unit through the remote sensor of monitor,
plug one end of remote wire into the remote out jack (3) and another end in
green connect to “REMOTE” of DVD unit.
DC 12V IN
REMOTE
INPUT OUTPUT
VIDEO L/R
A/V 2 INPUT DIGITAL
AUDIO
A/V OUTPUT
VIDEO 1 VIDEO 2L/R
DVD PLAYER
CIGARETTE LIGHTER
(2) (1)
(3)
(BLACK)
(GREEN)
(YELLOW)
(BLACK)
REMOTE WIRE
(GREEN) REMOTE WIRE
PVC CABLE (BLACK)

GB-13
ELECTRICAL CONNECTION
VIDEO 2 OUT
AC/DC
ADAPTOR
CIGARETTE LIGHTER
REMOTE CONTROL RECEIVER
VIDEO 2 IN
AUDIO 2 R IN
AUDIO 2 L IN
WHITE
RED
YELLOW
DC 12V IN
REMOTE
INPUT OUTPUT
VIDEO L/R
A/V 2 INPUT DIGITAL
AUDIO
A/V OUTPUT
VIDEO 1 VIDEO 2L/R
DIGITAL AUDIO
VIDEO 1 OUT
AUDIO R OUT
AUDIO L OUT
WHITE
RED
YELLOW
YELLOW

DVD PLAYER
GB-14
1. POWER ( )
2. EJECT ( )
3. SETUP
4. AUDIO
5. SOURCE
6. Disc Slot
7. PLAY/PAUSE ( II )
8. STOP ( )
9. PREVIOUS ( )
10. NEXT ( )
11. VOLUME
12. VOLUME
13. / , / cursor buttons
14. ENTER
15. Indicator Light for DVD
16. Indicator Light for AV INPUT 1
17. Indicator Light for AV INPUT 2
18. VIDEO IN 1
19. AUDIO IN 1 L
20. AUDIO IN 1 R
21. IR
22. Reset button
17
10 612 515 16 2
17 21
3
20
19184
11
22
8
913
14

DVD PLAYER
GB-15
23. DC 12V INPUT Socket
24. DC 12V OUTPUT Socket
25. REMOTE Socket
26. VIDEO 2 INPUT
27. AUDIO 2 INPUT L/R
28. DIGITAL AUDIO
29. VIDEO 1 OUTPUT
30. AUDIO OUTPUT L/R
31. VIDEO 2 OUTPUT
23 24 25 28 3026 29 3127

GB-16
DVD PLAYER
This unit is designed for home-use and car-use. When installed on the car, please
follow the installation instruction below.
Note:
1. First remove the two screws that locket the unit core, then attach the brackets on
both sides of unit with screws (M4x6), last install the unit with screws (M5x25).
2. When fix the unit, you can slide the screw (M5x25) to left side or right side to meet
your needed position. In the figure below, select two holes among the positions that
marked 1,2,3 and 4 to fix the bracket.
SCREW
M5X25
SCREW
M4X6
SCREW
M4X6
SCREW LOCKED THE UNIT CORE
3
1
2
3
1
2
4

GB-17
REMOTE CONTROL
6
1
3
7
11
4
8
10
5
9
12
13
14
16
15
17
20
18
19
2421
28
22
32
23
25
29
2726
3130
2
LOCATION AND FUNCTION OF KEYS

GB-18
REMOTE CONTROL
1. POWER Press POWER to turn the unit ON or OFF.
2. EJECT Press to eject the disc.
3. MUTE Press to mute the sound.
4. SUBTITLE Changing of the SUBTITLE language on multi-subtitle language
DVD disc.
5. ANGLE Changing of the view angle on multi-angle DVD disc.
6. DISPLAY Display statistical disc information during playback.
7. MODE Changing between DVD mode, AV1 mode and AV2 mode.
8. SETUP Display the SETUP menu.
9. PAL/NTSC Switch between PAL mode and NTSC mode.
10. AUDIO Changing of the AUDIO soundtrack on multi-audio soundtrack
DVD disc. Changing of the sound mode of the CD disc.
11. TITLE Display the TITLE menu that is stored in DVD disc.
12. MENU Display the root menu that is stored on the DVD disc
13. / , / In case of MENU mode, / , / , buttons served as cursor
buttons to select item left/right, ahead/back.
14. ENTER Confirm the Track/Chapter selected with the numeric buttons or
selected with the cursor buttons on TV screen.
15. / Changing for slow forward/reverse playback motion.
16. Press to play the disc.
17. / Press to start forward rapidly & to reverse rapidly.
18. / Press to skip to the next track & press to skip back one
track.
19. Press it to stop playback.
20. Press it to pause playback.
21. 0 - 9 Numeric buttons
22. 10+ Digital selecting button, cooperatively used with numeric buttons.
23. CLEAR When you input a number in error, press the button to clear it.
24. VOLUME+/- Press VOLUME+/- button to increase or decrease the volume
level.
25. ZOOM Allows the picture to be increased or decreased in size.
26. RESUME When in stop mode, press the button, then play can be resumed
from the stop point.
27. GOTO Disc search button, cooperatively used with numeric buttons.
28. PBC Chaning between PBC ON and PBC OFF.
29. RANDOM Allows the track played in random order.
30. PROGRAM Allows the track played in the order you programmed.
31. REPEAT Switch the Repeat mode of discs.
32. A-B A-B repeat allows a passage to be repeated continuously.

GB-19
REMOTE CONTROL
Preparing the Remote Control
Inserting the Batteries
1. Open the battery compartment cover.
2. Insert the new batteries. Make sure
that the positive and negative
terminals of the batteries are oriented
indicated.
3. Close the cover
Battery: Two AAA size battery.
Using the Remote Control
Face the remote control towards the
player front face IR mark (remote control
signal reciver).
Operation angle: About ±30 degree in
each the direction of the front of the IR
mark.
Loading a Disc
1. Turn the ignition on the the accessory
position.
2. Press the POWER button (1).
3. Insert the disc with printed side facing
up into the disc slot (2).
4. The player starts playback
automatically.
Ejecting a Disc
Press (EJ) button (3) to eject the disc.
BASIC PLAY
Stopping Play
- Brief press the (Stop) button to stop
the unit playback, when press the
(Play) button it can continuous normal
playback.
- Press (Stop) button twice, it will stop
the playback and go back to initial
Track/Chapter.
Rapid Forward/Rapid Reverse
Press & during play. Each time
the button is pressed, the speed of rapid
forward/reverse changes according to
the disc as follow.
DVD:
VCD/CD:
MP3:
Skipping Track
Press / buttons on the remote
handset or on the front panel during
playback.
Press to skip to next track, and
to back one track.
Note: For some VCD 2.0 dics
(PBC-playback control), / buttons
may be unavailable.
Slow Motion Play
Press / during play.
Each time the button is pressed, the
speed of slow forward/reverse changes
according to the disc as follow.
DVD:
Normal Playback 2X 4X 6X 8X
Normal Playback 2X 4X
Normal Playback 2X 4X 8X
Normal Playback 1X 2X 3X 4X
BASIC OPERATION
1 2 3

GB-20
BASIC OPERATION
Disc Search (GOTO)
FOR DVD
Press GOTO button twice, the screen will
display the following message:
You can select the item you want to
watch through TIME setting by using
numeric buttons and ENTER key.
FOR CD/VCD (WITH PBC OFF)/:
Press GOTO button once, the screen will
display the following message:
Use numeric buttons to input the time
directly.
ZOOM
Allows the picture to be incresed or
decreased in size. Press ZOOM to toggle
among 1.5 scale, 2.0 scale and 3.0 scale.
During Zoom mode, press / , /
buttons to move pictures up, down, left
or right direction.
RANDOM
Press RANDOM button, track selection
will be made in random order. The display
screen will show “SHUFFLE ON” on the
right-top corner. Press RANDOM button
again, “SHUFFLE OFF” appears and
release the mode.
PROGRAM
In stop mode, press PROGRAM button,
the screen will display “PROGRAM
P00:00”. For example: press numeric
button 4 and button, “PROGRAM
P01:04” appears. It means track 4 will be
played first.
MODE SELECTION
Press SOURCE button on the front panel
of the unit or MODE button on the remote
TITLE 01/01 TIME -- : -- : --
00:00:25
GOTO -- : --
00:00:25
Pause (still picture)
Pressing on the remote control or
on the front panel during playback will
stop play temporary. Return to normal
playback, press on the remote control
or on the front panel.
MUTE
Will mute the sound, but the disc
continues playing. When you unmute the
sound (press MUTE again), sound will
resume.
Repeat
FOR DVD:
Press the REPEAT button to select repeat
mode as follow.
FOR CD:
Press the REPEAT button to select repeat
mode as follow.
1.
Continuously repeat at the current chapter/
track, when selected REP-ONE mode.
2.
Select REP-ALL mode to continuously
repeat all chapter/track on the current disc.
3.
When the player finish playback the current
discc last chapter/track, it will stop display
the elapsed time. When selected REPEAT
OFF mode, REP-ONE & REP-ALL
disappear at the screen display.
4. REPEAT feature does not support
VCD2.0 (with PBC ON).
A-B
A-B repeat allows a passage to be
repeated continuously. Press A-B button
at the start of the required passage, then
press A-B button again at the end of the
passage. To revert to normal playing,
press A-B button again. Each time the
button pressed, the screen will display
as follows:
A TO B SET A A TO B SET B A TO B CANCELLED
CHAPTER REPEAT ON TITLE REPEAT ON
REPEAT OFF
REP-ONE REP-ALL REPEAT OFF
Other manuals for MES-205
1
Table of contents
Other LENCO Car Video System manuals