LENCO MES-208 User manual

OWNER’S MANUAL
Mobile Video System
• Digital Audio Out-Coaxial
• 7” TFT LCD Monitor
• Multi-subtitle Languages Function
• Multi-audio Languages Function
• Multi-angle Function
• Parental Control
• Remote Control
MES208

GB-2
CONTENTS
Pack .............................................................................................................................3
DVD Features ..............................................................................................................4
Safety Information ......................................................................................................5
Disc Notes...................................................................................................................6
Installation...................................................................................................................7
Install the Monitor and DVD Unit to the Mounting Bag ..........................................7
Install the Mounting Bag With the Monitor and DVD Unit ......................................8
Method A...........................................................................................................8
Method B ..........................................................................................................8
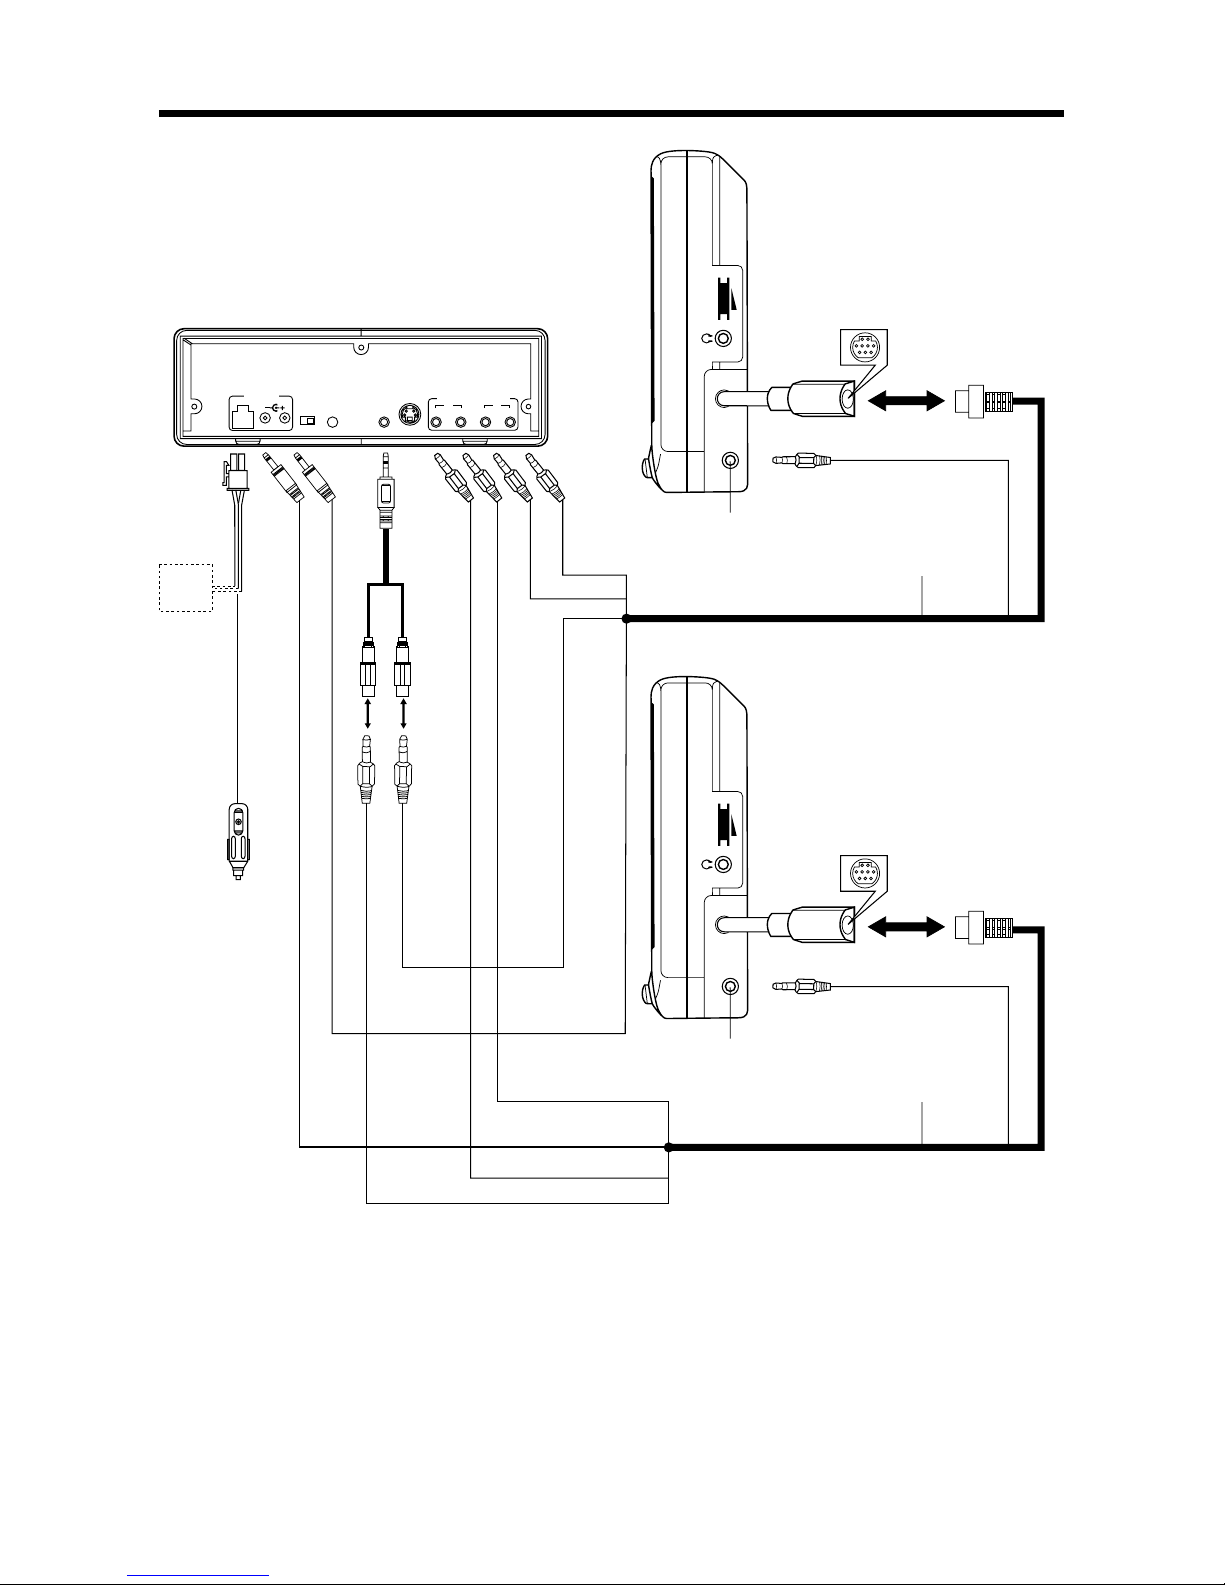
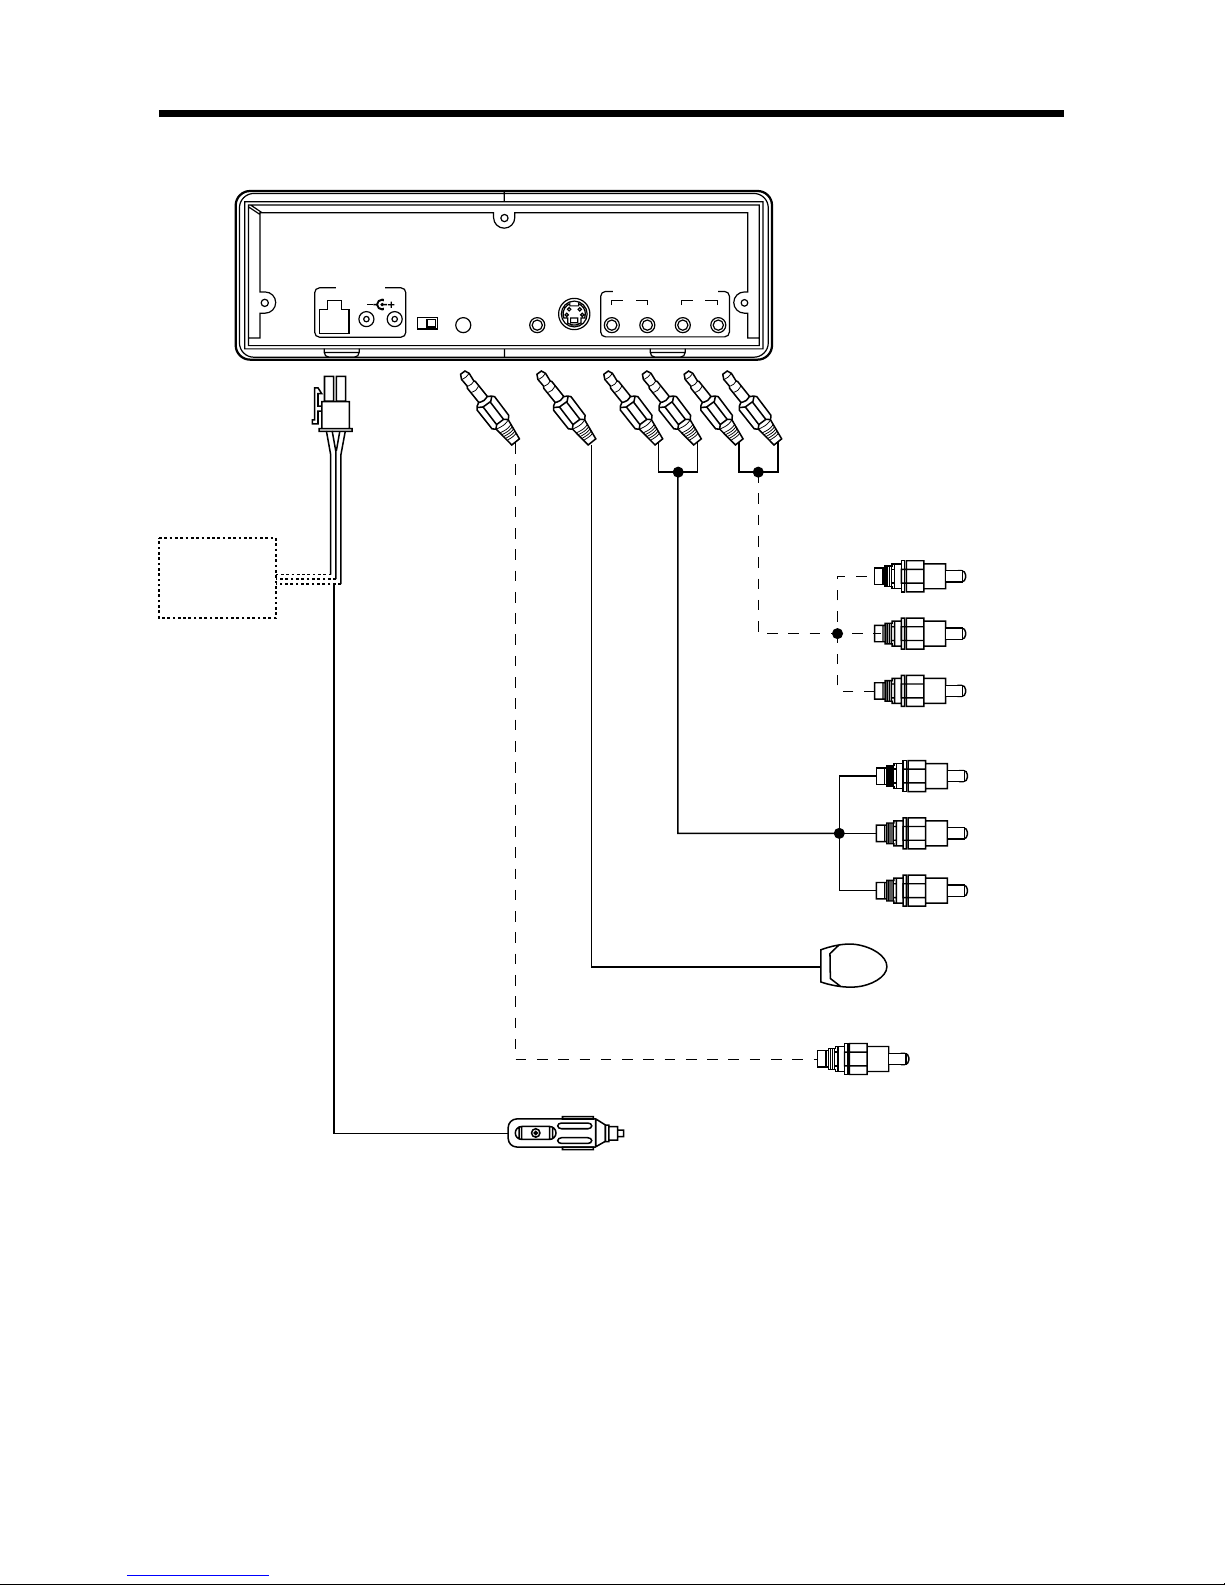
Electrical Connection.................................................................................................9
DVD Player ................................................................................................................11
Remote Control ........................................................................................................14
Location and Function of Keys.............................................................................14
Preparing the Remote Control..............................................................................15
General Operation ....................................................................................................16
Turn the Unit On....................................................................................................16
Basic Play .............................................................................................................16
DVD Video Menu Play...........................................................................................17
Mode Selection.....................................................................................................17
Reset Function......................................................................................................17
Last Play Memory .................................................................................................17
Advanced Operation ................................................................................................17
Repeat Play/ Paragraph Repeat Play ...................................................................17
PBC Menu Playback of VCD/SVCD .....................................................................17
On-screen Display Function .................................................................................18
PAL/NTSC System Selection................................................................................19
Bookmark Function ..............................................................................................19
Random Playing....................................................................................................19
Zoom Function......................................................................................................20
Special Function for DVD .....................................................................................20
Special Function for VCD .....................................................................................21
Data Disc and Audio CD Play Operation ..............................................................21
Setup..........................................................................................................................23
Language Setup ...................................................................................................23
Display Setup........................................................................................................24
Audio Setup ..........................................................................................................24
Lock Setup............................................................................................................25
Others Setup.........................................................................................................26
Trouble Shooting ......................................................................................................27
Specifications ...........................................................................................................28
Monitor ......................................................................................................................29
Control & Function Keys.......................................................................................30
AC/DC Adaptor .........................................................................................................32

PACK
GB-3
Examine the contents of the box that you DVD player was packed in. There should be
the following:
• DVD Player
• 2 x 7” TFT LCD Monitor
• Remote Control with 2 AAA Batteries
• Mounting Bag with 3 additional straps
• Cigarette Lighter Plug
• 9 - Pin AV Lead for Connection to DVD AV output
• Remote Wire for Controlling DVD via Monitor's Remote Sensor
• AC/DC Adaptor for home use
• Instruction Book
• Warranty Card

GB-4
Compatible with PAL DVD (Video CD)
and NTSC DVD (Video CD)
This player can play discs recorded in
either PAL or NTSC format.
•A single LSI chip now integrates all
major DVD playback circuit functions
including MPEG2 decoder, video D/A
converter, and audio decoders.
•L/R stereo analog audio outputs for
connection to existing head unit aux
inputs. Video output is composite
video.
•Supplied remote handles
multi-function software (multi-language
audio-track/subtitle, multi-angle, multi-
story, etc.), plus all basic functions.
USE THIS PRODUCT SAFELY
When Driving
Keep the volume level low enough to be
aware of road and traffic conditions.
When Car Washing
Do not expose the product to water or
excessive moisture. This could cause
electrical shorts, fire or other damage.
When Parked
Parking in direct sunlight can produce
very high temperatures inside your
vehicle. Give the interior a chance to
cool down before starting playback.
Use the Proper Power Supply
This product is designed to operate with
a 12 volt DC, negative ground battery
system (the regular system in a North
American car).
Protect the Disc Mechanism
Avoid inserting any foreign objects into
the slot of this player.
Failure to observe this may cause
malfunction due to the precise
mechanism of this unit.
Use Authorized Service Centres
Do not attempt to disassemble or adjust
this precision product. Please refer to
the Service Centre list included with this
product for service assistance.
For Installation
The unit should be installed in a
horizontal position with the front end up
at a convenient angle, but not more than
30˚.
DVD FEATURES

GB-5
CAUTION:
MOBILE DVD PLAYER IS A CLASS I
LASER PRODUCT. HOWEVER THIS
MOBILE DVD PLAYER USES A
VISIBLE/INVISIBLE LASER BEAM
WHICH COULD CAUSE HAZARDOUS
RADIATION EXPOSURE IF DIRECTED.
BE SURE TO OPERATE THE MOBILE
DVD PLAYER CORRECTLY AS
INSTRUCTED.
USE OF CONTROLS OR
ADJUSTMENTS OR PERFORMANCE OF
PROCEDURES OTHER THAN THOSE
SPECIFIED HEREIN MAY RESULT IN
HAZARDOUS RADIATION EXPOSURE.
DO NOT OPEN COVERS AND - DO NOT
REPAIR YOURSELF. REFER SERVICING
TO QUALIFIED PERSONNEL.
WARNING:
•TO REDUCE THE RISK OF FIRE OR
ELECTRIC SHOCK, DO NOT EXPOSE
THIS EQUIPMENT TO RAIN OR
MOISTURE.
•TO REDUCE THE RISK OF FIRE OR
ELECTRIC SHOCK, AND ANNOYING
INTERFERENCE, USE ONLY THE
RECOMMENDED ACCESSORIES.
•THIS DEVICE IS INTENDED FOR
CONTINUOUS OPERATION.
This product incorporates copyright
protection technology that is protected
by method claims of certain U.S. patents
and other intellectual property rights
owned by Macrovision Corporation and
other rights owners. Use of this
copyright protection technology must be
authorized by Macrovision Corporation,
and is intended for home and other
limited viewing uses only unless
otherwise authorized by Macrovision
Corporation. Reverse engineering or
disassembly is prohibited.
SAFETY INFORMATION
Region Management Information
Region Management Information:
This Mobile DVD Player is designed and
manufactured to respond to the Region
Management Information that is recorded
on a DVD disc. If the Region number
described on the DVD disc does not
correspond to the Region number of this
Mobile DVD Player, this Mobile DVD
Player cannot play this disc.

DISC NOTES
GB-6
Disc formats supported by this player
DVD
12 cm disc
(Single-sided disc only)
Video CD
12 cm disc
CD
12 cm disc
MP3
12 cm disc
Discs which cannot be played with this
player
•DVD-ROM
•DVD-R/DVD-RAM
•CDV
•CD-G
Handling and Cleaning
•Dirt, dust, scratches and warping disc
will cause misoperation.
•Do not place stickers or make
scratches on discs.
•Do not warp discs.
•A disc should always be kept in its
case when not in use to prevent from
damaging.
•Do not place discs in the following
places:
1. Direct sunlight
2. Dirty, dusty and damp areas
3. Near car heaters
4. On the seats or dashboard
Disc Cleaning
Use a dry soft cloth to wipe the surface.
If the disc is quite dirty, use a soft cloth
slightly moistured with isopropyl (rubbing)
alcohol. Never use solvents such as
benzine, thinner or conventional record
cleaners as they may mar the surface of
the disc.
Note:
A disc may become somewhat scratched
(although not enough to make it
unusable) depending on your handle it
and conditions in the usage environment.
V
I
D
E
O
Note these scratches are not an
indication of any problem with the player.
Preparing New Discs with Rough
Spots
A new disc may have rough edges on its
inside and outside edges. If a disc with
rough edges is used, the proper setting
will not be performed and the player will
not play the disc. Therefore, remove the
rough edges in advance by using a ball
point pen or pencil as shown below. To
remove the rough edges, press the side
of the pen or pencil against the inside
and outside edges of the disc.
Rough spots
on inside edge
Ball point pen
or pencil
Rough spots on
outside edge
Label side up
Do not touch
the underside
of the disc
Do not bend
Wipe the disc from center
toward the outside edge

INSTALLATION
INSTALL THE MONITOR AND DVD UNIT TO THE MOUNTING BAG
1. The monitor is placed on the upper side of the mounting bag.
The DVD unit is placed on the underside of the mounting bag. See Fig.1.
2. As shown in Fig.2, the monitor is well installed in the bag.
INSTALL THE MOUNTING BAG WITH THE MONITOR AND DVD UNIT
METHOD A
1. You can separate the bag and place the monitor and DVD unit individually. Place
the monitor on the headrest and locate the DVD under the seat. The monitor is
fixed by using the straps on the bag as shown in Fig.3.
2. Regular set-up allows only one viewer: By slightly tilting the display to the right,
when mounted behind driver, both rear passengers can view.
Fig. 2
GB-7
Fig. 1
Fig. 3

METHOD B
1. Separate the bag and place DVD unit under the seat.
2. The monitor can be positioned between seats. By using “strap extenders”, the
monitor can be mounted on the console between the front seats. Convenient
for differentiation, the three “strap extenders”have been marked 1#, 2#, 3#.
As shown in Fig.4, stick the 1#, 2# and 3# strap extenders to the proper position
of the mounting bag according to the direction of the arrows.
3. Let the right and left straps go around the side of the console with the top
strap coming straight back over the console to meet the right and left. Then
the monitor is mounted on the console between the front seats as shown in
Fig.5 below.
4. Last locate the DVD under the seat.
INSTALLATION
Fig. 4
Strap#1
Strap#2 Strap#3
Fig. 5
GB-8
Fig. 6

ELECTRICAL CONNECTION
CAUTION:
1. Put the 9-pin mini din plug (1) into the 9-pin mini din socket (2) at the side of the
display.
2. The yellow terminal is connected to the VIDEO out socket of DVD unit and
the black terminal is connected to the AUDIO L/R out socket. The other black
terminal is connected to the DC 12V OUT of DVD unit.
3. When you want to control the DVD unit through the remote sensor of monitor,
plug one end of remote wire into the remote out jack (3) and another end in
green connect to “REMOTE”of DVD unit.
GB-9
DVD PLAYER
CIGARETTE LIGHTER
YELLOW
BLACK
AB
DIGITAL
AUDIO
A/V OUTPUT
TYPE
DC 12 V
INPUT OUTPUT REMOTE
S-VIDEO
AUDIO VIDEO AUDIO VIDEO
AUDIO/VIDEO OUTPUT
1 2
(2) (1)
(3)
(GREEN) REMOTE WIRE
PVC CABLE (BLACK)
(2) (1)
(3)
(GREEN) REMOTE WIRE
PVC CABLE (BLACK)
YELLOW
BLACK
BLACK
BLACK
BLACK
AC/DC
ADAPTOR

GB-10
ELECTRICAL CONNECTION
Note:
•The S-VIDEO output is only effective on DVD, not effective on AV source. That is
to say, the video signal of AV can’t be output from the S-VIDEO jack.
•Slide AV OUTPUT TYPE switch on the back of the unit left or right to select A or
B. When the switch is slid to A side, the AV OUTPUT 1 and AV OUTPUT 2 are both
under the control of the MODE button on the remote control or the SOURCE button
on the front panel of the unit, i.e. the signal output may be any one of the DVD, AV
INPUT signal source.
When the switch is slid to B side, the AV OUTPUT 1 just outputs the AV INPUT
signal and it doesn’t under the control of the MODE button or SOURCE button. But
the signal output from the AV OUTPUT 2 is under the control of the MODE or
SOURCE button.
(OPTIONAL)
DIGITAL AUDIO
VIDEO 2 OUT
AUDIO 2 L OUT
AUDIO 2 R OUT
RED
WHITE
YELLOW
VIDEO 1 OUT
AUDIO 1 L OUT
AUDIO 1 R OUT
WHITE
RED
YELLOW
REMOTE CONTROL RECEIVER
AC/DC
ADAPTOR
CIGARETTE LIGHTER
AB
DIGITAL
AUDIO
A/V OUTPUT
TYPE
DC 12 V
INPUT OUTPUT REMOTE
S-VIDEO
AUDIO VIDEO AUDIO VIDEO
AUDIO/VIDEO OUTPUT
1 2
(OPTIONAL)

DVD PLAYER
GB-11
17
10 612 515 16 2
17 21
3
20
19184
11
22
8
913
14
1. PWR ( )
2. EJ ( )
3. SETUP
4. AUDIO
5. SOURCE
6. Disc Slot
7. PLAY/PAUSE( II)
8. STOP ( )
9. PREV ( )
10. NEXT ( )
11. VOLUME
12. VOLUME
13. / , / cursor buttons
14. ENTER
15. Indicator Light for DVD
16. Indicator Light for AV
17. Indicator Light for STAND BY
18. VIDEO IN
19. AUDIO IN L
20. AUDIO IN R
21. IR
22. Reset button
FRONT VIEW

DVD PLAYER
GB-12
BACK VIEW
2523 24 26 27 28 29 30 31 32
23. DC 12V INPUT Socket
24. DC 12V OUTPUT Socket
25. AV OUTPUT TYPE Switch
26. DIGITAL AUDIO
27. REMOTE Socket
28. S-VIDEO Socket
29. AUDIO OUTPUT 1
30. VIDEO OUTPUT 1
31. AUDIO OUTPUT 2
32. VIDEO OUTPUT 2

SCREW
M5X25
SCREW
M4X6
SCREW
M4X6
SCREW LOCKED THE UNIT CORE
3
1
2
3
1
2
4
GB-13
DVD PLAYER
This unit is designed for home-use and car-use. When installed on the car, please
follow the installation instruction below.
Note:
1. First remove the two screws that locket the unit core, then attach the brackets on
both sides of unit with screws (M4x6), last install the unit with screws (M5x25).
2. When fix the unit, you can slide the screw (M5x25) to left side or right side to meet
your needed position. In the figure below, select two holes among the positions that
marked 1,2,3 and 4 to fix the bracket.

GB-14
REMOTE CONTROL
6
1
3
7
11
4
8
10
5
9
12
13
14
16
15
17
20
18
19
2421
28
22
32
23
25
29
2726
3130
2
LOCATION AND FUNCTION OF KEYS

GB-15
REMOTE CONTROL
1. POWER Press POWER to turn the unit ON or OFF.
2. EJECT Press to eject the disc.
3. MUTE Press to mute the sound.
4. SUBTITLE Changing of the SUBTITLE language on multi-subtitle
language DVD disc.
5. ANGLE Changing of the view angle on multi-angle DVD disc.
6. CONSOLE Display statistical disc information during playback.
7. MODE Changing between DVD mode and AV mode.
8. SETUP Display the SETUP menu.
9. PAL/NTSC Switch between PAL mode, NTSC mode and AUTO mode.
10. AUDIO Changing of the AUDIO soundtrack on multi-audio
soundtrack DVD disc.Changing of the sound mode of the
VCD/CD discs.
11. TITLE Display the TITLE menu that is stored in DVD disc.
12. MENU Display the root menu that is stored on the DVD disc.
13. / , / In case of MENU mode, / , / buttons served as cursor
buttons to select item left/right, ahead/back.
14. ENTER Confirm the Track/Chapter selected with the numeric
buttons or selected with the cursor buttons on TV screen.
15. / Changing for slow forward/ reverse playback motion.
16. Press to play the disc.
17. / Press to search forward rapidly & to search reverse
rapidly.
18. / Press to skip to the next track & press to skip back
one track.
19. Press it once to pre-stop playback; press it twice to stop
playback.
20. Press it for the first time to pause playback. Press it again
to stop at the next picture (step function for DVD/VCD/SVCD).
21. 0-9 Numeric buttons
22. 3D During disc playback, press it to select normal or 3D
surround effect mode.
23. CLEAR When you input a number in error, press the button to clear
it.
24. VOLUME+/- Press VOLUME+/- button to increase or decrease the
volume level. (Only in DVD mode)
25. ZOOM Allows the picture to be increased in size.
26. BOOKMK During playback, press to enter bookmark function.
27. GOTO Press to select the bookmark that you set.
28. PBC Changing between PBC ON and PBC OFF on the VCD
disc.
29. RANDOM Allows the track played in random order.
30. PROGRAM Allows the track played in the order you programmed.
31. REPEAT Switch the Repeat mode of discs.
32. A-B A-B repeat allows a passage to be repeated continuously.
Preparing the Remote Control
Inserting the Batteries
1. Open the battery compartment cover.
2. Insert the new batteries. Make sure that the positive and negative terminals of the
batteries are oriented indicated.
3. Close the cover
Battery: Two AAA size battery.
Using the Remote Control
Face the remote control towards the player front face IR mark (remote control signal
receiver).
Operation angle: About ±30 degree in each the direction of the front of the IR mark.

GB-16
GENERAL OPERATION
TURN THE UNIT ON
After all connections are completed
correctly, press the (POWER) button
on the front panel or on the remote
control to turn on the power. When the
unit is on, it will search the disc
automatically. If there is a disc in the disc
slot, the unit will start playback
automatically. Besides this, you should
turn on the monitor that is connected to
the player.
Standby State
1) When the unit is on, press (POWER)
on the front panel or on the remote
control to turn the unit off temporarily,
in order to stop the playback in a short
time and the unit goes into standby
state.
2) In standby state, press (POWER) on
the front panel or on the remote
control again to recall playback. And
for disc playback, it can realize
memory play function.
Note: The unit has screen saver function
(select “ON”in Screen Saver setup). If
the playback is stopped and there is not
any button operation in 5 minutes, it will
activate the screen saver funcation
automatically; when any button for DVD
function is pressed, the screen saver
function will release automatically.
Remote Sensor (IR)
Point the remote handset to the remote
sensor IR on the front panel. Receive
the signal from remote handset.
Loading a Disc
1. Insert the disc with printed side facing
up into the disc slot.
2. The player will start playback
automatically.
Ejecting a Disc
Press (EJECT) button on the front panel
or on the remote control to eject the disc.
BASIC PLAY
STOPPING PLAYBACK
- Briefly press (Stop) button to pre-
stop the unit playback, when button
on the front panel or (Play) button on
the remote control is pressed, normal
playback will continue.
- Press (Stop) button twice to stop the
playback and go back to DVD LOGO.
Pausing Play/Step Play
Pressing on the remote control for the
first time or presing on the front panel
during playback will stop playback
temporarily. To return to normal
playback, press on the remote control
or on the front panel.
If you play a DVD/VCD/SVCD, press on
the remote control again to stop at the
next picture (step function). If you play a
CD/MP3/Picture CD, pressing on the
remote control again is ineffective.
Rapid Forward/Rapid Reverse
Press & during playback. Each
time the button is pressed, the speed of
rapid forward/reverse changes according
to the disc as follows.
DVD:
VCD/CD/MP3:
Slow Motion Playback (For DVD Only)
Press / during play.
Each time the button is pressed, the
speed of slow forward/reverse changes
according to the disc as follows.
DVD:
In slow motion state, press on the
remote control to recover normal playback.
Skipping Track
Press / buttons on the remote
control or on the front panel during
playback.
Press to skip to the next track, and
press to skip to the previous track.
Note: For some VCD2.0 discs (PBC-
playback control), / buttons may
be unavailable.
Normal Playback X2 X4 X16 X100
Normal Playback X2 X4 X8
X1/32 X1/16 X1/8 x1/4 x1/2
Disc slot Eject button

GB-17
GENERAL OPERATION
Mute
Press MUTE button to mute the sound,
but the disc continues playing. Press
MUTE again or press volume up/down
buttons on the front panel or on the
remote control, sound will resume.
Volume Level Adjustment
In DVD mode, press VOLUME / on
the front panel or VOLUME +/- on the
remote control to increase or decrease
the volume level.
DVD VIDEO MENU PLAY
When playing a DVD disc in the DVD player:
1) The disc will be played automatically
and stop at menu picture.
2) Use / , / cursor buttons to
move between the highlight bars in the
menu.
3) Press ENTER button to confirm the
selected item.
MODE SELECTION
Press SOURCE button on the front panel
of the unit or MODE on the remote
control to select among DVD and AV
mode. When select one mode, the
corresponding indicator on the front panel
will be illuminated.
RESET FUNCTION
RESET button is placed on the front
panel and must be activated with either
a ballpoint pen or thin metal object. The
reset button is to be activated for the
following reasons:
- Initial installation of the unit when all
wiring is completed.
- All the function buttons do not operate.
- Error symbol on the display.
LAST PLAY MEMORY
•During disc playback, if you press
(POWER) button to turn off the unit
and then press the button again to turn
on the unit, the DVD unit will resume
playing from the point that just
interrupted.
•During disc playback, if you press
(EJECT) button to eject the disc then
load the disc into the slot again , the
unit will resume playing from the point
that just interrupted.
•
During disc playback, if you press
SOURCE button or MODE button to
switch to AV mode, then return to DVD
mode again, the unit will resume playing
from the point that just interrupted.
ADVANCED OPERATION
REPEAT PLAY/ PARAGRAPH REPEAT
PLAY
Repeat play: when you want to repeat
play the whole disc or a track or a
chapter in the disc.
1) Press REPEAT button repeatedly to
select different repeat modes.
2) For different kinds of disc, pressing
REPEAT button has different effects.
Note: REPEAT feature does not support
VCD2.0 (with PBC ON).
Paragraph Repeat Play: when you
want to repeat playing a desired
paragraph.
A-B repeat allows a passage to be
repeated continuously.
1) Press A-B button first at the start of
the required passage.
A -
2) Press A-B button secondly at the end
of the passage.
A - B
3) Then the unit will repeat playing the
passage you just set from A to B.
4) To revert to normal playing, press A-B
button again.
Off
PBC MENU PLAYBACK OF VCD/SVCD
For some VCD or SVCD discs, there is a
menu in order to select the desired
contents. This menu is called PBC
(Playback Control) menu.
Press PBC button on the remote control
to change between PBC ON and PBC
OFF on the disc.
In PBC ON mode, REPEAT, RANDOM,
BOOKMARK, A-B, PROGRAM and
GOTO functions are unavailable.
Chapter
Title
Off
DVD
Track
All
Off
VCD/SVCD
CD/MP3/
WMA

GB-18
ON-SCREEN DISPLAY FUNCTION
Press the CONSOLE button during
playback to display the console
information of the current disc on the
screen.
For DVD:
1/1
OFF
0:01:45
1/17
1.ENG
D
3/2.1
Normal
2/32
Sound
Move Select
1) 1/17
Item: Title
Function: Display the current title
number and the total title
number; it can skip to the
desired title number.
Method: / buttons or use numeric
buttons to input and confirm
with ENTER button.
2) 2/32
Item: Chapter
Function: Display the current chapter
number and the total
chapter number; it can skip
to the desired chapter
number.
Method: / buttons or use numeric
buttons to input and confirm
with ENTER button.
3) 0:01:45
Item: Time
Function: Display the elapsed time;
you can input the time
directly to the skip to the
corresponding playback
point.
Method: Use numeric buttons to input
time and confirm with ENTER button.
4) 1.ENG
D
3/2.1
Item: Audio
Function: Display the current audio
soundtrack language and
digital audio output; it can
switch to other audio
soundtrack language and
digital audio output.
Method: / buttons or press
AUDIO button on remote
control or AUD button on the
front panel.
5) OFF
Item: Subtitle
Function: Display the current subtitle
language; it can switch to
other subtitle language.
Method: / buttons or press
SUBTITLE button.
6) 1/1
Item: Angle
Function: Display the current angle; it
can switch to other angle.
Method: / buttons or press
ANGLE button.
7) Normal
Item: Sound
Function: Display the current sound
mode; it can switch between
normal and 3D surround
effect mode.
Method: / buttons or 3D button.
For VCD:
0:01:45
PBC
Stereo
Normal
Sound
Move Select
ADVANCED OPERATION

GB-19
ADVANCED OPERATION
Note: The function is only effective when
the LOGO is shown. That is to say, when
no disc in, ejecting a disc and in stop
mode or pre-stop mode when playing
DVD/VCD, pressing PAL/NTSC is
effective.
BOOKMARK FUNCTION
During playback, pressing BOOKMK
button will enter into bookmark function.
1)During playback, when you want to set
a bookmark, press BOOKMK button,
the information will appear:
#1 : 1/9
This is to tell you that you have set a
bookmark.
2)If you want to watch the section that
you just set a bookmark, press GOTO
button, then press / buttons to move
the cursor to the desired number of the
bookmark, and press or ENTER
button to confirm.
1 2 3 4 5 - - - -
NOTE:
•You can press BOOKMK button again
to close the search menu on the screen.
•You can press BOOKMK button
repeatedly to set 9 bookmarks in all.
And you can press CLEAR button on
the remote control to clear the bookmark
you have set.
RANDOM PLAYING
Pressing RANDOM button during
playback will start to play tracks in
random order.
Press the button again to revert to normal
playback.
Note:
•This function is effective on VCD,
SVCD and CD.
•When playing a VCD/SVCD, the
random playback is effective with PBC
OFF.
1)
PBC
Item: Track
Function: When it is in PBC ON mode,
it display “PBC”(only display,
can’t be changed); when it
is in PBC OFF mode, it will
display the current track
number and total track
number (such as “1/16”) and
it can skip to the desired
track number.
Method: When in PBC OFF, press /
buttons or use numeric
buttons to input and confirm
with ENTER button.
2)
0:01:45
Item: Time
Function: Display the elapsed time;
you can input the time
directly to the skip to the
corresponding playback
point.
Method: In PBC mode, it can’t be
changed. In PBC OFF mode,
use numeric buttons to input
time and confirm with
ENTER button.
3)
Stereo
Item: Audio
Function: Display the current audio
mode; it can switch to other
audio mode.
Method: / buttons or press
AUDIO button on remote
control or AUD button on the
front panel.
4)
Normal
Item: Sound
Function: Display the current sound
mode; it can switch between
normal and 3D surround
effect mode.
Method: / buttons or 3D button.
PAL/NTSC SYSTEM SELECTION
Press the PAL/NTSC button to switch
between PAL, NTSC and AUTO three
modes.

GB-20
ZOOM FUNCTION
When playing DVD, VCD or some data
discs which including picture files, if you
want to view the some part of the picture
clearer:
1) Press ZOOM button to zoom in the
picture 4 times.
2) Press ZOOM button again to zoom in
the picture 16 times.
3) During zoom mode, pressing / ,
/ buttons will move pictures up, down,
left or right direction in order to find the
picture that you want to zoom in.
4) When the sale is 16 times, press ZOOM
button again to cancel the ZOOM
function.
SPECIAL FUNCTIONS FOR DVD
Multi-subtitle Language Function
Press SUBTITLE during playback. The
following information will be shown on
the screen.
OFF
Each time the button is pressed, the
subtitle language changes in sequential
order.
Notes:
- The language number is different
according to the disc.
- Some discs only contain one subtitle
language.
Multi-audio Language Function
Press AUDIO on remote control or AUD
button on the front panel during
playback. The following information will
be shown on the screen.
1.ENG
D
3/2.1
Each time the button is pressed, the
audio soundtrack language changes on
sequential order.
Notes:
- The language number is different
according to the disc.
- Some disc only contain one
soundtrack language.
Multi-angle Function
Press ANGLE during playback. The
following information will be shown on
the screen.
1/1
Each time the button is pressed, the
angle changes in sequential order.
Notes:
- The angle number is different
according to the disc.
- The function only works for discs
having scenes recorded at different
angles.
FREQUENTLY ASKED QUESTIONS
•When inserting a DVD disc, why it can’t
be played, just showing “region error”?
It is because that the DVD player and
the discs all have the “REGION CODE”.
If the region number described on the
DVD disc does not correspond to the
region number of this DVD player, the
unit cannot play the disc.
•When inserting a DVD disc, there is a
window shown on the screen that
requires entering 4 characters
password, why?
It is because that the current disc has
“Parental Control”level, and the player’s
parental level is set below the level of
the disc, you should enter the correct
password to play the disc normally.
ADVANCED OPERATION
Other manuals for MES-208
1
Table of contents
Other LENCO Car Video System manuals