Lennox LGH420 User manual

Page 1
©2017
See unit nameplate for manufacturer
and address. INSTALLATION
INSTRUCTIONS
AGENCY REQUIRED
RETAIN THESE INSTRUCTIONS
FOR FUTURE REFERENCE
LGH420, 480, 540, 600
35 THROUGH 50 TONS
PACKAGED GAS AND COOLING UNITS
506346-03
7/2017
506346-02
Table of Contents
Safety Page 1......................................
Connect Gas Piping Page 3.........................
High Altitude Derate Page 3.........................
Pressure Test Gas Piping Page 3.....................
Two-Stage Gas Valve Adjustment Page 3..............
Gas Heat Operation Page 4.........................
Proper Gas Flow Page 4............................
Typical Gas Heat Schematic Page 5..................
Typical Unit Schematic Page 6.......................
Repair Parts Listing Page 7..........................
Modulating Gas Valve Page 8........................
Safety
Use of this unit as a construction heater or air conditioner
is not recommended during any phase of construction.
Very low return air temperatures, harmful vapors and
operation of the unit with clogged or misplaced filters will
damage the unit.
If this unit has been used for heating or cooling of
buildings or structures under construction, the following
conditions must be met or the warranty will be void:
The vent hood must be installed per these installation
instructions.
A room thermostat must control the unit. The use of
fixed jumpers that will provide continuous heating or
cooling is not allowed.
A pre-filter must be installed at the entry to the return
air duct.
The return air duct must be provided and sealed to
the unit.
Return air temperature range between 55°F (13°C)
and 80°F (27°C) must be maintained.
Air filters must be replaced and pre-filter must be
removed upon construction completion.
The input rate and temperature rise must be set per
the unit rating plate.
The heat exchanger, components, duct system, air
filters and evaporator coil must be thoroughly
cleaned following final construction clean-up.
The unit operating conditions (including airflow,
cooling operation, ignition, input rate, temperature
rise and venting) must be verified according to these
installation instructions.
NOTE - The Commonwealth of Massachusetts
stipulates these additional requirements:
Gas units shall be installed by a licensed plumber
or gas fitter only.
The gas cock must be “T handle” type.
WARNING
Improper installation, adjustment, alteration, ser
vice or maintenance can cause property damage,
personal injury or loss of life. Installation and ser
vice must be performed by a licensed professional
HVAC installer or equivalent, service agency, or the
gas supplier
The unit is certified for installation on noncombustible
floors only. However, it may be installed on wood flooring,
or on class A, class B, or class C material covered floors
when used in downflow discharge applications when
mounted on an S1CURB10-E1 roof mounting frame.
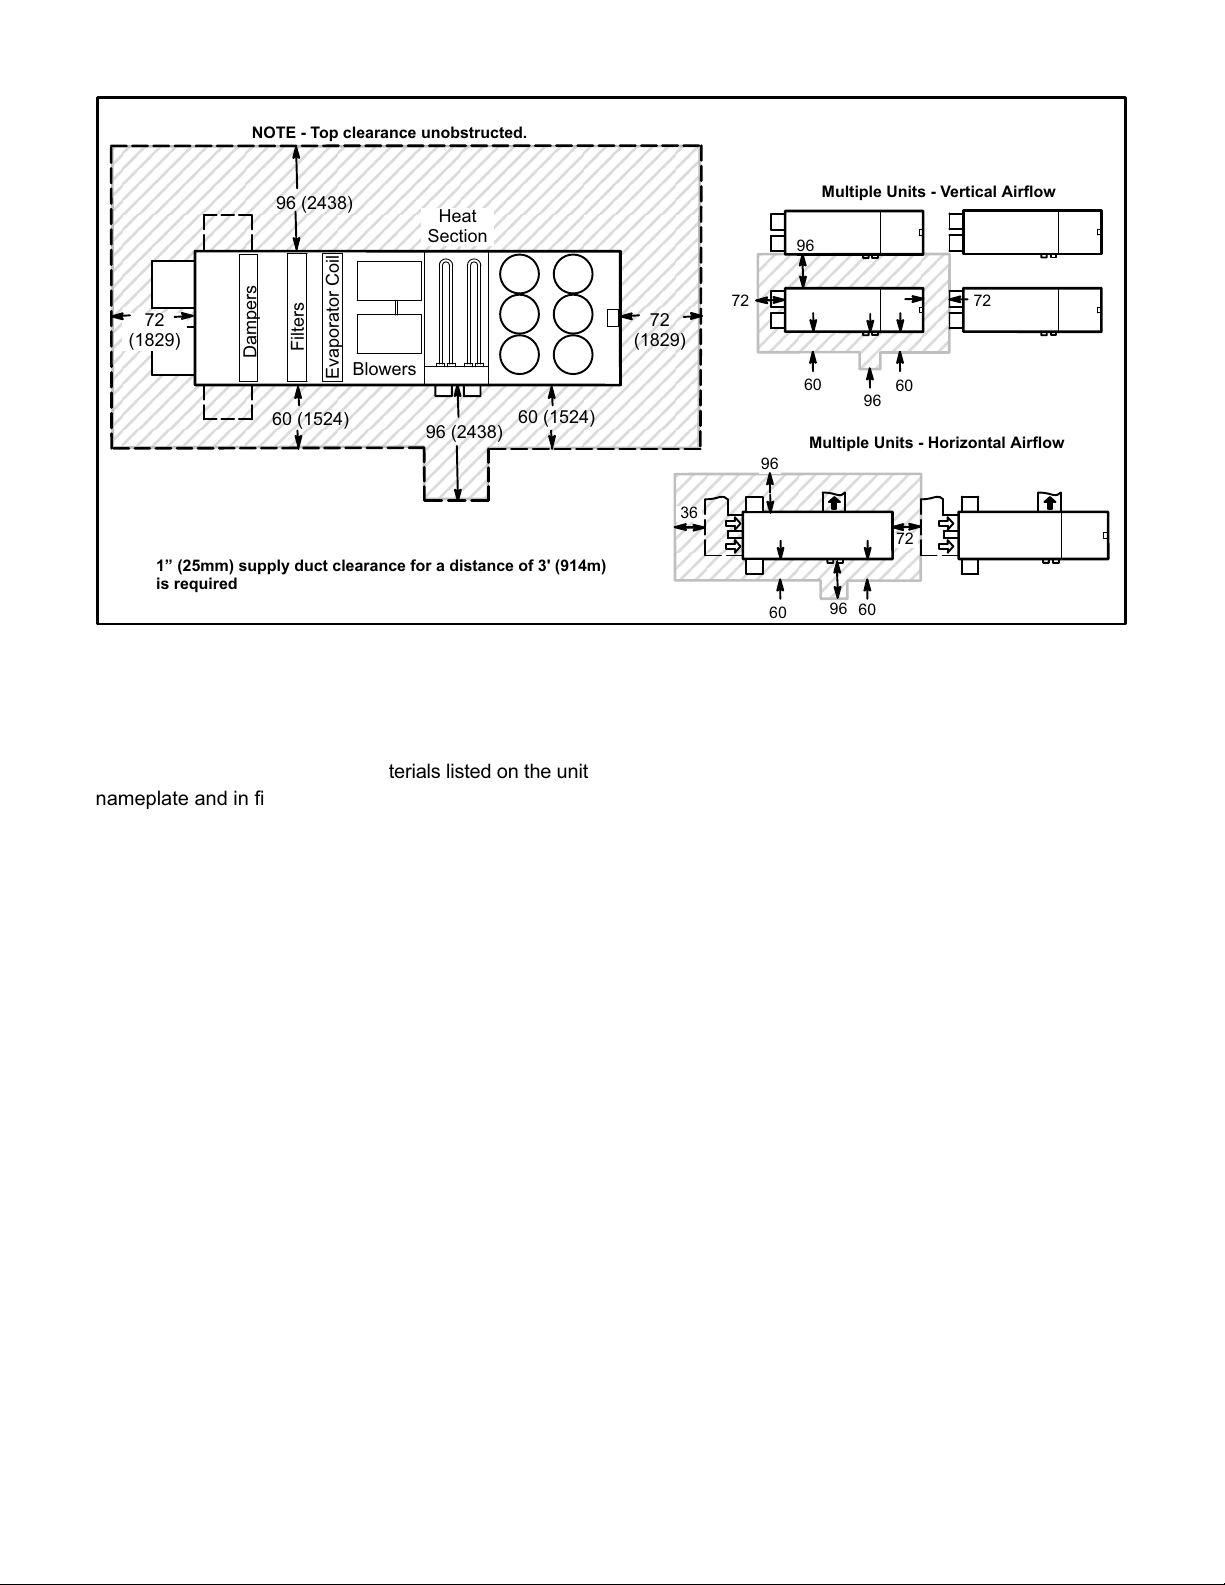
Adequate clearance shall be provided around air
openings into the vestibule area. Provisions shall be
made for proper operation and for combustion air and
ventilation air supply. Unit must be adjusted for the
temperature rise range and within the allowable external
static pressure on furnaces with a duct system as listed on
unit nameplate.

Page 2
FIGURE 1
420, 480, 540, 600 SERVICE CLEARANCES - inches (mm)
ÉÉÉÉÉÉÉÉÉÉÉÉÉÉÉÉÉÉÉÉ
ÉÉÉÉÉÉÉ
ÉÉÉÉÉÉÉ
ÉÉÉÉÉÉÉ
ÉÉÉÉÉÉÉ
ÉÉÉÉÉÉÉ
Blowers
Heat
Section
Filters
Evaporator Coil
Dampers
96 (2438)
60 (1524)
72 72
96
60
NOTE - Top clearance unobstructed.
96 (2438) 60 (1524)
72
(1829)
96
72
(1829)
60
ÉÉÉÉÉÉÉÉÉ
ÉÉÉÉÉÉÉÉÉ
ÉÉÉÉÉÉÉÉÉ
ÉÉÉÉÉÉÉÉÉ
ÉÉÉÉÉÉÉÉÉ
72
96
96 60
60
36
Multiple Units - Vertical Airflow
Multiple Units - Horizontal Airflow
1” (25mm) supply duct clearance for a distance of 3' (914m)
is required on SC units equipped with electric heat.
United States
The unit is ETL certified for outdoor installations only at
the clearances to combustible materials listed on the unit
nameplate and in figure 1.
Installation of the ETL certified units must conform with
local building codes. In the absence of local codes, units
must be installed according to the current National Fuel
Gas Code ANSI Z223.1/NFPA 54.
When installed, the unit must be electrically wired and
grounded according to local codes or, in the absence of
local codes, with the current National Electric Code,
ANSI/NFPA 70.
The current American National Standard (ANSI-
Z233.1/NFPA54) National Fuel Gas Code is available
from the following address:
American National Standard Institute Inc.
11 West 42nd Street
New York, NY 10036
The current National Electric Code (ANSI/NFPA 70) is
available from the following address:
National Fire Protection Association
1 Batterymarch Park
P.O. Box 9101
Quincy, MA 02269-9101
Use only the type of gas approved for use with this
furnace. Refer to unit nameplate.
Never test for gas leaks with an open flame. Check all
connections with a commercially available soap solution
made specifically for leak detection.
NOTE - Furnace must be adjusted to obtain a
temperature rise within the range(s) specified on the unit
nameplate. Failure to do so may cause erratic limit
operation.
Canada
The unit is ETL certified for combination heating/cooling
for outdoor installations and non-residential use only at
the clearances to combustible materials as listed on the
unit nameplate.
Installation of ETL certified units must conform with current
standard CSA B149.1, “Natural Gas and Propane
Installation Codes” and applicable local codes. Authorities
having jurisdiction should be consulted before installation.
The unit must be wired and electrically grounded
according to local codes or, in the absence of local codes,
current CSA Standard C22.1 Canadian Electrical Code
Part 1. Installation of combination heating/cooling units
must also conform with current CSA Standard B52
“Mechanical Refrigeration Code.”

Page 3
Connect Gas Piping
Two grommets are packaged with the flue exhaust and
air intake hoods located in the gas heat section.
Grommets are installed in the unit entry and gas heat
division panel knockouts. An additional grommet is
required when routing gas piping through the bottom of
the unit.
Before connecting piping, check with gas company or
authorities having jurisdiction for local code
requirements. When installing gas supply piping, length
of run from gas meter must be considered in determining
pipe size for 0.5” w.c. (.12kPa) maximum pressure drop.
Do not use supply pipe smaller than unit gas connection.
For natural gas units, operating pressure at the unit gas
connection must be a minimum of 6.0” w.c. (1.5kPa) and
a maximum of 14” (3.50kPa) w.c. For LP/propane gas
units, operating pressure at the unit gas connection must
be a minimum of 11” w.c. (2.74kPa) and a maximum of
13.5” w.c. (3.36kPa).
When making piping connections a drip leg should be
installed on vertical pipe runs to serve as a trap for
sediment or condensate. A 1/8” N.P.T. plugged tap is
located on gas valve for test gauge connection. Refer to
Heating Start-Up section for tap location. Install a ground
joint union between the gas control manifold and the
main manual shut-off valve. See figure 2 for side entry
gas supply piping.
Compounds used on threaded joints of gas piping shall be
resistant to the action of liquified petroleum gases.
TO GAS
VALVE
TO GAS
SUPPLY
MANUAL MAIN
SHUT-OFF VALVE
GAS PIPING
SUPPORT
GROUND
JOINT UNION
(REFER TO
LOCAL CODES)
DRIP LEG
SIDE ENTRY OF GAS SUPPLY PIPING
FIGURE 2
High Altitude Derate
Locate the high altitude conversion sticker in the unit
literature bag. Fill out the conversion sticker and affix next
to the unit nameplate.
Refer to table 1 for high altitude adjustments.
TABLE 1
HIGH ALTITUDE DERATE
Altitude Ft.* Gas Manifold Pressure
2000-4500 See Unit Nameplate
4500 And Above Derate 4% / 1000 Ft. Above Sea Level
*Units installed at 0-2000 feet do not need to be modified.
NOTE ‐ This is the only permissible derate for these units.
Pressure Test Gas Piping
For natural gas units, operating pressure at the unit gas
connection must be a minimum of 6.0” w.c. (1.5kPa) and
a maximum of 14.0” (3.5kPa) w.c. For LP/propane gas
units, operating pressure at the unit gas connection must
be a minimum of 11” w.c. (2.74kPa) and a maximum of
13.5” w.c. (3.36kPa).
When testing the pressure of gas lines, the gas valve
must be disconnected and isolated. Gas valves can be
damaged if subjected to more than 0.5 psig (3.5 kPa).
WARNING
FIRE OR EXPLOSION HAZARD
Failure to follow the safety warnings exactly could
result in serious injury, death or property damage.
Never test for gas leaks with an open flame. Use a
commercially available soap solution made specifi
cally for the detection of leaks to check all connec
tions. A fire or explosion may result causing prop
erty damage, personal injury or loss of life.
Two-Stage Gas Valve Adjustment
Gas manifold pressures should match pressures shown in
table 2. On two stage gas valves, initiate a W2 thermostat
demand to check high fire pressure before low fire
pressure. See figure 3 or 4. With high fire operating, reduce
the thermostat demand to W1 and check the low fire
pressure. Refer to the Unit Controller manual to initiate a
thermostat demand.
See Optional Modulating Gas Valve (MGV) section on
units equipped with MGVs.
IMPORTANT - On 2-stage gas valves do not set low
fire pressure lower than the certified minimum input
rating listed in table 2.

Page 4
TABLE 2
MANIFOLD INPUT PRESSURES in.wg. (kPa)
Unit
Natural Gas Propane (LP) Gas
1st Stage
+0.2(+.05)
2nd Stage
+0.3(+.08)
1st Stage
+0.2(+.05)
2nd Stage
+0.3(+.08)
420-600 1.6 (0.40) 3.7 (0.92) 5.5 (1.37) 10.5 (2.61)
HONEYWELL VR8205Q/VR8305Q SERIES GAS VALVE
GAS ALVE KNOB IS SHOWN IN OFF POSITION.
FIGURE 3
LOW FIRE
ADJUSTMENT
HIGH FIRE
ADJUSTMENT
MANIFOLD
INLET
PRESSURE
TAP
MANIFOLD
OUTLET
PRESSURE
TAP
WHITE RODGERS 36H54 GAS VALVE
Two-Stage
GAS VALVE SWITCH SHOWN IN ON POSITION.
FIGURE 4
LOW FIRE
ADJUSTMENT
HIGH FIRE
ADJUSTMENT
INLET
PRESSURE
TAP
MANIFOLD
PRESSURE
TAP
Gas Heat Operation
See the operating instruction plate on the unit for details.
Proper Gas Flow (Approximate)
1- Operate unit at least 15 minutes before checking gas
flow. Determine the time in seconds for two
revolutions of gas through the meter. (Two
revolutions assures a more accurate time.)
2- Divide the number of seconds by two and
compare to the time in table 3. If manifold pressure is
correct and rate is incorrect, check gas orifices for
proper size and restriction.
3- Remove temporary gas meter if installed.
NOTE- To obtain accurate reading, shut off all other
gas appliances connected to meter.
TABLE 3
GAS METER CLOCKING CHART
Unit In
put Rate
(Btuh)
Seconds for One Revolution
Natural LP
2 ft3Dial 3 ft3Dial 1 ft3Dial 2 ft3Dial
325,000 22 54 27 55
500,000 14 36 28 36
525,000 13 34 17 34
800,000 9 22 11 22
Natural-1000 btu/cu ft LP-2500 btu/cu ft
Note: Table assumes standard temperature (60°F), pressure
(30in.Hg.), and fuel heating values (Btuh/ft.3). Apply pressure
corrections in altitudes above 2000 ft

Page 5
TYPICAL GAS HEAT SCHEMATIC
This schematic is typical. See the wiring schematic on the unit for actual unit wiring.

Page 6

Page 7
Repair Parts Listing
When ordering repair parts, include the complete model number and serial number listed on the ETL rating plate - e.g.
LGH480H4BH1Y.
Gas Heat Section Parts
Heat Exchanger
Combustion Air Assembly
Combustion Air Proving Switch
Burner Assembly
Burner Manifold Assembly
Main Burner Orifices
Flame Roll-out Switches
Auxiliary Limit Controls
Ignition Electrode Assembly
Ignition Lead
Ignition Sensor Assembly
Sensor Lead
Combination Gas Valve
Limit Controls
Cooling Parts
Compressors
Condenser Fan Motors
Condenser Fan Blades
Condenser Fan Run Capacitors
Freezestats
Condenser Fan Mounting Bracket
Fan Grille
Indoor Blower Motors
Blower Wheel
Expansion Valve
Distributor
Exhaust Fans (Opt.)
Electrical Control Parts
Unit Controller
Compressor Contactors
Circuit Breakers (Opt.)
Transformer (Control)
Transformer (Contactor)
Blower Contactor
Limit, Blower Relay
Heat Relays
Condenser Fan Relays
Capacitor CAB
Relay CAB
Crankcase Heater
Disconnect Switch (Opt.)

Page 8
FIGURE 5
MODULATING GAS VALVE (MGV)
GV1
LEFT HEAT
SECTION GAS
VALVE
GV3
RIGHT HEAT
SECTION GAS
VALVE
GV5
RIGHT HEAT SECTION
MODULATING
GAS VALVE
GV4
LEFT HEAT SECTION
MODULATING
GAS VALVE
GAS
INLET
TO LEFT HEAT
SECTION
TO RIGHT
HEAT SECTION
MANIFOLD
PRESSURE
PORT
MANIFOLD
PRESSURE PORT
Optional Modulating Gas Valve (MGV)
Units equipped with optional modulating gas valves
(MGV) contain two modulating gas valves in addition to
two standard gas valves. See figure 5.
Operation
The Unit Controller will control modulating gas valves to
maintain 110°F (default) discharge air during the heating
cycle. The left heat section will operate when 25-50% of
nameplate heat is needed. Both heat sections will
operate when 50-100% of the nameplate heat is needed.
The normally open MGV will allow full heating capacity
should the MGV fail.
Start-Up
1- Operate the unit in heating mode according to the
Heating Start-Up section in this manual.
NOTE - BOTH GENERAL PURPOSE BOARD SWITCHES
MUST BE OFF FOR NORMAL UNIT OPERATION. SEE
FIGURE 6.
2- After the unit has operated for 5 minutes, use the Unit
Controller menu path MAIN > SERVICE > TEST >
HEAT > HEAT 2. The unit will operate at maximum
heating input.
3- Measure the manifold pressure at the gas valves.
Manifold pressures should be:
GV1 & GV3:
Natural - 4.0”w.c. LP - 10.8”w.c.
GV4 & GV5:
Natural - 3.7”w.c. LP - 10.5”w.c.
4- After the unit has operated for 5 minutes, use the Unit
Controller menu path MAIN > SERVICE > TEST >
HEAT > HEAT 1. The unit will operate at minimum
heating input.
5- Measure the manifold pressure at the gas valves.
Manifold pressures should be:
GV1 & GV3:
Natural - 4.0”w.c. LP - 10.8”w.c.
GV4 & GV5:
Natural - 0.9”w.c. LP - 2.6”w.c.
FIGURE 6
DIP SWITCHES IN
OFF POSITION FOR
NORMAL OPERATION
UNIT CONTROLLER (A55)
GP3
(A187)
BOARD
Unit Controller Output
The Unit Controller 0-10VDC output to the MGVs
increases to modulate valves further closed during a
reduced heating demand. The Unit Controller 0-10VDC
output to the MGVs decreases to modulate valves further
open during a higher heating demand.
Heating
Demand
Reduces
Unit Control
ler Output
To MGVs
Increases
MGVs
Modulate
Further
Closed
Heating
Output
Lowers
Heating
Demand
Increases
Unit Control
ler Output
To MGVs
Reduces
MGVs
Modulate
Further
Open
Heating
Output
Increases
Other manuals for LGH420
1
This manual suits for next models
3
Table of contents
Other Lennox Accessories manuals