Levenhuk DTX 43 User manual

Levenhuk DTX 43
Digital Magnifier
6x 8x 10x 14x
4.3''
7
COLOR
MODES
User Manual
Návod k použití
Bedienungsanleitung
Guía del usuario
Instrukcja obsługi
Инструкция по эксплуатации
Radost zaostřit
Zoom ran und hab Fun!
Amplíe y disfrute
Radość przybliżania
Приближает с удовольствием

Magnifier parts:
EN
123
4
5
6
7
8
9
10
11
13
14
12
TV out
MicroSD slot
USB port/DC in
Forward/Freeze
Playback
Backward
Magnify
1
2
3
4
5
6
7
Části lupy:
CZ
TV výstup
MicroSD slot
USB port/DC vstup
Vpřed/Zmrazit
Přehrát
Zpět
Zvětšit
1
2
3
4
5
6
7
Teile der Lupe:
DE
TV-Ausgang
Micro-SD-Einschub
USB/Stromversorgung
Vor/Standbild
Wiedergabe
Zurück
Vergrößern
1
2
3
4
5
6
7
Capture/Delete
Color mode
Power on/off
Battery compartment
Lens window
Foldable stand
Indicator light
8
9
10
11
12
13
14
Vyfotit/Smazat
Barevný režim
Zapnout/Vypnout
Prostor pro baterie
Okénko čočky
Skládací stojánek
Kontrolka
8
9
10
11
12
13
14
Aufnehmen/Löschen
Farbmodus
Ein/Aus
Batteriefach
Linsenfenster
Ausklappbarer Standfuß
Anzeige-LED
8
9
10
11
12
13
14
Piezas de la lupa:
ES
Conexión de salida a TV
Ranura microSD
Puerto USB/CC de entrada
Adelante/congelar imagen
Reproducir
Atrás
Aumentar
Capturar/borrar
Modo de color
Encendido/apagado
Compartimento de la batería
Ventana de la lente
Soporte plegable
Luz indicadora
1
2
3
4
5
6
7
8
9
10
11
12
13
14
Elementy lupy:
PL
Wyjście TV
Gniazdo karty microSD
Port USB/zasilania DC
Do przodu/zatrzymanie
Odtwarzanie
Do tyłu
Powiększenie
Przechwytywanie/usuwanie
Tryb koloru
Wł./wył. zasilania
Komora akumulatora
Okienko obiektywu
Składana podstawka
Kontrolka
1
2
3
4
5
6
7
8
9
10
11
12
13
14
Устройство лупы:
RU
Разъем TV
Разъем карты MicroSD
Разъем USB/кабеля питания
Кнопка «Вперед/Стоп-кадр»
Кнопка «Воспроизведение»
Кнопка «Назад»
Кнопка изменения увеличения
Кнопка спуска затвора/кнопка «Удаление»
Кнопка выбора цветового режима
Кнопка включения/выключения питания
Батарейный отсек
Линза
Складная подставка
Индикатор заряда аккумулятора (батареи)
1
2
3
4
5
6
7
8
9
10
11
12
13
14
1

Levenhuk DTX 43 Digital Magnifier
Never, under any circumstances, look directly at the Sun, another bright source of light or at a laser
through this device, as this may cause PERMANENT RETINAL DAMAGE and may lead to BLINDNESS.
User Manual
Care and maintenance
To keep your magnifier in good condition, observe the following guidelines:
1. Read the instructions in this user's manual before attempting to use the unit.
2. Do not attempt to repair the magnifier or open its case. This product contains no user serviceable parts.
3. Keep the magnifier away from wet areas, rain, and other sources of liquids. Do not submerge the unit.
4. Always operate the magnifier in a place where the temperature is 0–45 °C (32–113 °F).
5. Always store the magnifier in a cool and dry place at normal room temperature.
6. Do not attempt to force any connector into the unit's USB and MicroSD ports. All appropriate connectors should fit easily
into the ports.
Magnifier functions
Loading battery
Please use the Li-ion battery to power the magnifier. Slightly push and pull the battery door latch to open the battery
compartment. Load the battery according to the polarities shown inside the battery compartment, and then snap close the
battery door.
Note: Remove the battery when it is not in use for a long period of time.
Charging the battery
Before using the magnifier, you must charge its battery.
1. Plug the miniUSB connector of the USB cable into the miniUSB port located on the right side of the magnifier. Then plug the
USB connector of the USB cable into the port on the power adaptor, and next plug the power adaptor into a standard AC outlet.
2. When the battery gets charged, the LED indicator turns off. Unplug the magnifier.
3. You can now use your magnifier for up to two hours of continuous use. When the battery is low, the low-power indicator will
blink on the right down corner of the screen. Then you have to connect the power adaptor and plug it in to recharge the battery.
Note: Always turn the magnifier off during charging. The battery will not charge if the magnifier is left on.
EN
2

Reading with the magnifier
To read with the magnifier, operate as the following:
1. Turn on the unit by pressing the Power ON/OFF switch 10 located on side.
2. Pull out the foot of the magnifier until it sits at its maximum range.
3. Place the magnifier flat against the text you want to read.
4. Slide the unit gradually to the right to read to the end of the line. Slide the unit down and back to the left to read the next line of
text.
5. To change the level of magnification, press the Magnify button.
6. To change the colors used on the screen, press the Color Mode button until you find the mode best suited for your vision
needs.
Using the magnifier
Color Mode selection
Press the Color Mode button to cycle through the magnifier's 7 different color modes as follows: full color, black on white, white
on black, blue on white, blue on yellow, yellow on black, yellow on blue.
Magnification adjustment
Press the Magnify button to cycle through the four level of magnifications: 6x, 8x, 10x or 14x.
Freeze image
Press the Forward/Freeze button to switch between freezing and unfreezing the current image.
Capture photo
Load a MicroSD card (not included) into the MicroSD card slot. Press the snapshot capture button to capture a photo. The
captured photos will be automatically stored in the MicroSD card.
Playback
Press the Playback button to view captured photos. Press the Forward button or the Backward button to move forth or back.
Press the Playback button again will return the magnifier to reading mode.
Delete
Press the Playback button to view captured images. Press the Capture/Delete button to delete an image.
Download captured pictures to a PC
Connect the magnifier to a PC using a standard miniUSB cable. Plug the miniUSB connector of the cable into the miniUSB port on
the side of the magnifier, then plug the standard USB connector of the cable into the PC. Turn the power on. You can now
download the captured pictures to the PC.
Output to monitor with TV-in
Connect the magnifier with monitor with TV-in by TV video cable, turn the power on and then you can see live video on the
monitor. 3

Problem
The screen is blank
The unit can't be turned on
The image on the screen is dark
and/or distorted.
There are smudges or blemishes on
the screen
Text is too small to read
Solution
Ensure that the power is on.
Ensure the battery has enough power.
Verify that the item you want to magnify is positioned correctly under the center of the
screen.
Change the battery with a new one.
Check the installed battery's position.
Ensure that the unit is positioned flat on the page you are reading.
Ensure that the foot of the magnifier flips out to its maximum position.
Clean the screen and the Lens (located on the bottom of the unit).
Press the magnify button.
Troubleshooting
Always purchase the correct size and grade of battery most suitable for the intended use.
Always replace the whole set of batteries at one time; taking care not to mix old and new ones, or batteries of different types.
Clean the battery contacts and also those of the device prior to battery installation.
Make sure the batteries are installed correctly with regard to polarity (+ and -).
Remove batteries from equipment that is not to be used for an extended period of time.
Remove used batteries promptly.
Never attempt to recharge primary batteries as this may cause leakage, fire, or explosion.
Never short-circuit batteries as this may lead to high temperatures, leakage, or explosion.
Never heat batteries in order to revive them.
Do not disassemble batteries.
Remember to switch off devices after use.
Keep batteries out of the reach of children, to avoid risk of ingestion, suffocation, or poisoning.
Utilize used batteries as prescribed by your country laws.
Battery safety instructions
Low battery indication
If battery power is low, a symbol appears on the lower right corner of the screen, indicating that you have to charge the
battery.
Power off
Turn off the power of the unit by pressing the Power ON/OFF switch 10 located at the side.
To prolong the battery life, please always turn off the magnifier when not using it.
The magnifier will turn off automatically if it is not in use for 5 minutes.
4

Levenhuk International Lifetime Warranty
All Levenhuk telescopes, microscopes, binoculars and other optical products, except for accessories, carry a lifetime warranty
against defects in materials and workmanship. Lifetime warranty is a guarantee on the lifetime of the product on the market.
All Levenhuk accessories are warranted to be free of defects in materials and workmanship for six months from date of retail
purchase. The warranty entitles you to free repair or replacement of the Levenhuk product in any country where a Levenhuk
office is located if all warranty conditions are met. For further details please visit our web site:
https://www.levenhuk.com/warranty.
If warranty problems arise, or if you need assistance in using your product, contact the local Levenhuk branch.
The kit includes: portable digital magnifier, AC adaptor, Li-ion Battery, TV-out cable, USB cable, carrying bag, cleaning fabric,
user manual.
The manufacturer reserves the right to make changes to the product range and specifications without prior notice.
5

Digitální lupa Levenhuk DTX 43
Nikdy za žádných okolností se pomocí tohoto zařízení nedívejte přímo na Slunce, jiný jasný zdroj
světla nebo laser, jelikož může dojít k TRVALÉMU POŠKOZENÍ SÍTNICE či k OSLEPNUTÍ.
Návod k použití
Údržba
Pro zachování dobrého stavu vaší lupy dodržujte následující postup:
1. Přečtěte si instrukce v tomto návodu před samotným použitím.
2. Nepokoušejte se lupu opravovat či otevírat obal. Tento výrobek neobsahuje žádné části opravitelné uživatelem.
3. Držte mimo vlhké prostředí, déšť a jiné zdroje tekutin. Neponořujte.
4. Vždy používejte na místě s okolní teplotou 0–45 °C.
5. Lupu vždy skladujte na chladném a suchém místě za normální pokojové teploty.
6. Nesnažte se zasunout jakýkoliv konektor silou do USB a MicroSD portů. Všechny vhodné konektory by měly jít do portů
zasunout lehce.
Funkce lupy
Vkládání baterie
Používejte prosím lithiovou baterii. Pro otevření prostoru pro baterie zlehka zatlačte a zatáhněte za jazýček dvířek. Vložte
baterii podle polarity ukázané na obrázku uvnitř prostoru pro baterie, poté zaklapněte dvířka.
Poznámka: Baterii vyndejte, pokud se dlouhou dobu nepoužívá.
Nabíjení baterie
Před použitím lupy nabijte baterii.
1. Připojte adaptér pomocí USB kabelu. Zasuňte miniUSB napájecího adaptéru do miniUSB portu umístěného na pravé
straně zařízení. Poté zasuňte druhý konec napájecího adaptéru do standardní AC zásuvky.
2. Jakmile bude baterie nabita, LED kontrolka na baterii zhasne. Odpojte zařízení.
3. Nyní můžete používat lupu až po dvě hodiny nepřetržitého provozu. V případě prázdné baterie začne blikat ukazatel
prázdné baterie v pravém dolním rohu displeje. Poté je nutné připojit napájecí adaptér a zapojit jej do sítě.
Poznámka: Během nabíjení musí být lupa vždy vypnutá. Baterie se nebude nabíjet, dokud bude lupa zapnutá.
CZ
6

Čtení s pomocí lupy
Při čtení pomocí lupy postupujte následovně:
1. Zapněte přístroj stisknutím tlačítka zapnout/vypnout 10 umístěném na straně.
2. Vysuňte spodní část lupy do její maximální polohy.
3. Umístěte lupu horizontálně na text, který chcete číst.
4. Posunujte přístroj postupně doprava až na konec řádku. Posuňte přístroj dolů a zpět doleva pro čtení dalšího řádku.
5. Pro změnu úrovně zvětšení stiskněte tlačítko Zvětšit.
6. Pro změnu barev na displeji mačkejte tlačítko barevný režim dokud nenajdete ten nejlepší režim dle vašich potřeb.
Používáni lupy
Výběr barevného režimu
Mačkejte tlačítko barevný režim pro volbu následujících 7 barevných režimů: barevný, černá na bílé, bílá na černé, modrá v bílé,
modrá ve žluté, žlutá v černé, žlutá v modré.
Nastavení zvětšení
Mačkejte tlačítko Zvětšit pro volbu následujících čtyř zvětšení: 6x, 8x, 10x či 14x.
Zmrazit obraz
Mačkejte Zmrazit/Uvolnit pro přepínání mezi zmrazením a uvolněním aktuálního obrazu.
Vyfotit
Zasuňte MicroSD kartu (není součástí dodávky) do MicroSD slotu. Stiskněte tlačítko Vyfotit pro pořízení fotografie. Pořízené
fotografie budou automaticky uloženy na MicroSD kartu.
Přehrát
Stiskněte tlačítko Přehrát pro zobrazení pořízených fotografií. Stiskněte tlačítko vpřed a zpět pro pohyb vpřed a vzad.
Opětovné stisknutí tlačítka Přehrát navrátí lupu do čtecího režimu.
Smazat
Pokud držíte tlačítko Přehrát a chcete smazat fotografie, stiskněte tlačítko Vyfotit/Smazat pro jejich smazání.
Stahování pořízených fotografií do PC
Připojte lupu do počítače pomocí USB kabelu, zapněte, a následně budete moci stáhnout pořízené fotografie.
Zobrazte na monitoru pomocí TV vstupu
Připojte lupu do TV vstupu monitoru pomocí TV kabelu, zapněte, následně budete moci na monitoru sledovat živý obraz.
Ukazatel vybité baterie
Pokud dojde k vybití baterie, objeví se v pravém dolním rohu displeje symbol (prázdný) upozorňující na nutnost nabít
baterii.
7

Problém
Displej je prázdný
Přístroj nelze zapnout
Obraz na displeji je tmavý a/nebo
zkreslený.
Na displeji jsou šmouhy či kazy
Text je příliš malý a nejde přečíst
Řešení
Ujistěte se, že je přístroj zapnutý.
Ujistěte se, že je dostatečně nabitá baterie.
Ujistěte se, že věc, kterou chcete zvětšit, je správně umístěna pod středem displeje
Vyměňte baterii za novou.
Zkontrolujte polohu vložené baterie.
Ujistěte se, že přístroj leží rovně na stránce, kterou čtete.
Ujistěte se, že je spodek lupy vyklopený na maximum.
Očistěte displej a čočky (umístěné vespod přístroje).
Stiskněte tlačítko zvětšit.
Řešení problémů
Vždy nakupujte baterie správné velikosti a typu, které jsou nejvhodnější pro zamýšlený účel.
Při výměně vždy nahrazujte celou sadu baterií a dbejte na to, abyste nemíchali staré a nové baterie, případně baterie různých
typů.
Před instalací baterií vyčistěte kontakty na baterii i na přístroji.
Ujistěte se, zda jsou baterie instalovány ve správné polaritě (+ resp. -).
V případě, že zařízení nebudete delší dobu používat, vyjměte z něj baterie.
Použité baterie včas vyměňujte.
Baterie se nikdy nepokoušejte dobíjet, mohlo by dojít k úniku obsahu baterie, požáru nebo k explozi.
Baterie nikdy nezkratujte, mohlo by to vést ke zvýšení teploty, úniku obsahu baterie nebo k explozi.
Baterie se nikdy nepokoušejte oživit zahříváním.
Po použití nezapomeňte přístroj vypnout.
Baterie uchovávejte mimo dosah dětí, abyste předešli riziku spolknutí, vdechnutí nebo otravy.
S použitými bateriemi nakládejte v souladu s vašimi vnitrostátními předpisy.
Bezpečnostní pokyny týkající se baterií
Vypnout
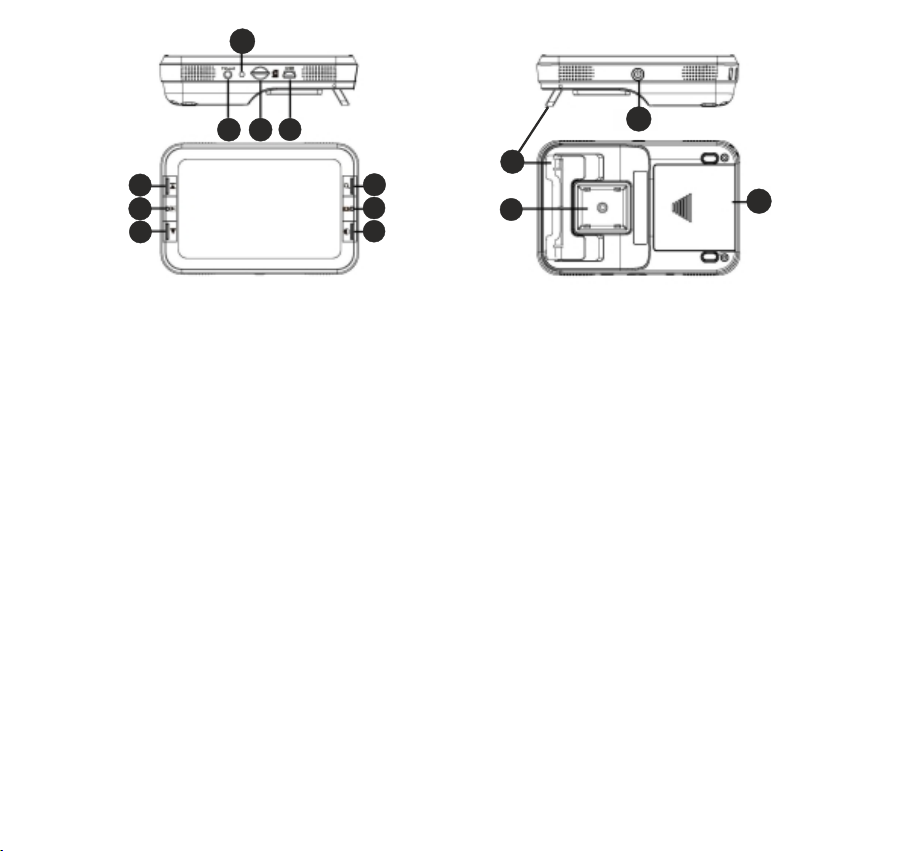
Vypněte přístroj stisknutím tlačítka zapnout/vypnout 10 umístěném na straně.
Pro prodloužení životnosti baterie vždy lupu vypněte, pokud ji nepoužíváte.
Lupa se vypne automaticky při nečinnosti delší než 5 minut.
8

Mezinárodní doživotní záruka Levenhuk
Na veškeré teleskopy, mikroskopy, triedry a další optické výrobky značky Levenhuk, s výjimkou příslušenství, se poskytuje
doživotní záruka pokrývající vady materiálu a provedení. Doživotní záruka je záruka platná po celou dobu životnosti produktu
na trhu. Na veškeré příslušenství značky Levenhuk se poskytuje záruka toho, že je dodáváno bez jakýchkoli vad materiálu a
provedení, a to po dobu dvou let od data zakoupení v maloobchodní prodejně. Tato záruka vám v případě splnění všech
záručních podmínek dává nárok na bezplatnou opravu nebo výměnu výrobku značky Levenhuk v libovolné zemi, v níž se nachází
pobočka společnosti Levenhuk. Další informace – navštivte naše webové stránky: http://www.levenhuk.cz/zaruka. V případě
problémů s uplatněním záruky, nebo pokud budete potřebovat pomoc při používání svého výrobku, obraťte se na místní
pobočku společnosti Levenhuk.
Sada obsahuje: přenosná digitální lupa, AC adapter, Li-ion baterie, TV kabel výstup, USB kabel, transportní taška (pouzdro),
hadřík na čištění, návod k použití.
Společnost Levenhuk si vyhrazuje právo provádět bez předchozího upozornění úpravy jakéhokoliv výrobku, případně zastavit
jeho výrobu.
9

Levenhuk DTX 43 Digitale Lupe
Richten Sie das Instrument unter keinen Umständen direkt auf die Sonne, andere helle Lichtquellen
oder Laserquellen. Es besteht die Gefahr DAUERHAFTER NETZZHAUTSCHÄDEN
und ERBLINDUNGSEGEFAHR.
Bedienungsanleitung
Pflege und Wartung
Beachten Sie die folgenden Hinweise, um Ihre Lupe immer in einem gepflegten Zustand zu halten:
1. Lesen Sie die Bedienungsanleitung, bevor Sie die Einheit in Betrieb nehmen.
2. Versuchen Sie nicht, die Lupe zu reparieren oder das Gehäuse zu öffnen. Das Produkt enthält keine vom Benutzer zu
wartenden Teile.
3. Halten Sie die Lupe fern von feuchten Bereichen, Regen und anderen Quellen von Flüssigkeit. Tauchen Sie die Einheit nicht
ins Wasser.
4. Betreiben Sie die Lupe nur bei Temperaturen zwischen 0 und 45 °C.
5. Bewahren Sie die Lupe stets bei Zimmertemperatur an einem kühlen und trockenen Ort auf.
6. Micro-SD-Karten und USB-Kabel sollten sich leichtgängig einstecken lassen. Üben Sie keine übermäßige Kraft aus.
Funktionen der Lupe
Einlegen der Batterie
Die Lupe arbeitet mit Lithium-Batterien. Öffnen Sie das Batteriefach durch vorsichtiges Schieben und Ziehen am
Batteriefachdeckel. Legen Sie die Batterie ein und beachten Sie dabei die Angaben zur korrekten Polarität im Batteriefach.
Rasten Sie anschließend den Batteriefachdeckel wieder ein.
Hinweis: Nehmen Sie die Batterie bei längerer Nichtbenutzung aus dem Fach heraus.
Laden der Batterie
Laden Sie die Batterie, bevor Sie die Lupe verwenden.
1. Verwenden Sie das Netzteil mit USB-Kabel. Stecken Sie die Mini-USB-Stecker des USB-Kabels in den Mini-USB-
Anschluss auf der rechten Seite der Einheit. Stecken Sie das Netzteil in eine Netzsteckdose.
2. Wenn die Batterie fertig geladen ist, leuchtet die Batterie-LED nicht. Trennen Sie die Einheit. Die Batterie-LED geht aus.
DE
10

3. Sie können jetzt die Lupe bis zu zwei Stunden ununterbrochen benutzen. Wenn die Batterie zur Neige geht, blinkt die
Anzeige für geringen Ladestand rechts unten im Display. Schließen Sie das Netzteil an und stecken es dann in eine
Netzsteckdose, um die Batterie wieder aufzuladen.
Hinweis: Schalten Sie die Lupe während des Ladens immer aus. Die Batterie wird nicht aufgeladen, solange die Lupe
eingeschaltet ist.
Lesen mit der Lupe
So benutzen Sie die Lupe zum Lesen:
1. Schalten Sie die Einheit durch Drücken der Ein/Aus-Taste 10 auf der Seite ein.
2. Klappen Sie den Standfuß der Lupe ganz aus.
3. Legen Sie die Lupe flach auf den Text, den Sie lesen möchten.
4. Schieben Sie die Lupe allmählich nach rechts, um bis zum Ende der Zeile zu lesen. Schieben Sie die Lupe nach unten und
wieder nach links, um die nächste Textzeile zu lesen.
5. Drücken Sie die Vergrößerungstaste, um die Vergrößerungsstufe zu ändern.
6. Durch wiederholtes Drücken der Farbmodus-Taste können Sie die auf dem Display verwendeten Farben an Ihre Bedürfnisse
anpassen.
Bedienung der Lupe
Auswahl des Farbmodus
Durch mehrfaches Drücken der Farbmodus-Taste können Sie die folgenden 7 Farbmodi der Lupe durchwechseln: Farbig,
Schwarz auf Weiß, Weiß auf Schwarz, Blau in Weiß, Blau in Gelb, Gelb in Schwarz, Gelb in Blau.
Einstellen der Vergrößerung
Drücken Sie die Vergrößerungstaste, um die vier Vergrößerungsstufen durchzuwechseln: 6x, 8x, 10x oder 14x.
Standbild
Drücken Sie die Standbildtaste , um das aktuelle Bild einzufrieren und wieder freizugeben.
Aufnehmen eines Fotos
Legen Sie eine Micro-SD-Karte (nicht im Lieferumfang) in den Micro-SD-Karteneinschub ein. Drücken Sie auf die
Aufnahmetaste, um ein Foto aufzunehmen. Die aufgenommenen Fotos werden automatisch auf der Micro-SD-Karte
gespeichert.
Wiedergeben
Drücken Sie die Wiedergabetaste, um die aufgenommenen Fotos anzusehen. Mit der Zurück-Taste und der Vor-Taste können Sie
durch die Fotos blättern.
Drücken Sie die Wiedergabetaste erneut, um in den Lesemodus zurückzukehren.
11

Problem
Display bleibt schwarz
Einheit lässt sich nicht einschalten
Bild auf Display ist dunkel oder
verzerrt.
Flecken oder Schmierer auf dem
Display
Text ist zu klein zum Lesen
Lösung
Stellen Sie sicher, dass das Gerät eingeschaltet ist.
Stellen Sie sicher, dass die Batterie aufgeladen ist.
Kontrollieren Sie, ob der zu vergrößernde Gegenstand korrekt und mittig unter dem
Display angeordnet ist.
Tauschen Sie die Batterie gegen eine neue Batterie aus.
Überprüfen Sie, ob die Batterie richtig eingelegt ist.
Stellen Sie sicher, dass die Einheit flach auf der Seite liegt, die Sie lesen.
Überprüfen Sie, ob der Standfuß der Lupe ganz ausgeklappt ist.
Reinigen Sie Display und Linse (die Linse befindet sich auf der Rückseite der Einheit).
Drücken Sie auf die Vergrößerungstaste.
Problembehebung
Immer die richtige, für den beabsichtigten Einsatz am besten geeignete Batteriegröße und -art erwerben.
Stets alle Batterien gleichzeitig ersetzen. Alte und neue Batterien oder Batterien verschiedenen Typs nicht mischen.
Batteriekontakte und Kontakte am Instrument vor Installation der Batterien reinigen.
Sicherheitshinweise zum Umgang mit Batterien
Löschen
Wenn die Wiedergabetaste gedrückt wurde und Sie beim Betrachten der aufgenommenen Fotos ein Foto löschen möchten,
drücken Sie die Aufnehmen/Löschen-Taste, um das Foto zu löschen.
Laden aufgenommener Fotos auf einen PC
Schließen Sie ein USB-Kabel an den USB-Anschluss der Lupe an und verbinden Sie das Kabel mit einem PC. Schalten Sie die
Lupe ein. Sie können jetzt die aufgenommenen Bilder auf den PC laden.
Ausgabe an einen Bildschirm mit TV-Eingang
Schließen Sie das TV-Out-Kabel an den TV-Ausgang der Lupe an, verbinden Sie das Kabel mit einem Bildschirm. Jetzt können
Sie ein Live-Video auf dem Bildschirm sehen.
Anzeige für geringen Ladestand
Wird eine nicht ausgefüllte Batterie rechts unten im Display angezeigt, ist der Ladestand der Batterie niedrig, und die
Batterie muss geladen werden.
Ausschalten
Schalten Sie die Einheit durch Drücken der Ein/Aus-Taste 10 auf der Seite aus.
Schalten Sie die Lupe bei Nichtverwendung aus, um die Lebensdauer der Batterie zu verlängern.
Die Lupe schaltet sich nach 5 Minuten Nichtbenutzung automatisch aus.
12

Beim Einlegen der Batterien auf korrekte Polung (+ und -) achten.
Batterien entnehmen, wenn das Instrument für einen längeren Zeitraum nicht benutzt werden soll.
Verbrauchte Batterien umgehend entnehmen.
Primärbatterien nicht wieder aufladen! Beim Aufladen von Primärbatterien können diese auslaufen; außerdem besteht Feuer-
und Explosionsgefahr.
Batterien nicht kurzschließen, um Hitzeentwicklung, Auslaufen oder Explosionen zu vermeiden.
Batterien dürfen nicht zum Wiederbeleben erwärmt werden.
Instrumente nach Verwendung ausschalten.
Batterien für Kinder unzugänglich aufbewahren, um Verschlucken, Ersticken und Vergiftungen zu vermeiden.
Entsorgen Sie leere Batterien gemäß den einschlägigen Vorschriften.
Lebenslange internationale Garantie
Levenhuk garantiert für alle Teleskope, Mikroskope, Ferngläser und anderen optischen Erzeugnisse mit Ausnahme von Zubehör
lebenslänglich die Freiheit von Material- und Herstellungsfehlern. Die lebenslange Garantie ist eine Garantie, die für die
gesamte Lebensdauer des Produkts am Markt gilt. Für Levenhuk-Zubehör gewährleistet Levenhuk die Freiheit von Material-
und Herstellungsfehlern innerhalb von zwei Jahren ab Kaufdatum. Die Garantie berechtigt in Ländern, in denen Levenhuk mit
einer Niederlassung vertreten ist, zu Reparatur oder Austausch von Levenhuk-Produkten, sofern alle Garantiebedingungen
erfüllt sind. Weitere Einzelheiten entnehmen Sie bitte unserer Website: http://de.levenhuk.com/garantie.
Bei Problemen mit der Garantie, oder wenn Sie Unterstützung bei der Verwendung Ihres Produkts benötigen, wenden Sie sich
an die lokale Levenhuk-Niederlassung.
Lieferumfang: Portable digitale Lupe, Netzteil, Lithium-Ionen-Batterie, TV-Out-Kabel, USB-Kabel, Tragetasche,
Reinigungstuch, Bedienungsanleitung.
Levenhuk behält sich das Recht vor, Produkte ohne vorherige Ankündigung zu modifizieren oder einzustellen.
13

Lupa digital Levenhuk DTX 43
Nunca, bajo ninguna circunstancia, mire directamente al Sol, ni a otras fuentes de luz intensa ni a un
láser a través de este instrumento, ya que hacerlo podría provocar DAÑOS PERMANENTES A LA
RETINA y CEGUERA.
Manual de usuario
Cuidados y mantenimiento
Para mantener su lupa en buen estado, respete las siguientes indicaciones:
1. Lea las instrucciones de este manual antes de intentar utilizar este dispositivo.
2. No intente reparar la lupa ni abrir la carcasa. Este producto no contiene piezas que el usuario pueda reparar.
3. Mantenga la lupa alejada de zonas húmedas, lluvia y otras fuentes de líquidos. No sumerja la unidad en líquidos.
4. Utilice siempre la lupa en lugares donde la temperatura se encuentre entre 0 °C y 45 °C.
5. Guarde siempre la lupa en un lugar fresco y seco, a la temperatura ambiente normal.
6. No intente introducir a la fuerza ningún conector a los puertos USB o microSD del dispositivo. Los conectores adecuados
encajarán fácilmente en los puertos.
Funciones de la lupa
Utilización de la batería
Utilice la batería de iones de litio como fuente de electricidad de la lupa. Presione ligeramente y tire de la pestaña de la
tapa para abrir el compartimento de la batería. Cargue la batería respetando las polaridades indicadas en el interior del
compartimento y después cierre la tapa hasta que haga clic.
Nota: Cuando no vaya a utilizar la lupa durante un período largo de tiempo, extraiga la batería.
Carga de la batería
Antes de utilizar la lupa, cargue la batería.
1. Conecte el puerto miniUSB del cable USB en el puerto miniUSB situado a la derecha de la unidad. Luego conecte el
conector del cable USB en el puerto del transformador de corriente y a continuación enchufe el transformador en una toma
estándar de corriente alterna.
2. Cuando la batería esté cargada se encenderá el indicador LED. Desenchufe el dispositivo. En ese momento se apagará el
indicador LED de la batería.
ES
14

3. Ahora puede utilizar su lupa de forma continuada hasta dos horas. Cuando haya poca batería, el indicador de carga
parpadeará en la esquina derecha inferior de la pantalla. En ese caso, conecte el transformador y enchúfelo para recargarlo.
Nota: Apague siempre la lupa mientras se esté cargando. La batería no se cargará si la lupa se ha dejado encendida.
Lectura con la lupa
Para leer con la lupa, siga los siguientes pasos:
1. Encienda el dispositivo presionando el interruptor de encendido/apagado 10 situado en un lateral.
2. Tire del pie de la lupa hasta que alcance su longitud máxima.
3. Coloque la lupa plana contra el texto que desee leer.
4. Deslice la unidad de forma gradual hacia la derecha para ir leyendo hasta el final de la línea. Deslice la unidad hacia abajo
y de nuevo hacia la izquierda para leer la siguiente línea de texto.
5. Para ampliar más o menos la imagen, pulse el botón Aumentar.
6. Para cambiar los colores de la pantalla, pulse el botón de modo de color hasta que encuentre el modo que mejor se
adapta a sus necesidades de visión.
Uso de la lupa
Selección del modo de color
Pulse el botón de modo de color para ir cambiando entre los 7 modos diferentes de color de la lupa: todo color, negro sobre
blanco, blanco sobre negro, azul sobre blanco, azul sobre amarillo, amarillo sobre negro, amarillo sobre azul.
Ajuste de los aumentos
Pulse el botón Aumentar para ir cambiando entre los cuatro niveles de aumentos. 6x, 8x, 10x o 14x.
Congelar imagen
Pulse el botón Adelante/congelar imagen para alternar entre congelar la imagen y reproducirla normalmente.
Captura de fotos
Cargue una tarjeta microSD (no incluida) en la ranura correspondiente. Pulse el botón de captura de instantáneas para
tomar una foto. Las fotos se guardarán automáticamente en la tarjeta microSD.
Reproducción
Pulse el botón de reproducción para ver las fotos que ha tomado. Pulse los botones Adelante y Atrás para moverse hacia
adelante y hacia atrás.
Pulsando de nuevo el botón de reproducción la lupa vuelve al modo de lectura.
Borrar
Pulse el botón de reproducción para ver las fotos que ha tomado. Pulse el botón Capturar/Borrar para borrar una imagen.
15

Descargar fotos a un ordenador
Conecte la lupa a un ordenador con un cable estándar miniUSB. Conecte el conector miniUSB del cable en el puerto miniUSB
situado en el lateral de la lupa y a continuación introduzca el conector USB estándar del cable en el ordenador. Encienda la
lupa. Ahora puede descargar al ordenador las fotografías que haya tomado.
Salida de la imagen a un monitor con conexión de entrada de imagen
Conecte la lupa a un monitor con entrada de TV utilizando un cable de vídeo y enciéndala para poder ver vídeo en vivo en el
monitor.
Indicación de batería baja
Si la batería está baja, aparecerá un símbolo en la esquina inferior derecha de la pantalla para indicarle que tiene que
cargar la batería.
Apagar la lupa
Apague el dispositivo presionando el interruptor de encendido/apagado 10 situado en un lateral.
Para alargar la vida de la batería, apague siempre la lupa cuando no la esté utilizando.
La lupa se apagará automáticamente si no se utiliza durante 5 minutos.
Problema
No se ve nada en la pantalla
La lupa no se enciende
La imagen se ve oscura o
distorsionada en la pantalla
Se ven manchas o marcas en
la pantalla
El texto es demasiado pequeño y no
se puede leer
Solución
Asegúrese de que la lupa esté encendida.
Asegúrese de que la batería esté suficientemente cargada.
Compruebe que el objeto que desea ampliar esté situado correctamente, debajo del
centro de la pantalla.
Sustituya la batería por otra nueva.
Compruebe que la batería esté colocada en la posición correcta.
Asegúrese de que la lupa esté colocada plana sobre la página que está leyendo.
Asegúrese de que el pie de la lupa esté extendido en su posición máxima.
Limpie la pantalla y la lente (situada en la parte inferior de la lupa).
Pulse el botón de aumentos.
Resolución de problemas
Compre siempre las pilas del tamaño y grado indicado para el uso previsto.
Reemplace siempre todas las pilas al mismo tiempo. No mezcle pilas viejas y nuevas, ni pilas de diferentes tipos.
Limpie los contactos de las pilas y del instrumento antes de instalarlas.
Asegúrese de instalar las pilas correctamente según su polaridad (+ y -).
Instrucciones de seguridad para las pilas
16

Quite las pilas si no va a utilizar el instrumento durante un periodo largo de tiempo.
Retire lo antes posible las pilas agotadas.
No intente nunca recargar pilas primarias (pilas de un solo uso) ya que podría provocar fugas, fuego una o explosión.
No cortocircuite nunca las pilas ya que podría aumentar su temperatura y podría provocar fugas o una explosión.
Nunca caliente las pilas para intentar reavivarlas.
No intente desmontar las pilas.
Recuerde apagar el instrumento después de usarlo.
Mantenga las pilas fuera del alcance de los niños para eliminar el riesgo de ingestión, asfixia o envenenamiento.
Deseche las pilas usadas tal como lo indiquen las leyes de su país.
Garantía internacional de por vida Levenhuk
Todos los telescopios, microscopios, prismáticos y otros productos ópticos de Levenhuk, excepto los accesorios, cuentan con
una garantía de por vida contra defectos de material y de mano de obra. La garantía de por vida es una garantía a lo largo de
la vida del producto en el mercado. Todos los accesorios Levenhuk están garantizados contra defectos de material y de mano
de obra durante dos años a partir de la fecha de compra en el minorista. La garantía incluye la reparación o sustitución
gratuita del producto Levenhuk en cualquier país en el que haya una oficina Levenhuk si se reúnen todas las condiciones de la
garantía. Para más detalles visite nuestra página web: http://es.levenhuk.com/garantia.
En caso de problemas con la garantía o si necesita ayuda en el uso de su producto, contacte con su oficina de Levenhuk más
cercana.
Se entrega con: lupa digital portátil, transformador de corriente alterna, batería de iones de litio, cable de salida a TV, cable
USB, bolsa de transporte (funda), paño de limpieza, manual de usuario.
Levenhuk se reserva el derecho a modificar o descatalogar cualquier producto sin previo aviso.
17

Lupa cyfrowa Levenhuk DTX 43
Pod żadnym pozorem nie wolno kierować tego urządzenia bezpośrednio na słońce, światło laserowe
lub inne źródło jasnego światła, ponieważ może to spowodować TRWAŁE USZKODZENIE SIATKÓWKI
lub doprowadzić do ŚLEPOTY.
Instrukcja obsługi
Konserwacja i pielęgnacja
Aby zachować lupę w dobrym stanie, należy przestrzegać poniższych zaleceń:
1. Przed rozpoczęciem korzystania z urządzenia należy zapoznać się z niniejszą instrukcją obsługi.
2. Nie należy podejmować prób naprawy urządzenia ani otwierać jego obudowy. Urządzenie nie zawiera części przeznaczonych
do serwisowania przez użytkownika.
3. Chroń urządzenie przed kontaktem z wilgotnymi powierzchniami, deszczem i innymi źródłami cieczy. Nie zanurzaj
urządzenia.
4. Korzystaj z lupy wyłącznie w miejscach, w których temperatura wynosi 0–45°C.
5. Zawsze przechowuj urządzenie w chłodnym i suchym miejscu w temperaturze pokojowej.
6. Nie umieszczaj złączy w portach USB i microSD przy użyciu siły. Odpowiednie złącza można z łatwością umieścić w portach.
Funkcje lupy
Wkładanie akumulatora
Należy używać baterii litowej. Delikatnie wciśnij zatrzask klapki akumulatora i pociągnij za niego, aby otworzyć komorę
akumulatora. Umieść akumulator zgodnie z oznaczeniem polaryzacji w komorze akumulatora, a następnie zatrzaśnij klapkę
akumulatora.
Uwaga: Gdy lupa nie jest używana przez dłuższy czas, należy wyjąć akumulator.
Ładowanie akumulatora
Przed rozpoczęciem korzystania z lupy należy naładować akumulator.
1. Podłącz kabel USB do zasilacza. Podłącz port miniUSB zasilacza do portu miniUSB znajdującego się z prawej strony
urządzenia. Następnie podłączyć drugi koniec zasilacza do standardowego gniazda sieciowego.
2. Po zakończeniu ładowania akumulatora kontrolka LED akumulatora przestanie się świecić. Odłącz urządzenie.
PL
18

3. Teraz lupa umożliwia ciągłą pracę przez dwie godziny. Gdy akumulator będzie bliski rozładowania, zaświeci się kontrolka
niskiego poziomu naładowania akumulatora w prawym dolnym rogu ekranu. Należy podłączyć zasilacz do urządzenia i
podłączyć go do gniazda sieciowego, aby naładować akumulator.
Uwaga: Urządzenie powinno być zawsze wyłączone podczas ładowania. Akumulator nie jest ładowany, gdy urządzenie jest
włączone.
Czytanie przy użyciu lupy
Aby czytać przy użyciu lupy, należy wykonać następujące czynności:
1. Włącz urządzenie, naciskając przycisk wł./wył. zasilania 10 znajdujący się z boku urządzenia.
2. Wysuń podstawę lupy, ustawiając ją w położeniu maksymalnego zasięgu.
3. Umieść lupę płasko na czytanym tekście.
4. Przesuń urządzenie stopniowo w prawo, aby czytać do końca wiersza. Przesuń urządzenie w dół i w lewo, aby rozpocząć
czytanie kolejnego wiersza tekstu.
5. Aby zmienić poziom powiększenia, naciśnij przycisk powiększenia.
6. Aby zmienić kolory używane na ekranie, naciskaj przycisk trybu koloru aż do uzyskania odpowiedniego trybu.
Korzystanie z lupy
Wybór trybu koloru
Naciskaj przycisk trybu koloru, aby przełączać między następującymi 7 różnymi trybami: pełny kolor, białe na czarnym, czarne
na białym, niebieskie na białym, niebieskie na żółtym, żółte na czarnym, żółte na niebieskim.
Regulacja powiększenia
Naciskaj przycisk powiększenia, aby przełączać między następującymi czterema poziomami powiększenia: 6x, 8x, 10x lub 14x.
Zatrzymanie obrazu
Naciskaj przycisk zatrzymania/wznowienia, aby przełączać między zatrzymaniem i wznowieniem wyświetlania bieżącego
obrazu.
Przechwytywanie zdjęcia
Umieść kartę microSD (niedołączona do zestawu) w gnieździe karty microSD. Naciśnij przycisk przechwytywania, aby
przechwycić zdjęcie. Przechwycone zdjęcia zostaną automatycznie zapisane na karcie microSD.
Odtwarzanie
Naciśnij przycisk odtwarzania, aby wyświetlić przechwycone zdjęcia. Naciśnij przycisk Do przodu lub Do tyłu, aby przejść do
poprzedniego lub kolejnego zdjęcia.
Naciśnij ponownie przycisk odtwarzania, aby powrócić do trybu czytania lupy.
Usuwanie
Po naciśnięciu przycisku odtwarzania w celu wyświetlenia przechwyconych zdjęć, aby usunąć zdjęcia, naciśnij przycisk
przechwytywania/usuwania.
19
Other manuals for DTX 43
1
Table of contents
Languages:
Other Levenhuk Magnifier manuals

Levenhuk
Levenhuk Zeno 700 User manual

Levenhuk
Levenhuk Zeno Multi Series User manual

Levenhuk
Levenhuk Zeno 60 User manual

Levenhuk
Levenhuk Zeno 90 User manual

Levenhuk
Levenhuk Zeno 1000 User manual

Levenhuk
Levenhuk DTX 43 User manual

Levenhuk
Levenhuk Zero Vizor N1 User manual

Levenhuk
Levenhuk Zeno 50 2.2x Main Lens User manual

Levenhuk
Levenhuk Zeno 900 5x LED User manual

Levenhuk
Levenhuk Zeno Vizor H2 User manual