Lexmoto LX06 User manual

USER’S MANUAL
LX06
(EEC L1e-B)

Welcome to the family of LX06 owners! We will guide you to know each function for the right and safe use of electric scooters.
To ensure your safety, please read this manual carefully before riding and make sure you are always following the requirements below:
Please contact the Local Customer Service Center if you have any questions about this scooter.
We are at our service at any time. Wish you safe and pleasant riding experience!
Fully understand the information in this manual, including but not limited to the relevant instructions, precautions and warnings.
Fully understand the operation and contingency measures of electric scooters.
Be fully aware of warning labels of LX06 electric scooters.
We will not take any responsibility resulting from the unauthorized modification, failure to use original spare parts, or installation of components that
affect the performance and safety of the scooter.
1 2
Whether the handlebar is stable and flexible when turning.
Whether the switches on the right and left handlebars can work normally.
Whether the speed accelerator can work normally.
Make sure the tire pressure is normal. The suggested tire pressure is 26-29psi for front wheel and 29-32 psi for rear wheel.
Check tire surface for cracks, damage, wear, and foreign matter puncture or attachment
Whether the tread depth is suffcient (>0.8 mm).
Whether any fault warning light on the instrument panel goes on after being powered.
Whether the battery is fully charged.
Whether the head and tail lights, brake lights and winkers can work normally.
Whether the horn can work normally.
Whether the rear mirrors are clean. Adjust them to the appropriate angle.
Whether the brake oil is suffcient, and whether the handlebars and brake system can work normally.
For any abnormality or operational concern, please contact local Customer Service Center.
Checks Before Riding
1
2
3
4
5
6
7
8
9
10
11
12
Make sure to check the following items before riding a electric scooter, which will guarantee your safety on the road.
RIDING GUIDEUSER INSTRUCTIONS

To ensure the safety of you and others, please make sure to observe the following matters:
Do not ride after you take medications, drink alcohol, or when you are unwell, which may affect your riding ability.
Observe traffic regulations and traffc signs and confirm the surrounding road conditions and scooter conditions at any time to avoid danger.
Wear safety equipment, such as helmet, and appropriate protective clothing if necessary, such as gloves and boots.
Perform a basic check each time before riding, so as to confirm the light, brake, tread and tire pressure and check other parts for looseness or abnormal noise,
and regularly go to Local Service Center for maintenance.
In order to ensure the safety of you and others, please DO NOT use high beam in good lighting conditions. The continuous use of high beam will cause the visual
disturbance to vehicles and pedestrians on the opposite side, thus affecting normal driving.
Please do not make or answer any call during riding, which is likely to cause traffc accidents.
3 4
DESCRIPTION OF COMPONENTS AND PARTS
Installation of Mirrors
Take out the left and right mirrors, insert the hole and rotate the
mirror clockwise to the correct position.
Use the spanner to fasten the nut,make sure the left and right mirror
is on the same line and suitable for the driver’s view.
1
2
SAFETY INSTRUCTIONS

35 6
DIAGRAM OF INSTRUMENT PANELDESCRIPTION OF COMPONENTS AND PARTS
Rear direction indicator
Rear combination lamp
Stop lamp/rear position lamp
Converter
Controller
Headlamp
Front position lamp
Speedometer
Rearview mirror
Handle
USB charger
Battery
Horn
Rear registration plate lamp
Direction indicator
Front suspension
Motor
%
Ⅰ
Brake error
Motor or motor wire error
Handle or handle wire error
Side stand power off
Power on
Accumulated mileage
Mileage unit
Gear position
Low voltage need
recharge the battery
High beam
Temperature
Speed
Battery capacity
lower beam
Turn signal on
Controller error

Details Of Instrument Panel
7 8
SWITCH FUNCTIONOPERATION GUIDE
M
!
P
READY
ECU
Power on
Turn signal on
Meter working temperature
Side stand power off
Controller error
Motor or motor wire error
Brake or brake wire error
Handle or handle wire error
Scooter in P position
Low voltage need recharge the battery
Low voltage for the battery to
the limit level
Lamp Function
High beam on
Gear postion display; single driving time
Speed display, km/h & mp/h switch is available;
external plug switch (off is km/h, on is mp/h)
Battery capacity level
Total milage of the scooter. Speed unit (mile/km)
synchronous switches.
(ODO is accumulated milage.
First showing the accumulated milage and then
single milage with 0000.0. Speed unit (mile/km)
synchronous switches.
Motor error, erase the error and run the
motor for 4 minutes, the error indicator
will disappear automatically.
Lamp Function
%
Left Start Button Right Start Button
1
1
2
2
3
3
Emergency glasher
Push upward the switch,
all turning lights on and flick,
same display on the meter
Push to left and right to
switch on/off the head lamp.
Press the “ Repair” button to
drive the scooter in low speed
when some motor/controller
errors happens.
Item Switch position Functions
Switch of headlight
Repair button
1
2
3
1
2
3
Near-far light switch
High beam is on when turning
on the button
Low beam is on when turning
on the button
Left turning signal on
Right turning signal on
Horn on
Item Switch position Functions
Indicator control
Horn control

Turn the key to postion and power on the scooter.
ATTENTION:
1. Make sure all lights are in “off” condition, or it may cause power-off protection
due to battery protection programe ;
2. If the power-off protection happen, switch off the lights and restart the circuit
breaker and power on the scooter again.
910
Before riding,make sure the electronic side stand retracted and rotate the handlebar to ensure that the handlebar lock is closed.If the Parking button
is pressed when riding, the bike will be dis- energized. So DO NOT press it when riding for avoiding danger caused by the sudden loss of power.
If the electronic side stand is extended when riding, the bike will be dis- energized. So DO NOT extend the electronic side stand when riding for avoiding
danger caused by the sudden loss of power.
The scooter must be fully stopped before starting. In case of abnormality during riding, please ride carefully or push it to a safe place. DO NOT try
restarting the bike during riding or on the lane so as to avoid danger
OPERATION GUIDE
Guide of ignition key
1Start power supply
1
4
2
3
OPEN
IGNITION
OFF
OPEN
OPEN
SHUT
LOCK
1
2
1
2
Speed levels Press the button to adjust the speed level,
level information will be synchronous shown
in meter
Press the ignition key for 1 second to release the
P gear until the “P” mark in the meter disapper;
The speed regulating function is still effective
when the P gear function is normally turned on;
when the power is on and the whole vehicle stops,
press the P button for 1 second to enter the P gear
postion, the P mark is synchronous in the meter.
Item Switch position Functions
P gear postion
1 2 3
P
SWITCH FUNCTION
2
3
Open the saddle
Handle bar lock and relieve
4The key hole status
Turn the key to left to open the saddle.
1. Turn the handle bar to left until stop;
2. Push the key and turn to left till ( ) position, the handle bar is locked;
3. Push the key and turn to right till ( ) position, the handle bar is unlocked.
1. The key hole is closed when in ( ) position;
2. Turn the key towards to ( ) position,the key hole is in open position.
TIPS:
SHUT

11 12
BATTERY INSTALLATION AND DISMOUNT
Install the cable
Remove the power cord
With the advanced Smart Remote Controller, you can easily lock or unlock your
electric scooter by simply pressing the button within 50 meters.
1
2
3
4
Unlock
Press the unlock button, and the start button stays on. The scooter enters
into the unlocked state.
Lock
When the scooter is in the static state, press the lock button, and the start
button flashes. The scooter enters the locked state.
Remote keyless entry
After unlock the scooter,press this button twice within two(2) seconds, and
the scooter will be in the “Powered” state without key.
Search key
Press this witch within 50m, “Bi Bi” sounds searching the scooter.
How To Operate The Smart Remote Contol
1
2
43
OPERATION GUIDE
1
2
Open the small cap on the top of battery case
Align the power cord with the white arrow on the socket. Insert slowly and press firmly until
you hear a "clicking" sound.
The power plug can be pulled out by rotating the blue buckle ring counterclockwise and
pulling it up with force.

13 14
Guide for side stand power off fuction
Handlebar is short of power, scooter not able to be started.Scooter ON position, scooter can be powered on.
USB & SIDE STAND
Guide of the USB
1. Open the dust cover of the USB charging port;
2. Connect the cable
USB
GUIDE OF THE BREAKER
ON
ON
When the master switch is ON, the vehicle's main power source is connected.
OFF
OFF
When the master switch is OFF, the vehicle's main power source is disconnected.

15 16
BATTERY USE INSTRUCTIONS
TIPS:
Short circuit of the cathode and the anode at the battery's input.
Keep it away from children, fire and heat source. It is strictly forbidden
to throw it into the fire; Violent movements, shock and extrusion are
prohibited;
Only the specified charger can be used, and other chargers are
prohibited to charge the battery;
This product has been subjected to strict inspection before leaving
factory, and it is strictly prohibited to dismantle it. Please contact our
company's after-sales department for any question.
TIPS:
Do not expose the battery to water, and prevent it from being
damped by water or rained.
Charge temperature: 0-45 °C, discharge temperature: -20-45 °C;
Battery capacity will be reduced when placed in a low-temperature
environment;
Charge the battery when you use it, but make sure to charge it before
the capacity is lower than 20%. When it is not used
for a long time, please remove it from the scooter.
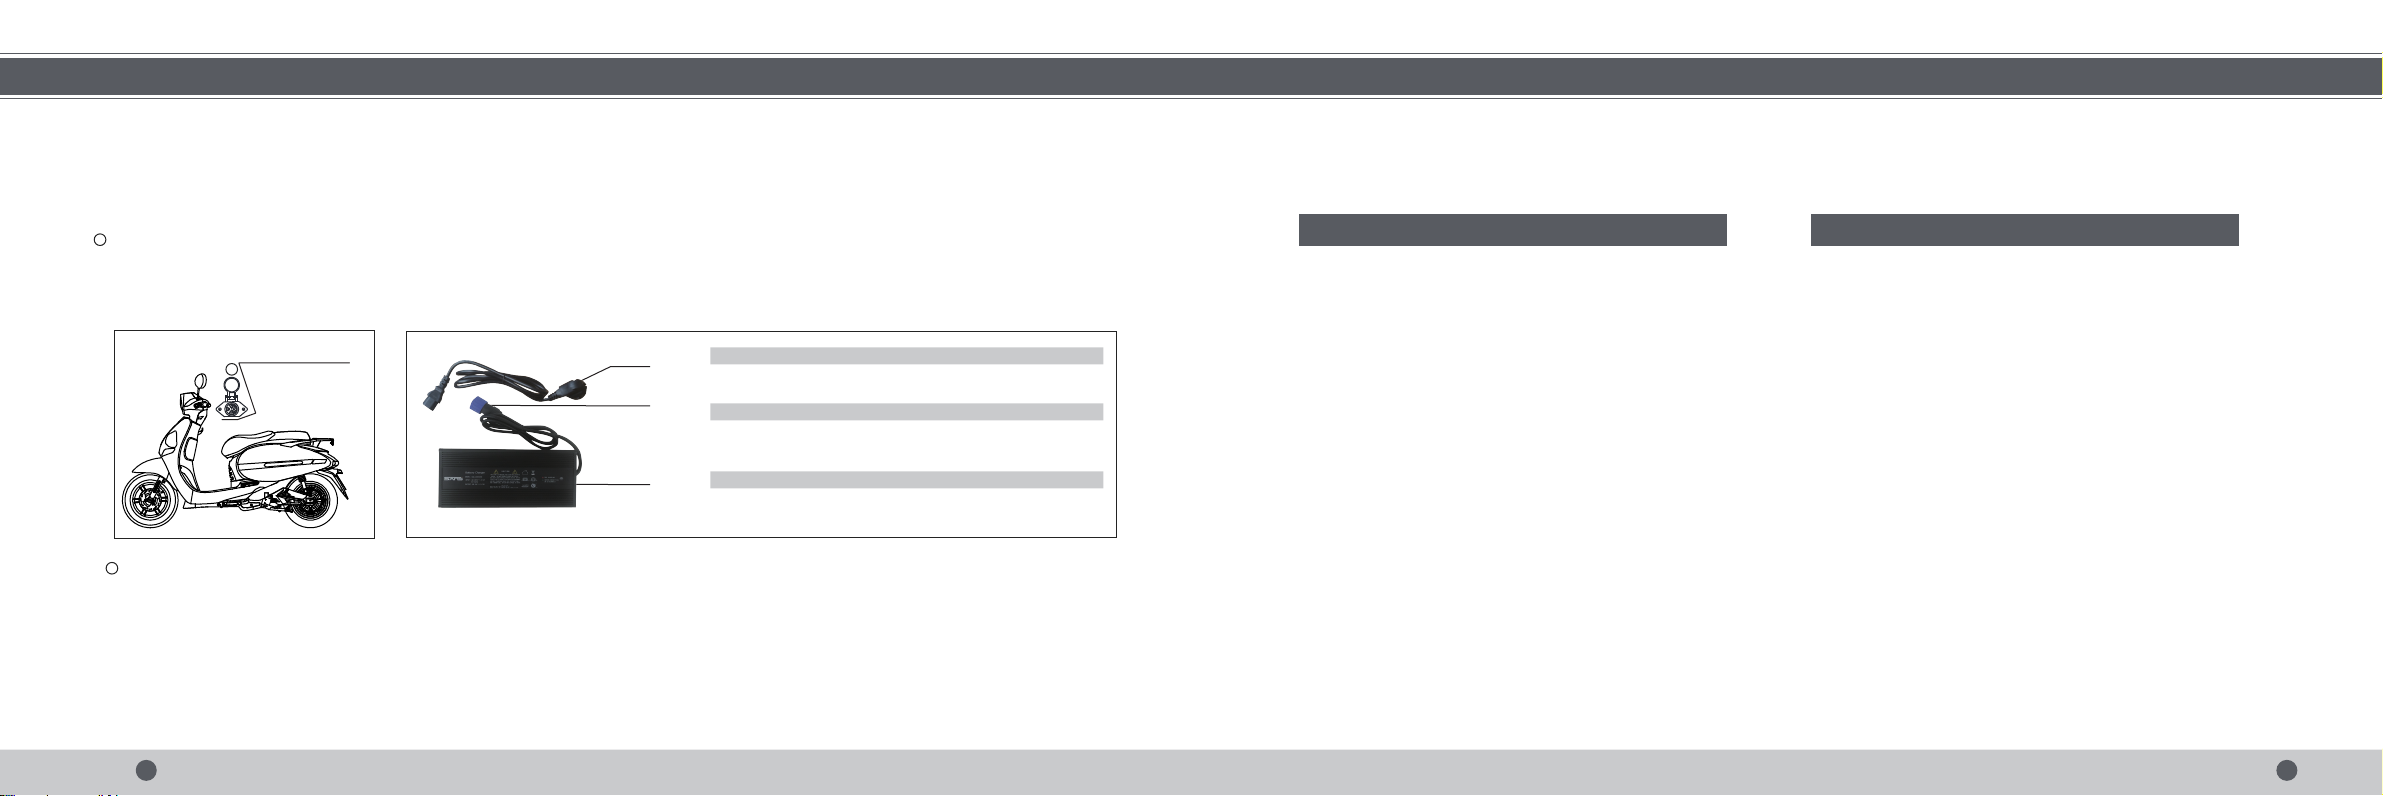
Pull up the battery from scooter,insert the main charger plug into the charging socket of the battery. Insert the chargers AC power plug into the home power
socket, and the battery starts charging when the charger indicator turns red.The battery is fully charged if the charger indicator turns from red to green.
2
BATTERY USE INSTRUCTIONS
Insert the main charger plug into the charging port of the scooter.
Insert the chargers AC power plug into the home power socket, and the battery starts charging when the charger indicator turns red. The battery is fully charged
if the charger indicator turns from red to green.
How to Charge the Battery
1
1
Charging Interface
I
2
3
11
Input power terminal: connect the output charging end and plug
the input power terminal into AC supply.
Output charging end:Before charging, use the output end to
connect the battery, make sue the socket be plugged in
properbly.
Please use the special matching charger for charging, charging
time of a single set battery is normally with in 3~4h.
Input power terminal
2Output charging end
3Power indicator

17 18
Please charge the battery to half-saturation state when storing or transporting it (after the battery is discharged, charge it for 3 hours).
Place it in a dry and ventilated place;
Battery and charger should be kept in a clean,dry,and ventilated place. Keep them away from corrosive materials,power source and heat source;
Storage conditions: ambient temperature -20-35 °C, humidity <65% RH;
When storing the charger, please disconnect it from the battery.
Regular maintenance can enhance the service life and driving safety of the electric scooter. Please refer to the following suggestions and take care of your
scooter.
Storage, Maintenance and Transportation
BATTERY USE INSTRUCTIONS MAINTENANCE
Routine Cleaning and Maintenance
Regular Inspection and Maintenance
Cleaning:Please use clean water and neutral detergent to clean it, and use soft cloths and sponges to clean the surface;
It is prohibited to use metal brushes, sandpaper or the like to clean it, in order not to scratch the parts surface. After cleaning, dry it with soft cloths.
TIPS:
TIPS:
Please disconnect the air switch before cleaning.
Do not use strong water jet to directly wash it, so as to avoid the default of mechanical parts caused by water invasion.
Storage: try to park it in a dry and cool room to reduce the exposure to sun and rain and avoid the reduction of service life due to corrosion of parts.
When left unused for a long time, please turn off the air switch and disconnect the power supply circuitto prevent over discharging.
After long-term storage, please fully charge it before use.
The new scooter must be subject to the first inspection and maintenance in the Service Center when it reaches 1,000 km or two months (whichever comes first).
The scooter is recommended to be subject to regular inspection and maintenance in the Service Center at every 3,000 km or six months (whichever comes first).
Please disconnect the air switch before cleaning.
Do not use strong water jet to directly wash it, so as to avoid the fault of mechanical parts caused by being damped.

19 20
TROUBLE-SHOOTING& FAQ
The scooter has no electricity,
and the READY lamp does not
shine.
When turning the speed
regulating steering handle-bar,
the motor does not turn after
being powered.
Speed is slow or mileage is
short.
Battery can not be charged.
Battery is poorly connected.
Air switch is not turned on.
Low battery volume.
Side stand is not retracted.
Brake handle does not reach the right position.
Steering handlebar failure.
The controller plug is loose.
Controller failure.
Low battery.
Under-inflated tire.
Heavily overloaded.
Brake pads interference.
Battery aging or normal scrap.
Poor contact of the main plug of the charger.
Do not use the wrong charger.
Battery aging or normal scrap.
Battery low-voltage protection.
Charge the battery.
Inflate the tire, and check the tire pressure before riding.
Foster a good habit, and keep the appropriate load Change
the brake pads and check the brake system before riding.
Change battery.
Check whether the main plug is in a right place Use the
special charger.
Contact of the main plug again.
Contact with local service office of battery.
Charge the battery.
Put away the side stand.
Close the parking key.
Place the brake handle at the right position.
Change handlebar.
Re-plug controller.
Change controller.
Connect the battery properly at its main plug.
Turn on the air switch.
Regular maintenance can improve the service life and driving safety of the electric scooters.
Please refer to the fol-lowing suggestions and take care of your scooter.
Failure Causes Solutions
ELECTRICAL SCHEMATIC
12V/40W
1.5Hz
High beam instruction
Horn switch
flasher
Hc
meter board assembly
strong power
B
60V
converter
black
Signal
ground
Front turn left light
L
Blue
Wheel moved test
Speed
indicator
120W
Headlight
Turn right instruction
Left
Turn switch
HA
black
orange
C
grey
Max output power120W
brown
signal of speed handle bar
Rear turn right light
H
Pink
The power off braker
Meter cathode
Turn left instruction
Ha
Right
The negative control
HC
+5V
HB
The power lock
Light blue
The charging
plug
pink
License lamp
250V/
1
0A
Front turn right light
Brushless controller
+
White
+
Speed
indicator
Power capacity indicator
Left
Anti-theft
alarm device
Hb
battery pack1
brake switch
antenna
+5V
Air switch1
A
Fuse
The headlightswitch
60V low voltage
Rear turn left light
Y
Front headlight
Alarm signal
-
Turn light
-
Reverse gear
Meterlighting
Right
12V
12V
Table of contents
Other Lexmoto Scooter manuals