LG D950 G Flex User manual

MBM64358001 (1.0) W
Quick start guide
Guide de démarrage rapide
LG-D950G
E N G L I S H
FRANÇAIS
www.lg.com/ca
Printed in Korea

©2014 LG Electronics Canada, Inc. All rights reserved. LG and Life’s Good are
registered trademarks of LG Corp.
All other trademarks are the properties of their respective owners. Screen images
simulated.
*The flexibility of this product is limited. This phone may be bent flat up to 180
degrees for a limited period of time only.
Do not bend inward or twist. Availability and design may vary by carrier.
2014 LG Electronics Canada, Inc. Tous droits réservés. LG et Life’s Good sont des
marques déposées de LG Corp
Toutes les autres marques sont la propriété de leurs propriétaires respectifs. Images
d’écran sont simulées.
* La flexibilité de ce produit est limitée. Ce téléphone peut être légèrement appuyé à
plat jusqu’à 180 degrés pour une période de temps limitée.
Ne tordez pas ou ne pliez pas le téléphone. Disponibilité et conception peuvent varier
par opérateur mobile.

ENGLISH
Quick start guide
LG-D950G
To download the latest full version of the user guide, go to
www.lg.com on your PC or laptop.
4G LTE* ready
*
Please check with your network operator if 4G LTE is available on your USIM

Index
Overview.............................................................1
Setup .................................................................2
Screen................................................................4
Call/Messaging.................................................6
Contacts ............................................................ 7
Google account.................................................8
E-mail.................................................................8
Downloading applications................................9
Internet/Maps ................................................. 10
Camera ............................................................. 11
Video camera................................................... 11
VuTalk .............................................................. 12
QSlide.............................................................. 14
QuickMemo..................................................... 15
QuickTranslator............................................... 16
QuickRemote ...................................................17
QuickTheater ...................................................17
Dual Window................................................... 18
Connect your phone with your computer..... 19
For Your Safety................................................ 21
Safety Guidelines .......................................... 30
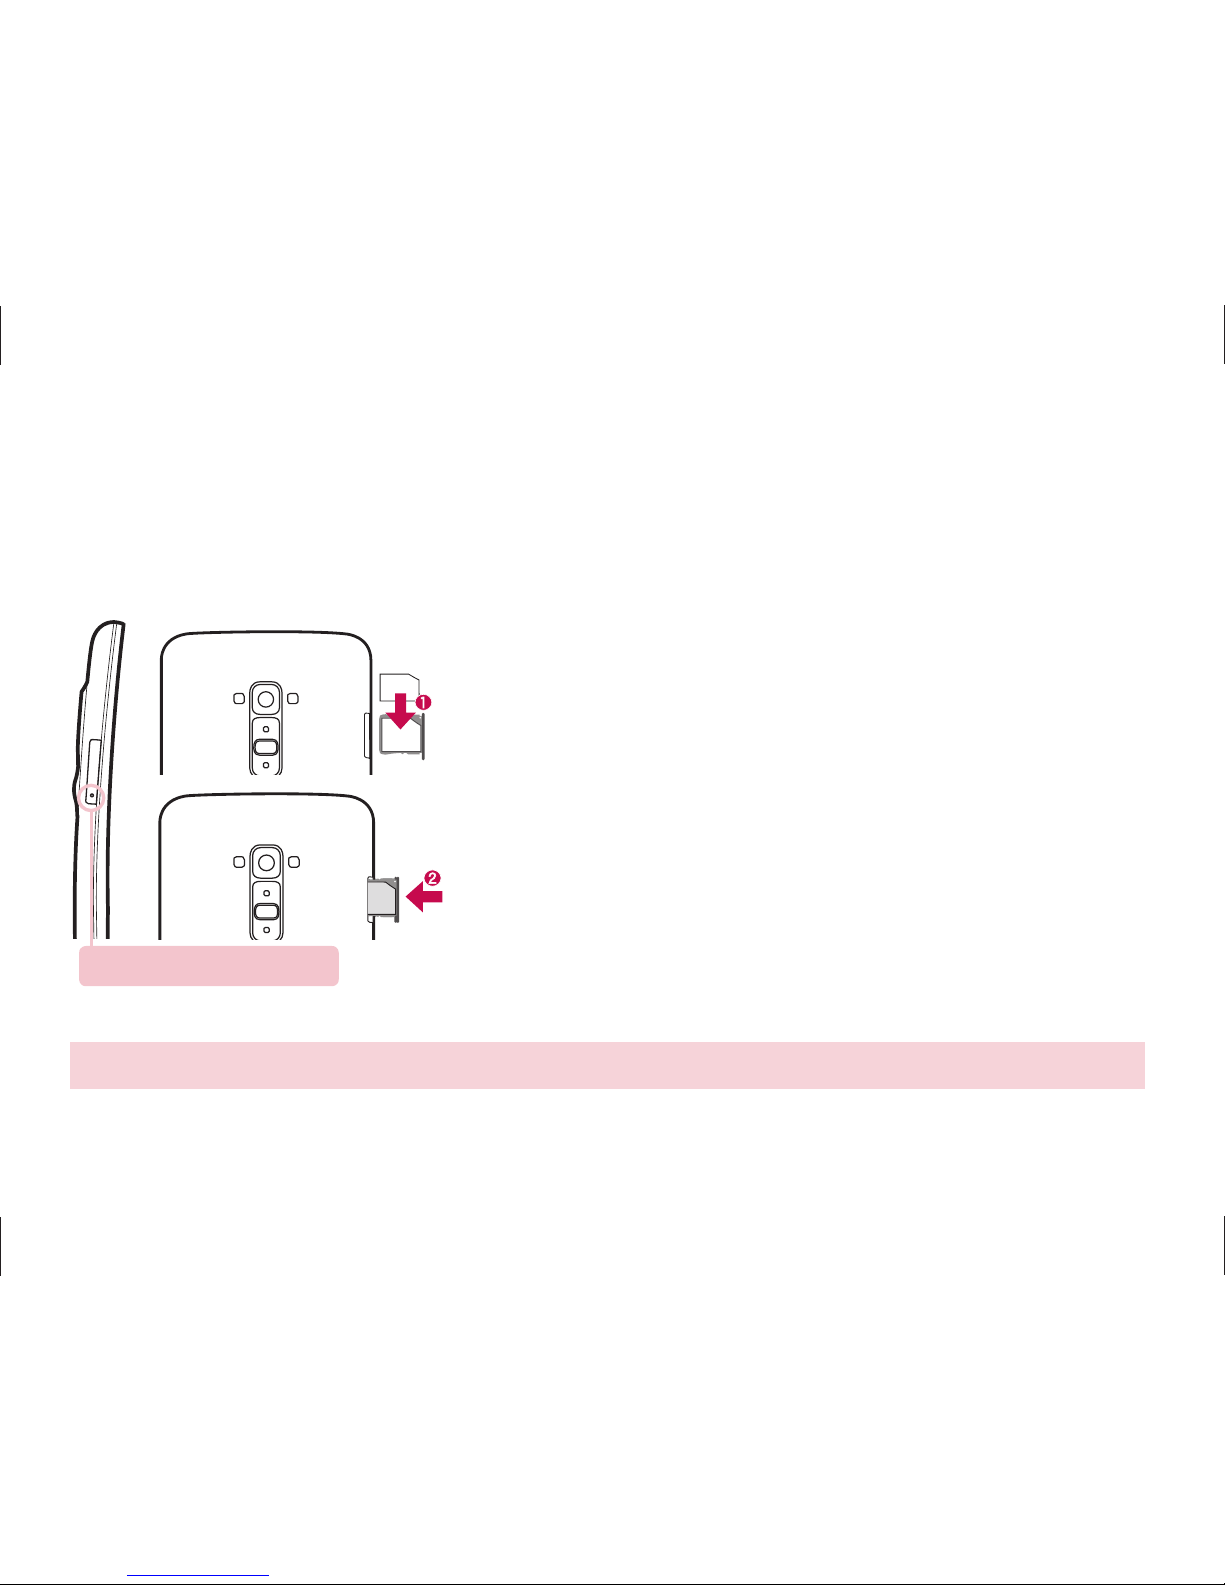
NOTE:
• Always use genuine LG accessories. Failure to do
this may void your warranty.
• Accessories may vary in different regions.
• Some features and services may vary by area,
phone, carrier, plan and software version.
• Screen displays and illustrations on this Quick
Start Guide may differ from those you see on
actual phone.

1
FRONT
Overview
Notification LED
Front Camera
Lens
Proximity Sensor
Home Key:
Return to home
screen from any
screen.
Back Key:
Return to the
previous screen.
Exit an app after
using it.
Volume Keys
(Whilst screen is
switched off)
- Long Press
Up to launch
QuickMemo
- Long Press
Down to launch
Camera
NOTE: The back cover of this product applies a “self-healing” technology, which
self-repairs minor scratches in just a few minutes. Minor scratches are those
cause by ordinary and normal use of the phone. Scratches caused by abrasive
surface, misuse, including but not limited to intentional scratches, and damages
caused by a fall or dropping the product, may not disappear. The “self-healing”
results may vary depending on the extent of the damage as well as other
conditions. Any warranty on the “self-healing” is hereby expressly excluded.
BACK
TOP
BOTTOM
Sub Microphone Flash
Charger/USB Port
Speaker
Earpiece
Rear Camera Lens
IR(infrared) LED
Menu Key:
Check what
options are
available.
Power/Lock Key
Touch Screen
Main
Microphone
Headset
Jack

2
Setup
NOTE:
Make sure the gold contact area on the card is facing downwards.
Before you start using the phone, you need to insert the micro-USIM card.
Installing the micro-USIM card
Eject button aperture
The eject button is a small round aperture on the bottom
of the tray door.
1. Insert the micro-USIM ejection tool that comes
with the phone (or a thin pin) into the eject button
aperture, and push firmly but gently until the tray
pops out.
2. Remove the tray and place the micro-USIM card
inside it, with the contacts out and the angled corner
to the right. There is only one possible way to fit the
card snugly into the tray.
3. Carefully reposition the tray in the slot and push it
gently back into the phone.

3
Setup
Turning on the phone Charging the phone
Power/Lock
Key
Press and hold the Power/Lock
key for a couple of seconds.
When you first turn on the phone,
you will be guided through
a series of essential steps to
configure the phone settings.
• The charging port is at the bottom of the phone.
• Insert one end of the charging cable into the phone
and plug the other end into an electrical socket.
• To maximize the battery lifetime, ensure that the
battery is fully charged before you use it for the first
time.
TIP! If the phone is locked and does not work, press and hold the Power/Lock key for 10 seconds to turn it off.

4
X2
X2
(
(
KnockON)
KnockON)
KnockON
KnockON is enabled by default. To turn it on or off, from the home
screen, press and tap System settings > General > Gestures
> Screen on/off. With KnockON enabled and the phone locked,
quickly double-tap the screen to wake the phone. Double-tap the
screen again to lock the phone.
Home
You can customize each screen by adding widgets or shortcuts of your
favourite applications.
Adding icons to the Home screen
Swipe your finger right or left to move through the screens. Stop
when you get to a screen that you want to add items to.
Touch and hold an empty area in the Home screen. Touch the
Apps, Widgets or Wallpapers option then select the item you want
to add.
Screen
TIP! To delete a home screen application icon, touch and hold it, then drag it to the icon .

5
Screen
Unlock
After a period of inactivity, to conserve the battery, the screen you are currently viewing will
be replaced by the lock screen.
Unlocking the screen
Press the Power/Lock key.
Swipe the screen in any direction to unlock it.
Notification
On this screen, you can view and manage Sound, Wi-Fi, Bluetooth etc. The notification
drawer runs across the top of the screen.
TIP! Touch Edit
and select items to be displayed on the
notification drawer.

6
Making a call
1. Touch .
2. Dial the number you want to call or start typing the name of the contact by touching .
Answer a call
<lock screen> <unlock screen>
Sending a message
1. Touch > .
2. In the To field, enter a number or touch to select a number from Call logs, Contacts,
Favourites or Groups.
3. Compose your message and touch Send.
NOTE: To answer an incoming call in locked screen, hold and slide icon in any direction. When the screen
is unlocked, you just need to touch the icon to answer.
Call/Messaging

7
You can automatically synchronize the contacts on the phone with any of your online
address books, or even import contacts from another SIM card.
To import/export contacts, touch > Import/Export.
Creating a new contact
1. To create a new contact, touch and enter the contact’s information.
2. Touch Add another field to see more categories.
3. Touch Save to save the contact.
NOTE: To add a number from a recent call to your contacts, locate the number in your call log, touch the
number. Touch > New contact to create a new contact entry, or touch update contacts to add a new
number to existing contacts.
Contacts

8
The first time you open the Google application, you need to sign in. If you do not have a
Google account, you will be prompted to create one.
Creating a Google account
1. Touch > .
2. Touch New to start the Gmail setup wizard.
3. You then need to follow the setup instructions and enter the necessary information to
activate the account. Please wait while the server creates your account.
You can stay connected with MS Exchange and other popular email providers.
Setting up an account
1. Touch > .
2. Select an email provider.
3. Enter your email address and password, then touch Next.
4. Follow the remaining instructions. When complete, touch Done to view your inbox.
Google account
E-mail

9
Downloading applications
Download fun games and useful apps from the Play Store.
In home screen
1. Touch > .
2. Sign in to your Google account.
3. Touch a category to browse selections, or touch to search for an item.
4. Touch an app and follow the on-screen installation instructions. Once the app has been
downloaded and installed, you will see a notification in the status bar.
Managing applications
Touch > > Apps.
You cannot uninstall the pre-installed applications.

10
Use the Web browser to surf the Net with ease. Use Maps during a journey to pinpoint your
location and check for traffic updates on route.
Browsing the Web
1. Touch > .
2. Touch the web address bar and enter an address, and then touch Go.
3. Scroll to navigate and touch links to open them. Touch the Menu key to access additional
settings.
4. To open a new browser tab, touch > .
Setting up Maps
1. Touch > .
2. Set up the connection to Wi-Fi or mobile data connection with GPS.
Internet/Maps
TIP! Use your index finger and thumb in a pinching or spreading motion to zoom in or out when using the
Web browser, map or pictures. The use of these services and download content will generate additional costs.
Charges for details, please consult your network operator.

11
Flash
Swap camera
Shot mode
Settings
Video mode
Capture button
Gallery
Video camera
Flash
Swap camera
Recording mode
Settings
Camera mode
Start recording
Gallery
Camera

12
With the VuTalk feature, you can make an interactive and more creative notes with the other
party. Visual communication is possible while sharing a photo, a map or camera preview.
NOTE:
• Only available with a phone that supports this feature as well.
• You can also use the VuTalk feature during a call.
• The screen will lock if there is no input.
• Requires data connection. Data charge will apply to both phones.
Register VuTalk Before Use
1. Tap > Contacts > . You can also register VuTalk service while you are in a call.
2. Read the LG apps terms and conditions and privacy policy. If you agree, tap the check boxes,
then tap Accept.
VuTalk

13
Communicate Visually with VuTalk
1. Tap
>
Contacts > . Only the contacts who use the VuTalk feature will be displayed.
2. Tap a contact to start VuTalk with.
3. In the contact's details screen, tap . After the other party accepts your VuTalk request,
you can start VuTalk with him/her.
4. Use the VuTalk screen to chat and visually communicate with your friend.
• Tap to attach a photo, take a new photo, map view, or a sticker.
• Tap the Pen icon and Eraser icon to write on the images you attached.
5. When you finish VuTalk, tap or to exit the VuTalk feature. The created VuTalk screen is stored in the
Notebook app.
NOTE: If you tap and go back to the Home screen, the VuTalk feature still runs in the background.

14
From any screen, bring up a notepad, calendar, and more as a window inside your screen.
OR
Tap to exit the QSlide and return to full window.
Tap to adjust transparency.
Tap to end the QSlide.
Tap to adjust the size.
QSlide
1. Touch and slide the status bar downwards > tap QSlide
apps or while using applications that support QSlide, tap
. The function will be continuously displayed as a small
window on your screen.
2. You can make a call, browse the Web, or choose other
phone options. You can also use and tap the screen under
the small windows when the transparency bar is not full
.
NOTE: QSlide can be supported up to two windows at the
same time.

15
The QuickMemo allows you to create memos and capture screen shots.
Capture screens, draw on them and share them with family and friends with QuickMemo.
OR
1. (While screen is switched off)
Press and hold the Volume
Up key. Or touch and slide
the status bar downward and
tap .
2. Select the desired
menu option from
Pen type, Colour,
Eraser and create
a memo.
3. Tap in the Edit menu
to save the memo with
the current screen. To exit
QuickMemo at any time,
tap .
TIP! Touch to keep the current memo on the screen and use the phone continuously. Tap to select whether
to use the background screen. Tap to share the memo with others via any of the available applications.
QuickMemo

16
Simply aim the camera of your smart phone at the foreign sentence you want to
understand. You can get the real-time translation anywhere and anytime.
You can buy additional dictionaries for offline translation from the Google Play Store.
Home language.
Destination language.
Translation of word.
Translation of sentence.
Translation of block.
Settings.
QuickTranslator
1. Tap > > Apps tab > QuickTranslator.
2. Tap Word, Line or Block.
3. Tap and select the desired language.
4. Hold the phone toward the subject you want to translate for a few
seconds.
Other manuals for D950 G Flex
1
Table of contents
Languages:
Other LG Cell Phone manuals