LG VENUS User manual

Tips, hints
& shortcuts
for your device and service
Consultas, consejos
y soluciones rápidas
para tu aparato y servicio
©2007 Verizon Wireless. Todos los derechos reservados.MCDD0014501 (1.1) verizonwireless.com/espanol
H
©2007 Verizon Wireless. All Rights Reserved. verizonwireless.com
VX8800_QRG.CVR 1.1.qxd 10/10/07 5:46 PM Page 2

Welcome to Verizon Wireless.
It’sthe Network.
SM
For an interactive guide to your new wireless device,
go to verizonwireless.com.
Bienvenido a Verizon Wireless.
EslaCompañía.
SM
Para una guía interactiva de tu nuevo aparato
móvil, ve a verizonwireless.com/espanol.
VX8800_QRG.CVR 1.1.qxd 10/10/07 5:46 PM Page 3

TABLE OF CONTENTS
The basics................................................................................3
Getting started ............................................................4
Using Bluetooth®..........................................................6
Placing and receiving calls............................................7
Setting up and accessing Voice Mail ............................9
Locking/Unlocking your wireless device ....................10
Using speakerphone ..................................................11
Changing Ringtones ..................................................11
Using TXT Messaging ................................................12
Assistance ............................................................................13
May we help you? ......................................................14
EZ Move® (if you move)..............................................19
Loss or theft ..............................................................19
Toll-free calls and emergency services ......................19
Fraud prevention........................................................19
Assistive communication devices ..............................20
Mobile entertainment ..........................................................21
Messaging & chat ......................................................22
News & information ..................................................28
Get It Now® ................................................................31
V CAST ........................................................................33
Optional services ..................................................................39
Safety and protection ................................................40
Wireless device protection..........................................40
Voice services..............................................................40
International services ................................................40
Other products and services........................................41
More information ..................................................................42

pg 2
Thank you for choosing Verizon Wireless
You’re now connected to the power of America’s most reliable wireless
network. This guide will help you understand your new wireless device
and all the things you can do with it. So let’s get started.
For more details, please refer to the User Guide that came with your
wireless device.
Welcome

THE BASICS
pg 3
• Getting started
• Using Bluetooth®
• Placing and receiving calls
• Setting up and accessing Voice Mail
• Locking/Unlocking your wireless device
• Using speakerphone
• Changing Ringtones
• Using TXT Messaging
The basics

THE BASICS
pg 4
Getting started 5. Message Key Use to access the Messaging menu.
6. Side Volume Keys Use to adjust the ringer volume in
standby mode and the earpiece volume during a call.
7. All Calls Key Displays the list of all calls.
8. Voice Features Key Use for quick access to Voice Commands
and Voice Recorder feature.
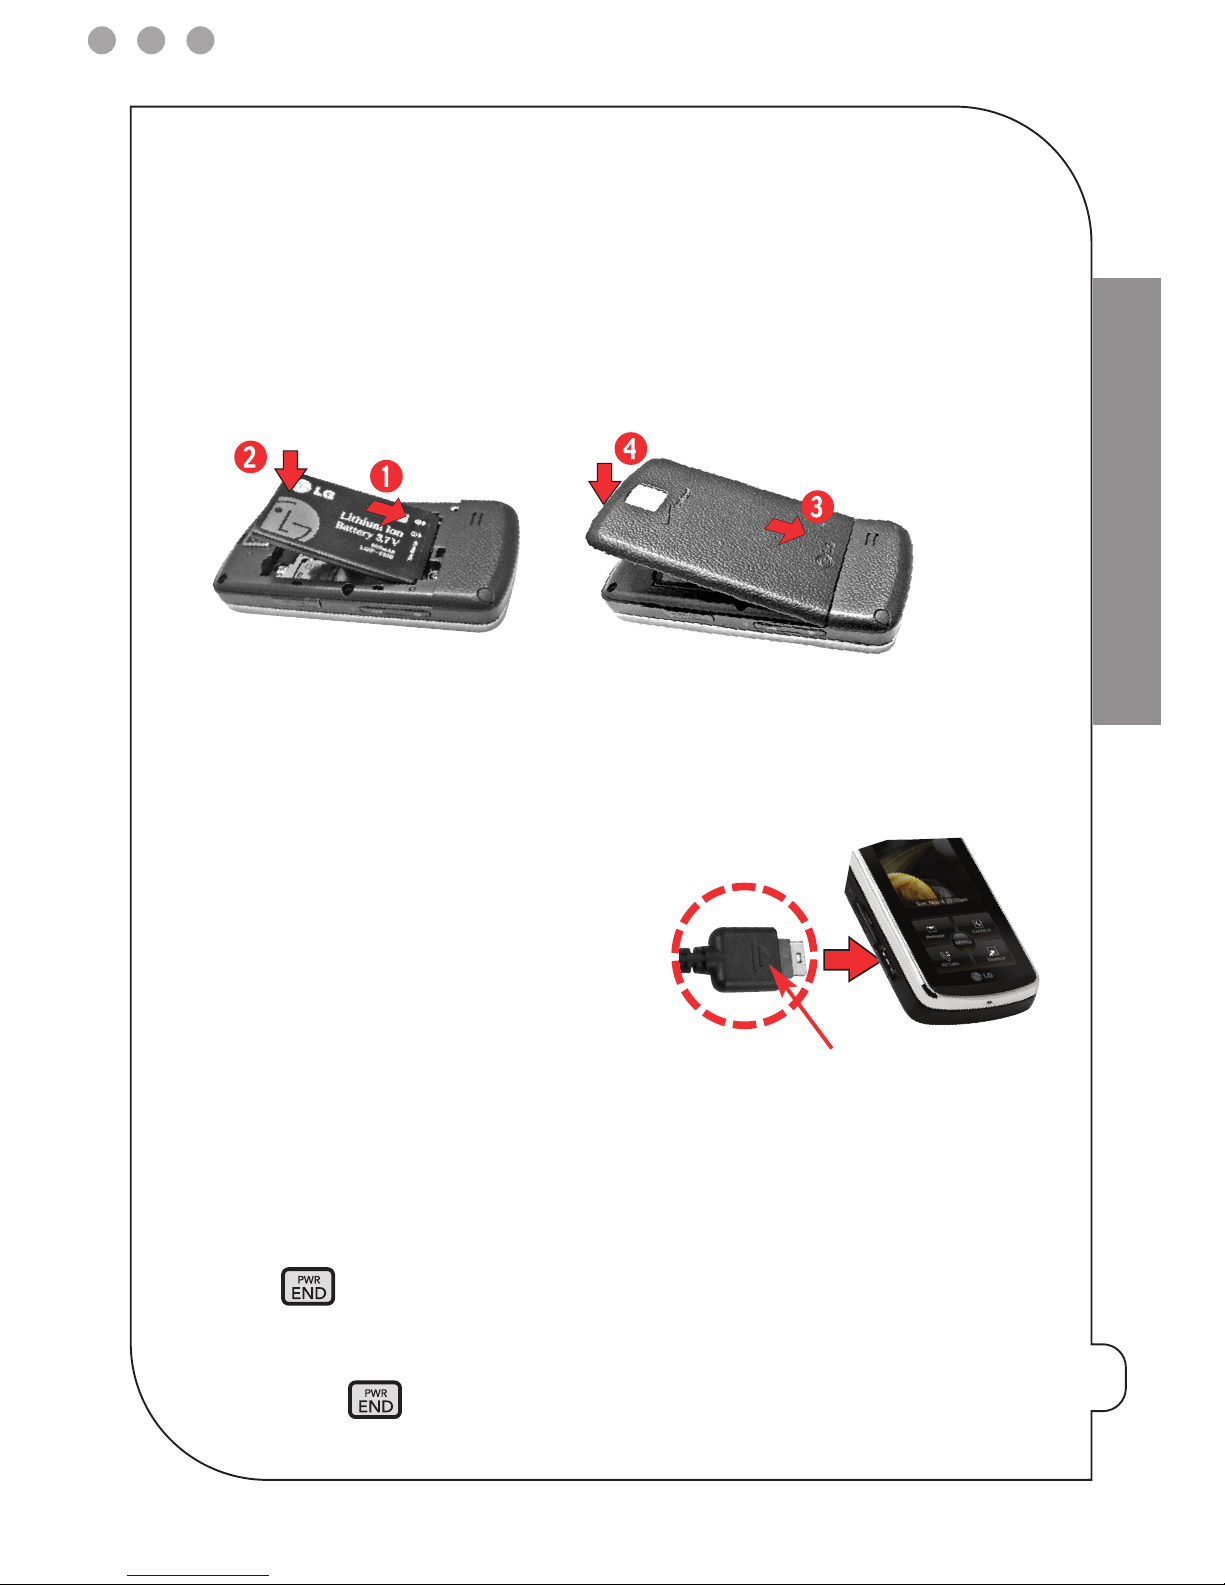
9. Accessory Charger Port Connects the phone to the battery
charger, or other compatible accessory.
10. SEND Key Use to make or answer calls.
11. Vibrate Mode Key Press and hold for about 3 seconds.
12. MENU/OK Key Selects the function displayed at the bottom
of the LCD between the Left and Right Soft Key functions.
13. Contacts Key Use to access Contacts menu.
14. Shortcut Key Use for quick access to assigned menus by
simply touching the menu you want.
15. PWR/END Key Use to turn the power on/off and to end a
call.
16. Alphanumeric Keypad Use to enter numbers and
characters and select menu items.
17. CLR Key Deletes single spaces or characters with a quick
press, but press and hold to delete entire words. Will also
back you out of menus, one level at a time.
18. Camera Lens Used to take a photo. Keep it clean for
optimal photo quality.
19. microSD™ Slot Accommodates optional microSD cards.
Supports up to 4GB.
20. Music Shortcut Key Activates Music Player. Enjoy sweet music
from yourVENUS™! Use this key to unlock touch keypad when the
slide is closed.
21. Side Camera Key Use for quick access to Camera function.
22. Touch Keys YourVENUS™ has a Touch Screen below the
LCD screen which illuminates a variety of individual Touch
Keys. To use them, lightly touch your selection with your
finger.
Just the basics; we’ll get into
the fun stuff later on.
1. Earpiece
2. Slide Slide up to answer an incoming
call and slide it down to end the call.
3. LCD Screen Displays messages and
indicator icons. The Power Save mode
automatically dims the screen and
then darkens it if no keys are pressed.
4. 2.5mm Headset Port Allows you to
plug in an optional headset for
convenient, hands-free conversations.
NOTE: The Quick Reference Guide gives
navigation instructions according to the
default settings.
1
2
3
5
4
7
8
9
10
6
11
12
13
15
16
17
14
19
20
21
22
18

THE BASICS
pg 5
Installing the battery
1: Place the edge of the battery that has the battery terminals into the opening
on the back of the phone [1], then press it into place [2].
2: Align the tabs on the battery cover with the slots on the back of the phone [3],
then press the cover down until it clicks [4].
Charging the battery
1: Attach the charger to the phone. Make sure that the triangle symbol faces up
when inserting the plug into the charger port.
2: Plug the charger into a wall outlet.
NOTICE: Please use only an approved charging accessory
to charge your LG phone.
Improper handling of the charging port, as well as the
use of an incompatible charger, may cause damage to
your phone and void the warranty.
Powering your wireless device on for the first time
It’s important to fully charge the battery before turning on your wireless device.
1: Install a charged battery or connect the phone to an external power source.
2: Press until the LCD screen lights up.
Powering your wireless device off
Press and hold until the display turns off.
NOTICE
Triangle symbol
should face up.

THE BASICS
pg 6
Using Bluetooth®
How to turn on Bluetooth®
1: Open the slide and touch the Touch Key.
2: Touch the Down Arrow Touch Key to scroll to Settings & Tools menu
and touch the Touch Key.
3: Press Bluetooth Menu.
4: Touch the Touch Key.
How to pair your Bluetooth headset with your wireless device
1: Touch the Touch Key.
2: Touch the Down Arrow Touch Key to scroll to Settings & Tools menu
and touch the Touch Key.
3: Press Bluetooth Menu, then press Add New Device.
4: Follow the Bluetooth® accessory* instructions to set the device to pairing
mode.
5: If Bluetooth® power is set to off, you will be prompted to turn power on.
Scroll to Yes and touch the Touch Key.
6: The device will appear in Add New Device menu once it has been located.
Highlight the device and Touch the Touch Key.
* Accessory sold separately.
PAIR
OK
OK
MENU
Turn On
OK
MENU

THE BASICS
pg 7
7: The handset will prompt you for the passcode. Consult the Bluetooth®
accessory instructions for the appropriate passcode (typically “0000”- 4 zeroes).
Enter the passcode and touch the Touch Key.
8: Once pairing is successful, select Always Ask or Always Connect and touch
the Touch Key to connect with the device.
9: Once connected, you will see the device listed in the Bluetooth® Menu and the
Bluetooth® device connected icon will show up on your enunciator
when connected to the Bluetooth® device. You can also check out the
connection with a blue icon on the list.
Placing and receiving calls
Placing calls
1: Make sure the phone is turned on.
If not, press for about three seconds.
If necessary, enter the lock code. The lock code is the last 4 digits of your
mobile phone number if it is set.
2: Enter the phone number.
3: Press .
4: Press to end the call.
NOTE: Your phone has a Voice Commands feature that also lets you make calls by phone number,
name, or location.
OK
OK

THE BASICS
pg 8
Receiving calls
1. When the phone rings (and/or vibrates) answer the call by either opening the
slide and/or touching the Touch Key, depending on the Call Answer
setting.
NOTE: When the slide is open and unlocked, touch the Touch Key to immediately stop the
ringing or vibration. Then, you can choose to touch the Touch Key to answer the call or touch
the Touch Key to send it to voicemail.
2: Press to end the call.
Standard features included as part of your Calling Plan
With our Calling Plans, you can enjoy the value and convenience of these features
at no extra monthly access charge:
• Basic Voice Mail • Caller ID
• Caller ID Blocking • 3-Way Calling
• Call Forwarding
Please note that some of these features may incur usage charges and/or depend
on digital service, so they may not be available in all areas.
For step-by-step instructions on some of these calling features, please refer to your
Wireless Device Manual, or go to verizonwireless.com/welcome and select
“Where can I find help with features on my wireless device?” in the “Frequently
Asked Questions” section.
Ignore
Answer
Quiet
Answer

THE BASICS
pg 9
Setting up and accessing Voice Mail
How to set up your Voice Mail
1: Press *86 (*VM) and . If you hear a system greeting, press to
interrupt it.
2: Follow the setup tutorial.
3: Select a password.
4: Record a voice signature and greeting for your Voice Mailbox.
How to access your Voice Mail from your wireless device
1: Press *86 (*VM) and .
If you hear a system greeting or your own greeting when you press *86 and ,
press immediately to interrupt the greeting (if applicable) and follow the
prompts.
2: Follow the prompts to enter your password and retrieve your messages.
How to access your Voice Mail from any phone to save your minutes
1: Dial your wireless number.
2: Once you hear the system greeting or your own greeting, press
immediately to interrupt the greeting and follow the prompts.
How to reset your Voice Mail password
1: Press *611 and (airtime-free) from your wireless device or call
1-800-922-0204 (toll-free) from any phone to reach the easy-to-use
automated Customer Service menu.
2: Enter your 10-digit wireless number.
3: Select Option 2, and then press when prompted for the password reset
menu.

THE BASICS
pg 10
4: Enter your 5-digit billing zip code. Then follow the prompts for security
verification and resetting your password.
Once you have registered for My Account, you will have the ability to reset your
Voice Mail password online or via your Mobile Web 2.0-capable wireless device.
For more information on how to register for My Account, go to page 29.
NOTE: Voice Mail may not be available in some areas. Voice Mailboxes not set up within 45 days will be
cancelled. Your Verizon Wireless Voice Mailbox is not password protected until you create a password by
following the setup tutorial. Airtime and other charges will be incurred when using Voice Mail from your
wireless phone. IN Calling minutes do not apply to Voice Mail retrievals; you will be charged to maintain
your connection to Voice Mail.Verizon Wireless is not liable for missed messages, or deletions of messages
from your Voice Mailbox, even if you have saved them.
Locking/Unlocking your wireless device
Keeps your phone from unauthorized use. Once the phone is locked, it's in
restricted mode until the lock code is entered. You can receive phone calls and
still make emergency calls. You can modify the lock code using the Edit Codes
submenu within the Security menu.
1: Open the slide and touch the Touch Key then touch the Down Arrow
Touch Key to scroll to Settings & Tools, and touch the Touch Key.
2: Press Phone Settings.
3: Press Security then enter the four-digit lock code.
4: Press Phone Lock.
5: Select an option then touch the Touch Key.
Unlocked The phone is not locked (Lock mode can be used).
On Power Up The phone is locked when it is turned on.
NOTE: Your lock code is typically the last 4 digits of your phone number.
OK
OK
MENU

pg 11
Using speakerphone
To activate or cancel the speaker functionality while in a call touch the
Touch Key. Once activated, the speaker icon is displayed on the screen, and
the on-screen instruction reads it is turned off after 1 minute of inactivity.
Changing Ringtones
Your wireless device comes with a selection of Ringtones. Here’s how to manage
your Ringtone preferences:
Selecting a Ringtone
1: Open the slide and touch the Touch Key then touch the Down Arrow
Touch Key to scroll to Settings & Tools, and touch the Touch Key.
2: Press Sounds Settings.
3: Press Call Sounds then press Call Ringtone.
4: Touch the Up/Down Arrow Touch Key / to scroll to a ringtone then
touch the Touch Key to save the sound.
Adjusting Ringtone volume
With the phone slide open, press Side Volume Keys up and down.
Setting Ringtone to vibrate
1: Press for 3 seconds.
2: To reset, press and hold .
OK
OK
MENU
Speaker
THE BASICS

pg 12
Using TXT Messaging
Sending a new TXT Message to a wireless device
1: Open the slide and touch the Touch Key.
2: Press New Message, then press TXT Message.
3: Enter the phone number or e-mail address of the recipient and touch the
Touch Key.
4: Enter the message up to 160 characters, and touch the Touch Key to send
the message.
For text options, touch the Left Soft Key for Word, Abc, ABC, 123, Symbols and
Quick Text.
You can also press to change the case of a letter.
Fees apply for text messages/alerts both sent and received.
TXT Messages are charged in accordance with your Messaging Plan.
Sending a new TXT Message to a landline number
Follow these steps, and the recipient will hear your TXT Message as a voice recording:
1: Open the slide and touch the Touch Key.
2: Press New Message, then press TXT Message.
3: Enter the landline number.
4: Type out the message.
5: Press .
6: Opt-in message will appear.
7: Reply Y for yes and N for no.
NOTE: Only one opt-in is required for each landline number.
OK
OK
THE BASICS

ASSISTANCE
pg 13
• May we help you?
• If you move
• Loss or theft
• Toll-free calls and emergency services
• Fraud prevention
• Assistive communication devices
Assistance

ASSISTANCE
pg 14
May we help you?
Online assistance
Main website: verizonwireless.com
Other helpful websites and information:
verizonwireless.com/welcome
•Information on your wireless device, coverage, Calling Plan, billing and
payment information
•FAQs, interactive demos for your wireless device and how to read your bill
•My Account registration for online account management
verizonwireless.com/myaccount
Use My Account to:
•Check your balance, minutes or make payments
• Add or remove features
• Reset Voice Mail passwords and more
The My Account Advantage
Get these added benefits for registering for My Account:
•You’ll receive free Back-Up Assistant so you never have to worry
about losing your wireless device contact list.
As a My Account member, Back-Up Assistant will let you automatically
retain a copy of your saved wireless device numbers to a secure website, so
they’re always available if you lose or upgrade your wireless device.
•You can get a new wireless device every year with Annual
Upgrade.
Sign up for a 2-year agreement on a Calling Plan of at least $49.99 and you
can purchase a new wireless device at its promotional price through My
Account every year with a 2-year renewal (upgrade fee applies).
•If you’re using more minutes than your Calling Plan includes, we’ll
let you know with Minute Check.
Minute Check will periodically notify you through My Account if you’re
exceeding your plan allowance and let you know of other Calling Plan

ASSISTANCE
pg 15
options that may save you money.
See verizonwireless.com/myaccount for details. Back-Up Assistant, Annual Upgrade and Minute Check are
available for accounts with up to 10 lines that are enrolled in My Account.
verizonwireless.com/data
•Demos and tutorials on products and services
• Online technical support for products and services
Customer Service assistance
Customer Service Representatives are also available at your local
Verizon Wireless Communications Store during normal business hours.
For Customer Service, call 1-800-922-0204 (toll-free in the U.S., 6am–11pm).
Our Worry Free Guarantee® to you
• You’ll enjoy America’s most reliable wireless network.
• You can change your calling plan at any time.
As your needs change, you can change to any current calling plan. You won’t
pay any additional fees and you won’t have to extend your contract.
• If you ever have a problem, it becomes our problem the first time you call.
No run-around, no hassles. If your issue can’t be resolved during the course of
your first call, we’ll get back to you with an answer.
• Your satisfaction is guaranteed with our Test Drive program.
Now you can Test Drive our network; make calls and even try out a cool new
device. Every device you purchase from Verizon Wireless comes with a 30-day
satisfaction guarantee. And if you don’t love us, take your number to someone
else within 30 days. You won’t have to pay an early termination fee, and we’ll
pay for any calls you’ve made.
• You can get a free phone every two years with New Every Two.
Sign up for a calling plan of at least $34.99 and qualify for a free phone after

ASSISTANCE
pg 16
two years, with a two-year renewal. Or choose to apply your New Every Two
credit towards the purchase of a more expensive phone.
Test Drive: Credit/refund for activation, plan access & voice overage charges only. America’s Choice or select data
plan req’d. Customer must pay all other charges, incl. taxes, surcharges, and separately-billed data & download
charges. Early termination fee applies unless device is returned. Some plans are only available with specific
equipment. Acceptance of a promotion may require a new 1- or 2-year agreement.
How to sign up for New Every Two
If you maintain service on a Calling Plan of $34.99 or higher and fulfill your 2-year
term, you will qualify for a free wireless device. If your Calling Plan monthly access is
$79.99 or higher for the entire 3 months prior to completing your New Every Two
wireless device upgrade, you will get up to $100 toward the purchase of that
wireless device. If your Calling Plan monthly access was between $34.99 and $79.99
at any time during the 3 months prior to completing your New Every Two wireless
device upgrade, you will get up to $50 toward the purchase of that wireless device.
When completing your New Every Two upgrade, you will need to renew your
agreement for another 2 years on a Calling Plan with a monthly access of $34.99 or
higher. Upgrading your wireless device at a discounted price, including exercising
your Annual Upgrade option, will re-start your eligibility for New Every Two.
See the More Information section in the back of this guide for additional conditions.
Address or account changes
It’s important that we have your most current information so we’re able to reach
you for any reason. There are 3 ways to update your information:
• Online — Go to verizonwireless.com/contactus and follow these instructions:
1. Select the appropriate choice from the drop-down menu in the
“Send an Email” section.

ASSISTANCE
pg 17
2. Fill out the online form.
3. Select “Topic” and “Subtopic” from the drop-down menu.
4. Hit “Send” to submit email.
• U.S. Mail — Use the change-of-address form on the back of your bill.
• Telephone — Call Customer Service at 1-800-922-0204 from any phone
(toll-free in the U.S.) or *611 and SEND from your wireless device (airtime-free).
Billing options
Your service comes with a streamlined bill that you’ll receive each month at no
additional cost. Your bill includes all applicable charges, but will not contain any
call details (e.g., date, time and wireless device number called).
Detailed billing
Call details are available for free online at verizonwireless.com under My Account.
A monthly fee applies to receive call details on your paper bill.
Going paperless
You have the option of eliminating your paper bill and receiving bill notification
via email. To eliminate your paper statement, or to make manual or automatic
bill payments, register for My Account at verizonwireless.com/myaccount and
then select the quick link under the “Billing” tab for “Go Paperless”.
Paying your bill
Verizon Wireless gives you several convenient options to pay and manage your
monthly bill. Some of those options are:
•At verizonwireless.com/myaccount — Make one-time or recurring
payments using your debit card, credit card, ATM card, electronic check/ACH
or enroll in our Auto Pay Program.

ASSISTANCE
pg 18
•With the Auto Pay Program — Allows you to choose to have automatic
payment deductions taken from your bank account. To enroll, you can fill out
the back of your remittance slip and mail it in, call 1-866-868-3882, or log on
to verizonwireless.com/myaccount.
•By calling from your wireless device — Press #768 and SEND and follow the
prompts to enter your payment information.
•Using My Account from your wireless device — Make a one-time payment
by credit card, debit card and/or electronic check directly from your wireless
device as long as your wireless device is Mobile Web 2.0.-capable.
*To make
a payment, simply launch your web browser, select “VZW SERVICES”, then
“My Account”. If you don’t subscribe to Mobile Web 2.0, you will see an option
to view My Account for free once you launch the browser.
•Home banking — Verizon Wireless and CheckFree® have teamed together
to give you the option to pay your wireless bill online at your choice of more
than 1,700 financial services locations across the Internet. You will be able to
schedule payments using a designated bank account and arrange for monthly
bill payments via your preferred home-banking service provider.
•Check payment via mail — Allows you to mail in a personal or business
check, along with the remittance slip and envelope provided with your billing
statement.
•In person — Payments can be made at your local Verizon Wireless
Communications Store using our Bill Payment Kiosks.
*See Wireless Device Manual for details.
Other manuals for VENUS
3
Table of contents
Other LG Cell Phone manuals