LG 23LX2R User manual

OWNER'S MANUAL
MODEL: 23LX2R
Internet Home Page : http://us.lge.com
Please read this manual carefully before operating your set,
Retain it for future reference.
Record model number and serial number of the set,
S_ the label attach_ on the back cover and quote
this information to your dealer
when you require service,
P/NO : 3828TUL321C (0505-REV00)
Printed in Korea

Warning
l
rnlng
WARNING'
TO REDUCE THE RISK OF ELECTRIC SHOCK DO NOT REMOVE COVER (OR BACK). NO USER
SERVICEABLE PARTS [NSWDE REFER TO QUALIFIED SERVICE PERSONNEL
The lightning flash with arrowhead symbol, within an equilatera[ triangle, is intended to alert the user to
the presence of uninsuWated °dangerous voWtage"within the product's encUosure that may be of suffi-
cient magnitude to constitute a risk of electric shock to persons.
The exclamation point within an equiIatecal td_gme is intend_ to _ert the user to the presence of
import_t o_rating and maintenance (servicing) instructions in the [iterature accemp_ying the appD
ance,
NOTE TO CABLEiTV INSTALLER:
This reminder is provid_ to call the CATV system inst_leCs attention to Article 820-40 of the N_ionat Electric
Code (U.S.A.). The c_-_e provides gui_lines for proper grounding _d, in particular, specifies that the cable
ground shall be cennected to the grounding system of the buiMing, as dose to the point of the c_[e entry as prac-
tical.
REGULATORY INFORMATION
This equipment has been tested and found to comply with the limits for a Class B digital device, pursuant to Part
15 of the FCC Rules. These Jimits are designed to provide reasonabme protestion against harmfut interference in
a residential installation. This equipment generates, uses _d can radiate radio frequency energy and, if not
installed _d us_ in accordance with the instnJcflons, may cause harmful interference to radio communications.
However, there is no guarantee that interference will not occur in a pa_cumar in_ammation.If this equipment does
cause harmful interference to radio or television reception, which can be determin_ by turning the equipment off
and on, the user is encouraged to try to correct the interference by one or more of the following measures:
- Reorient or relocate the receiving antenna
- Increase the separa_on between the equipment and receiver
- Connect the equipment into an outlet on a circuit different from th_ to which the receiver is connected_
- Consutt the dealer or an experienced radio_q'v technician for help.
Any changes or modifications not expressly approved by the party responsible for compliance could void the
user's authority to operate the equipment.
CAUTION:
Do not attempt to modify this product in my way w_hout written authoriz_ion from LG Electronics Corporation.
Unauthorized rr_dification could void the user's authority to operate this product
U.S.A. only
COMPUANCE:
The responsible party for this product's compliance is:
LG Elect_anics US,A, [nc,
1_ Sy#7_ Avenue, _glewo_ Cliffs, NJ 07632
Phone: 1-201-816-2_0
h_://www.lgusa.com
...... J
2

F
m
Ions
WARNING .'
To redu_ the risk of fire or el_ric shock, DO NOT ex_se this ®paratus to r±n or moisture.
Safety Inslructions
Apparatus shah not be exposed 'to dripping or splashing and no obiec_ '[ilied wi'_ liquids, such as vases, shall _ placed orr_the
apparatu&
CAUTION .'
These servicing instructions are for use by qu_ified servi_ per_nne[ only. To redu_ the risk of el_ric shock, do not perform
my serv_ing other th_ that _ntained in the operating instnJctions unless you are qu_ified to do _.
IMPORTANT SAFETY INSTRUCTIONS
1. Read these instructions.
2, Keep these instructions
3. Heed _1 warnings.
4. FoBow aB instructions.
5_Do not use this apparatus near water.
6. Clean only with a d_ cloth.
7. Do not block any of the ventilation openings. InstaB in accordance with the manufacturer's instructions.
8. Do not instal[ near any heat sources such as radiators, heat registers, stoves, or other appara_Js (including amplifiers) that
produ_ heat.
9. Do not _feat the safety pur_se of the polarized or grounding type plug. A polarized plug has two blades with one wider
than the cthe_. A grounding ty_ plug has two blades and a third grounding ptot_g The wide blade or the third prong is
provided for your safety. When the provided plug does not fit into your outlet, consult an electrician for replacement of the
obsolete outiet
10, Protect the power cord from _ing walked on or pinched particularly at plugs, convenience receptacles, and the _int
where they exit from the _paratus.
11, Only use the attachments /accessories specified by the manufacturen

Safety instructions
Instructions continued
f
12. Use only with a cart, stand, tripod, bracket, or t_le specified by the manufacturer, or somdwith the apparatus. When a
cart is used, use cat_rtion when moving the cart /apparatus combination to avoid injury from tip-over_
831_
13. Unplug this apparatus during lightning storms or when unused for long pedods of time.
14 Refer aH servicing to quaJified service personnel Servicing is required when the apparatus has _en _maged in any
way_ such as power supply cord or plug is d_a_d, liquid has been spimmedor objects have falmeninto the apparatus, the
apparatus has been ex_sed to rain or moisture, _es not operate normammy,or has been dropped.
CAUTION concerning the Power Cord
Most appliances recommend they be placed upon a _dicated circuit; that is, a single out_et circuit which _wers only that
appliance and has no additional out,eta or branch circ4Jits. Check the specification page of this owner's manual to be certain.
Do not overload wall out_ets Ovedoa_d wall outlets loose or damaged wail outlets, extension cords, frayed power cerds_
or _maged or crack_ wire insulation are dangerous, Any of these conditions could resuit in electric shock or fire,
Periodically examine the cord of your app_iance_ and if its appearance indicates dam._ge or deterioration, unplug it, discon o
tinue use of the applianse_ and have the cord replaced with an exact replacement part by an a_horized servicer,
Protect the power cord from physicaJ or mechanical abuse, such as being twisted, kinked, pinched, closed in a doer, or
walked u_n. Pay particular attention to plugs, w_l outlets, and the point where the cord exits the appliance.
it On Disposal
aThe fluorescent lamp used in this product con_ins a smaJl a_unt of mercury
b. Do not disuse of this product with general household waste.
_-_ Dispos_ of this product must be carded out in accorc_3nco to the regumations of your local authority.
4

Contents
Warnings ..................................... 2
Safety [nstructions 3~4
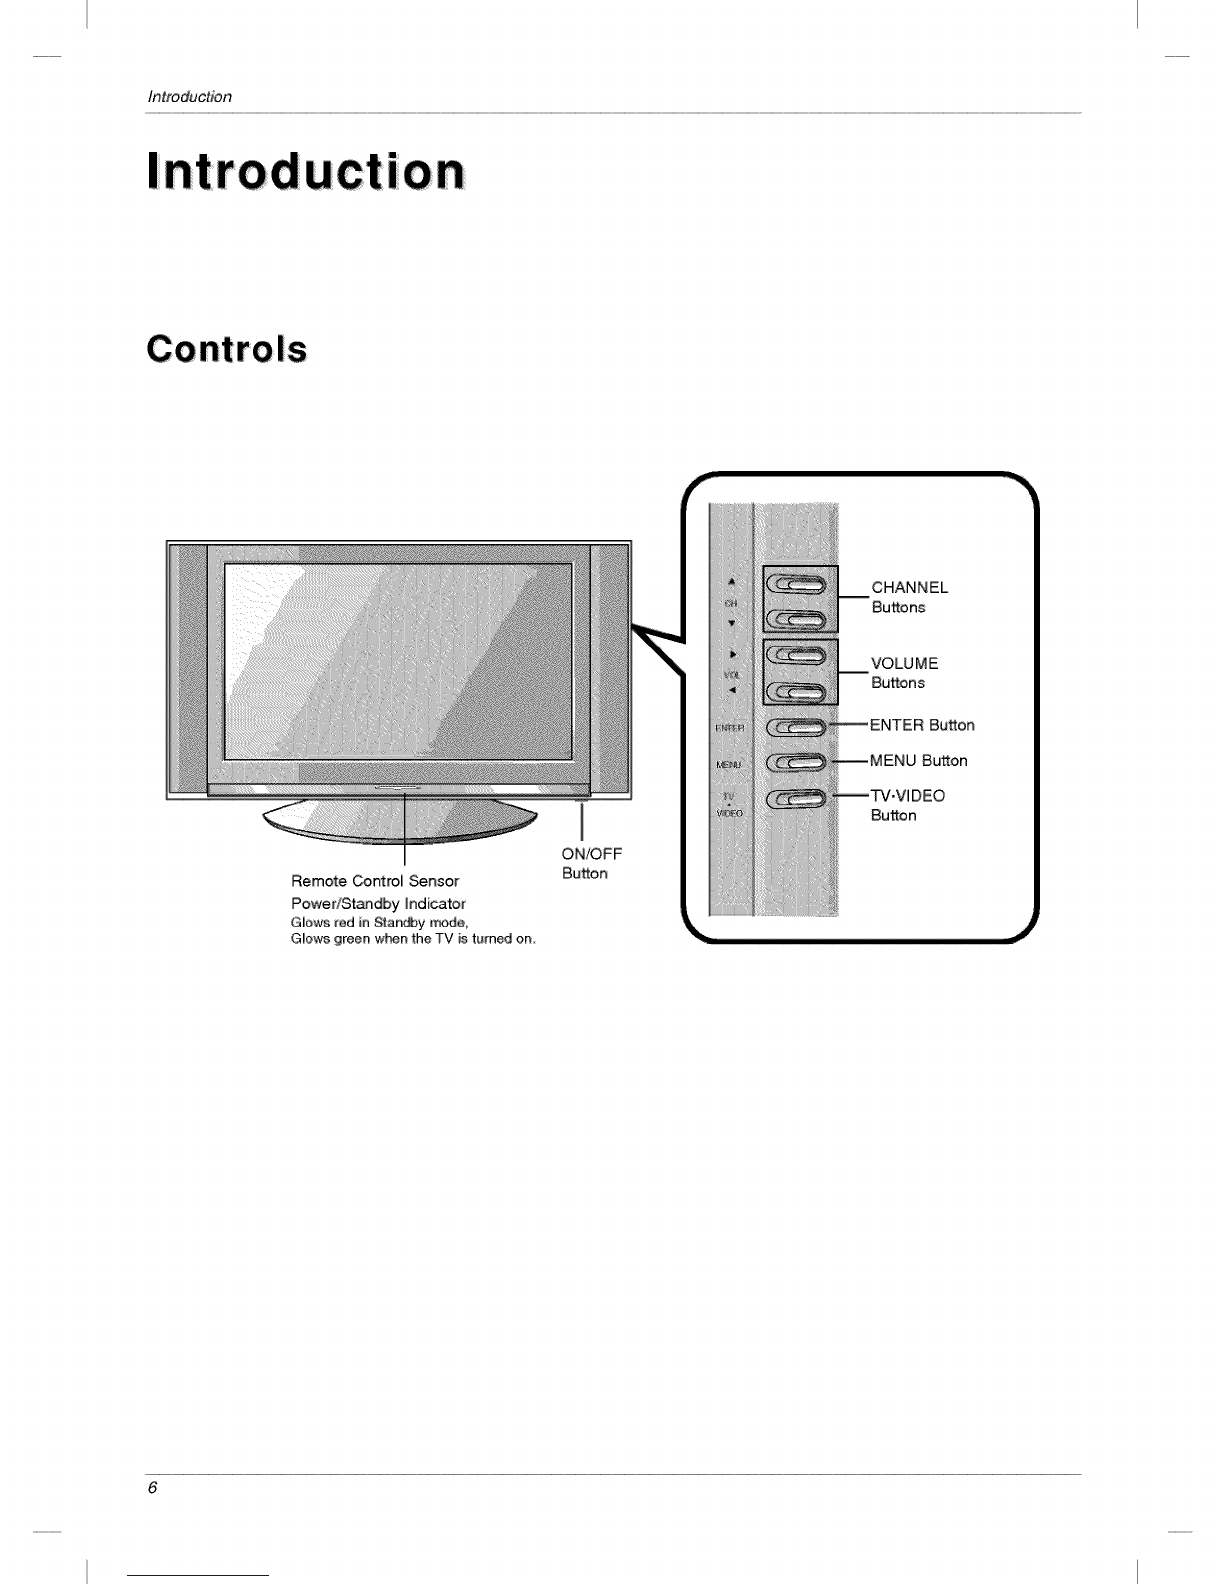
Introduction
Controls ............................... 6
Connection Options ...................... 7
Remote Control Key Functions .............. 8
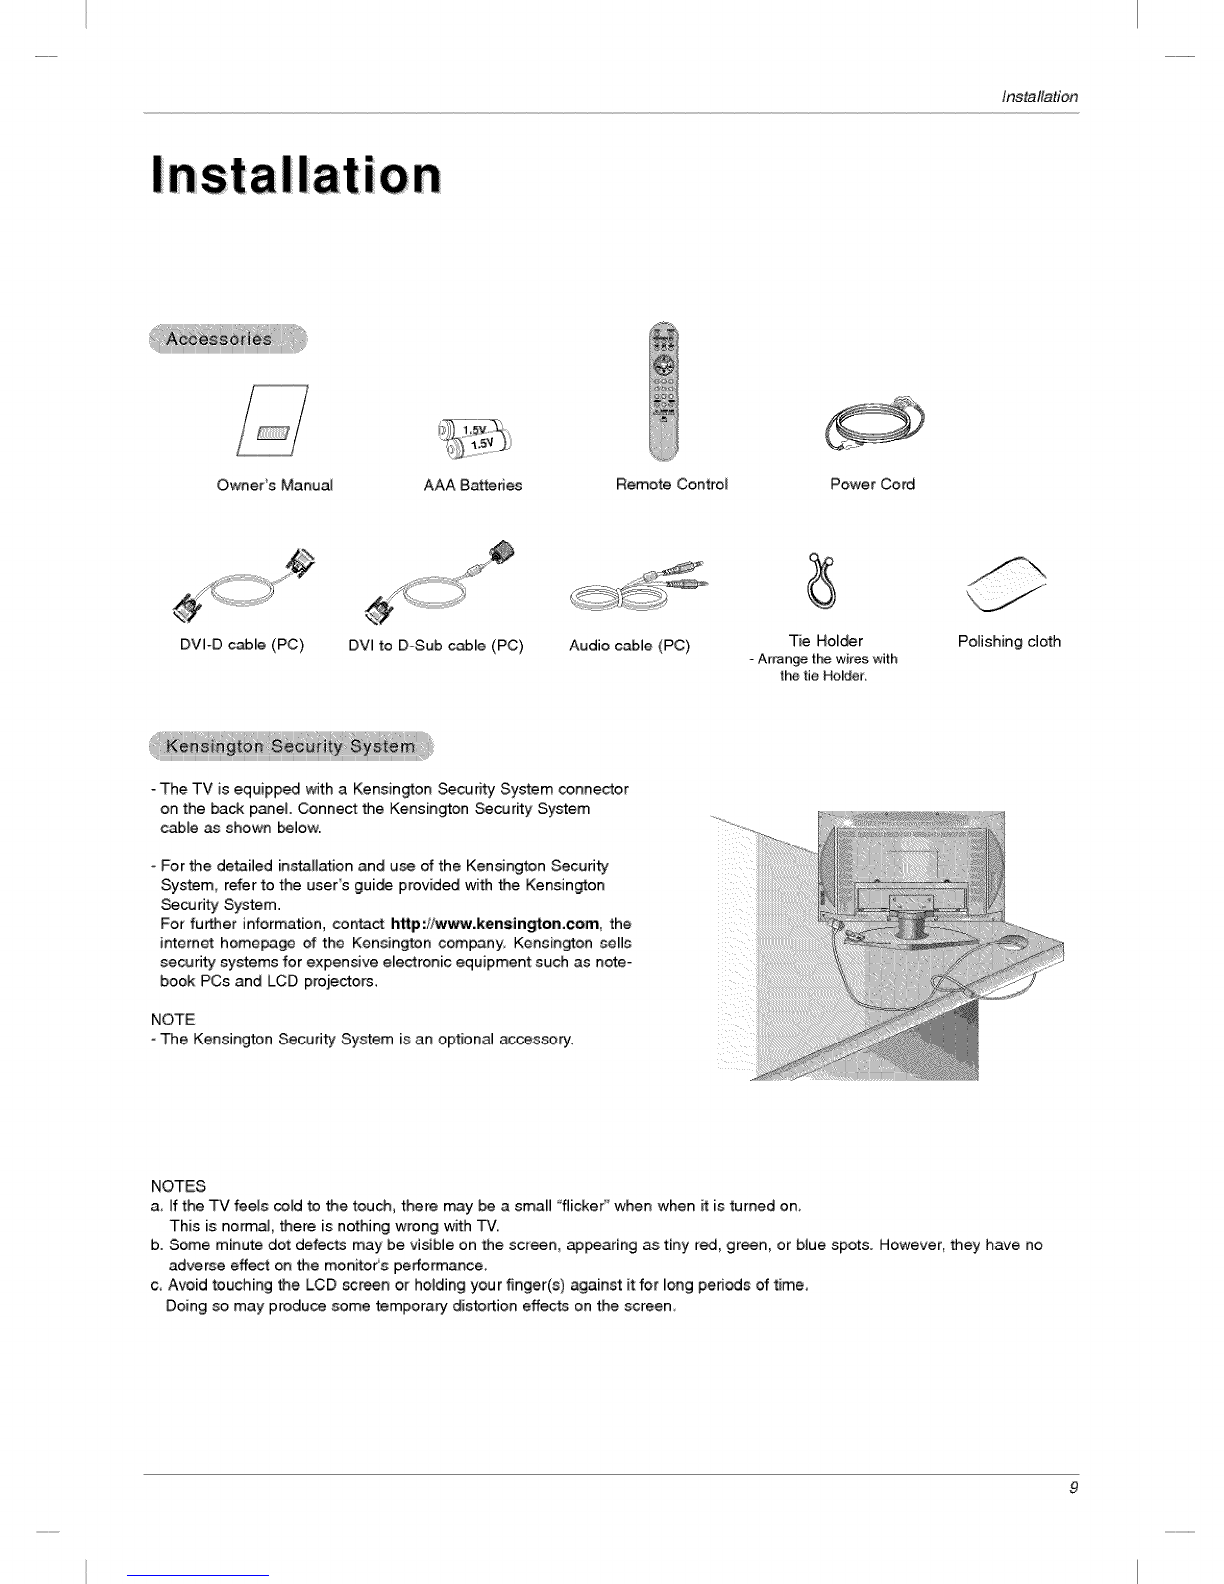
InstallationAccessories 9
Kensington Security Sy_em ................ 9
In_lation Instruction
Connection of TV 10
Cable HoI_rs .......................... 10
Swivel stand 10
Extema[ Equipn'_nt Connec_ons
Antenna Connection ..................... 11
VCR Setup 12
Cable TV Setup 12
E_ernaJ A[V Source Setup ......... 13
DVD Setup 13
DTV Setup 14
PC Setup 14
Operation
TV Operation Overview ............ 15
Menu Langua_ Selection ......... !5
Channel Menu Options
Merr#rizing the Channels with EZ Scan ...... 16
Add/Delete Channels with Manual Program ...16
Favorite Channels Setup .................. 16
Picture Menu Options
EZ Video ............................. 17
Manual Picture Control (User option) ........ 17
Cinema Mo_ Setup ..................... 17
Picture Format (ARC) .................... 17
Sound Menu Options
EZ Audio ......................... 18
Equamizer Adiu_ments ................... 18
AVL (Auto Vomume Leveler) ................ 18
Setmd B_ce ......................... 19
Stereo/SAP Broadcasts Setup ............. 19
Time Menu Options
Auto CIocA Setup ....................... 20
Manual Clock Setup ..................... 20
On/Off Timer Setup ..................... 21
SmeepTimer Setup ...................... 21
Auto Off .............................. 21
Special Menu Options
Closed Captions ........................ 22
Caption/Text ........................... 23
Captions .............................. 23
Key Lock ............................. 23
Logo ................................. 23
Lock Menu Options ....................... 24
Lock Menu Setup ....................... 25
PC Menu Options ......................... 26
Maintenance ................................. 27
Product Specficatlons ......................... 27
Troubleshooting Checklist ...................... 28
After reading this manual, keep it handy for future reference,

Introduction
nion
Controls
Remote ControW_nsor
Powe r/St_dby hdicator
GIo_ _edin Stagy _e,
G!ows green wbenthe TV is turned on
I
ON/OFF
Button
Button
Button
Button
6

Introduction
Connection Options
0
PC SOUND INPUT
DVI INPUT
(RGB INPUT)
UPGRADE PORT
JACK
REMOTE CONTROL
JACK
AC INPUT
AUDIO/VIDEO
INPUT
COMPONENT1 DVD/DTV IN)
((480i/480pi720pilO80i), Audio)
ANTENNA
INPUT

Introduction
- When using the remote control aim it at the remote control sensor on the TV.
MUTE -,_
Switches the sound on or off. -_..
TV/VIDEO _
Sel_: TV, Video, S-Video
Component 1, Component 2
or PC mode.
FOR
(Refer to p.16)
EXIT
NUMBER buttons
MULTIMEDIA
Selects: TV, Component 1,
Component 2 or PC mo_.
POWER
r_
(Refer to p,19)
MENU
ENTER
CH A/V(Channel button)
VOL '< /I_ (Volume button)
AUDIO
(Refer to p.18)
CC,
(Refer to p.22)
AR(
(Refer to p.17)
VIDEO
(Refer to p,17)
SLEEP
(Refer to p.21)
FLASHBK
Press the FLASHBK button to
return to the last channel you were
watching
• Open the battery compartment cover on the back side and
insert the batteries with correct £omadty.
• Use two 1.5V batteries of AAA type. Don't mix used batteries
with new batteries,
8

Installation
R
Ion
Owner's Manual AAA 8arteries Remote Control Power Cord
DVFD c_[e (PC) DVl to D-Sub c_[e (PC) Audio cabJe (PC) Tie Holder
- Arrange t_ wires with
#_ tie HoNer.
Polishing cloth
The TV is equipped with a Kensington _curity System connector
on the bacA p_eL Connect the Kensington Security System
c_[e as shown _low.
- For the detailed instaBation and use of the Kensington Secunty
System, refer to the users gui_ provided with the Kensington
_d_y System.
For further information, contact httpg/www,kensington,com, the
internet home.pie of the Kensington company Kensington sells
secudty systems for expensive electronic equipment such as note-
book PCs and LCD proiectors,
NOTE
- The Kensington Secudt:y System is an optional a_ssory.
NOTES
a If the TV feels cold to the touch there may be a smaB °flicke¢' when when ff is turned on,
This is nom'_a]_there is nothing wrong with TV.
b. Some minute dot defects may be visibJe on the screen, _ar[ng as tiny red, green, or b_ue spots. However, they have no
adverse effect on the monitoVs performance,
c, Avoid touching the LCD screen or holding your finger(s) against it for long penods of time,
Doing so may produce some temporary distortion effects on the screen

Installa#on
Installation Instruction
O Pu[[ the _ck cover backside while pushing the two tabs and then lift it up
Connect the antenna cable to the socket mark_ 75 _&on the back For the _st reception an
out, or _tenna should _ u_d.
0 To _nnect an a_itiona[ equipment, s_ the External Equipment Connections section.
Connect the power cord
Close the _ck cover.
0
Thread, then pull the cables (except the antenna cable) through the hole on the TV stand, Arrange the antenna cable through the
side hole as shown _ow.
Antenna c_[e
The TV can be conveniently swivelled on P_sstand 30° to the [eft or right to provi_ the optimum viewing angle,
10

Installation
Equipme nt Co nnect ions
-For optimum picture quality, adjust antenna direction.
Connecting to Janinside Antenna setup
- If you have a 75£_ round cable, insert the bronze wire and then tighten the c_nnection nut. If you have a _0£:z flat wire, connect
the twined wire to the antenna converter and then connect the _nverter to the antenna iack on the TV.
If using 75,(&round cable_ do not bend the bronze wire, It may cause poor picture quality
Connecting to an Outdoor Antenna Setup
- In poor signaJ areas to get better picture qual_y, install a
signal amplifier to the antenna as shown to the dght
- If sign_ n_s _ be split for two _#s, use an antenna
signal splitter for _nn_on.
11

Installation
Exte rnaI Equipment Co nnections Continued
- In Video mode_ TV automatJcaBy reverts to TV mode if the
FOR button or FLASHBK buttons are pressed.
Connection 1
Set VCR switch to 3 or 4 and then tune TV to the same
channet humor,
Conn_tion 2
1. Connect the audioivi_o output jacks on VCR to the corre- _'3_t_
sponding input iacks on the TV. When connecting the TV F
to a VCR, rr_3tch the iack colors (Video = yellow, Audio
Left = white, and Audio Right = red)
2 Insert a video tape into the VCR and press PLAY on the
VCR. (Refer to the VCR owners manu_.)
3. Use the TV/VIDEO button on the remote control to select
Video. (ff connected to S-VIDEO on side panel select the
_Vtdeo external input source)
_,_ eee e eeoc ÷
Typical
_tenr_s []
[]
- After subscribing to a [_a] cable TV service and installing a converter you can watch cable TV programming
- For further cable TV informa_on, contact a local cable service provider
Conn_tion 1
1 _lect 3 or 4 with channel switch on cable box
2 Tune the TV channel to the same selected output channel
of cable box,
3. _lect channels at the cable box or with the _b[e box
remote control
Conn_tion 2
1 Conn_ the audio/vi_o outpLrt jacks on Cable Box to the
corresponding input jacks on the TV. When connecting
the TV to C_[e _x, mat_ the jack colors
(Video =yellow, Audio Left =white_ and Audio Right =
red)
2 Use the TV/VIDEO button on the remote control to select
Video.
3. _lect channels with the _b[e box remote control Cable Box
12

installation
Connections
Connect the audio/video ol:_put jacks on the external A!V
equip_nt to the corresponding input jacks on the TV.
When connec_ng the TV to externa] A/V equipm_nt_
match the iack colors (Video =yellow, Audio Left = white
and Audio Right = red)
Viewing Setup
1, Turn on the external A_4 equipment
2_ Use the _/VIDEO button on the remote controWto
select Video,
3. Operate the corresponding external equipment. Refer
to external equip_nt operating guide. External
Equipment
Camcorder
Video Game set
Connections
1. Connect the DVD video outputs to the COMPONENT (Y, PB,
PR)jacks and connect the DVD audio outputs to the AUDIO
jacks,
2, If your DVD only has an S-Video outpLrt jack, connect this to
the SWIDEO inpLrt on the TV and connect the DVD audio
outputs to the AUDIO INPUT jacks on the TV, as shown in
the figu re.
NOTE: ff your DVD p_ayer _es not ha_ component video
output_ use S-Video
Viewing Setup
1_Turn on the DVD player, insert a DVD
2. Use the _/VIDEO or MULTIMEDIA button on the remote
control to select Com_nent 1 or Component 2 (If connect-
ed to S-VIDEO, select the S_Video input source.)
3, Refer to the DVD player's manual for oper_ing instructions,
• Component Input ports
To get better picture quality, conn_ a DVD player to
the component input ports as shown below.
Component ports
of the TV
DVD
Side Panel
Video output ports
of DVD player
DVD
13

Instaflation
- To watch digi_[[y br_dcast programs_ purchase and
connect a digitaJ set4op box
Conn_tions
Connect the digi_l set4op box video oLrtpLrts to the
COMPONENT (Y, PB PR) jacks and connect the digital
set4op box audio outputs to the AUDIO jacks.
Viewing Setup
1 Turn on the digP_alset4op box (Refer to the owneYs
manual for the digP_alset4op box,)
2. Use the _/VIDEO or MULTIMEDIA button on the
remote control to select Com_nent 1. DTV Receiver (_t4op Box)
- After setup, be sure to select PC source on TV.
Conn_tions
1 Set the monitor output resolution on the PC before
connecting to the TV.
2. Connect the TV to the PC with the PC cable.
3, Connect the PC audio outpt_4 to the TVs PC SOUND
inpLrt
Viewing Setup
1 Turn on the PC
2 Use the _/VIDEO or MULTIMEDIA button on the
remote control to select PC.
Monitor Display Specifications
_DE Reso_n _ontal Vert_l
VGA 640x480 314 60
SVGA 800x600 37.8 60
XGA 1024x768 483 60
1280x768 47.6 60
WXGA 1360x768 47.6 60
.................................. H
NOTE
Connect the signal cable (DVI-D cable, Not DVl to D-Sub cabte)
from the DV[ output socket of the PC to the DVl input socket of
the set when using a PC with DV[ output, in some video cards,
DV[-Analog output may not be supported.
NOTES
a, For optimum picture qua[_bt, use standard WX_ 1360x7_ computer output at a 60Hz refresh rate, Using other formats
(VGA, SVGA, etc.) or refresh rates may resuff in redused picture quality. (To ch_ the computer video ou_ut format,
please refer to the operating n_3nual for the computer you are using).
b If the message "Out el range" appears on the screen_ adiust the PC output to a format listed in the 'Monitor Display
Specifications' chart above.
c. The synchronization input form for Horizont_ _d Vertical frequencies is separate.
DPM (Display Power Man_ement) m_e
ff the PC goes to power saving mode, the monitor automatically switches to DPM mode.
If you don't use the PC cable provided, DPM mode may not work
14

OpefatioR
I
I0 n
TV Operation Overview
1. First, make al_equipment _nnections. Plug the AC Adapter into the TV, then plug the AC Adapter into a power
outlet. At this time, the TV is switched to standby mo_.
• In standby n-_de, press the POWER, CH (A,V), '_t/V_EO, M1LTI,T_EDL& or number button on the remote
controWor ON,JeFF, _ (A,V), _F_/_EO Wocatedon the TV to turn the TV on,
2. Select the viewing sour_ by pressing _/V_EO or MUL_IA repeatedmy.
* Note: See page i6 ff you have not auto programmed the TV to r_ive channels in your Joca] broadcast area.
3. After viewing, press the PO_ button on the remote _ntrol or ON/O_ Iocat_ on the TV. The TV reverts to
standby mo_.
NOTE
• If you want to turn the TV off, press the on/off button located on the TV, If you intend to be away on vacation,
disconnect the power plug from the wall power oLrtlet
Menu Language Selection
-The menus c_ be shown on the _reen in the selected language. First select your language.
1. Press the MENU button and then use & /V button to select the Spec_ menu.
2 Pi'ess tJ-_i_ bL_on _d then use & /V button _o_e_ __,
3. Press t_ I_ b_n and then use A /T button to select your desired language.
From this point on, the on-screen menus will be shown in the manguage of your
choir.
4. Press the ENTER button to save.
15

Operation
Menu 0 ptions
-For ALrtOprogram to work, the programming source must be connected to the TV and the TV must _ receiving programming sig-
nals either over-the-Mr or from a _ble-type servi_ provider.
1. Press U_ MENU _Jtton _ U_n use A _T button to _ the P_,z_l,_ menu.
2 Press the i_ button _d then use A T button to select _Sc_.
3. Press the I_ button to begin the channel search.
*Wait for auto program to _mplete the channel searc_ cycle before
choosing a channel, The TV scans for over4he_air channels and then
channels provided by a cable service,
NOTES
, When the channel search is complete, use the A sT buttons to _view the memorized channels
•ff you press the ENTER button in auto pr_ramming, the func_on will stop _d only channels progr_,_ming up to that ti_ _l] re_in.
•A_o program function can memorize only the channels which are being re_ived at that time.
You can manually include or erase individual channels
1, Presstk_ MENU b_n ardthen _A _'V'button _ se_ttt'_ _nel _u
2 Press the _ bL_on and then use A _'VbL_on to select M_U_ prog,
3 Press the i_ button and then use _1_i_ button to select a channel you want
to add to memory or erase
4. Press the V bu_on and then use 41/ I_ bu_on to select Memory (add) or
_e (delete),
5. Press the ENTER button to save. The current channel is added to Memory
or Erased from the c4_annel list.
The current chan_l number _ d_p]ayed,
Favonte Channel lets you quickly tune in up to 8 channels of your choise without having to wait for the TV to scan through
all the in-between channels.
1. Press the MENU button _d then use & _T button to select the Channel menu.
2 Press the I_ btx_on and then use • _V btxtton to select Favorite oh,
3. Press the _ button _d then use A _,V button to select the first favorite chine] position.
4 Use the _1_I_button to set the desired channe_ number for first fa_or_e channel
5 Repeat steps 3 to 4 to memorize other channels
6 Press the ENTER button to save
•To tune to a favor_e channel, press the FCR (FavetRe Channel Review) button repe_ed]y, The 8 favorite channels appear on
_he screen one=by-ene.
16

Operation
Picture Menu Options
-This function adiusts the TV for the best picture appearance,
1, Press the VIDEO button repeatedly to select the picture appearance setup option as shown below,
1o,,,mm U,°,
•You _n Nee adjust EZ Vld_ in the _cture menu.
• C1_, Optimum and Soft are preset for _od picture quaWityat the factory and cannot be changed,
You can adiust picture contrast_ brighmess cower,sharpness and tint to the levels you prefer
1. Press the MENU button _d men u_ A _'V button to select the Pl_e _u.
2, Press the I_ button and then use A _T button to select User
3. Press me I_ button and then use A /T button to select the desired picture
option (Con_ Brtghtness_ Color S_ness _-tt).
4_ Use the <_i_ button to make appropriate adiusm_ent&
• Con_rast_8rightr_s, Color, _d Sharpness are adjustable from 0 to 1_
• Trot is adjustable from - 50 to + 50.
5. Press the ENTER button to save.
Sets up the TV for the best picture appearan_ for viewing movies.
1. Press the MENU button _d men u_ A V burn to select the Picture _u.
2, Press the I_ button and then use A _Vbutton to select _en_
3, Press the I_ button and then use A _T button to to select On or Off
4, Press the ENTER bLr[ton to save
You can watch TV in various picture fom_ats; _, _om, 4=&
Repeatedly press the ARC button to select your desired picture format.
•16_
You can enioy the cinema (the picture format of 169) or _neraJ TV programme through the 169 n_de,
The screen 16:9 is viewed iust like that bLrtthe screen 4:3 is magnified to the left and right so that the screen 16:9 is full
You can enioy the cinema in a vast screen through the Zoom re#de,
The screen 4:3 is magnified to the upper /lower and left /right sides so that the screen 16:9 is fu& The bottom and top of the pic-
ture rr_3y _ lost.
•4:3
_is picture format is 4 to 3 of general _¢.
NOTES
16_9 _d 4,3 are avatlable in PC mode only:
17

Operation
Sou nd Men u Options
This function lets you enjoy the best sound without any sp_ial adjustment _cause the TV select_ the appropriate
sound option bard on the program content
1 Use the AUDIO button to seiect the appropriate sound setup as shown below
• You c_ also adjust _ Audio in the Sound menu.
1. Press the MENU button and then use A zT button to select the Sound menu.
2. Press the _ bL_on and then use A /T bL_on to select _ Au_
3 Press the I_ bL_on and then use A T bL_on to select U_-et
4 Press the I_ button and then use _ /I_ bL_on to select the band you want to adjust Then, use ,i, /Vbutton to adjust
the band level
5 Press the ENTER button to save
AVL maintains an equal volume level aLrtomatically even if the channel is changed,
1. Press the MENU button and then use A/V burn to _lect the Sound menu.
2. Press the _ button and then use A /T button to select AVL.
3 Press the I_ bL_on and then use A T button to to select On or Off,
4 Press the ENTER button to save
18

Operation
Sound Menu Options continued
1_ Press the MENU btYdonand then use A /T button to select the $ott_ menu
2. Press the I_ button and then use A _T button to select BeQe_rtce.
3. Press the i_ button and then use _ _i_ button to adju_ the sound b_se.
• _lance is adiustable from Left 50 to Right 50_
4 Press the E_ER button to save
The TV c_ reseive MTS stereo progr_s and any SAP (Seconc_3ry Audio Program) that accompanies the
stereo program, if the broadcaster tr_smits an additional _und signal as well as the original one.
Mono: The primary [angua_ is heard from left and nght speakers, Signal mode is mono
Stereo: The primary language is heard from [eft and right speakers SignaJ mode is stereo
SAP: The _e_ndary [_nguage is heard from Jeft and right speakers.
1, Press the MS button repeatedly,
r4-o°o ,t-.-o I-7
• Select mono sound mode if the signal is not dear or in poor signN re_ption areas.
•Stereo, SAP mode are available only if included on the broadcast signal
19

Operation
Menu 0 ptions
The time is set automatically through from a PBS broadcast signal
The PBS channe_ sign_ includes information for the correct time _d daylight saving time.
1. Press the MENU button _d then use A /V button to select the Timer menu.
2Press the I_ button and then use A /T bLr_on to seWectC_
3. Press the I_ button and then use A /T button to select Auto.
4. Press the _ button and then use A /T button to select the time zone for your viewing a_a. Your choices are:
Auto, 1_$.T. (Eastern Standard _me), CS.T. (Central Standard Time), M.S.T. (Mountain Standard Time), P.S.T.
(Pacific Standard _me) Alaska_ and Hawaii
5. Press the I_ button and then use A /T button to set ]P]B45¢hem_L
6. Press the I_ button and then use A / T button to set ]BAT. (Daylight Savings Time) Auto, Off or On, _pending
on whether or not your viewing area observes Daylight Savings T_me.
7. Press the ENTER button to save.
If the time on the clock is incorrect, reset the clock n-_nually,
1 Pre_ the MENU button and then use A /Vbutton to select the Timer
menu.
2Press the I_ bu_on and then use & /V butto_ to select _,
3 Press the I_ button and then use A / T button to select _,
4. Press the _ button and then use A /T button to set the hour.
5. Press the _ button and then use A /T button to set the minutes.
6. Press the ENTER button to save.
20
Other manuals for 23LX2R
3
Table of contents
Other LG LCD TV manuals