LG 22MA33B User manual

ENGLISH
www.lg.com
OWNER’S MANUAL
LED TV*
Please read this manual carefully before operating your TV and retain
it for future reference.
* LG LED TV applies LCD screen with LED backlights.
22MA33A 22MA33B 28MN30A
24MN33A 24MN33B


2
ENGLISH
TABLE OF CONTENTS
TABLE OF CONTENTS
3 LICENSES
4 INSTALLATION PROCEDURE
5 ASSEMBLING AND PREPARING
5 Unpacking
7 Parts and buttons
9 Lifting and moving the TV
10 Setting up the TV
10 - Attaching the Stand Base
10 - Detaching the Stand Base
12 - Mounting on a table
13 - Using the Kensington security system
13 - Tidying cables
13 - Mounting on a wall
15 MAKING CONNECTIONS
15 Connecting an antenna
16 Connecting to a HD receiver, DVD, VCR
player or Gaming device
16 - HDMI connection
17 - Composite connection
18 Connecting to a USB
19 Connecting to a PC
19 - RGB connection
20 Audio System connection
20 - External Stereo Connection
21 REMOTE CONTROL
22 WATCHING TV
22 Turning the TV on for the first time
22 Watching TV
22 Managing programmes
22 - Automatically setting up programme
23 - Manually setting up programme
24 - Editing your programme list
24 - Selecting a programme on the programme
list
24 Using additional options
24 - Adjusting aspect ratio
25 - Using the input list
26 ENTERTAINMENT
26 Connecting USB storage devices
27 Browsing files
28 Viewing photos
29 Listening to music
30 Viewing movies
32 DivX® VOD Guide
33 CUSTOMIZING TV SETTING
33 Accessing main menus
33 Customizing Settings
33 - SETUP Settings
34 - PICTURE Settings
36 - AUDIO Settings
37 - TIME Settings
38 - OPTION Settings
38 - LOCK Settings
39 TELETEXT
39 Switch On/Off
39 Simple Text
39 - Page selection
39 - Programming a colour button in LIST
mode
39 Fastext
39 - Page selection
39 Special Teletext Function
40 MAINTENANCE
40 Cleaning Your TV
40 Screen and frame
40 Cabinet and stand
40 Power cord
41 TROUBLESHOOTING
41 General
42 SPECIFICATIONS

3
ENGLISH
LICENSES
LICENSES
Supported licenses may differ by model. For more information of the licenses, visit www.lg.com.
The terms HDMI and HDMI High-Definition Multimedia Interface, and the HDMI logo
are trademarks or registered trademarks of HDMI Licensing LLC in the United States
and other countries.
Manufactured under license from Dolby Laboratories. Dolby and the double-D symbol
are trademarks of Dolby Laboratories.
ABOUT DIVX VIDEO: DivX® is a digital video format created by DivX, LLC, a
subsidiary of Rovi Corporation. This is an official DivX Certified® device that plays DivX
video. Visit divx.com for more information and software tools to convert your files into
DivX videos.
ABOUT DIVX VIDEO-ON-DEMAND: This DivX Certified® device must be registered
in order to play purchased DivX Video-on-Demand (VOD) movies. To obtain your
registration code, locate the DivX VOD section in your device setup menu. Go to vod.
divx.com for more information on how to complete your registration.
DivX Certified® to play DivX® video up to HD 1080p, including premium content.
DivX®, DivX Certified® and associated logos are trademarks of Rovi Corporation or its
subsidiaries and are used under license.
Covered by one or more of the following U.S. patents: 7,295,673; 7,460,668; 7,515,710;
7,519,274

4
ENGLISH
INSTALLATION PROCEDURE
1Open the package and make sure all the accessories are included.
2Attach the stand to the TV.
3Connect an external device to the TV.
yImage shown may differ from your TV.
yYour TV’s OSD (On Screen Display) may differ slightly from that shown in this manual.
yThe available menus and options may differ from the input source or product model that you are using.
yNew features may be added to this TV in the future.
NOTE

5
ENGLISH
ASSEMBLING AND PREPARING
Unpacking
Check your product box for the following items. If there are any missing accessories, contact the local dealer where you
purchased your product. The illustrations in this manual may differ from the actual product and accessories.
yThe accessories supplied with your product may vary depending on the model.
yProduct specifications or contents in this manual may be changed without prior notice due to upgrade of
product functions.
NOTE
yDo not use any pirated items to ensure the safety and product life span.
yAny damages or injuries by using pirated items are not covered by the warranty.
CAUTION
yThe items supplied with your product may vary depending on the model.
yProduct specifications or contents of this manual may be changed without prior notice due to upgrade of product
functions.
yFor an optimal connection, HDMI cables and USB devices should have bezels less than 10 mm thick and 18 mm
width. Use an extension cable that supports USB 2.0 if the USB cable or USB memory stick does not fit into your
TV’s USB port.
NOTE
*A 10 mm
*B 18 mm
A
B
A
B

7
ENGLISH
ASSEMBLING AND PREPARING
INPUT
OK
SETTINGS
HDMI IN
RGB IN (PC)
DC-IN
(19 V )
AV IN
VIDEO
AUDIO
L/MONO
AUDIO OUT
RR
L
Remote Control
Sensor
Connection panel (See p.15)
Touch button Description
Scrolls through the saved programmes.
Adjusts the volume level.
OK Selects the highlighted menu option or confirms an input.
SETTINGS Accesses the main menus, or saves your input and exits the menus.
INPUT Changes the input source.
/ I Turns the power on or off.
Standby Light
yLighting On: Turned off
yLighting Off: Turned on
Parts and buttons
(Depending on the country)
All of the bottoms are touch sensitive and can be operated through simple touch with your finger.
NOTE
Touch Buttons
22MA33A
22MA33B
24MN33A
24MN33B

8
ENGLISH
ASSEMBLING AND PREPARING
HDMI IN
RGB IN (PC)
DC-IN
(19 V )
AV IN
VIDEO
AUDIO
L/MONO
AUDIO OUT
RR
L
INPUT
OK
SETTINGS
28MN30A
Remote
Control Sensor
Standby Light
yLighting On :
When Power is turned off
yLighting Off :
When Power is turned on
Connection panel (See p.15)
Touch button Description
Scrolls through the saved programmes.
Adjusts the volume level.
OK Selects the highlighted menu option or confirms an input.
SETTINGS Accesses the main menus, or saves your input and exits the menus.
INPUT Changes the input source.
/ I Turns the power on or off.
All of the bottoms are touch sensitive and can be operated through simple touch with your finger.
NOTE
Touch Buttons
(Depending on the country)

9
ENGLISH
ASSEMBLING AND PREPARING
yWhen holding the TV, the screen should face
away from you to prevent the screen from
scratches.
yWhen transporting the TV, do not expose the TV
to jolts or excessive vibration.
yWhen transporting the TV, keep the TV upright,
never turn the TV on its side, or tilt towards the
left or right.
Lifting and moving the TV
When moving or lifting the TV, read the following to
prevent the TV from being scratched or damaged and for
save transportation regardless of its type and size.
Avoid touching the screen at all times, as this may
result in damage to the screen or some of the
pixels used to create images.
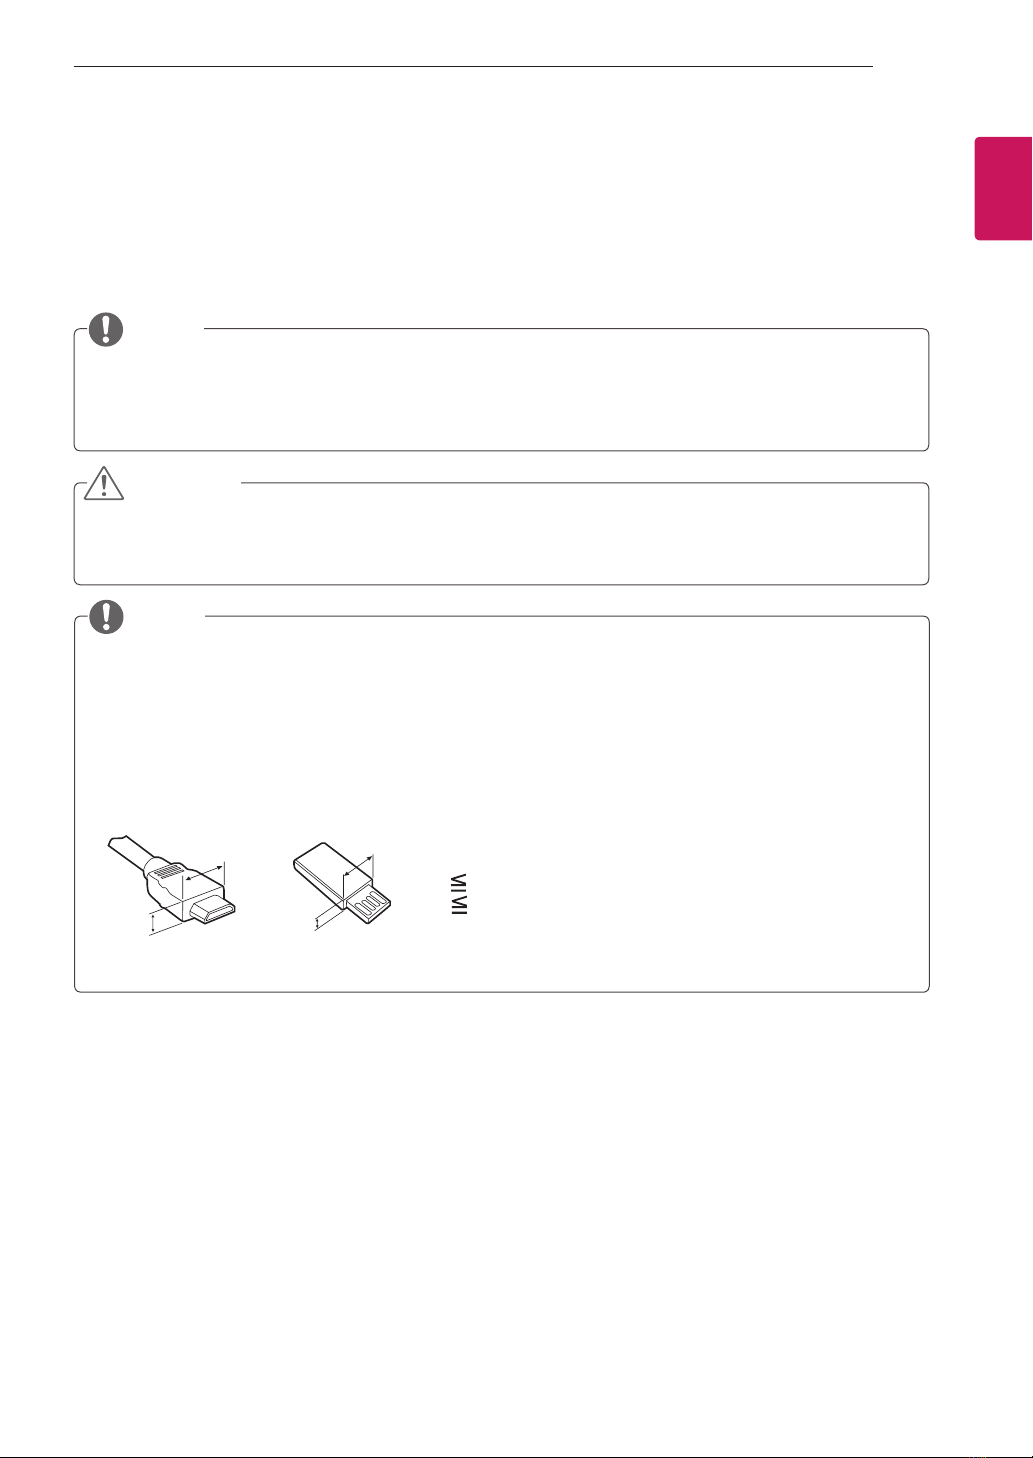
CAUTION
yIt is recommended to move the TV in the box or
packing material that the TV originally came in.
yBefore moving or lifting the TV, disconnect the
power cord and all cables.
yHold the top and bottom of the TV frame firmly.
Make sure not to hold the transparent part,
speaker, or speaker grill area.

10
ENGLISH
ASSEMBLING AND PREPARING
Setting up the TV
Image shown may differ from your TV.
2
1
Stand Base
Attaching the Stand Base Detaching the Stand Base
yWhen Detaching the stand from TV, Detach the
stand with lifting up the lever in the direction of the
arrow.
NOTE
1
Stand Base
2
CAUTION
yLay a foam mat or soft protective cloth on the
surface to protect the screen from damage.
yWhen attaching the stand to the TV set, place the
screen facing down on a cushioned table or flat
surface to protect the screen from scratches.
CAUTION
yLay a foam mat or soft protective cloth on the
surface to protect the screen from damage.
yWhen Detaching the stand to the TV set, place the
screen facing down on a cushioned table or flat
surface to protect the screen from scratches.

11
ENGLISH
ASSEMBLING AND PREPARING
CAUTION
yDo not carry the TV upside-down as this may
cause it to fall off its stand, resulting in damage or
injury.
yThe illustration shows a general example of
installation and may look different from the actual
product.

12
ENGLISH
ASSEMBLING AND PREPARING
2Connect the AC-DC Adapter and Power Cord
to a wall outlet.
Do not place the TV near or on sources of heat, as
this may result in fire or other damage.
CAUTION
Mounting on a table
1Lift and tilt the TV into its upright position on a
table.
Leave a 10 cm (4 inches) (minimum) space from the
wall for proper ventilation.
10 cm
10 cm
10 cm
10 cm
or
Disconnect the power cord first, and then move or
install the TV. Otherwise electric shock may occur.
CAUTION

13
ENGLISH
ASSEMBLING AND PREPARING
Using the Kensington security
system
The Kensington security system connector is located
at the back of the TV. For more information of
installation and using, refer to the manual supplied
with the Kensington security system or visit
http://www.
kensington.com
.
Connect the Kensington security system cable between
the TV and a table.
The Kensington security system is optional. You can
obtain additional accessories from most electronics
stores.
NOTE
Tidying cables
Gather and bind the cables with the cable tie.
Mounting on a wall
If you intend to mount the TV to a wall, attach Wall
mounting interface (optional parts) to the back of the TV.
When you install the TV using the wall mounting interface
(optional parts), attach it carefully so it will not drop.
1Please, Use the screw and wall mount interface
in accordance with VESA Standards.
2If you use screw longer than standard, the TV
might be damaged internally.
3If you use improper screw, the product might
be damaged and drop from mounted position.
In this case, LG Electronics is not responsible
for it.
4VESA compatible only with respect to screw
mounting interface dimensions and mounting
screw specifications.
10 cm
10 cm
10 cm
10 cm
For proper ventilation, allow a clearance of 10 cm
on each side and from the wall. Detailed installation
instructions are available from your dealer, see the
optional Tilt Wall Mounting Bracket Installation and Setup
Guide.
(Not Provided)

14
ENGLISH
ASSEMBLING AND PREPARING
5Please use VESA standard as below.
y784.8 mm (30.9 inch) and under
* Wall Mount Pad Thickness : 2.6 mm
* Screw : Φ 4.0 mm x Pitch 0.7 mm x
Length 10 mm
y787.4 mm (31.0 inch) and above
* Please use VESA standard wall mount pad and
screws.
VESA (A x B) 100 x 100
Standard screw M4
Number of screws 4
yVESA (A x B)
A
B
yDisconnect the power cord first, and then move or
install the TV. Otherwise electric shock may occur.
yIf you install the TV on a ceiling or slanted wall, it
may fall and result in severe injury.
yUse an authorized LG wall mount and contact the
local dealer or qualified personnel.
yDo not over tighten the screws as this may cause
damage to the TV and void your warranty.
yUse the screws and wall mounts that meet the
VESA standard. Any damages or injuries by
misuse or using an improper accessory are not
covered by the warranty.
CAUTION
yUse the screws that are listed on the VESA
standard screw specifications.
yThe wall mount kit includes an installation manual
and necessary parts.
yThe wall mount bracket is optional. You can obtain
additional accessories from your local dealer.
yThe length of screws may differ depending on the
wall mount. Be sure to use the proper length.
yFor more information, refer to the instructions
supplied with the wall mount.
NOTE

15
ENGLISH
MAKING CONNECTIONS
Connect various external devices to the TV and switch input modes to select an external device. For more information
about an external device’s connection, refer to the manual supplied with each device.
Available external devices are: HD receivers, DVD players, VCRs, audio systems, USB storage devices, PC, camcorders
or cameras, gaming devices, and other external devices.
yIf you record a TV program on a DVD recorder or VCR, make sure to connect the TV signal input cable to the
TV through a DVD recorder or VCR. For more information about recording, refer to the manual supplied with the
connected device.
yThe external device connection may differ from the model.
yConnect external devices to the TV regardless of the order of the TV port.
MAKING CONNECTIONS
Connect an antenna, cable or cable box to watch TV referring to the following. The illustrations may differ from the actual
accessories and an RF cable is optional.
Connect the TV to a wall antenna socket with an RF cable (75 Ω).
yUse a signal splitter to use more than 2 TVs.
yIf the image quality is poor, install a signal
amplifier properly to improve the image quality.
yIf the image quality is poor with an antenna
connected, aim the antenna to the proper
direction.
yVisit
http://AntennaWeb.org
for more information
about the antenna and cable connection.
NOTE
yMake sure not to bend the copper wire of the RF
cable.
yComplete all connections instructions between
devices, and then connect the power cord to the
power outlet to prevent damages to your TV.
CAUTION
Copper wire
Wall Antenna Socket
Outdoor Antenna
yVHF Antenna
yUHF Antenna
(Not Provided)
NOTE
Connecting an antenna
(Depending on the country)

16
ENGLISH
MAKING CONNECTIONS
HDMI IN
Connect a HD receiver, DVD, VCR player or Gaming device to the TV and select an appropriate input mode.
HDMI is the best way to connect a device.
Transmits the digital video and audio signals from an external device to the TV. Connect the external device and the TV
with the HDMI cable as shown on the following illustration.
yUse a High Speed HDMI™ Cable.
yHigh Speed HDMI™ Cables are tested to carry an HD signal up to 1080p and higher.
ySupported HDMI Audio format: Dolby Digital(Up to 48kHz), PCM(Up to 192 kHz, 32 kHz / 44.1 kHz / 48 kHz /
88 kHz / 96 kHz / 176 kHz / 192 kHz) *DTS is not supported.
NOTE
Connecting to a HD receiver, DVD, VCR player or Gaming device
HDMI connection
DVD / Blu-Ray / HD Cable Box /
HD STB / Gaming device
(Not Provided)

17
ENGLISH
MAKING CONNECTIONS
AV IN
VIDEO
AUDIO
L/MONO
AUDIO OUT
RR
L
AUDIO OUT
R
L
Transmits the analogue video and audio signals from an external device to the TV. Connect the external device and the
TV with the composite cable as shown on the following illustration.
Check to ensure the cables are matched with the corresponding colour connection.
NOTE
Composite connection
DVD / Blu-Ray / HD Cable Box /
HD STB / Gaming device
(Not Provided)

18
ENGLISH
MAKING CONNECTIONS
Connect a USB storage device such as s USB flash memory, external hard drive, MP3 player or a USB memory card
reader to the TV and access the USB menu to use various multimedia files.
Connecting to a USB
or
USB
(Not Provided)

19
ENGLISH
MAKING CONNECTIONS
Connecting to a PC
Transmits the analogue video signal from your PC to the TV. Connect the PC and the TV with the D-sub 15 pin cable as
shown the following illustrations. To transmit an audio signal, connect an optional audio cable.
NOTE
If you do not use an optional external speaker, connect the PC to the TV with the optional audio cable.
RGB connection
H
D
MI
IN
RGB IN (PC)
USB IN
5 V 0.5 A
DC-IN
(19 V )
AV IN
VIDEO
AUDIO
L/MONO
A
U
DI
O
OUT
R
R
L
DC-IN
HDMI IN
RGB IN (PC)
(19 V )
VIDEO AV IN AUDIO
L/MONO
R
V
IDE
O
COMPONENT IN
A
U
DI
O
OUT
R
L
PC
(Not Provided)
This manual suits for next models
6
Table of contents
Other LG LED TV manuals