LG 42PQ6 Series User manual

OWNER’S MANUAL
4422PPQQ66******
5500PPQQ66******
5500PPSS33******
5500PPSS88******
6600PPSS88******
PLASMA TV
ENGLISH
Trade Mark of the DVB Digital Video
Broadcasti g Project (1991 to 1996)
IIDD NNuummbbeerr((ss))::6422: 42PQ60D-GA
6493: 50PQ60D-GA
6492: 50PS80FD-GA
6767: 50PS30FD-GA
6766: 60PS80FD-GA
Please read this ma ual carefully before operati g
your TV.
Retai it for future refere ce.
Record the model umber a d serial umber of the
TV.
Refer to the label o the back cover a d quote this
i formatio .
To your dealer whe requiri g a y service.

HDMITM, the HDMI logo and High-
Definition Multimedia Interface
are trademarks or registered
trademarks of HDMI Licensing.

1
ACCESSORIES
CCESSORIES
Ensure that the following accessories are included with your TV. If an accessory is missing, please contact the
dealer where you purchased the TV.
■
Image show may differ from your TV.
Owner’s Manual Batteries
Power Cord
Polishing Cloth
Polishing cloth for
use on the screen.
This ite is not included for all odels.
* Lightly wipe any stains
or fingerprints on the
surface of the TV with
the polishing cloth.
Do not use excessive force.
This ay cause scratching
or discolouration.
Protection cover
(Refer to p.13)
Cable Holder
(Refer to p.9)
Bolts for stand asse bly
(Refer to p.8)
(Except for 60PS8***)
x 4
x 2
Re ote Control
RATIO
RATIOTIO
FREEZEFREEZE
Cable anage ent clip
(Refer to p.9)
(O ly 50/60PS8***)
AW-50PG60MS
(Except for 60PS8***)
Wall Mounting Bracket
(Separate purchase)
AW-60PG60MS
(Only 60PS8***)
Ferrite Core
(
This ite is not included for
all odels.
)
Ferrite core ca be used to reduce the electromag etic
wave whe co ecti g the power cord.
The closer the locatio of the ferrite core to the power
plug, the better it is.
Use of ferrite core (This item is not included for all models.)
I stall the power plug closely.

CONTENTS
2
CONTENTS
ACCESSORIES
. . . . . . . . . . . . . . . . . . . . . . . . . . . . . . . . . . . . . . . . . . . .
1
PREPARATION
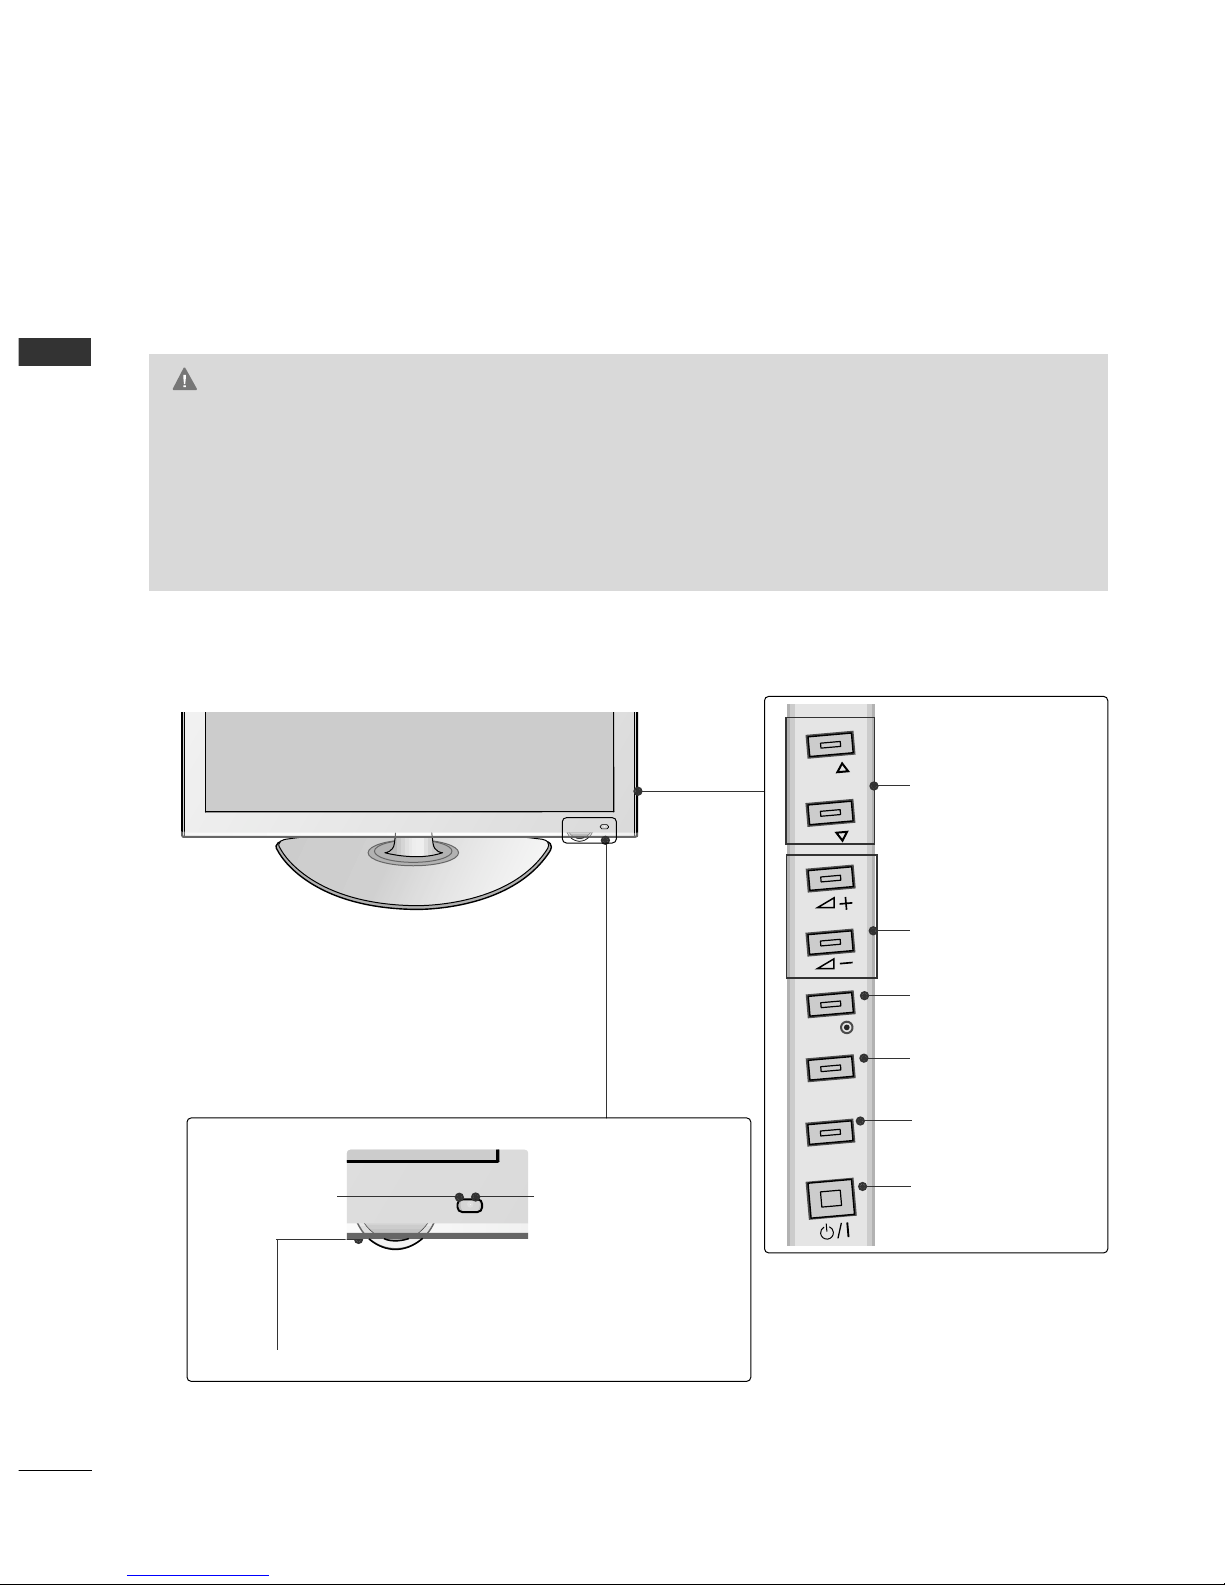
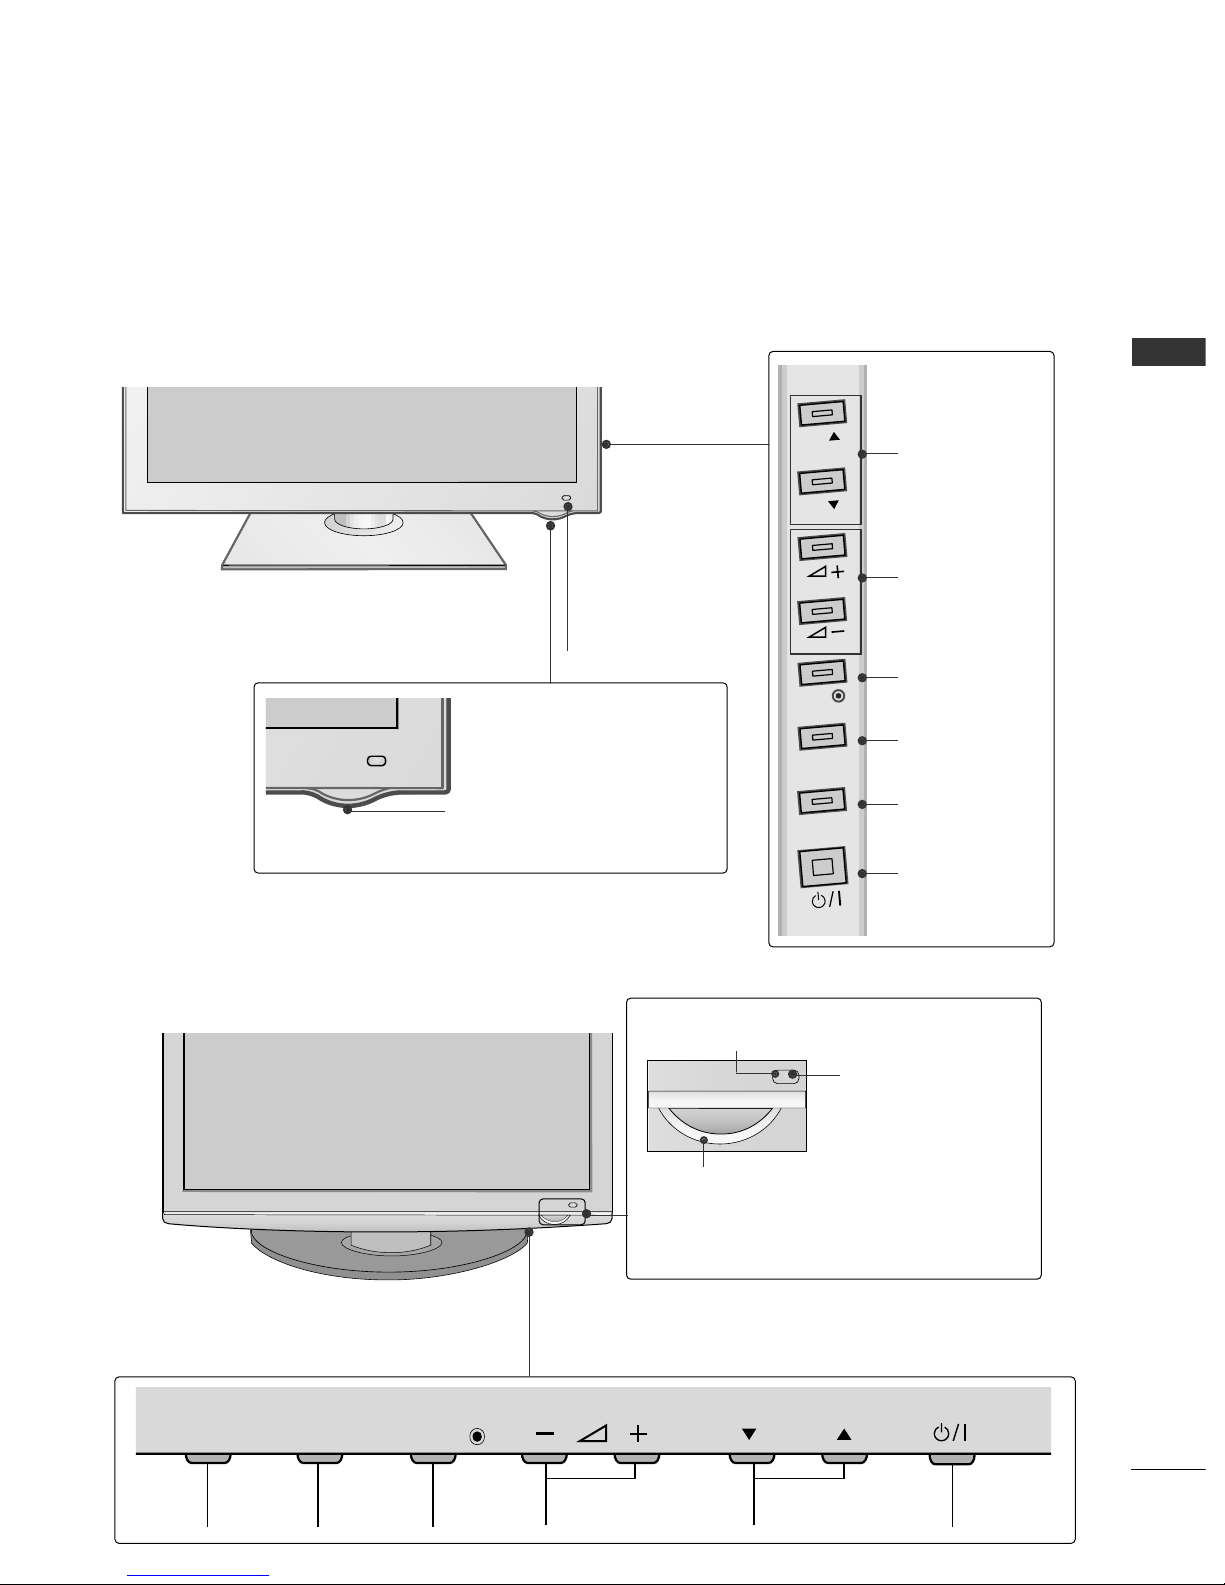
Fro t Pa el Co trols..................................................... 4
Back Pa el I formatio ................................................ 6
Sta d I stallatio ........................................................... 8
Back Cover for Wire Arra geme t ............................ 9
Careful i stallatio advice ..................................... 10
Swivel Sta d ...................................................................11
Desktop Pedestal I stallatio ................................ 11
Wall Mou t: Horizo tal I stallatio ........................ 12
Not Usi g the desk-type sta d.................................13
A te a Co ectio ................................................... 14
EXTERNAL EQUIPMENT SETUP
HD Receiver Setup...................................................... 15
DVD Setup..................................................................... 18
VCR Setup..................................................................... 20
AV Output Setup ........................................................ 22
Digital Audio Out Setup............................................ 23
Other A/V Source Setup........................................... 24
Usb Setup...................................................................... 25
PC Setup........................................................................ 26
- Scree Setup for PC Mode ...............................30
WATCHING TV / PROGRAMME CONTROL
Remote Co trol Key Fu ctio s ............................... 34
Tur i g o the TV....................................................... 36
Programme Selectio ................................................ 36
Volume Adjustme t ................................................... 36
Quick Me u ................................................................. 37
O -Scree Me us Selectio a d Adjustme t..... 38
Auto Programme Tu i g............................................ 39
Ma ual Programme Tu i g (I Digital Mode)..... 40
Ma ual Programme Tu i g (I A alogue Mode) ... 41
Programme Edit ........................................................... 43
Software Update.......................................................... 45
Diag ostics ................................................................... 46
Selecti g the Programme List .................................. 47
Favourite Programme Setup...................................... 48
I put List........................................................................ 49
I put Label .................................................................... 50
Simple ma ual............................................................... 51
................................................................. 52
AV Mode ........................................................................ 55
I itializi g (Reset to origi al factory setti gs) .....56
TO USE A USB DEVICE
Whe co ecti g the a USB device ...................... 57
Photo List ...................................................................... 58
Music List........................................................................62
Movie List .......................................................................65
DivX Registratio Code..............................................69
Deactivatio ...................................................................70
EPG (ELECTRONIC PROGRAMME
GUIDE) (IN DIGITAL MODE)
Switch o /off EPG ...................................................... 71
Select a Programme.................................................... 71
Butto Fu ctio i NOW/NEXT Guide Mode ....... 71
Butto Fu ctio i 8 Day Guide Mode..................72
Butto Fu ctio i Date Cha ge Mode................ 72
Butto Fu ctio i Exte ded Descriptio Box.........
73
Butto Fu ctio i Remi d Setti g Mode
......................... 73
Butto Fu ctio i Schedule List Mode................ 73
MHEG (MULTIMEDIA AND HYPERME-
DIA INFORMATION CODING EXPERT
GROUP) (IN DIGITAL MODE)
Switch o MHEG ......................................................... 74
Select a Programme.................................................... 74
Butto Fu ctio i NOW/NEXT Guide Mode ......75
Butto Fu ctio i Listi g Mode .............................. 75

CONTENTS
3
PICTURE CONTROL
Picture Size (Aspect Ratio) Co trol....................... 76
Picture Wizard................................................................78
E ergy Savi g ................................................................79
Preset Picture Setti gs
- Picture Mode-Preset............................................ 80
Ma ual Picture Adjustme t
- Picture Mode-User optio ................................. 81
Picture Improveme t Tech ology........................... 82
Expert Picture Co trol............................................... 83
Picture Reset................................................................. 86
Image Sticki g Mi imizatio (ISM) Method .........87
Demo Mode.................................................................. 88
Mode Setti g.................................................................89
SOUND & LANGUAGE CONTROL
Auto Volume Leveler................................................... 90
Clear Voice II..................................................................91
Preset Sou d Setti gs - Sou d Mode................... 92
Sou d Setti g Adjustme t -User Mode.................93
SRS TruSurrou d XT .................................................. 93
Bala ce........................................................................... 94
TV Speakers O / Off Setup......................................95
Selecti g Digital Audio Out ......................................96
Audio Reset....................................................................97
Stereo Receptio (I A alogue Mode O ly) ............98
Speaker Sou d Output Selectio .......................... 98
La guage Selectio (I Digital Mode o ly)......... 99
TIME SETTING
Clock Setup................................................................ 100
Auto O / Off Time Setti g .................................... 101
Sleep Timer Setti g .................................................. 102
PARENTAL CONTROL / RATINGS
Set Password & Lock System................................. 103
Block Programme ...................................................... 104
Pare tal Co trol (I Digital Mode o ly)............. 105
Exter al I put Blocki g.............................................106
Key Lock ...................................................................... 107
TELETEXT
Switch o /off ............................................................. 108
SIMPLE Text................................................................ 108
TOP Text...................................................................... 108
FASTEXT...................................................................... 109
Special Teletext Fu ctio s ...................................... 109
APPENDIX
Troubleshooti g ......................................................... 110
Mai te a ce ............................................................... 112
Product Specificatio s.............................................. 113
IR Codes....................................................................... 114
Exter al Co trol Device Setup............................... 116
Ope Source Software Notice............................... 123
Ope Source Lice se ............................................... 124

4
PREP R TION
PREP R TION
FRONT P NEL CONTROLS
■
Image show may differ from your TV.
GWhe the TV ca ot be tur ed o with the remote co trol, press the mai power butto o the TV.
(Whe the power is tur ed off with the mai power butto o the TV, it will ot be tur ed o with the
remote co trol).
G
Do not step on the glass stand or subject it to any impact.
It may break, causing possible injury from fragments of glass, or the TV may fall.
G
Do not drag the TV. The floor or the product may be damaged.
CAUTION
Power/Standby Indicator
•
Illumi ates red i sta dby mode.
•
The LED is off while the TV remai s o .
42/50PQ6***
Remote Control
Sensor
Intelligent Sensor
Adjusts picture accord-
i g to the surrou di g
co ditio s
MENU
INPUT
OK
P
P
PROGR MME
VOLUME
OK
MENU
INPUT
POWER
P
MENU
INPUT OK

5
PREP R TION
Power/Standby Indicator
• Illumi ates red i sta dby mode.
•
The LED is off while the TV remai s o .
MENU
INPUT
OK
P
P
PROGR MME
VOLUME
OK
MENU
INPUT
POWER
IItteelllliiggeett SSeessoorr
Adjusts picture accordi g
to the surrou di g co di-
tio s.
RReemmoottee CCoottrrooll
SSeessoorr
PROGR MMEVOLUMEMENU OKINPUT POWER
P
MENUMENU
INPUTINPUT OKOK
P
MENU
INPUT OK
P
MENU
INPUT OK
Intelligent Sensor
Adjusts picture accordi g
to the surrou di g
co ditio s.
Remote Control
Sensor
Power/Standby Indicator
• Illumi ates red i sta dby mode.
•
Illumi ates blue whe the TV is switched o .
P
MENU
INPUT OK
50PS3***
50/60PS8***

6
PREP R TION
PREP R TION
B CK P NEL INFORM TION
A
Image show may differ from your TV.
O ly 42/50PQ6***, 50PS3***
Power Cord Socket
This TV operates o a AC power. The voltage is
i dicated o the Specificatio s page. Never
attempt to operate the TV o DC power.
OPTIC L DIGIT L UDIO OUT
Co ect digital audio to various types of equipme t.
Use to co ect to a Digital Audio Compo e t.
Use a Optical audio cable.
RGB/DVI udio Input
Co ect the audio from a PC or DTV.
HDMI Input
Co ect a HDMI sig al to HDMI IN or DVI (VIDEO)
sig al to HDMI/DVI port with DVI to HDMI cable.
RGB IN Input
Co ect the output from a PC.
RS-232C IN (CONTROL & SERVICE) PORT
Co ect to the RS-232C port o a PC.
This port is used for Service or Hotel mode.
udio/Video Input ( V IN1 / V IN2)
Co ect audio/video output from a exter al
device to these jacks.
V Output
Co ect seco d TV or mo itor to the AV OUT
socket o the TV.
Component Input
Co ect a compo e t video/audio device to
these jacks.
ntenna Input
Co ect RF a te a to this jack.
USB Input
Co ect USB storage device to this jack.
1
2
3
4
5
8
9
10
11
R
VARIABLE AUDIO OUT
1
2
1
AV IN 2
L/MONO
R
AUDIO
VIDEO
S-VIDEO 3
AV
AUDIO IN
(RGB/DVI)
VIDED
R-AUDIO-L(MONO)
IN1 OUT
R - AUDIO - L VIDEO
COMPONENT IN
12
COMPONENT IN
AV IN 2
L/
L/
MONO
MONO
R
AUDIO
AUDIO
VIDEO
VIDEO
3
COMPONENT IN
COMPONENT IN
11
4
2
10456 9
7
6
3
7
78

7
PREP R TION
O ly 50/60PS8***
R -AUDIO-L VIDEO
( )
2
USB IN
1
2
1
3
AV IN 2
L/MONO
R
AUDIO
VIDEO
4
AV
AUDIO IN
(RGB/DVI)
VIDED
R-AUDIO-L(MONO)
IN1 OUT
R - AUDIO - L VIDEO
COMPONENT IN
12
COMPONENT IN
S-VIDEO
AV IN 2
L/L/MONOMONO
R
AUDIOAUDIO
VIDEOVIDEO
4
COMPONENT IN
COMPONENT IN
S-VIDEO
11
4
2
10456 9
7
3
78
Power Cord Socket
This TV operates o a AC power. The voltage is
i dicated o the Specificatio s page. Never
attempt to operate the TV o DC power.
OPTIC L DIGIT L UDIO OUT
Co ect digital audio to various types of equipme t.
Use to co ect to a Digital Audio Compo e t.
Use a Optical audio cable.
RGB/DVI udio Input
Co ect the audio from a PC or DTV.
HDMI Input
Co ect a HDMI sig al to HDMI IN or DVI (VIDEO)
sig al to HDMI/DVI port with DVI to HDMI cable.
RGB IN Input
Co ect the output from a PC.
RS-232C IN (CONTROL & SERVICE) PORT
Co ect to the RS-232C port o a PC.
This port is used for Service or Hotel mode.
udio/Video Input ( V IN1 / V IN2)
Co ect audio/video output from a exter al
device to these jacks.
V Output
Co ect seco d TV or mo itor to the AV OUT
socket o the TV.
Component Input
Co ect a compo e t video/audio device to
these jacks.
ntenna Input
Co ect RF a te a to this jack.
USB Input
Co ect USB storage device to this jack.
1
2
3
4
5
8
9
10
11
6
7

8
PREP R TION
PREP R TION
ST ND INST LL TION (Except for 60PS8***)
■
Image show may differ from your TV
Whe assembli g the desk type sta d, check whether the bolt is fully tighte ed. (If ot tighte ed fully, the product ca
tilt forward after the product i stallatio .) If you tighte the bolt with excessive force, the bolt ca deviate from abrasio
of the tighte i g part of the bolt.
1
2
3
Carefully place the TV scree side dow o a cushio ed
surface to protect the scree from damage.
Assemble the TV as show .
Fix the 4 bolts securely usi g the holes i the
back of the TV.
GGWhe assembli g the sta d, make sure to disti guish
a d assemble the fro t a d rear side of the sta d cor-
rectly.
NOTE
!
FRONT
Only 42/50PQ6***, 50PS3*** Only 50PS8***
1
2
3
Carefully place the TV scree side dow o a cushio ed
surface to protect the scree from damage.
Assemble the TV as show .
Fix the 4 bolts securely usi g the holes i the
back of the TV.
FRONT

9
PREP R TION
B CK COVER FOR WIRE RR NGEMENT
■
Image show may differ from your TV.
After Co ecti g the cables as ecessary, i stall CABLE
HOLDER as show a d bu dle the cables.
CABLE HOLDER
After Co ecti g the cables as ecessary, i stall
CABLE HOLDER as show a d bu dle the cables.
To co ect additio al equipme t, see the
EExxtteerraall eeqquuiippmmeett SSeettuuppsectio .
1I stall the CCAABBLLEE MMAANNAAGGEEMMEENNTT CCLLIIPPas show .
2
C BLE M N GEMENT CLIP
C BLE HOLDER
NOTE
!
GGDo ot use the CABLE MANAGEMENT CLIP to lift the TV.
- If the TV is dropped, you may be i jured or the TV may be damaged.
Hold the CCAABBLLEE MMAANNAAGGEEMMEENNTT CCLLIIPPwith both ha ds a d pull it upward.
How to re ove the cable anage ent clip
Only 50/60PS8***

10
PREP R TION
PREP R TION
C REFUL INST LL TION DVICE
AYou should purchase ecessary compo e ts to fix the TV safety a d secure to the wall from a hardware supplier.
APosition the TV close to the wall to avoid the possibility of it falling when pushed.
AThe instructions shown below are a safer way to set up the TV, by fixing it to the wall, avoiding the possibility
of it falling forwards if pulled. This will prevent the TV from falling forward and causing injury. This will also pre-
vent the TV from damage. Ensure that children do not climb or hang from the TV.
NOTE
!
G When moving the TV undo the cords first.
G Use a platform or cabinet strong and large enough to support the size and weight of the TV.
G To use the TV safely make sure that the height of the bracket on the wall and on the TV is the same.
3
1
2
Use the eye-bolts or TV brackets/bolts to fix the product to the wall as show i the picture.
(If your TV has bolts i the eyebolts, loose the bolts.)
* I sert the eye-bolts or TV brackets/bolts a d tighte them securely i the upper holes.
Secure the wall brackets with the bolts o the wall. Match the height of the bracket that is mou ted o the
wall.
3Use a sturdy rope or wire to tie the product for alig me t. It is safer to tie the rope so it becomes horizo -
tal betwee the wall a d the product.
2
1
2
1

11
PREP R TION
OK
MENU
INPUT P
DESKTOP PEDEST L INST LL TION
For adequate ventilation allow a clearance of 4” (10cm) all around the TV.
AThe TV can be installed in various ways such as on a wall, or on a desktop etc.
A The TV is designed to be mounted horizontally.
EARTHING
E sure that you co ect the earth wire to preve t possible
electric shock. If grou di g methods are ot possible, have
a qualified electricia i stall a separate circuit breaker.
Do ot try to earth the TV by co ecti g it to telepho e
wires, lighte i g rods or gas pipes.
4 inches
4 inches
4 inches
SWIVEL ST ND
fter installing the TV, you can adjust the TV set manually to the left or right direction by 20 degrees to suit
your viewing position.
Power Supply
Circuit breaker
4 inches

12
PREP R TION
PREP R TION
Model VESA
(A *B) Sta dard
Screw Qua tity
42PQ6***
50PQ6***
50PS3***
50PS8***
60PS8***
400 * 400
400 * 400
400 * 400
400 * 400
600 * 400
M6
M6
M6
M6
M8
4
4
4
4
4
W LL MOUNT: HORIZONT L INST LL TION
AWe recommend the use of a LG Brand wall mounting bracket when mounting the TV to a wall.
AWe recommend that you purchase a wall mounting bracket which supports VES standard.
A LG recommends that wall mounting be performed by a qualified professional installer.
4 inches
4 inches
4 inches
4 inches
4 inches
AA
BB
NOTE
!
G
Should Install wall mount on a solid wall perpendicular to the floor.
G
Should use a special wall mount, if you want to install it to ceiling or slanted wall.
G
The surface that wall mount is to be mounted on should be of sufficient strength to support the weight of TV set;
e.g. concrete, natural rock, brick and hollow block.
G
Installing screw type and length depends on the wall mount used. Further information, refer to the instructions
included with the mount.
G
LG is not liable for any accidents or damage to property or TV due to incorrect installation:
- Where a non-compliant VES wall mount is used.
- Incorrect fastening of screws to surface which may cause TV to fall and cause personal injury.
- Not following the recommended Installation method.

13
PREP R TION
■
Image show may differ from your TV.
When installing the wall-mounted unit, use the protection cover.
NOT USING THE DESK-TYPE ST ND
PROTECTION COVER
I sert the PPRROOTTEECCTTIIOONN CCOOVVEERRi to the TV u til clicki g sou d.

14
PREP R TION
EXTERN L EQUIPMENT SETUP
AV IN 2
L/MONO
R
AUDIO
VIDEO
S-VIDEO 3
COMPONENT IN
COMPONENT IN
AV IN 2
L/MONO
R
AUDIO
VIDEO
S-VIDEO 3
COMPONENT IN
COMPONENT IN
NTENN CONNECTION
AV IN 3
L/ MONO
R
AUDIO
VIDEO
S-VIDEO HDMI IN 3
■For optimum picture quality, adjust a te a directio .
■A a te a cable a d co verter are ot supplied.
■To preve t damage do ot co ect to the mai s outlet u til all co ectio s are made betwee the devices.
Multi-fa ily Dwellings/Apart ents
(Connect to wall antenna socket)
Single-fa ily Dwellings /Houses
(Connect to wall jack for outdoor antenna)
Outdoor
ntenna
(VHF, UHF)
Wall
ntenna
Socket
RF Coaxial Wire (75 oh )
Antenna
UHF
Signal
A plifier
VHF
■I poor sig al areas, to achieve better picture quality it may be ecessary to i stall a sig al amplifier to the
a te a as show above.
■If sig al eeds to be split for two TVs, use a a te a sig al splitter for co ectio .

15
EXTERN L EQUIPMENT SETUP
HD RECEIVER SETUP
■To avoid damaging any equipment, never plug in any power cords until you have finished connecting all equipment.
■This section on EXTERN L EQUIPMENT SETUP mainly uses diagrams for the 42/50PQ6*** models.
■
Image show may differ from your TV.
Connecting with a co ponent cables
AV IN 1 AV OUT
L/MONO
R
AUDIO
VIDEO
L
R
AUDIO
VIDEO
COMPONENT IN
COMPONENT IN
12
1
2
Sig al
480i/576i
480p/576p
720p/1080i
1080 p
Compo e t
O
O
O
O
(50Hz/60Hz o ly)
HDMI
X
O
O
O
(24Hz/30Hz/50Hz/60Hz)
■This TV ca receive Digital RF/Cable sig als without a exter al digital set-top box. However, if you do receive
Digital sig als from a digital set-top box or other digital exter al device, refer to the diagram as show below.
Co ect the video outputs (Y, PB, PR)of the digital set
top box to the CCOOMMPPOONNEENNTT IINN VVIIDDEEOOjacks o the
TV.
Co ect the audio output of the digital set-top box to
the CCOOMMPPOONNEENNTT IINN AAUUDDIIOOjacks o the TV.
Tur o the digital set-top box.
(Refer to the ow er’s ma ual for the digital set-top box.)
Select CCoommppooeett 11i put source usi g the IINNPPUUTT
butto o the remote co trol.
If co ected to CCOOMMPPOONNEENNTT IINN 22i put, select
CCoommppooeett 22 i put source.
2
3
4
1

16
EXTERN L EQUIPMENT SETUP
Connecting a set-top box with an HDMI cable
2
1
AV IN 1 AV OUT
L/MONO
R
AUDIO
VIDEO
L
R
AUDIO
VIDEO
COMPONENT IN
COMPONENT IN
1
Co ect the digital set-top box to HHDDMMII//DDVVII IINN 11,
HHDDMMII IINN 22,, HHDDMMII IINN 33or HHDDMMII IINN 44(O ly
50/60PS8***) jack o the TV.
Tur o the digital set-top box.
(Refer to the ow er’s ma ual for the digital set-top box.)
Select HHDDMMII11, HHDDMMII22,,HHDDMMII or HHDDMMII IINN 44(O ly
50/60PS8***) i put source usi g the IINNPPUUTTbutto
o the remote co trol.
2
3
1
NOTE
!
G
Check that your HDMI cable is version 1.3 or higher.
If the HDMI cables don’t support HDMI version 1.3, flicker
ing or no screen display can result. Please use the latest
cables that support at least HDMI version 1.3.
42/50PQ6***, 50PS3***
50/60PS8***
2
1
AV IN 1 AV OUT
L/MONO
R
AUDIO
VIDEO
L
R
AUDIO
VIDEO
COMPONENT IN
COMPONENT IN
3
1

17
EXTERN L EQUIPMENT SETUP
Connecting with an HDMI to DVI cable
AV IN 1 AV OUT
L/MONO
R
AUDIO
VIDEO
L
R
AUDIO
VIDEO
AV
AUDIO IN
(RGB/DVI)
VIDEO
R-AUDIO-L(MONO)
IN1 OUT
R - AUDIO - L VIDEO
COMPONENT IN
1
2
1
COMPONENT IN
12
Co ect the digital set-top box to HHDDMMII//DDVVII IINN 11
jack o the TV.
Co ect the audio output of the digital set-top box to
the AAUUDDIIOO IINN ((RRGGBB//DDVVII)) jack o the TV.
Tur o the digital set-top box. (Refer to the ow er’s
ma ual for the digital set-top box.)
Select HHDDMMII11i put source usi g the IINNPPUUTTbutto
o the remote co trol.
2
3
4
1
42/50PQ6***, 50PS3***
AV IN 1 AV OUT
L/MONO
R
AUDIO
VIDEO
L
R
AUDIO
VIDEO
AV
AUDIO IN
(RGB/DVI)
VIDEO
R-AUDIO-L(MONO)
IN1 OUT
R - AUDIO - L VIDEO
COMPONENT IN
1
2
1
COMPONENT IN
3
12
50/60PS8***

18
EXTERN L EQUIPMENT SETUP
DVD SETUP
Connecting with a co ponent cables
AV IN 1 AV OUT
L/MONO
R
AUDIO
VIDEO
L
R
AUDIO
VIDEO
COMPONENT IN
COMPONENT IN
12
1
2
Co ect the video outputs (Y, PB, PR)of the DVD to the
CCOOMMPPOONNEENNTT IINN VVIIDDEEOOjacks o the TV.
Co ect the audio outputs of the DVD to the
CCOOMMPPOONNEENNTT IINN AAUUDDIIOOjacks o the TV.
Tur o the DVD player, i sert a DVD.
Select CCoommppooeett 11i put source usi g the IINNPPUUTT
butto o the remote co trol.
If co ected to CCOOMMPPOONNEENNTT IINN 22i put, select
CCoommppooeett 22 i put source.
Refer to the DVD player's ma ual for operati g
i structio s.
2
3
4
5
1
Co ponent Input ports
To achieve better picture quality, connect a DVD player to the component input ports as shown below.
Compo e t ports o the TV
YPBPR
Video output ports
o DVD player
Y
Y
Y
Y
PB
B-Y
Cb
Pb
PR
R-Y
Cr
Pr
This manual suits for next models
9
Table of contents
Other LG Plasma TV manuals
Popular Plasma TV manuals by other brands

Panasonic
Panasonic Viera TH-P42V20A operating instructions

Hitachi
Hitachi UltraVision 42HDX62 operating guide

Panasonic
Panasonic Viera TH-37PV8P operating instructions

Toshiba
Toshiba 42WP66R Service manual

Panasonic
Panasonic Viera TH-42PZ700E operating instructions

Panasonic
Panasonic TH-42PE7U Service manual