LG LRE3091ST User manual

ELECTRIC RANGE
To contact LG Electronics, 24 hours a day,
7 days a week:
1-888-542-2623 (CANADA)
Or visit us on the Web at:
ca.lge.com (Canada)
Printed in Mexico
P/No.: MFL55646606
USER’S GUIDE
Please read this guide
thoroughly before
operating and keep it handy
for reference at all times.
LRE3091ST
LRE3091SB
LRE3091SW
Models

2
INTRODUCTION
IMPORTANT SAFETY INFORMATION ......3-9
A liance Outlet .............................................................9
PARTS AND FEATURES
Parts And Features ......................................................15
Control Panel Features ................................................16
SURFACE CONTROLS COOKING
Power Outage Message ...............................................10
Hot Surface Indicator ....................................................10
Locations Of the Radiant Surface Elements and
Controls ........................................................................10
Setting Surface Controls ..............................................11
Ti s To Protect the Glass Cookto Surface .................12
Glass Cookto Surface ................................................12
Cooking Areas ..............................................................13
Using the Pro er Cookware .........................................13
Home Canning Ti s ......................................................14
MAINTENANCE
Care and Cleaning ..................................................31-32
Cleaning The Glass Cookto ..................................32-33
Removing and Re lacing the Lift-Off Oven Door .........34
Door Care Instructions .................................................34
OPERATING INSTRUCTIONS
Setting the Clock ..........................................................17
Minimum and Maximum Control Pad Settings .............17
Setting the Timer On/Off ..............................................18
Setting Oven Lockout Feature .....................................18
Changing Hour Mode On Clock (12-hr, 24-hr) .............19
Setting Tem erature Unit - Fahrenheit or Celsius ........19
Setting Bee er Volume ................................................19
Setting Preheating Alarm Light On / Off .......................20
Thermostat Adjustment ................................................20
Setting Bake .................................................................21
Baking Layer Cakes .....................................................22
Before Using Oven Racks ............................................22
Setting Timed Bake ......................................................23
Setting Delayed Timed Bake ........................................24
Setting Broil ..................................................................25
Recommended Broiling Guide ................................25-26
Turn the Oven Light On / Off ........................................26
Self-Clean ...............................................................27-29
Removing And Re lacing the Storage Drawer ............30
Oven Vent ....................................................................30
TROUBLESHOOTING
Before Calling for Service ........................................35-38
WARRANTY
Warranty for Customers in Canada ..............................39 Product Registration Information
Model:
Serial Number:
Date of Purchase:
Staple your receipt here.
THAN YOU!
Congratulations on your
urchase and welcome to the
LG family. Your new LG Electric
range combines recision
cooking features with sim le
o eration and stylish design.
Follow the o erating and care
instructions in this manual and
your range will rovide you with
many years of reliable service.

READ ALL INSTRUCTIONS BEFORE USE
SAFETY PRECAUTIONS
To reduce the risk of ti ing of the range, the range
must be secured by ro erly installing anti-ti
bracket.
• To check that the anti-ti bracket is ro erly
installed:
Gras the to rear edge of the range back guard
and carefully attem t to tilt it forward. Verify that
the anti-ti devices are engaged.
• Warming drawer or storage drawer: Remove
drawer and visually ins ect that the rear leveling
leg is fully inserted into the anti-ti bracket.
• Refer to the installation manual for ro er anti-ti
bracket installation.
• Be certain your a liance is ro erly installed and
grounded by a qualified technician.
• Do not re air or re lace any art of the a liance
unless s ecifically recommended in the manual.
• All other servicing should be referred to a
qualified technician.
• Always disconnect ower to a liance before
servicing by un lugging, removing the fuse or
switching off the circuit breaker.
Read and follow all instructions before using your oven to revent the risk of fire, electric shock, ersonal injury,
or damage when using the range. This guide do not cover all ossible conditions that may occur. Always
contact your service agent or manufacturer about roblems that you do not understand.
WARNING This symbol will alert you to hazards or unsafe practices which
could cause serious bodily harm or death.
CAUTION This symbol will alert you to hazards or unsafe practices which could
cause bodily injury or property damage.
This is the safety alert symbol. This symbol alerts you to potential hazards that can
kill or hurt you and others. All safety messages will follow the safety alert symbol
and either the word WARNING or CAUTION. These words mean:
3
ENGLISH
IMPORTANT SAFETY INFORMATION
WARNING
• DO NOT step or sit on the door.
Install the Anti-Tip Bracket packed
with range.
- The range could be ti ed and injury
might result from s illed hot liquid,
food, or the range itself.
- If the range is ulled away from the
wall for cleaning, service, or any
other reason, ensure that the anti-ti
bracket is ro erly reengaged when
the range is ushed back against the
wall.

4
IMPORTANT SAFETY INFORMATION
SAFETY PRECAUTIONS (cont.)
• DO NOT TOUCH HEATING ELEMENTS OR
INTERIOR SURFACES OF OVEN.
Heating elements may be hot even though they
are dark in color. Interior surfaces of an oven
become hot enough to cause burns. During and
after use, do not touch or let clothing or other
flammable materials contact heating elements or
interior surfaces of oven until they have had
sufficient time to cool. Other surfaces of the
a liance may become hot enough to cause
burns. Among these surfaces are oven vent
o enings and surfaces near these o enings, oven
doors, and windows of oven doors.
• Use Care When Opening Door.
Let hot air or steam esca e before you remove or
re lace food in the oven
• Do Not Heat Unopened Food Containers.
Build-u of ressure may cause container to burst
and result in injury.
• Be certain all packing materials are removed
from the appliance before operating.
Kee lastics, clothes, and a er away from arts
of the a liance that may become hot.
• DO NOT force the door open.
This can damage the automatic door locking
system. Use care when o ening the oven door
after the self-cleaning cycle. Stand to the side of
the oven when o ening the door to allow hot air or
steam to esca e. The oven may still be VERY
HOT.
• DO NOT use a steel-wool pad.
It will SCRATCH the surface.
• DO NOT use harsh etching, abrasive cleaners
or sharp metal scrapers to clean the oven
door glass since they can scratch the surface.
It may result in shattering of the glass.
• Be careful when removing and lifting the door.
• DO NOT lift the door by the handle.
The door is very heavy.
• DO NOT step or sit on the door.
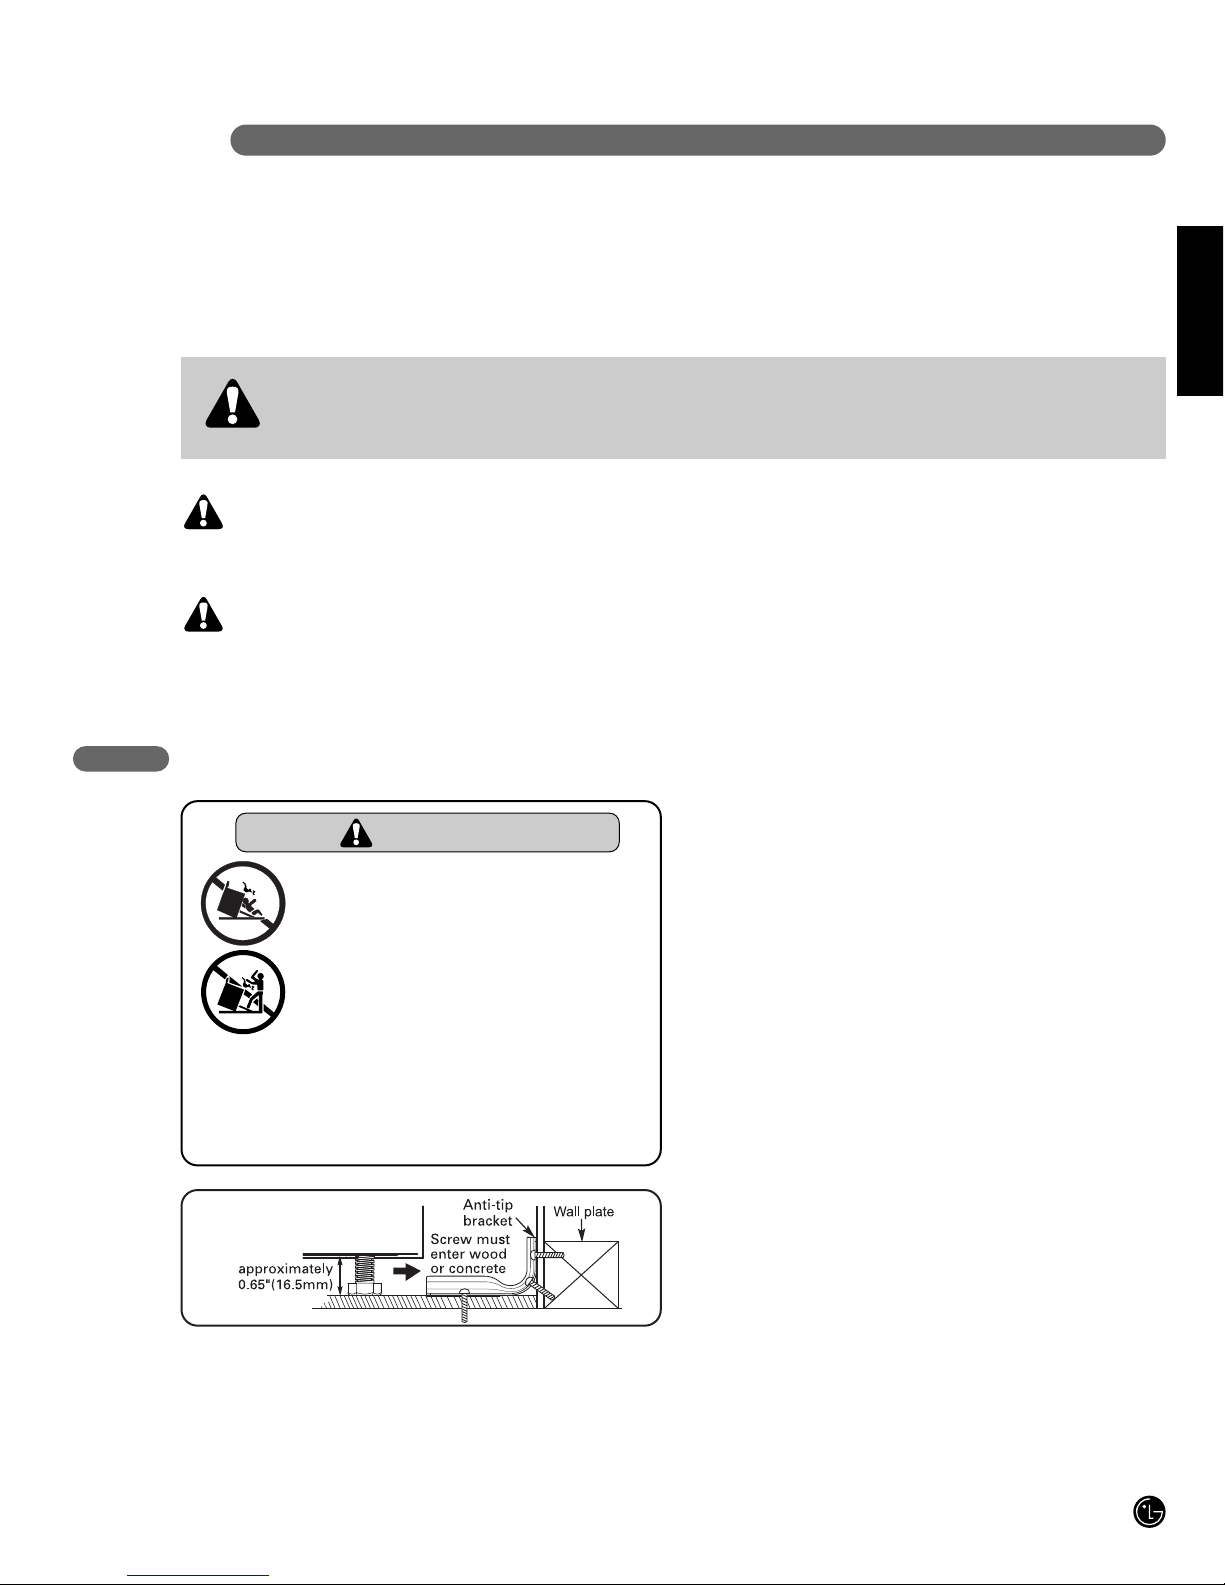
Install the anti-ti bracket acked with range.
- The range could be ti ed and injury might
result from s illed hot liquid, food, or the range
itself.
- If the range is ulled away from the wall for
cleaning, service, or any other reason, ensure
that the anti-ti bracket is ro erly reengaged
when the range is ushed back against the wall.
READ ALL INSTRUCTIONS BEFORE USE
• NEVER use your appliance for warming or
heating the room.
• DO NOT use water on grease fires.
Should an oven fire occur, leave the oven
door closed and turn the oven off. If the fire
continues, throw baking soda on the fire or
use a fire extinguisher.
• Use dry pot holders only.
Moist or damp pot holders on hot surfaces
may result in burns from steam. Do not let
the pot holder touch hot heating elements.
Do not use a towel or other bulky cloth.
• Storage in or on appliance.
Flammable materials should not be stored
in an oven or near surface elements.
• Wear proper apparel.
Loose-fitting or hanging garments should
never be worn while using the appliance.
WARNING

READ ALL INSTRUCTIONS BEFORE USE
5
ENGLISH
IMPORTANT SAFETY INFORMATION
ELECTRICAL SAFETY
• Protective Liners. Do not use aluminum foil or
any other material to line the oven bottoms.
Im ro er installation of these liners may result in
a risk of electric shock or fire.
• Do Not allow aluminum foil or meat robe to
contact heating elements.
• Before replacing your oven light bulb, switch
off the electrical power to the oven at the main
fuse or circuit breaker panel.
Failure to do so can result in severe ersonal
injury, death, or electrical shock.
• DO NOT line the oven walls, racks, bottom, or
any other part of the oven with aluminum foil
or any other material.
Doing so will disru t heat distribution, roduce
oor baking results and cause ermanent
damage to the oven interior (aluminum foil will
melt to the interior surface of the oven.)
• DO NOT place aluminum foil directly on the
oven bottom.
Aluminum foil
WARNING
• Do not place foods directly on the oven
bottom.
WARNING
VENTILATING HOODS
• eep Oven Vent Ducts Unobstructed.
The oven vent is located above the left rear
surface unit.
This area could become hot during oven use.
Never block this vent and never lace lastic or
heat-sensitive items on vent.
PAN PLACEMENT
Doing so will cause ermanent damage to the oven
bottom finish.
Heater

6
IMPORTANT SAFETY INFORMATION
READ ALL INSTRUCTIONS BEFORE USE
DEEP FAT FRYERS
• Use extreme caution when moving the grease
kettle or dis osing of hot grease.
SURFACE COOKING UNITS
• Use Proper Pan Sizes. This a liance is
equi ed with one or more surface units of
different size. Select utensils having flat bottoms
large enough to cover the surface unit heating
element.
The use of undersized utensils will ex ose a
ortion of the heating element to direct contact
and may result in ignition of clothing. Pro er
relationshi of utensil to burner will also im rove
efficiency.
• Never Leave Surface Units Unattended at High
Heat Settings. Boilovers cause smoking and
greasy s illovers that may ignite.
• Glazed Cooking Utensils. Only certain ty es of
glass, glass/ceramic, ceramic, earthenware, or
other glazed utensils are suitable for range-to
service without breaking due to the sudden
change in tem erature.
• Utensil Handles Should Be Turned Inward and
Not Extend Over Adjacent Surface Units. To
reduce the risk of burns, ignition of flammable
materials, and s illage due to unintentional
contact with the utensil, the handle of a utensil
should be ositioned so that it is turned inward,
and does not extend over adjacent surface units.
• Be sure you know which control ads o erate
each surface unit.
Make sure you turned on the correct surface unit.
SAFETY DURING USE
• Oven Racks. Always place oven racks in
desired position while oven is cool.
• Always use pot holders or oven mitts when
removing food from the oven or cooktop.
You can be burned because cookware and lates
will be hot.
• Use caution with the TIMED BA E or
DELAYED TIMED BA E features. Use the
automatic timer when cooking cured or frozen
meats and most fruits and vegetables. Foods
that can easily spoil, such as milk, eggs, fish,
meat or poultry, should be chilled in the
refrigerator first. Even when chilled, they
should not stand in the oven for more than 1
hour before cooking begins, and should be
removed promptly when cooking is
completed.
Eating s oiled food can result in sickness from
food oisoning.
• Should an oven fire occur, leave the oven door
closed and turn the oven off. If the fire
continues, throw baking soda on the fire or
use a fire extinguisher.
• DO NOT put water or flour on the fire.
Flour may be ex losive and water can cause a
grease fire to s read and cause ersonal injury.
• DO NOT use the broiler pan without the grid.
DO NOT cover the grid with aluminum foil.

7
ENGLISH
IMPORTANT SAFETY INFORMATION
CHILD SAFETY
• Children should be kept away from the
oven.
• Accessory parts will become hot when the
broiler is in use.
WARNING
• NEVER leave children alone or
unsupervised near the appliance when it is
in use or is still hot. Children should never
be allowed to sit or stand on any part of the
appliance as they could be injured or
burned.
• NEVER store items of interest to children in
cabinets above an appliance. Children
climbing on the appliance or on the
appliance door to reach items could be
seriously injured.
• Children must be taught that the appliance
and utensils in it can be hot. Let hot utensils
cool in a safe place, out of reach of small
children. Children should be taught that an
appliance is not a toy. Children should not
be allowed to play with controls or other
parts of the appliance.
CAUTION
• DO NOT leave small children unattended
near the appliance.
During the self-cleaning cycle, the outside of
the oven can become very hot to the touch.
CAUTION
GLASS/CERAMIC COOKING SURFACES
• DO NOT TOUCH SURFACE UNITS OR AREAS
NEAR UNITS.
Surface units may be hot even though they are
dark in color. Areas near surface units may
become hot enough to cause burns. During and
after use, do not touch, or let clothing or other
flammable materials contact surface units or
areas near units until they have had sufficient
time to cool. This includes the cookto and the
area above the oven door.
• Do Not Cook on Broken Cooktop. If cookto
should break, cleaning solutions and s illovers
may enetrate the broken cookto and create a
risk of electric shock. Contact a qualified
technician immediately.
• Clean Cooktop With Caution. Do not use
s onges or cloth to wi e s ills on a hot cooking
area. Use a ro er metal scra er.
• DO NOT use the glass cooktop surface as a
cutting board.
• DO NOT place or store items that can melt or
catch fire on the glass cookto , even when it is
not being used.
• Always turn the surface units on after lacing
cookware.
• DO NOT store heavy items above the cookto
surface that could fall and damage it.
READ ALL INSTRUCTIONS BEFORE USE

8
IMPORTANT SAFETY INFORMATION
GLASS/CERAMIC COOKING SURFACES (cont.)
• DO NOT place aluminum foil or lastic items such
as salt and e er shakers, s oon holders, or
lastic wra ings or any other material on the
range when it is in use.
- The hot air from the vent could melt lastics or
ignite flammable items.
• Make sure you turned on the correct surface unit.
• NEVER cook directly on the glass. Always use
cookware.
• Always place the pan in the center of the
surface unit you are cooking on.
NEVER leave surface units unattended at high
heat setting.
- Boilovers cause smoking and greasy s illovers
that may catch on fire.
• Always turn the surface units off before removing
cookware.
• DO NOT use plastic wrap to cover food.
- Plastic may melt onto the surface and be very
difficult to remove.
• DO NOT touch surface units until it has cooled
down.
• The surface elements may still be hot and burns
may occur if the glass surface is touched before it
has cooled down sufficiently.
• Immediately clean the s ills on cooking area to
revent a tough cleaning chore later.
• If cabinet storage is rovided directly above
cooking surface, limit it to items that are
infrequently used and can be safely stored in an
area subjected to heat. Tem eratures may be
unsafe for items such as volatile liquids, cleaners
or aerosol s rays.
• DO NOT touch surface elements until it has
cooled down sufficiently.
- The surface elements may still be hot and burns
may occur.
• NEVER leave food unattended at high or
medium-high setting. Boilovers can cause
smoking and greasy s illovers may catch on fire.
• When warming foods do not use containers that
seal. Allow venting for heated air to esca e
• DO NOT use a steel-wool pad.
- It will scratch the surface.
• DO NOT use scrub pads or abrasive cleaning
pads.
- They may damage your glass cookto surface.
• Cookware with rough or bottoms can mark or
scratch the cooktop surface.
• Do not slide anything metal or glass across
the cooktop.
• Do not use cookware with dirt or dirt built-up
on the bottom.
READ ALL INSTRUCTIONS BEFORE USE

The 120V a liance outlets located on the control
console may be used to run ortable a liances
laced on counterto s beside the range.
The outlets o erate inde endently and are not
affected by range control settings.
NOTE: Do not lace ortable a liances on the
cookto . Damage to the ortable a liance could
result if the cookto is hot.
Appliance Outlet Circuit Breakers:
The circuit breakers for the a liance outlets on
your range are located on to of the control
console. They are rated for 15 am s, that may tri
if the a liance lugged into it exceeds 15 am s.
To reset the circuit breaker, ress the switch of
located on the control console.
NOTE: If a liance outlet don ’t o erate, test out
your small ortable a liance by lugging into
other outlets.
9
ENGLISH
IMPORTANT SAFETY INFORMATION
SAFETY WHEN CLEANING
• Do Not Clean Door Gasket. The door gasket is
essential for a good seal. Care should be taken
not to rub, damage, or move the gasket.
• Do Not Use Oven Cleaners. No commercial
oven cleaner or oven liner rotective coating of
any kind should be used in or around any art of
the oven.
• Before self cleaning the oven. Remove broiler
an, all oven racks, meat robe and any other
utensils from the oven cavity.
• Never keep pet birds in the kitchen. The health
of birds is extremely sensitive to the fumes
released during an oven self-clean cycle. Fumes
may be harmful or fatal to birds. Move birds to
well-ventilated room.
• Clean in the self-clean cycle only arts listed in
this manual. Before self-clean the oven, remove
the broiler an and any utensils of foods from the
oven.
• It is normal for the cookto of the range to
become hot during a self-clean cycle. Therefore,
touching the cookto during a clean cycle should
be avoided.
• Important Instruction. In the event the self clean
error code Fis dis layed, and three long bee s
sound, the oven is malfunctioning in the self clean
mode. Switch off the electrical ower to the main
fuse or breaker and have serviced by a qualified
technician.
• Make sure oven lights are cool before
cleaning.
APPLIANCE OUTLETS
READ ALL INSTRUCTIONS BEFORE USE
Circuit Breakers
A liance Outlet

10
SURFACE CONTROLS COOKING
POWER OUTAGE MESSAGE
If your oven was set for a timed oven o eration and a
ower outage occurred, the clock and all rogrammed
functions must be reset.
The time of day will flash in the dis lay when there
has been a ower outage.
Press the Clear/Off ad. Reset the clock with the
correct time of day.
HOT SURFACE INDICATOR WILL
• Come on when the unit is hot to touch after.
• Come on during self-cleaning cycle.
• Stay on even after the unit is turned off.
• Glow until the unit has cooled down to
a roximately 150°F.
LOCATIONS OF THE RADIANT SURFACE ELEMENTS AND
CONTROLS
The radiant surface elements are located on the
cookto as below.
TIMER
DELAY
TIMED
BAKE BROIL WARM CLEAN LOCKED
Single
Left Front
Element
Single
Left Rear
Element
Single
Right Rear
Element
Dual
Right Front
Dual Element

22
1
A B
11
ENGLISH
SURFACE CONTROLS COOKING
SETTING SURFACE CONTROLS
Use to turn on the surface elements. An infinite choice of heat settings is available from Low to High. The knobs can
be set on or between any of the settings.
Place an on surface element.
Push in and turn the knob in either direction to the
desired heat setting.
• The control anel is marked to identify which
element the knob control. For exam le, the
gra hic above indicates left front element.
There is an element indicator light on
the control anel. When any surface
control knob is turned on, the light will
turn on. The light will turn off when all the
surface elements are turned off.
After cooking, turn knob to OFF. Remove an.
Dual Element (select modes)
The cooking surface has a dual element located at
the right front of the smoothto . This allows you to
change the size of the element.
The small element is o erated on the left side of the
knob control. To o erate the entire element, use the
right side of the knob control, The control for both
element sizes can be set anywhere between Low and
High.
Heating with inner
(smaller) element only
AB
Heating with both
element together
• NEVER leave food unattended at high or
medium-high setting.
- Boilovers can cause smoking and greasy
s illovers may catch on fire.
CAUTION
• DO NOT touch surface elements until they
have cooled down sufficiently.
- The surface elements may still be hot and burns
may occur.
CAUTION
• Use only cookware and dishes recommended
as safe for oven and cooktop use.
• Always use oven mitts when removing food
from the surface element as cookware and
plates will be hot.
• When warming foods do not use containers
that seal. Allow venting for heated air to
escape.
• Do not use plastic wrap to cover foods.
- Plastic may melt onto the surface and be very
difficult to clean.
CAUTION
To turn on a dual surface unit
(Right Front)
To turn on a single surface unit
(Left Front, Left Rear, Right Rear)
2
1
2

12
SURFACE CONTROLS COOKING
TIPS TO PROTECT THE GLASS COOKTOP SURFACE
Cleaning
(See ages 32~33 for more information)
Before first use, clean the cookto .
Clean your cookto daily or after each use. This will
kee your cookto looking good and can revent
damage.
If a s illover occurs while cooking, immediately clean
the s ill from the cooking area while it is hot to
revent a tough cleaning chore later. Using extreme
care, remove s ill with a ro er metal scra er.
Do not allow s ills to remain on the cooking area or
the cookto trim for a long eriod of time.
Do not use abrasive cleansing owders or scouring
ads which will scratch the cookto .
Do not use chlorine bleach, ammonia, or other
cleansers not s ecifically recommended for use on
glass-ceramic.
To Prevent Other Damages
Do not allow lastic, sugar, or foods with high sugar
content to melt onto the hot cookto . Should this
ha en, clean immediately. (See Cleaning, ages
32~33.)
Do not let a an boil dry as this will damage the
surface and an.
Do not use cookto as a work surface or cutting
board.
Do not cook food directly on the surface.
To Prevent Marks and Scratches
Do not use glass ans. They may scratch the surface.
Do not lace a trivet or wok ring between the surface
and an. These items can mark or scratch the to .
Do not slide aluminum ans across a hot surface.
The ans may leave marks which need to be
removed rom tly.”
(See Cleaning ages 32~33.)
Make sure the surface and the an bottom are clean
and dry before turning on to revent scratches.
To revent scratching or damaging to the glass-
ceramic to , do not leave sugar, salt, or fats on the
cooking area. Wi e the cookto surface with a clean
cloth or a er towel before using.
Do not slide heavy metal ans across the surface
since these may scratch.
To Prevent Stains
Do not use a soiled dish cloth or s onge to clean the
cookto surface. A film will remain which may cause
stains on the cooking surface after the area is heated.
Continuously cooking on a soiled surface may/will
result in a ermanent stain.
GLASS COOKTOP SURFACE
Glass Cooktop Surface Notes:
• The cooktop may emit light smoke and odor the
first few times the cookto is used. This is normal.
• Glass cooktops retain heat for a period of time
after the elements are turned off. Turn the
elements off a few minutes before food is com letely
cooked and use the retained heat to com lete
cooking. When the hot surface light turns off, the
cooking area will cool down enough to touch.
Because of the way they retain heat, the cookto
elements will not res ond to changes in settings as
quickly as coil elements.
• In the event of a otential boilover, remove the an
from the cooking surface.
• Do not attempt to lift the cooktop.
• The smoothto surface may a ear discolored when
it is hot. This is normal and will disa ear when the
surface cools.

13
ENGLISH
SURFACE CONTROLS COOKING
COOKING AREAS
The cooking areas on your range are identified by
ermanent circles on the glass cookto surface. For
the most efficient cooking, fit the an size to the
element size.
Pans should not extend more than 1/2 to 1-inch
beyond the cooking area.
When a control is turned on, a glow can be seen
through the glass cookto surface. The element will
cycle on and off to maintain the preset heat
setting, even on Hi.
For more information on cookware, refer to Cookware
Recommendations.
USING THE PROPER COOKWARE
Using the right cookware can revent many roblems,
such as food taking longer to cook or achieving
inconsistent results. Pro er ans will reduce cooking
times and cook food more evenly. Stainless steel is
recommended.
Check pans for flat bottoms by using
a straight edge or ruler
Place a ruler across the bottom of the an.
Hold it u to the light.
No light should be visible under the ruler.
Dual element
Single element
Recommended Incorrect
Flat bottom and straight
sides.
Heavy-gauge ans.
Pan sizes match the
amount of food to be
re ared and the size
of the surface element.
Weight of handle does
not tilt an. Pan is well
balanced.
Tight-fitting lids.
Flat bottom woks.
Curved, grooved, or
war ed an bottoms. Pans
with uneven bottoms do
not cook efficiently and
sometimes may not boil
liquid.
Very thin-gauge metal or
glass ans.
Pans are smaller or larger
than the element.
Cookware with loose or
broken handles. Heavy
handles that tilt the an.
Loose-fitting lids.
Woks with a ring-stand
bottom.
NOTE:
• Do not use a small an on a large element. Not only
does this waste energy, but it can also result in
s illovers burning onto the cooking area which
requires extra cleaning.
• Do not use non-flat s ecialty items that are
oversized or uneven such as round bottom woks,
ri led bottom, and/or oversized canners and
griddles.
• Do not use foil or foil-ty e containers. Foil may melt
onto the glass. If metal melts on the cookto , do not
use. Call an authorized service agent.

14
SURFACE CONTROLS COOKING
HOME CANNING TIPS
Be sure the canner is centered over the surface
unit. Make sure the canner is flat on the bottom.
The base must not be more than 1 inch larger than
the element. Use of water bath canners with ri led
bottoms may extend the time required to bring the
water to a boil and cookto s may be damaged.
Some canners are designed with smaller bases for
use on smooth to surfaces.
Use the high heat setting only until the water comes
to a boil or ressure is reached in the canner.
Reduce to the lowest heat setting that maintains the
boil, or ressure. If the heat is not turned down,the
cookto may be damaged.

15
ENGLISH
PARTS AND FEATURES
PARTS AND FEATURES
Ceramic glass
Broiler pan and Grid
(Not included in this model)
Anti-tip bracket
Model and serial
number plate
O en racks (2 ea)
Storage drawer
O en door
Gasket
O en racks (2 ea)
Self clean latch
Automatic o en light switch
Dual element
Single element
Appliance outlet
Appliance outlet circuit
breaker
Template
Screws (6 ea) Anchors (6 ea)
Anti-tip bracket

CLOC Pad: Press before setting the time of
day.
COO TIME Pad: Press and then use the
number ads to set the amount of time you want
your food to cook. The oven will shut off when the
cooking time has run out.
Display: Shows the time of day, oven
tem erature, whether the oven is in the bake,
broil or self-cleaning mode, and the times set for
the timer or automatic oven o erations.
BROIL Pad: Press to select the broil function.
BA E Pad: Press to select the bake function.
START Pad: Must be ressed to start any
cooking or cleaning function.
START TIME Pad: Use along with BAKE, CONV.
BAKE, CONV. ROAST, Cook time, and Self
Clean ads to set the oven to start and sto
automatically at a time you set.
TIMER ON/OFF Pad: Press to select the timer
feature.
+/- Pad: Enters or changes time, oven
tem erature. Sets HI or LO broil.
SELF CLEAN Pad: Press to select self-cleaning
function. See the using the Self-Cleaning Oven
section, age 27.
OVEN LIGHT Pad: Press to turn the oven light
on or off.
CLEAR/OFF Pad: Press to cancel all oven
o erations exce t the clock and timer.
NOTE:
If F– and a number appear in the display and
the oven control signals, this indicates a
function error code.
See age 35.
Press the CLEAR/OFF ad. Allow the oven to
cool for one hour. Put the oven back into
o eration.
If the function error code re eats, disconnect the
ower to the oven and call for service.
If your oven was set for a timed oven
operation and a power outage occurred, the
clock and all rogrammed functions must be
reset.
The time of day will flash in the display when
there has been a power outage.
16
PARTS AND FEATURES
CONTROL PANEL FEATURES
READ THE INSTRUCTIONS CAREFULLY BEFORE USING THE OVEN. For satisfactory use of your oven,
become familiar with the various features and functions of the oven as described below. Detailed instructions
for each feature and function follow later in this Owner's Manual.
7 8 10 11 129
1 2 4 5 63
1
11
12
2
3
4
5
6
7
8
9
10

SETTING THE CLOCK
17
ENGLISH
OPERATING INSTRUCTIONS
To set the clock:
The CLOCK ad is used to set the clock. The clock
has been reset at the factory for 12 hours o eration.
When the range is first lugged in, or when the ower
su ly to the range has been interru ted, the time of
day in the dis lay will flash. You can make a choice
between 12-hour clock and 24-hour clock (refer to
age 19):
Press CLEAR/OFF.
Press CLOC .
Press the +or –ad to set the time
of day.
Press START.
The clock will start.
MINIMUM & MAXIMUM CONTROL PAD SETTINGS
All of the features listed have minimum and maximum
time or tem erature settings that may be entered into
the control. An entry acce tance bee will sound each
time a control ad is ressed.
An entry error tone (3 short bee s) will sound if the
entry of the tem erature or time is below the minimum
or above the maximum settings for the feature.
FEATURE MIN. TEMP. MAX. TEMP.
BAKE TEMP.
BROIL TEMP.
SELF CLEAN
TIME
170°F / 80°C
LO (400°F)
2 hours
550°F / 285°C
HI (550°F)
4 hours

18
OPERATING INSTRUCTIONS
SETTING THE TIMER ON/OFF
To set the Timer (example for 5 minutes):
The TIMER ON/OFF serves as an extra timer in the
kitchen that will bee when the set time has run out.
It does not start or sto cooking.
The TIMER ON/OFF feature can be used during any
of the other oven control functions.
NOTE:
If the remaining time is not in the dis lay, recall the
remaining time by ressing the Timer on/off.
NOTE:
1. If you ress TIMER ON/OFF once, it allows you to
set the time in seconds.
(for exam le: if you ress 50, it means 50 seconds)
2. If you ress TIMER ON/OFF twice, it allows you to
set the time in minutes.
(for exam le: if you ress 5, it means 5 minutes)
Press TIMER ON/OFF twice.
0:00 and HR inside O will a ear
and TIMER will flash in the dis lay.
Press the +or -ad until the correct
time a ears in the dis lay.
Press TIMER ON/OFF.
The time will count down with 5:00
and TIMER will show in the dis lay.
NOTE:
If TIMER ON/OFF is not ressed,
the timer will return to the time of
day.
When the set time has run out, End
will show in the dis lay. The clock
will sound with 3 bee s every 15
seconds until TIMER ON/OFF is
ressed.
To cancel the Timer before the set time has
run out:
Press TIMER ON/OFF once.
The dis lay will return to the time of
day.
SETTING OVEN LOCKOUT FEATURE
To activate the Oven Lockout feature:
The START ad controls the Oven Lockout feature.
The Oven Lockout feature automatically locks the
oven door and revents most oven controls from
being turned ON.
It does not disable the clock, the timer, or the interior
oven light.
Press and hold START for
3 seconds.
2 bee s will sound, DOOR
LOC ED will flash in the dis lay.
Once the oven door is locked the
DOOR LOC ED indicator will sto
flashing and remain on along with
the lock icon( ) light.
To reactivate normal oven operation:
Press and hold START for 3
seconds. A bee will sound
2 times. The DOOR LOC ED will
continue to flash until the oven door
has com letely unlocked and the
lock icon( ) light will clear.
The oven is again fully o erational.
LOCKED
LOCKED

Your control is set to use a 12-hour clock. If you
would refer to have a 24-hour clock, follow the ste s
below.
TIMER ON/OFF ad control the Fahrenheit or Celsius
tem erature dis lay modes. The oven control can be
rogrammed to dis lay tem eratures in Fahrenheit or
Celsius. The oven has been reset at the factory to
dis lay in Fahrenheit.
The bee er volume feature allows you to adjust the
volumes to a more acce table volume. There are
three ossible volume levels.
19
ENGLISH
OPERATING INSTRUCTIONS
CHANGING HOUR MODE ON CLOCK (12-hour or 24-hour)
Changing between 12 and 24 hour clock:
Press and hold the CLOC ad for
3 seconds.
Press the CLOC ad to switch
between the 12 and 24 hour clock.
Press START to acce t the desired
change.
SETTING BEEPER VOLUME
To set beeper volume:
Press and hold TIMER ON/OFF for
3 seconds. The dis lay will show
O t,
Press -to switch bee er volume
(Hi, Lo, and OFF.)
Press START to acce t the desired
change.
SETTING TEMPERATURE UNIT — FAHRENHEIT OR
CELSIUS
To change display from Fahrenheit to
Celsius or Celsius to Fahrenheit:
Press and hold TIMER ON/OFF for
3 seconds. The dis lay will show
O t.
Press + to switch between the F
and C.
Press START to acce t the desired
change.

20
OPERATING INSTRUCTIONS
SETTING PREHEATING ALARM LIGHT ON/OFF
The interior oven light automatically turn on when the
oven door is o ened.
When oven reaches set-tem erature after reheat,
the oven notifies reheat-end by flashing oven lam
until door is o ened.
You can activate or deactivate smart oven light
feature. Default Setting is on.
To set smart oven light on/off:
Press and hold TIMER ON/OFF for
3 seconds. The dis lay will show
O t.
Press OVEN LIGHT to switch
between On and OFF.
Press START to acce t the desired
change.
THERMOSTAT ADJUSTMENT
The tem erature in the oven has been reset at the
factory. When first using the oven, be sure to follow
reci e times and tem eratures. If you think the oven
is too hot or too cool, the tem erature in the oven can
be adjusted. Before adjusting, test a reci e by using a
tem erature setting that is higher or lower than the
recommended tem erature. The baking results
should hel you to decide how much of an adjustment
is needed.
The oven tem erature can be adjusted from
±35° F (±19° C).
NOTE:
The thermostat adjustments made with this feature
will change just Bake, Convection Bake, and
Convection Roast tem erature.
To increase the oven temperature:
Press and hold BA E for 3
seconds.
To increase tem erature, use the +
ad to enter the desired change.
Press START to acce t the
tem erature change and the dis lay
will return to the time of day.
Press CLEAR/OFF to reject the
change if necessary.
To decrease the oven temperature:
Press and hold BA E for 3
seconds.
To decrease the tem erature, use
the -ad to enter the desired
change.
Press START to acce t the
tem erature change and the dis lay
will return to the time of day.
Press CLEAR/OFF to reject the
change if necessary.
Other manuals for LRE3091ST
1
This manual suits for next models
2
Table of contents
Languages:
Other LG Range manuals

LG
LG LDG3036ST User manual

LG
LG LRG3083ST User manual

LG
LG LRE30955ST Use and care manual

LG
LG Studio LSES302ST User manual

LG
LG LSE4616ST.BSTLLGA User manual

LG
LG LRG3097ST User manual

LG
LG LSB5682SW Use and care manual

LG
LG LSIL6336FE User manual

LG
LG LRE3194ST User manual

LG
LG LSIS6338 E Series User manual