LG V-C4380STS User manual

VACUUM CLEANER
SERVICE MANUAL
MODEL : V-C4380STS
VC4380T
V-C4380STR
CAUTION
BEFORE SERVICING THE UNIT, READ THE
"SAFETY PRECAUTIONS" IN THIS MANUAL.
Website http://biz.lgservice.com
삼흥
정판
P/NO : 3828Fi5877A
June, 2008
Printed in Korea

-2-
CONTENTS
SAFETY PRECAUTIONS.............................................................................................................................3
CAUTIONS ...................................................................................................................................................3
DESCRIPTION..............................................................................................................................................4
SPECIFICATIONS ........................................................................................................................................4
DISASSEMBLY ........................................................................................................................................5~6
TROUBLE SHOOTING GUIDE................................................................................................................7~9
SCHEMATIC DIAGRAM.............................................................................................................................10
PRINTED CIRCUIT BOARD ......................................................................................................................10
EXPLODED VIEW ................................................................................................................................11~13
REPLACEMENT PARTS LIST............................................................................................................14 ~19

-3-
SAFETY PRECAUTIONS
BEFORE OPERATING THIS VACUUM CLEANER, READ THIS SERVICE MANUAL THOROUGHLY,
AND OBSERVE EACH POINT CAREFULLY.
1. Filter
1) The filter is composed of a motor safety filter, a
exhaust filter and a paper bag or a cloth bag.
2) Never use the vacuum cleaner without filters. It
may harm the motor.
3) When the cloth bag, the motor safety filter and
the exhaust filter are soiled, wash the filter with
neutral cleanser.
NOTE : Re-use of the cloth bag, motor safety filter.
Never wash the filter in a washing machine or in
a dishwasher.
Never use hot water for washing the filter.
Re-use the filter after drying it completely in the
shade.
Do not dry near fire or direct sun ray.
2. Dust indicator
When the dust bag is full of dust, the indicator turns
to red (Suction power will be reduced). Then,
change the paper bag with the new one or clean the
cloth bag.
4. Avoid sucking such materials as :
1) Liquid or wet dust :
Clogs the ventilation holes, reduces the suction
power significantly and harms the motor.
2) Inflammable liquids such as benzene, alcohol or
solvents.
3) Burning objects such as cigarette butts.
4) Bulky objects such as vinyl, paper etc.
5) Sharp objects such as needles, pins, metal or
glass particles etc.
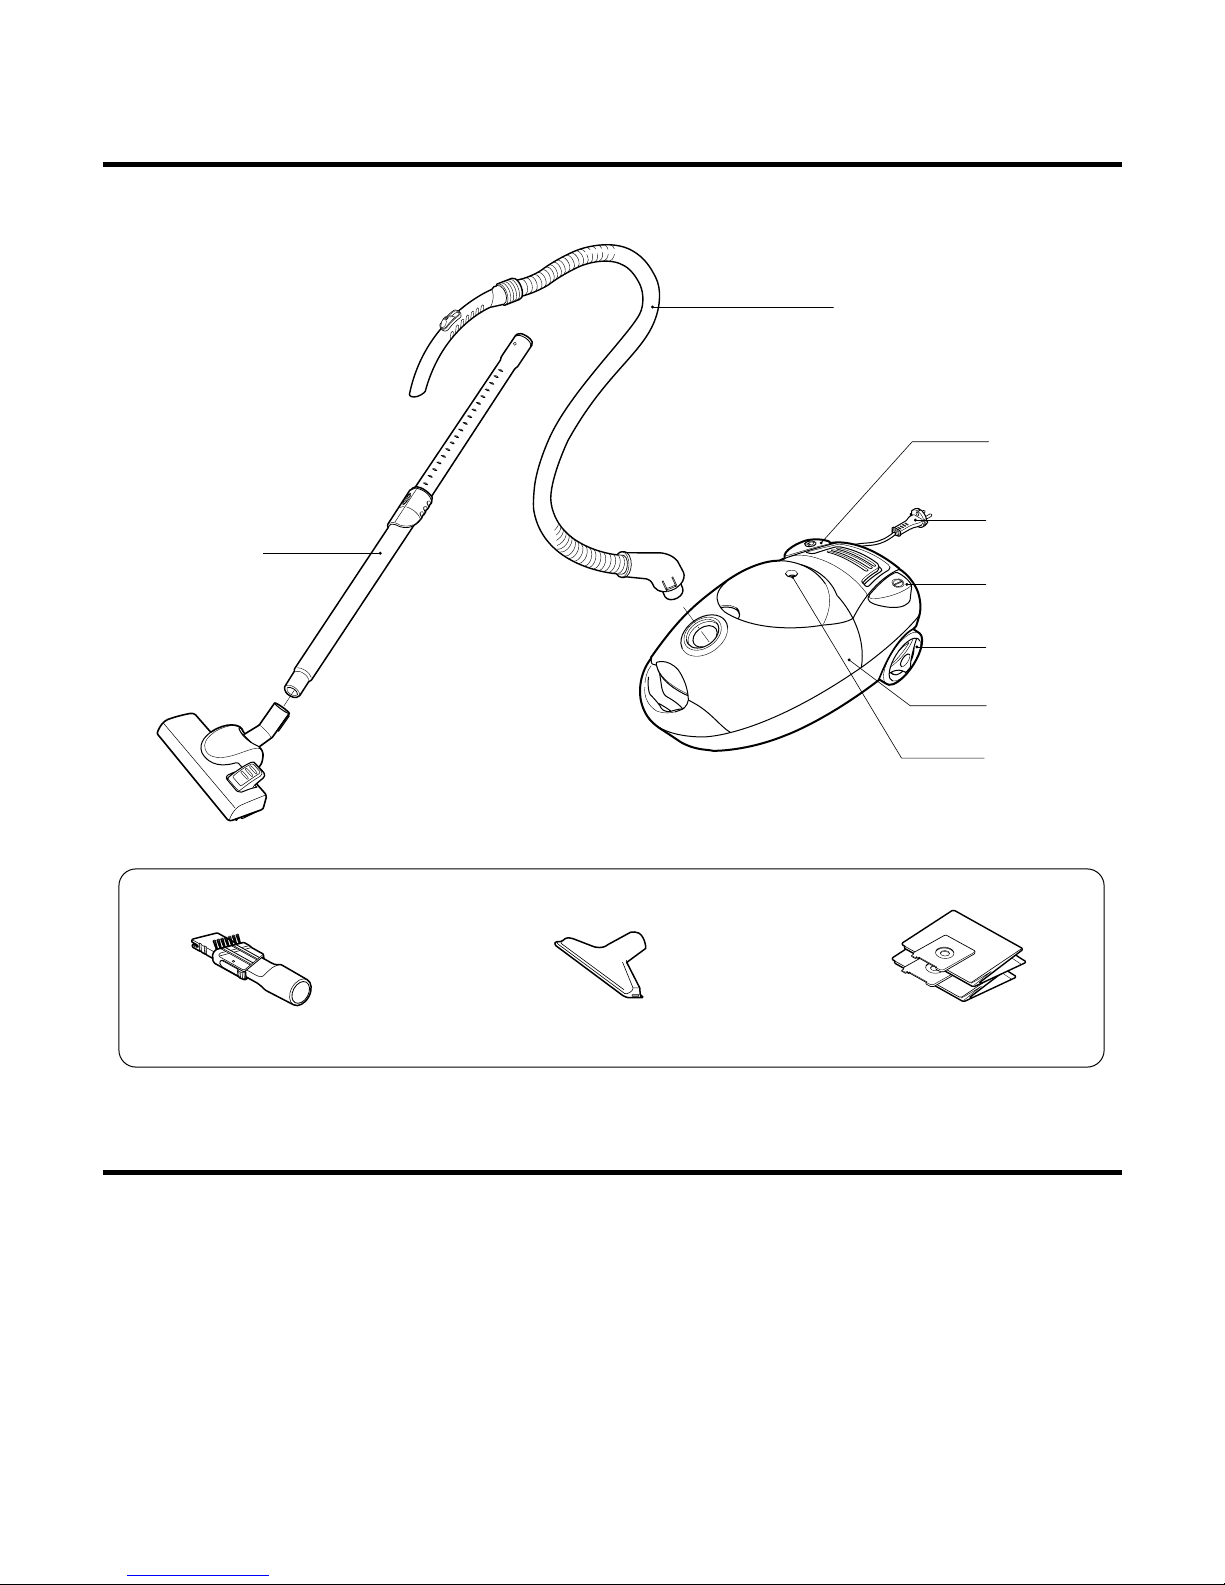
5. Attachments
1) Nozzle : for cleaning wooden floor, the room floor
and carpet.
2) Dusting Brush and Crevice Tool :
For cleaning any crevice, inside corners of
window frames.
For delicate vacuuming of fabrics on the
furniture, curtains, etc.
3) Upholstery Nozzle : for vacuuming the dust on
the upholstery.
6. Close supervision is necessary when this
vacuum cleaner is used by or near children.
Children's carelessness may cause damage to
the cleaner or injure persons.
7. Air exhausted from the vacuum cleaner is
normally warm. But if extraordinarily hot air is
exhausted, check if the telescopic tube, hose or
dust bag is clogged or not.
8. Electric shock could occur if used outdoors or
on wet surfaces.
CAUTIONS
BEFORE ATTEMPTING TO SERVICE OR ADJUST ANY PART OF THE VACUUM CLEANER, DISCONNECT
THE ELECTRICAL POWER SUPPLY CORD FROM THE WALL OUTLET.
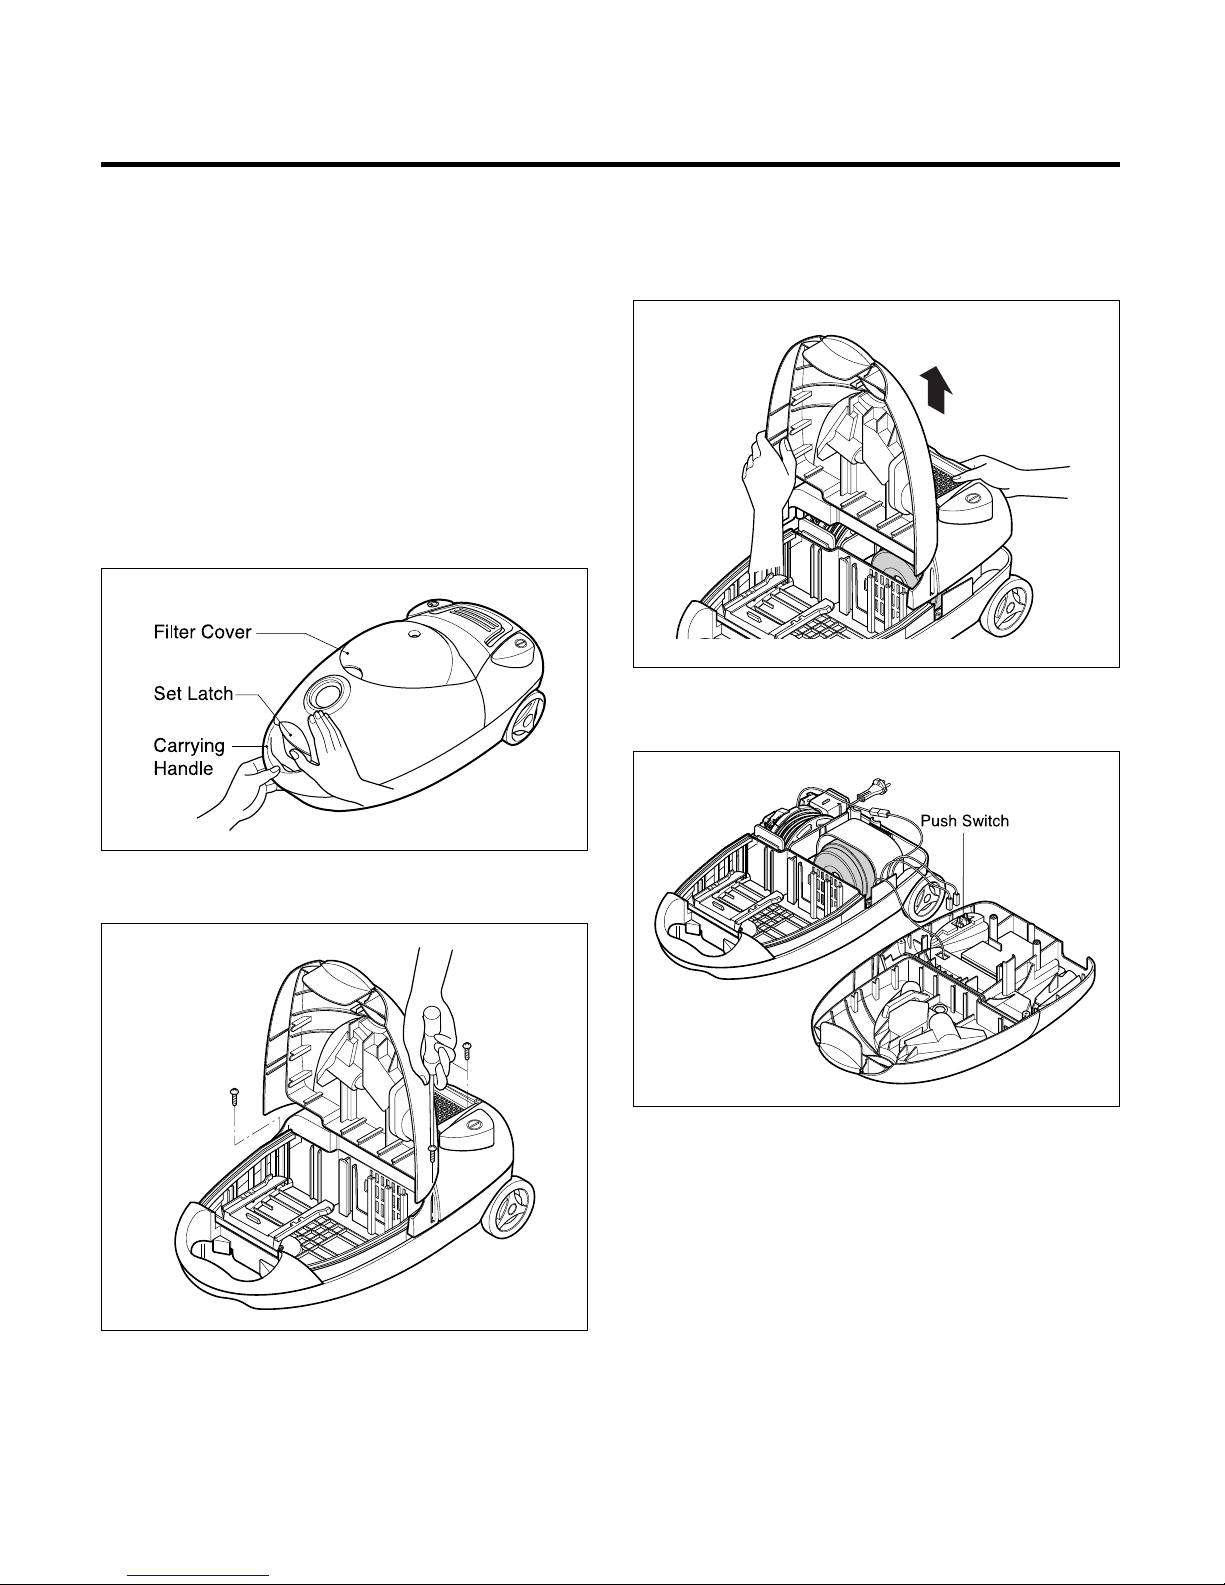
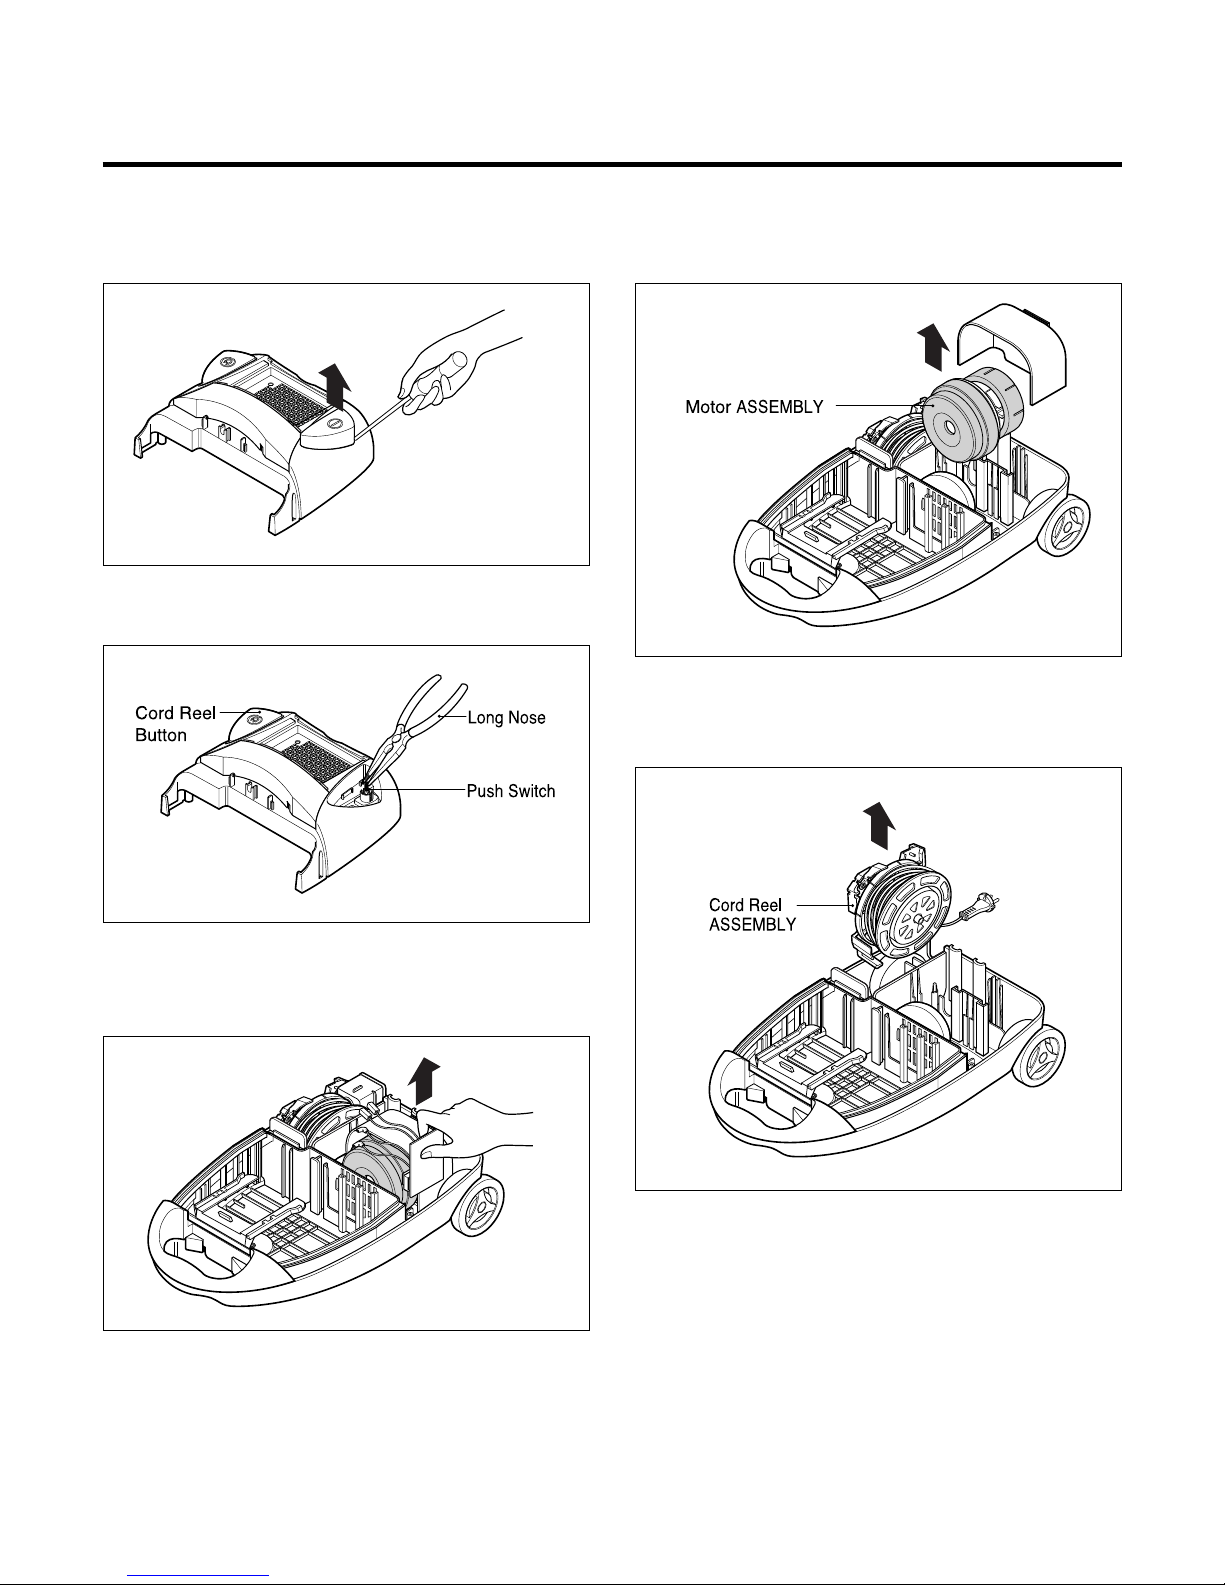
1. Motor exchange
1) Separate the Body Cover and Body Base by
unfastening the screws.
2) After disconnecting the lead wires, replace the
old motor with a new one.
2. In case of exchanging other parts. refer to the
exploded view.

-4-
DESCRIPTION
CANISTER
Brush Assembly,Dust Nozzle Assembly,Upholstery Filter Assembly,Paper
ATTACHMENTS
Dust Indicator
Cord Reel
Button
Filter cover
Wheel
Switch Button
(ON/OFF)
Power Cord
Nozzle Assembly,Floor
Pipe Assembly,
Telescopic
Flexible Hose ASS'Y
SPECIFICATIONS
1. MODEL : REFER TO THE COVER PAGE
2. POWER SOURCE : ON RATING PLATE
3. POWER CONSUMPTION : ON RATING PLATE
4. POWER CONTROL : SLIDE CONTROL ON HANDLE
5. CAPACITY : 6.2ℓ
6. CORD LENGTH : 6 m
7. NET WEIGHT : 5.8 kg
8. PACKING WEIGHT : 9 kg
9. NET DIMENSION : 305×522×230 (W×D×H)mm
10. PACKING DIMENSION
:358×577×370(W×D×H)mm
11. ATTACHMENTS
HOSE ASSEMBLY,FLEXIBLE ......................................... 1EA
PIPE ASSEMBLY,TELESCOPIC .................................... 1EA
NOZZLE ASSEMBLY,FLOOR ......................................... 1EA
BRUSH ASSEMBLY,DUST ............................................. 1EA
NOZZLE ASSEMBLY,UPHOLSTERY ............................ 1EA
FILTER ASSEMBLY,PAPER............................................ 1EA
• This specifications are subject to change according to the
buyer's request.

-5-
DISASSEMBLY
• Almost all the parts of this vacuum cleaner can be
assembled with a screw driver and each connecting
component easily fits each other.
Disassemble one by one referring to the exploded
view.
• If possible, don’t disassemble except for the
necessary parts. It is not necessary to disassemble
the parts that are not detailed in the exploded view.
1. Body Cover Assembly Replacement
1) Grasp carrying handle and open filter cover by
lifting latch.
2) Open the filter cover and remove the two screws
fastening the body base in the direction of arrow.
3) Lift body cover in the direction of the arrow.
4) Strip off the lead wires from the push switch and
others.
2. Filter cover assembly replacement
1) Push the hinge side by inserting flat screw driver
in crack between hinge and body cover.
NOTE : Before attempting to service or adjust any part of the vacuum cleaner,disconnect the electrical power
supply cord from the wall outlet.

-6-
3. Push Switch Assembly Replacement
1) Push the s/w button hook in the direction of the
arrow.
2) Push the push switch down grasping the wings of
push switch by long nose.
4. PWB Assembly Replacement.
1) Remove the two screws fastening the P.W.B
Assembly on the body cover.
5. Motor Assembly Replacement
1) Lift the motor assembly in direction of the arrow after
stripping off the lead wires.
6. Cord Reel Assembly Replacement
1) Lift the cord reel assembly from the body base in
direction of the arrow.

-7-
TROUBLE SHOOTING GUIDE
1. SWITCH ON BUT MOTOR DOSE NOT TURN.
2. SWITCH ON, MOTOR DOES NOT TURN BUT BUZZES
CHECKING CAUSE SOLUTION
Check the power
source
Abnormal
Normal
Poor plug insertion Insert again
The fuse is melt down in the
coverknife switch Exchange the fuse
Power cord cut Repair or exchange
Interior lead wire cut Exchange the lead wire
Motor armature cut Exchange the motor
Ball bearing defacement Exchange the motor
Impeller hindrance
(Caused by foreign matters)
Remove the foreign
matters
Motor(stator armature) coil
cut or damaged Exchange the motor
Poor contact carbon
brush defaced Exchange or repair
Poor switch contact point Exchange the switch

-8-
3. SWITCH OFF BUT MOTOR TURNS
4. WEAK SUCTION POWER
Poor connection Repair
Poor switch Exchange the switch
Carbon brush defaced Exchange the motor
Motor armature cut
Low rotation speed
Exchange the motor
Foreign matters attached to
the impeller
Remove the foreign
matters
Low voltage Inquire to the Power utility
company
Hose and extension wands
are clogged with foreign
matters
Remove the foreign
matters in the hose or
extension wands
Filter bag or cloth bag is filled
with inhaled foreign matters
Motor turns normally,
but suction power is weak
Remove the foreign
matters or exchange the
filter bag or clean the cloth bag
The slide knob on the handle
is opened
Close the slide knob by
sliding it

-9-
5. VIBRATION NOISES
6. RADIO, TV RECEPTION DISTURBANCE
7. IMPROPER TUBE OF NOZZLE CONNECTION
Loose parts Secure firmly
Unbalanced motor assembly Exchange or repair the motor
Foreign matters are attached
to the impeller Remove the foreign matters
Poor cord, lead wire Exchange cord, lead wire
Poor rectification of carbon
brush Exchange the the motor
Bent connection parts Exchange the parts
Poor connection
(Caused by foreign matters)
Remove the foreign matters
and reconnect
Poor electric connector or
receiver
Repair the electric connector or
receiver
Poor capacitor Exchange the capacitor
Poor rectification of carbon
brush Exchange the motor
Armature is cut or foreign
matters attachedattached
Exchange motor
Remove foreign matters

-10-
SCHEMATIC DIAGRAM
PRINTED CIRCUIT BOARD

-11-
MDSBA1
AJWBA1
EBRBM1
MDJBM1
AHJBA1
MAMBB1
MEGBB1
AHDBR1
MCQBM1 EAUBA1
ACQBM1
MCKBH1
ADQBH1
MHYBA1
MDSBA2 MCQBA1
MEGBC1
MEGBC2
EXPLODED VIEW
V-C4380STS(V-C4380ST.ALSQLGD)
V-C4380T(V-C4380ST.ALSQLUK)
V-C4380STR(V-C4380ST.AYRQLGD)
BASE ASSEMBLY, BODY
#EV#

-12-
COVER ASSEMBLY, BODY
MCKCE1
ADQCE1
MBGCR1
MBGCC1
MHYCC1
MCKCB1
EBFCP1
MDSCA1
ABCCB1
MCKCC1
EBRCM1
MCKCG1
AGBCN1
AESCA1
MCKCF1
MFGCA1
MGZCG1
MGZCR1
MEYCC1
#EV#

-13-
ACCESSORIES
AGRPT1
AGBN21
AEMAF1
#EV#

-14-
REPLACEMENT PARTS LIST
ABCCB1 5203FI2068A Brush Assembly,Dust R
ACQBM1 3551FI2418A Cover Assembly,Motor R
ADQCE1 5231FI3775B Filter Assembly,Exhaust R
ADQBH1 5231FI2471A Filter Assembly,Paper R
AEMAF1 5215FI1306A Hose Assembly,Flexible R
AESCA1 3520FI3475E Indicator Assembly R
AGBN21 5249FI1399B Nozzle Assembly,Floor R
AGBCN1 5248FI2259C Nozzle Assembly,Upholstery R
AGRPT1 5201FI2463A Pipe Assembly,Telescopic R
AHDBR1 4687FI1480Y Reel Assembly R
AHJBA1 4441FI3608B Roller Assembly R
AJWBA1 4660FI2417A Wheel R
EAUBA1 4681FI2462C Motor Assembly,AC,Vacuum Cleaner R
EBFCP1 6601FI3149B Switch,Push Button R
EBRBM1 6871FX2179A PCB Assembly,Main R
EBRCM1 6871FX3085A PCB Assembly,Main R
MAMBB1 3040FI1463A Base,Body R
MBGCC1 5020FI2340A Button,Control R
MBGCR1 5020FI2341A Button,Cord Reel R
MCKBH1 3550FI1633A Cover,Handle R
MCKCB1 3550FI1620A Cover,Body R
MCKCC1 3550FI2532A Cover,Control R
MCKCE1 3550FI1632D Cover,Exhaust Filter R
MCKCF1 3550FI1621A Cover,Filter R
MCKCG1 3550FI1622A Cover,Accessory R
MCQBA1 3940FI3646A Damper,Absorbing R
MCQBM1 3920FI2416A Damper,Motor Mount R
MDJBM1 5231FI4518E Filter,Motor Safety R
MDSBA1 3920FI1278A Gasket R
MDSBA2 3920FI3775A Gasket R
MDSCA1 3940FI4716A Gasket,Sealing R
MEGBC1 4930FI2442A Holder,Cord R
MEGBC2 4930FI2441A Holder,Cord R
MEGBB1 3500FI2238D Holder,Bag R
MEYCC1 4940FI4662A Knob,Control R
MFGCA1 4026FI2412A Locker R
MFL552 3828FI2844D Manual,Owners R
MGZCG1 4350FI3777A Ring,Guide R
LOC. NO. PART NO. DESCRIPTION
SVC REMARK
R : SERVICE PARTS
V-C4380STS(V-C4380ST.ALSQLGD)

-15-
MGZCR1 4350FI2001A Ring,Connector R
MHYBA1 4970FI4519B Spring R
MHYCC1 4970FI4511L Spring,Coil R
LOC. NO. PART NO. DESCRIPTION
SVC REMARK
R : SERVICE PARTS

-16-
REPLACEMENT PARTS LIST
ABCCB1 5203FI2068A Brush Assembly,Dust R
ACQBM1 3551FI2418A Cover Assembly,Motor R
ADQCE1 5231FI3775B Filter Assembly,Exhaust R
ADQBH1 5231FI2471A Filter Assembly,Paper R
AEMAF1 5215FI1336P Hose Assembly,Flexible R
AESCA1 3520FI3475E Indicator Assembly R
AGBN21 5249FI1399B Nozzle Assembly,Floor R
AGBCN1 5248FI2259C Nozzle Assembly,Upholstery R
AGRPT1 5201FI2487L Pipe Assembly,Telescopic R
AHDBR1 4687FI1481C Reel Assembly R
AHJBA1 4441FI3608B Roller Assembly R
AJWBA1 4660FI2417A Wheel R
EAUBA1 4681FI2462C Motor Assembly,AC,Vacuum Cleaner R
EBFCP1 6601FI3149B Switch,Push Button R
EBRBM1 6871FX2179A PCB Assembly,Main R
EBRCM1 6871FX3085A PCB Assembly,Main R
MAMBB1 3040FI1463A Base,Body R
MAY000 3890FG1202A Box,Color R
MBGCC1 5020FI2340A Button,Control R
MBGCR1 5020FI2341A Button,Cord Reel R
MCKBH1 3550FI1633A Cover,Handle R
MCKCB1 3550FI1620A Cover,Body R
MCKCC1 3550FI2532A Cover,Control R
MCKCE1 3550FI1632L Cover,Exhaust Filter R
MCKCF1 3550FI1621A Cover,Filter R
MCKCG1 3550FI1622A Cover,Accessory R
MCQBA1 3940FI3646A Damper,Absorbing R
MCQBM1 3920FI2416A Damper,Motor Mount R
MDJBM1 5231FI4518E Filter,Motor Safety R
MDSBA1 3920FI1278A Gasket R
MDSBA2 3920FI3775A Gasket R
MDSCA1 3940FI4716A Gasket,Sealing R
MEGBC1 4930FI2442A Holder,Cord R
MEGBC2 4930FI2441A Holder,Cord R
MEGBB1 3500FI2238D Holder,Bag R
MEYCC1 4940FI4662A Knob,Control R
MFGCA1 4026FI2412A Locker R
MFL552 3828FI2844A Manual,Owners R
LOC. NO. PART NO. DESCRIPTION
SVC REMARK
R : SERVICE PARTS
V-C4380T(V-C4380ST.ALSQLUK)

-17-
MGZCG1 4350FI3777A Ring,Guide R
MGZCR1 4350FI2001A Ring,Connector R
MHYBA1 4970FI4519B Spring R
MHYCC1 4970FI4511L Spring,Coil R
LOC. NO. PART NO. DESCRIPTION
SVC REMARK
R : SERVICE PARTS

-18-
REPLACEMENT PARTS LIST
ABCCB1 5203FI2068A Brush Assembly,Dust R
ACQBM1 3551FI2418A Cover Assembly,Motor R
ADQCE1 5231FI3775B Filter Assembly,Exhaust R
ADQBH1 5231FI2471A Filter Assembly,Paper R
AEMAF1 5215FI1306A Hose Assembly,Flexible R
AESCA1 3520FI3475E Indicator Assembly R
AGBN21 5249FI1399B Nozzle Assembly,Floor R
AGBCN1 5248FI2259C Nozzle Assembly,Upholstery R
AGRPT1 5201FI2463A Pipe Assembly,Telescopic R
AHDBR1 4687FI1480Y Reel Assembly R
AHJBA1 4441FI3608B Roller Assembly R
AJWBA1 4660FI2417A Wheel R
EAUBA1 4681FI2462C Motor Assembly,AC,Vacuum Cleaner R
EBFCP1 6601FI3149B Switch,Push Button R
EBRBM1 6871FX2179A PCB Assembly,Main R
EBRCM1 6871FX3085A PCB Assembly,Main R
MAMBB1 3040FI1463A Base,Body R
MBGCC1 5020FI2340D Button,Control R
MBGCR1 5020FI2341D Button,Cord Reel R
MCKBH1 3550FI1633D Cover,Handle R
MCKCB1 3550FI1620A Cover,Body R
MCKCC1 3550FI2532B Cover,Control R
MCKCE1 3550FI1632E Cover,Exhaust Filter R
MCKCF1 3550FI1621D Cover,Filter R
MCKCG1 3550FI1622D Cover,Accessory R
MCQBA1 3940FI3646A Damper,Absorbing R
MCQBM1 3920FI2416A Damper,Motor Mount R
MDJBM1 5231FI4518E Filter,Motor Safety R
MDSBA1 3920FI1278A Gasket R
MDSBA2 3920FI3775A Gasket R
MDSCA1 3940FI4716A Gasket,Sealing R
MEGBC1 4930FI2442A Holder,Cord R
MEGBC2 4930FI2441A Holder,Cord R
MEGBB1 3500FI2238D Holder,Bag R
MEYCC1 4940FI4662A Knob,Control R
MFGCA1 4026FI2412D Locker R
MFL552 3828FI2844D Manual,Owners R
MGZCG1 4350FI3777H Ring,Guide R
LOC. NO. PART NO. DESCRIPTION
SVC REMARK
R : SERVICE PARTS
V-C4380STR(V-C4380ST.AYRQLGD)

-19-
MGZCR1 4350FI2001H Ring,Connector R
MHYBA1 4970FI4519B Spring R
MHYCC1 4970FI4511L Spring,Coil R
LOC. NO. PART NO. DESCRIPTION
SVC REMARK
R : SERVICE PARTS

This manual suits for next models
2
Table of contents
Other LG Vacuum Cleaner manuals