Lifepro Recovery + Fitness X-FLEXCYCLE PRO User manual

XFLEXCYCLE PRO EXERCISE BIKE
READY,
SET, PRO
USER MANUAL

Aerobic exercise has
enormous benefits
for your body, brain,
and mental health.
At least 75
minutes of vigorous
aerobic exercise,
such as riding an
exercise bike, are
recommended each
week for optimal
health.
HELLO THERE.
Joel and I are athletes who suffered from
severe ACL injuries a few months apart.
We purchased multiple pieces of exercise
equipment for our in-home rehab but were
left disappointed and frustrated by fitness
gear that made big promises but gave no
support, no well-thought-out plan to follow,
and no results. And that’s how Lifepro came
about, and why the Recovery + Fitness active
recovery collection was created — we’ve
set out to change all of that. It’s why every
piece of equipment bearing our name not only
undergoes rigorous scrutiny to make sure it
delivers on power and efficacy, but also comes
with built-in support from our ‘guiding angels’
and a built-in lifetime warranty so that
you’re never left hanging.
Welcome to Lifepro.
We’re in this together now.

Not everyone can afford to hire a personal trainer or a team of professionals
to help them feel and look their best. But the good news is: you don’t have to.
Lifepro brings the gym to you.
With the Lifepro X-FlexCycle Pro Exercise Bike, you can build cardiovascular
fitness and muscle strength from the comfort of your own home. The
X-FlexCycle Pro’s low-decibel fly wheel is designed specifically for in-home use.
The bike frame has three easy to set recline angles: upright, semi-recumbent,
and recumbent. The recumbent and semi-recumbent positions help ease the
stress on your joints and lower back and reduce fatigue during exercise. The
cushioned seat and backrest provide a supremely comfortable ride.
The X-FlexCycle Pro improves muscle tone, cardiovascular fitness, blood
circulation, joint health and flexibility, and more. The X-FlexCycle Pro’s computer
displays your speed, workout duration, distance, pulse rate, and calories burned
so you can track your fitness progress. Sixteen magnetic pedal resistance
levels allow you to easily adjust the difficulty of your cycling workouts. On the
lowest resistance level, workouts would be equivalent to a leisurely bike ride
in the park. Increasing the pedal resistance allows you to create more intense
workouts, similar to biking up a steep hill. Just sit back, relax, and let your legs
do the work! See results in as little as 15–20 minutes a day.
Redefine your workouts and experience the
transformative power of the Lifepro X-FlexCyclePro:
Increase strength & stamina: improves stability and muscle tone
Regulate weight: boost your heart rate and burn calories.
Decrease chronic pain: improves core strength and circulation
Boost your metabolism: encourages your body to burn fat faster
Decrease your stress: increases serotonin and decreases cortisol
Lower blood pressure: improves circulation
Develop stronger bones: increases bone density
Check out the information in this manual for ways to get started using your
X-FlexCycle Pro. Next, be sure to visit our website xflexcyclepro.lifeprofitness.com
for access to our FREE library of workout videos which demonstrate how to
easily incorporate the X-FlexCycle Pro into your fitness routine.
Recovery + Fitness Collection 5

36 Hex Key 37 Wrench
35 Multi-tool
*Tools are located in the
hardware bag.
1
30
2
28
26
8
8
9
10
27
27
21
22
18
19
18 19
23 13
8
14
13
14
26
10
9
6R
3
15
6L
29
5R
4R
5L
4L
11
20
17
24
12
31
16
34
32
33
7
FRONT
7
REAR
PART AND HARDWARE CHECKLIST
Item No. Description Qty Note
1 Bike Body 1
2 Pedal Tension Knob 1 Pre-installed on bike body
3 Locking Pin 1 Located in hardware bag
4 Pedal Crank Arm 1 Labeled R and L; pre-installed on bike body
5 Pedal (Left and Right) 2 Labeled R and L
6 Pedal Nut 2 Pre-installed on pedals
7 Stabilizer (Front and Rear) 2 Bolts/washers/nuts are pre-fitted
M8×50mm Square-Neck Bolt 4
9 ∅20×1.5 Curved Washer 4
10 M8 Cap Nut 4
11 Seat 1 Bolts/washers are pre-fitted
12 Seat Adjustment Post 1
13 ∅24×1.5 Flat Washer 3
14 M8 Lock Nut 3
15 Seat Adjustment Knob 1 Located in hardware bag
16 Backrest Frame 1 Bolts and washers are pre-fitted
8 M8×50mm Square-Neck Bolt 2
13 ∅24×1.5 Flat Washer 2
14 M8 Lock Nut 2
17 Backrest Cushion 1 Bolts (4), washers (4) located in hardware bag
18 M8×45mm Bolt 4
19 ∅8.1×4.2 Spring Washer 4
20 Rear Handlebar 1 Bolts/washers are pre-fitted
21 M8×20mm Bolt 2
22 ∅8.2×2.1 Spring Washer 2
23 ∅20×1.5 Flat Washer 2
24 Front Handlebars and Computer 1 Bolts/washers are pre-fitted
25 AA Battery 2 Located in hardware bag. Not pictured on pg 6
26 M6×15mm Bolt 4
27 ∅18×1.5 Flat Washer 4
28 Speed Sensor Cable (Female) 1 Pre-installed; exists back of computer
29 Speed Sensor Cable (Male) 1 Pre-installed; exists front of bike body
30 Resistance Band 2 Pre-installed on bike body
31 Resistance Band Handle 2 For arm workouts
32 Velcro Leg Band 1 For leg workouts
33 Tension Pin and Plate 1 Pre-installed on bike body
34 Recline Adjustment Knob 1 Located in hardware bag
TOOL CHECKLIST*
Recovery + Fitness Collection 7Recovery + Fitness Collection 7
6X-FlexCycle Pro User Manual Lifepro
GET ACQUAINTED

8X-FlexCycle Pro User Manual Lifepro
EXERCISE BIKE PLACEMENT NOTES
In order to get in the habit of using your exercise bike every day, it’s helpful
to set it up in a convenient, comfortable location. The X-FlexCycle Pro is
designed to take up a minimal amount of floor space and to look great in any
room of your home.
IMPORTANT SAFETY NOTES FOR PLACEMENT OF YOUR
X-FLEXCYCLE PRO
• Do not use the X-FlexCycle Pro outdoors.
• Do not place the bike near water or in high-moisture environments.
• Set up the X-FlexCycle Pro where there will be at least 2 feet of clearance
on all sides of the bike.
• Only operate and store the X-FlexCycle Pro on a clear, flat, clean floor.
• We recommend you place a non-slip mat or rug under the exercise bike to
protect your carpet or floor. Before beginning exercise, ensure the floor
covering will not slide during use. The floor covering should be at least
56” × 30”.
CAUTION: Take care when lifting or moving the bike. Always use proper
lifting techniques and use assistance when needed.
Recovery + Fitness Collection 9Recovery + Fitness Collection 9
GET STARTED
FIRST STEPS
1. Remove your X-FlexCycle Pro from the shipping box and remove the
packaging from the main body of the bike and parts and open the
hardware bag.
NOTE: Most of the hardware (bolts, washers, and nuts) comes pre-fitted to
the associated part. Do not remove pre-fitted hardware until instructed to
do so.
2. Visually confirm that all parts, hardware, and tools listed on the
previous page are included.
3. Read carefully through this user manual and all safety instructions
before assembling and using the X-FlexCycle Pro.
4. Go to xflexcyclepro.lifeprofitness.com and register your product within
14 days of purchase to activate your lifetime warranty.
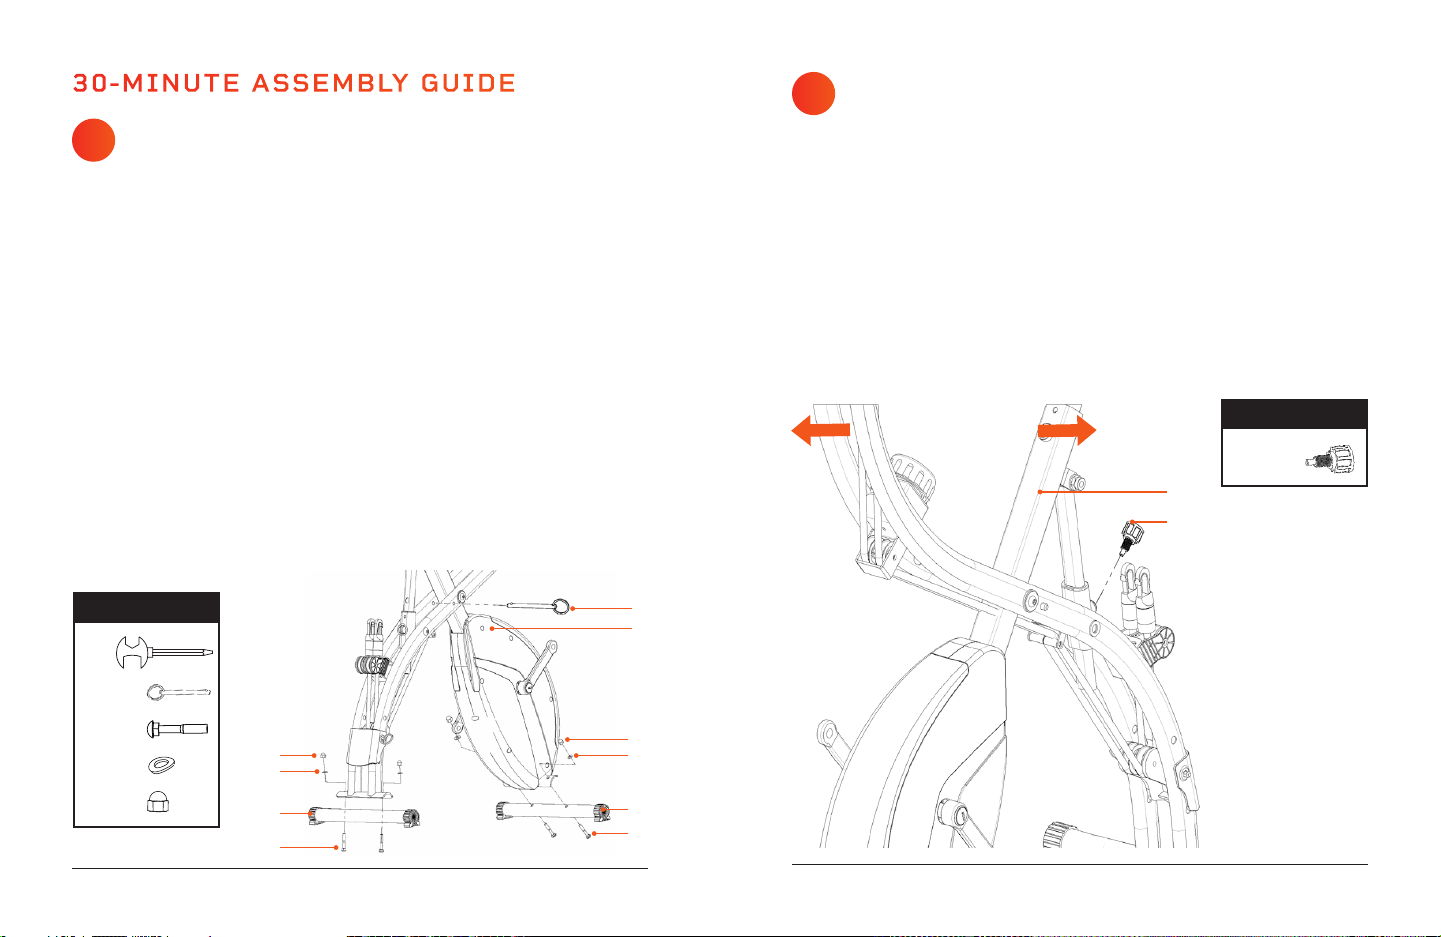
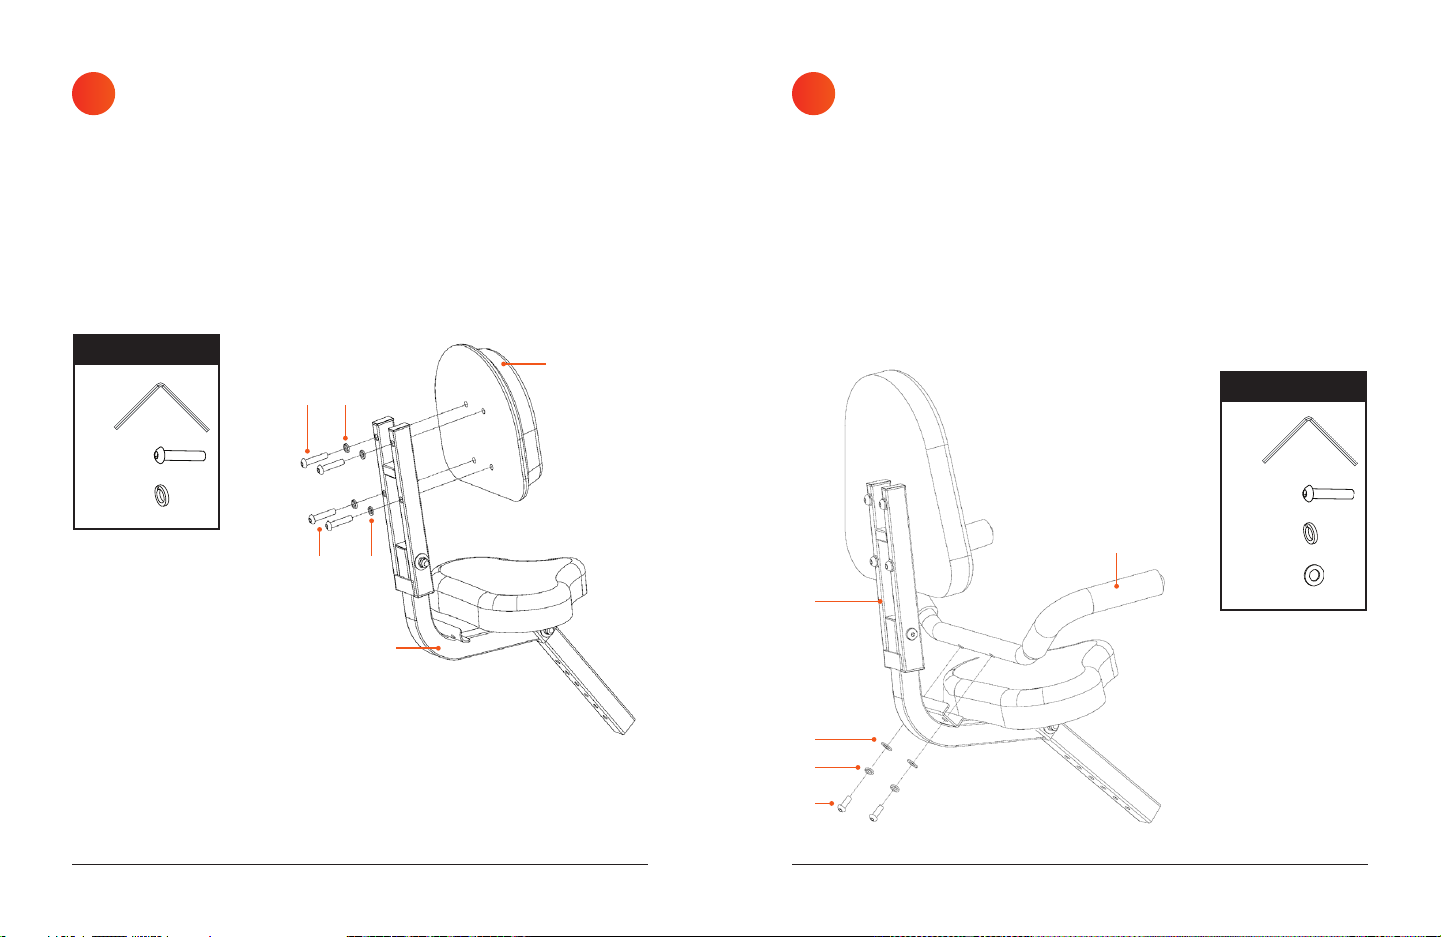
5. Complete the steps in the 30MINUTE ASSEMBLY GUIDE on page 10
to assemble your X-FlexCycle Pro.
CAUTION: Take care when lifting or moving the bike. Always use proper
lifting techniques and use assistance if needed.
NOTE: Assemble the bike on a flat surface at least 6-by-6-foot, free of
obstructions. CUSTOMER SUPPORT
If you have any questions about assembling or using your
X-FlexCycle Pro, we’re here to help. Call or email us and an experienced
customer support representative will be happy to assist you:
(732) 456-6063 or support@lifeprofitness.com.
XFLEXCYCLE PRO
EXERCISE BIKE
RECOVERY + FITNESS

Recovery + Fitness Collection 11
30-MINUTE ASSEMBLY GUIDE
1
10 X-FlexCycle Pro User Manual Lifepro Recovery + Fitness Collection 11
INSERT THE RECLINE
ADJUSTMENT KNOB
The recline adjustment knob (34) allows you to adjust the angle of the
bike frame to recumbent, semi-recumbent, or upright. See ADJUSTING THE
RECLINE ANGLE on page 28 for instructions.
1. Locate an adjustment knob in the hardware bag (the two adjustment
knobs are interchangeable).
2. Screw the recline adjustment knob (34) into the large threaded screw
hole near the two plastic resistance band clips at the back of the bike
body (1).
3. Grasp the top of the bike with both hands and slowly push together or
pull apart the frame until you hear the knob click into place.
4. Tighten the knob to secure the bike frame.
2
ATTACH FRONT AND
REAR STABILIZERS
NOTE: You may find it easier to attach the stabilizers with the body of the
bike laid on its side on the floor.
1. Locate the locking pin (3) and multi-tool (35) in the hardware bag.
2. Unfold the bike body (1) slightly and insert the locking pin as shown in
the figure below.
3. Remove the hardware from the front stabilizer (7).
4. Align the front stabilizer, wheels facing out, with the curved metal
attachment point at the front of the bike. Ensure the bolt holes line up.
5. Insert two M8×50mm bolts (8), through the square bolt holes in the
bottom of the stabilizer and through the attachment point. Ensure the
square necks of the bolts are fully seated in the square bolt holes.
6. Place a curved washers (9) onto each bolt.
7. Screw a cap nut (10) on the end of each bolt.
8. Repeat steps 2–5 to attach the rear stabilizer (7).
9. Use the multi-tool to fully tighten the cap nuts. Hold each bolt head in
place with one hand as you tighten the cap nut to ensure the square
neck of the bolt stays in place.
10
3
1
9
10 9
7
7
8
8
Front of
Bike
(8)
(10)
(3)
(35)
x1
(34) x1
x4
x4
x4
(9)
TOOLS & HARDWARE
TOOLS & HARDWARE
34
1

SECURE THE SEAT TO THE
SEAT ADJUSTMENT POST
1. Remove the hardware from the seat (11).
2. Lay the seat on the floor, underside up.
3. Slide the seat adjustment post (12) onto the three studs on the
underside of the seat.
4. Place a flat washer (13) onto each stud.
5. Screw a lock nut (14) onto each stud.
6. Use the multi-tool (35) to fully tighten the lock nuts.
3
Recovery + Fitness Collection 1312 X-FlexCycle Pro User Manual Lifepro Recovery + Fitness Collection 13
14
13
11
12
SECURE THE BACKREST FRAME
TO THE SEAT POST
1. Remove the hardware from the backrest frame (16).
2. Align the two bolt holes at the top of the seat adjustment post (12)
with the square bolt holes in the slot at the end of the backrest frame.
3. Insert two M8×50mm bolts (8) through the square bolt holes in the
backrest frame and through the seat post. Ensure the square neck of
each bolt fits into the square bolt hole in the backrest frame.
4. Place a flat washer (13) onto each bolt.
5. Screw a lock nut (14) onto each bolt.
6. Use the multi-tool (35) to fully tighten the lock nuts. Hold each bolt
head in place with one hand as you tighten the lock nut to ensure the
square neck of the bolt stays in place.
4
16
8 13 14
12
(14)
(13) x3
x3
(14)
(13)
(8)
x2
x2
x2
TOOLS & HARDWARE
TOOLS & HARDWARE
(35)
(35)

ATTACH THE BACKREST CUSHION
TO THE BACKREST FRAME
1. Locate the four M8×45mm bolts (18), four spring washers (19), and
hex key (36) in the hardware bag.
2. Align the four bolt holes in the backrest cushion (17) with the four bolt
holes at the top of the backrest frame (16).
3. Place a spring washer (19) onto each of the four M8×45mm bolts (18).
4. Screw each bolt/washer combination through the back of the backrest
frame and into the cushion.
5. Use the hex key to fully tighten the bolts.
5
Recovery + Fitness Collection 1514 X-FlexCycle Pro User Manual Lifepro Recovery + Fitness Collection 15
ATTACH THE REAR HANDLEBARS
TO THE BACKREST FRAME
1. Remove the hardware from rear handlebars (20).
2. Slide the handlebars into the slot at the curve of the backrest frame
(16). Align the bolt holes in the handlebars with the bolt holes in the
backrest frame slot.
3. Place a spring washer (22) and then a flat washer (23) onto each
M8×35mm bolt (21).
4. Screw each bolt/washer combination through the back of the backrest
frame and into the handlebars.
5. Use the hex key (36) to fully tighten the bolts.
6
16
23
22
21
20 (22)
(21)
x2
x2
(23) x3
(19)
(18)
(36)
x4
x4
17
16
19
1918
18
TOOLS & HARDWARE
TOOLS & HARDWARE
(36)

SECURE THE ASSEMBLED SEAT
TO THE BIKE BODY
1. Locate the second adjustment knob in the hardware bag.
2. Slide the seat adjustment post (12) into the seat post at the top of the
bike body (1).
3. Screw the seat adjustment knob (15) into the large threaded screw
hole on the front of the seat post.
4. When the knob is partially screwed in, pull the knob head out and slide
the seat slightly up or down until you hear a click indicating that the
seat adjustment post is locked into position.
5. Tighten the knob to secure the seat post.
NOTE: Adjust the seat to your desired height after the bike is fully
assembled. See ADJUST THE SEAT HEIGHT on page 22 for instructions.
7
Recovery + Fitness Collection 1716 X-FlexCycle Pro User Manual Lifepro Recovery + Fitness Collection 17
ATTACH THE RESISTANCE BAND HANDLES AND
VELCRO BAND TO THE BIKE BODY
1. The two resistance band handles (31) and the Velcro leg band (32) ship
intertwined; separate the three items.
2. Slide the metal ring at the end of each resistance band handle into one
of the two plastic resistance band clips at the front of the bike, just
above the pedal tension knob (2).
3. Slide the metal ring at the end of the Velcro leg band into one of the
two plastic resistance band clips at the back of the bike.
NOTE: See USE THE RESISTANCE BANDS on page 26 and ADJUST THE
TENSION OF THE RESISTANCE BANDS on page 27 for more information.
8
32
12
15
1
(15) x1
TOOLS & HARDWARE
2
31

ATTACH THE FRONT HANDLEBARS
AND COMPUTER TO THE BIKE BODY
1. Remove the hardware from the handlebar/computer frame (24).
2. Slide the handlebar/computer frame into the two slots at the top of the
bike body (1).
3. Place a flat washer (27) onto each of the four M6×15mm bolts (26).
4. Insert each bolt/washer combination through the bolt holes on either
side of the bike frame.
5. Use the hex key (36) to fully tighten the bolts.
6. Plug the male speed sensor cable (29) exiting the front of the bike into
the female speed sensor cable (28) exiting the back of the computer.
10
INSTALL TWO AA BATTERIES
IN THE COMPUTER
1. Locate the two AA batteries (25) in the hardware bag.
2. Remove the battery compartment cover (24A) on the back of the
computer monitor (24B).
3. Insert two AA batteries into the battery compartment. Be sure to
insert the batteries as shown in the figure below.
4. Replace the battery compartment cover.
CAUTION: Never mix old batteries and new batteries. Only use AA
batteries with the computer monitor.
9
Recovery + Fitness Collection 1918 X-FlexCycle Pro User Manual Lifepro Recovery + Fitness Collection 19
24A
25
24B 28
28
27
27 26
26
29 29
24
(26) x2
(27) x3
TOOLS & HARDWARE
(36)

ATTACH THE PEDALS
TO THE BIKE BODY
1. Identify the left and right pedals (labeled Land R). Identify the left
and right crank arms (also labeled Land R).
2. Remove the pedal nut (6R) from the right pedal (5R).
3. Screw the right pedal (5R) CLOCKWISE onto the right crank arm (4R).
4. Use the multi-tool (35) to fully tighten the pedal to the crank arm.
5. Screw the right pedal nut onto the end of the pedal.
6. Use the wrench (37) to fully tighten the pedal nut as you use the
multi-tool to hold the pedal in place. Turn the wrench CLOCKWISE and
turn the multi-tool COUNTER-CLOCKWISE to fully tighten.
7. Remove the pedal nut (6L) from the left pedal (5L).
8. Screw the left pedal (5L) COUNTER-CLOCKWISE onto the left crank
arm (4L).
9. Use the multi-tool to fully tighten the pedal to the crank arm.
10.Screw the right pedal nut onto the end of the pedal.
11.Use the wrench to fully tighten the pedal nut as you use the multi-tool
to hold the pedal in place. Turn the wrench COUNTER-CLOCKWISE and
turn the multi-tool CLOCKWISE to fully tighten.
CAUTION: Do not mix up the left and right pedal nuts.
CAUTION: Be sure to fully tighten the pedals and pedal nuts. Riding the
bike with loose pedals can cause injury and/or strip the pedals.
11
Recovery + Fitness Collection 2120 X-FlexCycle Pro User Manual Lifepro Recovery + Fitness Collection 21
Front of Bike
1
5L6L
5R
4R 6R
4L
TOOLS & HARDWARE
(35)
(37)

ADJUST THE
SEAT HEIGHT
The seat adjustment knob has an elastic head which allows you to adjust
the seat height without removing the knob from the bike frame. Six height
adjustment holes in the seat post provide a range of height options.
1. Loosen the seat adjustment knob (15).
2. Pull the knob head out and slide the seat up or down. Release the knob
and continue to slide the seat up or down until you hear a click.
3. Ensure the knob is securely inserted into one of the adjustment holes
by trying to slide the seat up and down again (it should not move).
4. Tighten the knob to secure the seat.
1ADJUST THE PEDAL
SAFETY STRAPS
The pedals (5R/L) have safety straps to keep your feet from sliding off
during exercise. Each strap has six adjustment holes along the outside of
the strap allowing you to lengthen or shorten the straps to fit your foot.
1. Put your right foot on the right pedal (5R) and adjust the safety strap
so it is snug (but not tight) across the top of your foot. Your foot should
be able to slide easily in and out.
2. Adjust the safety strap for the left pedal (5L) in the same manner.
2
RIDING THE BIKE FOR THE FIRST TIME
Recovery + Fitness Collection 2322 X-FlexCycle Pro User Manual Lifepro Recovery + Fitness Collection 23
15
5L
5R

1
•
•
4
•
•
7
•
•
1
0
•
•
1
3
•
•
1
6
T
E
N
S
I
O
N
C
O
N
T
R
O
L
ADJUST THE
PEDAL TENSION
Sixteen pedal tension levels allow you to increase or decrease how difficult
or easy it is to pedal.
1. Turn the pedal tension knob (2) clockwise to increase the pedal
resistance. Turn the knob counter-clockwise to decrease the resistance.
CAUTION: We strongly recommend beginning with the lowest pedal
tension level and slowly working your way up as you get used to riding the
X-FlexCyclePro.
NOTE: For best results, only adjust the pedal tension while pedaling.
3
Recovery + Fitness Collection 2524 X-FlexCycle Pro User Manual Lifepro Recovery + Fitness Collection 25
USE THE PULSE SENSORS
ON THE FRONT HANDLEBARS
The front handlebars have built-in pulse sensors which allow pulse to be
measured and displayed on the computer.
1. Grasp the sensors (24C) with both hands during exercise. Hold the
sensors firmly but not too tightly.
2. Your pulse will display on the computer (24B) after a few seconds.
CAUTION: Heart rate shown on the computer may be inaccurate.
Overexertion can damage your health.
NOTE: If the sensors become damp, it may be difficult to get a pulse
reading.
NOTE: See PULSE AND TARGET HEART RATE on page 32 and PULSE
MONITORING on page 33 for detailed information.
5
224C 24C
24B

USE THE RESISTANCE BANDS
TO ADD STRENGTH TRAINING TO YOUR WORKOUT
Incorporate strength training into your workouts with the set of two
resistance bands (30) built into the bike frame.
To strength train your upper body:
1. Sit in the seat, lean back against the backrest, and hold a resistance
band handle (31) in each hand.
2. Work your biceps, triceps, chest muscles, and shoulders by doing bicep
curls, flys, chest and shoulder presses, and other upper body exercises.
To strength train your lower body:
1. Stand behind the bike and wrap the Velcro leg band (32) around one
ankle.
2. Work your hips, glutes, hamstrings, quads, inductors, abductors, and
calves by doing straight leg raises, donkey kicks, back kicks, and more.
6
26 X-FlexCycle Pro User Manual Lifepro Recovery + Fitness Collection 27
ADJUST THE TENSION
OF THE RESISTANCE BANDS
Increase or decrease the tension of the resistance bands by adjusting the
resistance band tension pin (33A) and plate (33B).
1. Hold the tension plate in place with one hand as you pull out the
tension pin with your other hand.
2. Slide the metal tension plate up to decrease tension or down to
increase tension. There are three tension adjustment holes behind the
tension plate, along the lower curve of the bike frame. Each provides
a different level of tension: the top hole is easy, the middle hole is
medium, and the bottom hole is difficult.
3. At your desired tension level, align the hole in the side of the tension
plate with the hole in the bike frame behind it.
4. Re-insert the tension pin.
CAUTION: We recommend beginning with the easiest tension level and
slowly increasing the tension level as you get used to the resistance bands.
4
32
31
30
33A
33B
Rear of Bike

28 X-FlexCycle Pro User Manual Lifepro Recovery + Fitness Collection 29
MOVING THE XFLEXCYCLEPRO
You can easily move the exercise bike with the wheels on the front
stabilizer (7).
1. Stand in front of the bike.
2. Grasp the front handlebars (24) with both hands.
3. Tilt the bike toward you until it rests on the two wheels on the front of
the front stabilizer.
4. Slowly and carefully wheel the bike to its new location.
CAUTION: The exercise bike should ONLY be moved by an adult.
CAUTION: Ensure there are no children, pets, or object in your path
before moving the bike.
ADJUSTING THE RECLINE ANGLE
The X-FlexCycle Pro bike frame can be adjusted to three different recline
angles (upright, semi-recumbent, and recumbent) using the recline
adjustment knob (34) located on the frame adjustment bar (34A) behind the
seat post. There are three holes in the frame adjustment bar:
• The bottom hole selects the upright bike position, where the seat is in a
normal bike configuration.
• The middle hole selects the semi-recumbent bike configuration, where
the seat is angled slightly back.
• The top hole selects the recumbent bike configuration, where the seat is
angled even further back.
To adjust the recline angle of the bike:
1. Stand to one side of the bike and place your right foot behind the rear
stabilizer to control the movement of the frame.
2. Grab the front handlebars with
your left hand and lift slightly
(about ¼"). At the same time,
loosen, but do not remove, the
recline adjustment knob with your
right hand.
3. Lift the handlebars again slightly
and pull the knob head out which
removes it from the current
adjustment hole.
4. Grab the seat with your right hand
and the front handlebars with your
left hand and slowly lift up or push
down to adjust the frame to your
desired recline angle. You will hear
a click when the knob snaps into
the next adjustment hole.
5. Repeat steps 1–4, if necessary, to
reach your desired recline angle.
6. Tighten the knob to secure the bike
frame.
34A
34
24
7

30 X-FlexCycle Pro User Manual Lifepro Recovery + Fitness Collection 31
OPERATING INSTRUCTIONS
MODE INFORMATION SHOWN ON COMPUTER VALUE
SCAN Displays each mode in turn: spd, time, odo, cal, pulse Varies
SPEED SPD Displays the current workout speed in mi/hr 0.0 – 99.9 Mi/Hr
TIME TIME Displays the duration of the current workout 0:00 – 99:59 (Min:Sec)
ODOMETER ODO Displays the distance cycled in the current workout 0.00 – 999.9 Miles
CALORIES CAL Displays the calories expended in the current workout 0 – 9999 KCAL
PULSE PUL Displays the current pulse in beats per minute 40 – 240 BPM
CHANGE THE MODE
The computer's top line shows the
value for the selected mode. In the
grid at the bottom of the screen, you
can see the name and value for each
mode: speed, time, distance, calories,
and pulse*. See the table above for
details about each mode. The default
mode is scan mode.
To change the selected mode:
1. Press the blue Mode button to toggle through the modes in order: scan,
speed, time, odometer, calories, and pulse.
The name of the selected mode will flash to indicate it is selected. "SCAN"
will appear in the top-left corner when scan mode is selected.
*Both hands must be on the sensors to get a pulse reading.
RESET ALL WORKOUT VALUES
1. Press and hold the Mode button for 3 seconds to reset all workout
values.
AUTO SHUTOFF
The computer will automatically shut off after four minutes of inactivity.
The computer will automatically power on when you press the Mode button
or begin to exercise.
IMPORTANT SAFETY & EXERCISE TIPS
SAFETY TIPS
WARNING: Overexertion, or incorrect or excessive exercise, can damage your
health. Always exercise within the heart beat range and time limits recommended by
your physician.
1. Consult with a medical professional before beginning a new exercise program.
This is particularly important for those over the age of 35 or with pre-existing
health conditions.
2. Stop exercising immediately if you experience any of the following symptoms:
feeling faint, dizzy, or nauseous, pain or tightness in your chest, difficulty
breathing, irregular heartbeat. Overexertion, or incorrect or excessive exercise,
can damage your health. If you do experience any of these symptoms, consult
your doctor before continuing with your exercise program.
3. We recommend beginners hold the handlebars firmly while riding the
X-FlexCyclePro to help maintain balance. As you get more comfortable riding the
bike, you can try using the arm resistance bands.
4. Keep hands away from all moving parts.
5. Always remain seated while using the X-FlexCyclePro. Do not stand on the
pedals.
6. The X-FlexCyclePro does not have a braking system. Always slowly decrease
pedaling speed to stop. Do not stop pedaling abruptly.
7. Do not jump from the bike to the ground while it is in motion.
8. Always wear appropriate clothing, socks, and comfortable, well-fitting athletic
shoes when using the X-FlexCyclePro. Do not wear loose or baggy clothing as it
can get caught on the bike during exercise, causing injury.
9. Always properly warm up before exercise and cool down after to prevent injury.
10. Do not use the X-FlexCyclePro during or immediately after eating or when you
feel tired. Never use the X-FlexCyclePro while intoxicated.
11. Make sure that all third parties are familiar with the safety instructions.
EXERCISE TIPS
1. Keep your body and head facing forward at all times.
2. Make sure to breathe regularly and calmly during exercise.
3. Stay hydrated before, during, and after exercise.
4. Check your pulse regularly using the sensors on the front handlebars.

Recovery + Fitness Collection 33
20Age
200
150
130
110
195
146
127
107
100%
75%
65%
55%
of maximum heart rate
190
143
124
105
185
139
120
102
180
135
117
99
175
131
114
96
170
128
111
94
165
124
107
91
160
120
104
88
155
116
101
85
150
113
98
83
145
109
94
80
140
105
91
77
135
101
88
74
100
98
85
72
25 30 35 40 45 50 55 60 65 70 75 80 85 90
PULSE MONITORING
CAUTION: The pulse monitoring system may be inaccurate. Excessive
training can cause serious injury or even death. If you feel unwell and/or
lightheaded, stop training immediately. Make sure all users of this exercise
bike are familiar with this information, understand it, and apply it
unconditionally.
PULSE MONITORING USING THE PULSE SENSORS
The X-FlexCycle Pro is equipped with pulse sensors integrated into the front
handlebars. These sensors are used for short-term determination of the
pulse rate. To do this, you need to cover the sensors with both hands at the
same time. The pulse measuring system is based on changes in electrical
skin resistance measured by the sensors due to the heartbeat and blood
pressure fluctuations. These changes are summarized as a mean value and
shown after a short time on the computer as the current pulse rate.
CAUTION: For large parts of the population, the pulse-induced skin
resistance change is so minimal that usable values cannot be derived from
the measurement results. Also callouses on the palms, damp hands, and
body tremors may prevent correct measurement. In such cases, the pulse
value may be displayed incorrectly or not at all.
If the pulse fails to display or displays incorrectly, check to see if the same
problem occurs for other users. If the problem occurs only with one user, the
computer is not defective.
CAUTION: The pulse sensors measure heart rate only for the purpose of
displaying the current pulse during exercise. This value says nothing about
the safety and effectiveness of the training. Also, this type of measurement
is in no way designed or suitable for medical diagnostic purposes.
Therefore, it is important to discuss with your physician the most suitable
exercise type, duration, and exertion level for you and to create a suitable
exercise plan before you begin using the X-FlexCycle Pro.
This applies especially to those who:
• Are older than 35 years • Are overweight
• Have high or low blood pressure • Have not been physically active
• Have heart problems for a long period of time
32 X-FlexCycle Pro User Manual Lifepro
PULSE AND TARGET HEART RATE
Calculate your personal target heart rate, in beats per minute (shown in the chart
above) when training based on your fitness goals:
MAXIMUM HEART RATE
This value represents your maximum heart rate and serves as a basis from which
to calculate your personal training heart rate.
HEALTH & WELLNESS TRAINING
• Ideal for people who are overweight, older, beginners, and/or who do not exercise
regularly.
FAT BURNING TRAINING
• Ideal for athletes and sports people who aim to lose weight.
CONDITIONING & FITNESS TRAINING
• Ideal for athletes and sports people who want to improve their stamina and/or
conditioning.
For best results, calculate the average value of selected target zone (see chart):
• Health & Wellness: Zone average = 55% of max heart rate (max heart rate x 0.55)
• Fat Burning: Zone average = 65% of max heart rate (max heart rate x 0.65)
• Conditioning & Fitness: Zone average = 75% of max heart rate (max heart rate x 0.75)
Target Zone = 70-80% of Max Heart Rate
Target Zone = 50-60% of Max Heart Rate
220 - Your Age = Max Heart Rate
Target Zone = 60-70% of Max Heart Rate

EXERCISE RECOMMENDATIONS
PREPARING FOR EXERCISE
If you have not done endurance or cardio exercise for a long period of time, you
should make an appointment with your physician for a checkup and to discuss
your fitness goals. This is especially important for people who are over 35,
overweight, or have heart/circulatory problems.
EXERCISE RECOMMENDATIONS
HYDRATION
Adequate hydration is essential before and during exercise. During a 30 minute
workout it is possible to lose up to 4 cups of liquid. About 30 minutes before
beginning exercise, you should drink about 1.5 cups of water. Take care to
maintain balanced hydration during the workout.
EXERCISE FREQUENCY
Experts recommend endurance exercise 3–4 days a week to keep your
cardiovascular system fit. It is important to plan sufficient breaks, to give your
body enough time for rest and recovery. You should take at least one day off
after each workout.
EXERCISE INTENSITY
Many beginners make the mistake of exercising too intensely. If your goal is
to run a marathon, your intensity will certainly be high. However, most people
have fitness goals such as weight reduction, cardiac/exercise training, stress
reduction, and therefore should exercise at a lower intensity. We recommend
aiming for the appropriate target heart rate for your particular fitness goal.
See PULSE AND TARGET HEART RATE on page 32 for more information.
DURATION OF INDIVIDUAL WORKOUT SESSIONS
For optimal endurance or weight-reduction training, the duration of each
workout should be 25–60 minutes. Beginners and those who have not
exercised regularly for a long period of time should start with short workouts
of 10 minutes or less in the first week and then slowly increase workout
duration week by week.
WORKOUT DOCUMENTATION SAMPLE EXERCISE PLAN BELOW
To stay motivated and to evaluate the success of your training, create a training
plan before beginning a new exercise routine. In your plan, document data
from each training session, such as distance, training time, pulse, as well as
health data, such as body weight, blood pressure, resting heart rate (measured
in the morning right after waking up), and how you feel during exercise. See the
SAMPLE WEEKLY TRAINING PLAN on the next page.
Recovery + Fitness Collection 35
34 X-FlexCycle Pro User Manual Lifepro
SAMPLE WEEKLY TRAINING PLAN
Week: ________________ Month: ______________ Year: _________________
Day Date Exercise
Duration
Exercise
Distance
Calories
Burned
Pulse
Rate Notes
Mon.
Tues.
Wed.
Thur.
Fri.
Sat.
Sun.
Weekly
Totals:

Recovery + Fitness Collection 37
36 X-FlexCycle Pro User Manual Lifepro
WORKOUT INSTRUCTIONS
STEP 1: WARM-UP PHASE
Spend about 5 minutes doing warm up stretches before exercising; this
prevents pulled muscles and other exercise injuries. Stretching gets blood
flowing and helps loosen your muscles so they are ready for exercise. While
doing the following stretches, do not force or jerk your muscles, and most
importantly, if it hurts: STOP. After stretching, continue your warm-up by
riding the X-FlexCyclePro for 3–5 minutes at a slow speed and the lowest
tension level.
TOUCH YOUR TOES
1. Bend your knees slightly. Let your back and
shoulders relax as you bend over and try to
touch your toes.
2. Hold the stretch for 10–15 seconds. Repeat
3times.
STRETCH YOUR LEGS, CALVES, AND BUTTOCKS
1. Sit on the floor or a cushion. Place your left
foot against your right inner thigh.
2. Bend toward your right foot and try to touch
your toes.
3. Hold the stretch for 10–15 seconds.
4. Switch legs and repeat. Stretch each leg
3times.
STRETCH YOUR QUADS
1. Place your left hand on a wall or a table to help
with your balance.
2. With your right hand, grab your right ankle. Pull
your heel in toward your buttocks.
3. Hold the stretch for 10–15 seconds.
4. Switch legs and repeat. Stretch each leg 3 times.
STRETCH YOUR GROIN AND INNER THIGH
MUSCLES
1. Sit on the floor or a cushion with your knees
bent and the soles of your feet together.
2. Hold your ankles and bend forward at your hips.
3. Hold the stretch for 10–15 seconds. Repeat
3times.
STEP 2: EXERCISE PHASE
During the exercise phase you’re building muscle, stamina, and improving
your cardiovascular health slowly over time. The most important thing is
to always listen to your body. If you are tired or sore, slow down or stop
exercising for the day.
STEP 3: RECOVERY PHASE
After exercising, it’s important to give your body time to cool down and
recover. Ride the bike for another 3–5 minutes at a slow speed and the
lowest tension level. Then spend 5 minutes again completing the stretches
above to continue cooling down your muscles. Be careful not to force or jerk
your muscles as you stretch.

SAFETY INSTRUCTIONS
PLEASE KEEP THIS MANUAL IN A SAFE PLACE FOR REFERENCE.
WARNING: To reduce the risk of burns, fire, electric shock, injury to persons, or damage
to equipment, read the following important precautions and information before operating.
DISCLAIMER
1. The health benefits suggested or implied in this manual, other product literature, and
website are not certified or endorsed by any regulatory authority or medical institute.
2. The use of this bike is entirely at the user’s discretion. Please read all instructions and
safety information carefully before using this product. We assume no responsibility for
personal injury or property damage sustained by or through using this product.
RESPONSIBILITIES
3. It is the responsibility of the owner to ensure that all users of the X-FlexCycle Pro are
adequately informed of all warnings and precautions.
4. Use the X-FlexCycle Pro only as instructed in this manual.
5. Check the unit for any damage prior to each use. Safe use of the X-FlexCycle Pro can
only be assured when it is examined carefully before each use. Do not use if damaged,
faulty, defective, or if the device is making unusual noises exuding unusual odors. Do not
use the exercise bike again until it is in perfect working order.
6. Check the unit for loose nuts, bolts, and pedals prior to every use. Some parts, such as
the pedals, are prone to loosening over time. Fully tighten any loosened nuts, bolts, and
pedals before use.
7. Do not allow children to use the X-FlexCycle Pro. This product is for adult-use only.
8. Keep children and pets away from the X-FlexCycle Pro at all times.
9. Adults with diminished mental or physical capacity may only use the X-FlexCycle Pro
while supervised by a responsible adult.
10. Do not allow more than one person to use the X-FlexCycle Pro at a time.
11. Do not exceed the maximum weight capacity of 220 lbs.
12. Use caution when lifting or moving the X-FlexCycle Pro to avoid injury. Always use
correct lifting techniques and get the assistance of another person when needed.
13. The X-FlexCycle Pro is intended for in-home use only. Do not use the X-FlexCycle Pro in
any commercial, rental, institutional, therapeutic, or school setting.
BATTERY SAFETY
14. Only use AA batteries to power the computer monitor. Do not mix old and new batteries
or batteries of different types.
15. Ensure the batteries are inserted into the battery compartment according to the
polarity markings. Incorrect installation of batteries may cause battery leakage and
corrosion, resulting in damage to the computer.
16. Do not dispose of batteries in a fire. Do not dispose of batteries with normal household
waste; take batteries to a local recycling center.
17. Keep the X-FlexCycle Pro and batteries away from hot surfaces and heat sources such
38 X-FlexCycle Pro User Manual Lifepro
as heaters, heat vents, furnaces, ovens, stovetops, fireplaces, and open flames.
18. Never spill water or beverages onto the computer or operating components as this may
cause electric shock, fire, or damage to the bike components.
PERSONAL SAFETY INSTRUCTIONS FOR EXERCISE
19. Consult with a medical professional before beginning a new exercise program. This is
particularly important for those over the age of 35 or with pre-existing health conditions.
20. Incorrect or excessive exercise can be damaging to health. Always exercise within the
heart beat range and time limits recommended by your physician.
21. Stop exercising immediately if you experience any of the following symptoms: feeling
faint, dizzy, or nauseous, pain or tightness in your chest, difficulty breathing, irregular
heartbeat. If you do experience any of these symptoms, consult your doctor before
continuing with your exercise program.
22. Always properly warm up before exercise and cool down after to prevent injury.
23. Do not use the X-FlexCycle Pro during or immediately after eating or when you feel
tired. Never use the X-FlexCycle Pro while intoxicated.
24. Always wear appropriate clothing, socks, and comfortable, well-fitting athletic shoes
when using the X-FlexCycle Pro. Do not wear loose or baggy clothing as it can get
caught in the machine during exercise, causing injury.
25. Beginners and those who have issues with balance should hold the handlebars firmly
while riding the X-FlexCycle Pro. Keep hands away from all moving parts.
26. Always remain seated while using the X-FlexCycle Pro. Do not stand on the pedals.
27. The X-FlexCycle Pro does not have a braking system. Always slowly decrease pedaling
speed to stop. Do not stop pedaling abruptly.
28. Do not jump from the bike to the ground while it is in motion.
TRAINING ENVIRONMENT
29. Keep the X-FlexCycle Pro indoors, away from moisture and dust. Do not use outdoors.
30. Only operate and store the unit in a dry environment between 32°F - 104°F.
31. Place the unit on a solid, flat, level floor during operation and while not in use.
32. Ensure there is at least 2 feet of clearance around the entire bike.
33. Place a non-slip floor covering (rug, carpet, mat) beneath the bike to protect carpet or
flooring. Ensure the floor covering does not slide around before beginning exercise.
34. Use the X-FlexCycle Pro in a well-ventilated room, so that an optimal amount of oxygen
is available during training. Avoid drafty areas.
CLEANING, MAINTENANCE, AND STORAGE
35. Wipe down the X-FlexCycle Pro after exercise. Clean only with a damp cloth and mild,
non-abrasive detergent. Do not use chemical, abrasive, or solvent cleaners.
36. Store the device in a cool, dry location. Do not store in a garage or covered patio, or near
water. Remove batteries from the computer if the bike will not be used for a long time.
37. Only use with the original parts and accessories provided by the manufacturer.
38. Servicing other than the procedures in this manual should be performed by an
authorized service representative only.
39. Never insert or drop any object into any opening.
Recovery + Fitness Collection 39
Table of contents
Other Lifepro Exercise Bike manuals

Lifepro
Lifepro FlexCycle User manual

Lifepro
Lifepro X-FLEXCYCLE PLUS User manual

Lifepro
Lifepro X-FLEXCYCLE User manual

Lifepro
Lifepro X-FLEXCYCLE PRO User manual

Lifepro
Lifepro DASH X User manual

Lifepro
Lifepro FlexCycle User manual

Lifepro
Lifepro FlexStride User manual

Lifepro
Lifepro READY, SET, PRO User manual